ListView是Android應用程式很常使用的畫面元件,它可以顯示多筆資料項目讓使用者瀏覽、選擇與執行后續的操作。目前完成的記事應用程式,只有把簡單的文字資料設定給ListView元件使用,其實這個元件有非常多不同的用途,它可以顯示比較復雜的資料項目,讓使用者勾選和執行后續的功能。
這一章會加強ListView元件的使用,為它設計專用的畫面,讓一個項目可以顯示比較多的資料:
[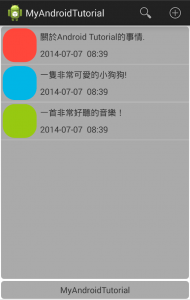](http://www.codedata.com.tw/wp-content/uploads/2015/02/AndroidTutorial5_03_01_01.png)
為了讓記事資料可以清楚的分類,所以在新增與修改記事加入設定顏色的功能:
[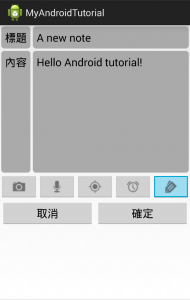](http://www.codedata.com.tw/wp-content/uploads/2015/02/AndroidTutorial5_03_01_02.png)?[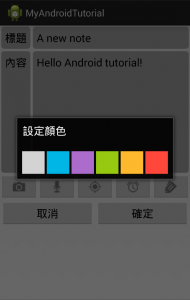](http://www.codedata.com.tw/wp-content/uploads/2015/02/AndroidTutorial5_03_01_03.png)
在瀏覽記事資料的主畫面,提供使用者勾選項目的功能,在未選擇與已選擇項目的狀態,需要顯示不同的功能表項目:
[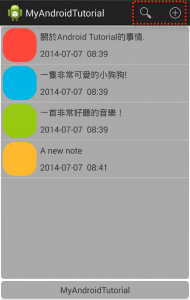](http://www.codedata.com.tw/wp-content/uploads/2015/02/AndroidTutorial5_03_01_04.png)?[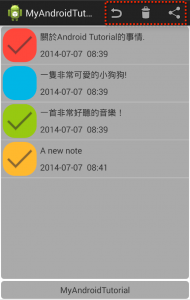](http://www.codedata.com.tw/wp-content/uploads/2015/02/AndroidTutorial5_03_01_05.png)
如果使用者選擇記事項目,為應用程式加入刪除記事的功能:
[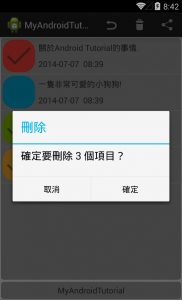](http://www.codedata.com.tw/wp-content/uploads/2015/02/AndroidTutorial5_03_01_06.png)
## 9-1 記事資料的封裝
不論是開發一般Java或Android應用程式,應用程式的功能越寫越多,程式碼也會更復雜,一般的物件封裝作法可以讓程式碼比較簡潔一些。這個應用程式需要管理所有的記事資料,所以應該為應用程式新增一個封裝記事資料的類別。因為希望可以為每一個記事資料加入顏色設定的功能,所以先建立一個封裝顏色資料的類別。在“net.macdidi.myandroidtutorial”套件上按鼠標右鍵,選擇“New -> Java Class”,在Create New Class對話框的Name輸入“Colors”,Kind選擇“Enum”后選擇“OK”。參考下面的內容完成這個程式碼:
~~~
package net.macdidi.myandroidtutorial;
import android.graphics.Color;
public enum Colors {
LIGHTGREY("#D3D3D3"), BLUE("#33B5E5"), PURPLE("#AA66CC"),
GREEN("#99CC00"), ORANGE("#FFBB33"), RED("#FF4444");
private String code;
private Colors(String code) {
this.code = code;
}
public String getCode() {
return code;
}
public int parseColor() {
return Color.parseColor(code);
}
}
~~~
在“net.macdidi.myandroidtutorial”套件上按鼠標右鍵,選擇“New -> Java Class”,在Create New Class對話框的Name輸入“Item”后選擇“OK”。參考下面的內容完成這個程式碼:
~~~
package net.macdidi.myandroidtutorial;
import java.util.Date;
import java.util.Locale;
public class Item implements java.io.Serializable {
// 編號、日期時間、顏色、標題、內容、檔案名稱、經緯度、修改、已選擇
private long id;
private long datetime;
private Colors color;
private String title;
private String content;
private String fileName;
private double latitude;
private double longitude;
private long lastModify;
private boolean selected;
public Item() {
title = "";
content = "";
color = Colors.LIGHTGREY;
}
public Item(long id, long datetime, Colors color, String title,
String content, String fileName, double latitude, double longitude,
long lastModify) {
this.id = id;
this.datetime = datetime;
this.color = color;
this.title = title;
this.content = content;
this.fileName = fileName;
this.latitude = latitude;
this.longitude = longitude;
this.lastModify = lastModify;
}
public long getId() {
return id;
}
public void setId(long id) {
this.id = id;
}
public long getDatetime() {
return datetime;
}
// 裝置區域的日期時間
public String getLocaleDatetime() {
return String.format(Locale.getDefault(), "%tF %<tR", new Date(datetime));
}
// 裝置區域的日期
public String getLocaleDate() {
return String.format(Locale.getDefault(), "%tF", new Date(datetime));
}
// 裝置區域的時間
public String getLocaleTime() {
return String.format(Locale.getDefault(), "%tR", new Date(datetime));
}
public void setDatetime(long datetime) {
this.datetime = datetime;
}
public Colors getColor() {
return color;
}
public void setColor(Colors color) {
this.color = color;
}
public String getTitle() {
return title;
}
public void setTitle(String title) {
this.title = title;
}
public String getContent() {
return content;
}
public void setContent(String content) {
this.content = content;
}
public String getFileName() {
return fileName;
}
public void setFileName(String fileName) {
this.fileName = fileName;
}
public double getLatitude() {
return latitude;
}
public void setLatitude(double latitude) {
this.latitude = latitude;
}
public double getLongitude() {
return longitude;
}
public void setLongitude(double longitude) {
this.longitude = longitude;
}
public long getLastModify() {
return lastModify;
}
public void setLastModify(long lastModify) {
this.lastModify = lastModify;
}
public boolean isSelected() {
return selected;
}
public void setSelected(boolean selected) {
this.selected = selected;
}
}
~~~
為了讓記事資料項目可以使用不同的顏色分類,所以新增一個繪圖資源。在“res/drawable”目錄上按鼠標右鍵,選擇“New -> Drawable resource file”。在“File name”輸入“item_drawable”后選擇“OK”。參考下面的內容完成這個繪圖資源:
~~~
<?xml version="1.0" encoding="utf-8"?>
<shape xmlns:android="http://schemas.android.com/apk/res/android"
android:shape="rectangle" >
<corners
android:topLeftRadius="20sp"
android:topRightRadius="20sp"
android:bottomLeftRadius="20sp"
android:bottomRightRadius="20sp" />
<solid android:color="#AAAAAA"/>
</shape>
~~~
為了讓ListView元件的每一個項目可以顯示比較多的資料,你可以為項目建立一個畫面配置檔。這個畫面配置檔需要使用一個額外的圖示(selected_icon.png),用來顯示使用者已經選擇一個項目,你可以在GitHub這一章的范例程式專案找到這個圖檔,把它復制到“res/drawable”目錄。現在準備新增一個給ListView元件項目使用的畫面資源,在“res/layout”目錄上按鼠標右鍵,選擇“New -> Layout resource file”。在“File name”輸入“single_item”后選擇“OK”。參考下面的內容完成這個畫面資源:
~~~
<?xml version="1.0" encoding="utf-8"?>
<LinearLayout xmlns:android="http://schemas.android.com/apk/res/android"
android:layout_width="match_parent"
android:layout_height="match_parent"
android:orientation="horizontal" >
<!-- 顏色分類 -->
<RelativeLayout
android:id="@+id/type_color"
android:layout_width="64dp"
android:layout_height="64dp"
android:layout_margin="3sp"
android:background="@drawable/item_drawable" >
<!-- 勾選 -->
<ImageView
android:id="@+id/selected_item"
android:layout_width="match_parent"
android:layout_height="match_parent"
android:layout_centerInParent="true"
android:src="@drawable/selected_icon"
android:visibility="invisible" />
</RelativeLayout>
<LinearLayout
android:layout_width="match_parent"
android:layout_height="match_parent"
android:layout_margin="3sp"
android:gravity="center_vertical"
android:orientation="vertical" >
<!-- 標題 -->
<TextView
android:id="@+id/title_text"
android:layout_width="match_parent"
android:layout_height="0dp"
android:layout_weight="1"
android:gravity="center_vertical" />
<!-- 日期時間 -->
<TextView
android:id="@+id/date_text"
android:layout_width="match_parent"
android:layout_height="0dp"
android:layout_weight="1"
android:gravity="center_vertical" />
</LinearLayout>
</LinearLayout>
~~~
需要在ListView元件中顯示比較復雜的畫面,就不能使用一般的Adapter物件,你可以依照自己的需求,撰寫一個自定的Adapter類別給ListView元件使用。在“net.macdidi.myandroidtutorial”套件上按鼠標右鍵,選擇“New -> Java Class”,在Create New Class對話框的Name輸入“ItemAdapter”后選擇“OK”。參考下面的內容完成這個程式碼:
~~~
package net.macdidi.myandroidtutorial;
import java.util.List;
import android.content.Context;
import android.graphics.drawable.GradientDrawable;
import android.view.LayoutInflater;
import android.view.View;
import android.view.ViewGroup;
import android.widget.ArrayAdapter;
import android.widget.ImageView;
import android.widget.LinearLayout;
import android.widget.RelativeLayout;
import android.widget.TextView;
public class ItemAdapter extends ArrayAdapter {
// 畫面資源編號
private int resource;
// 包裝的記事資料
private List items;
public ItemAdapter(Context context, int resource, List items) {
super(context, resource, items);
this.resource = resource;
this.items = items;
}
@Override
public View getView(int position, View convertView, ViewGroup parent) {
LinearLayout itemView;
// 讀取目前位置的記事物件
final Item item = getItem(position);
if (convertView == null) {
// 建立項目畫面元件
itemView = new LinearLayout(getContext());
String inflater = Context.LAYOUT_INFLATER_SERVICE;
LayoutInflater li = (LayoutInflater)
getContext().getSystemService(inflater);
li.inflate(resource, itemView, true);
}
else {
itemView = (LinearLayout) convertView;
}
// 讀取記事顏色、已選擇、標題與日期時間元件
RelativeLayout typeColor = (RelativeLayout) itemView.findViewById(R.id.type_color);
ImageView selectedItem = (ImageView) itemView.findViewById(R.id.selected_item);
TextView titleView = (TextView) itemView.findViewById(R.id.title_text);
TextView dateView = (TextView) itemView.findViewById(R.id.date_text);
// 設定記事顏色
GradientDrawable background = (GradientDrawable)typeColor.getBackground();
background.setColor(item.getColor().parseColor());
// 設定標題與日期時間
titleView.setText(item.getTitle());
dateView.setText(item.getLocaleDatetime());
// 設定是否已選擇
selectedItem.setVisibility(item.isSelected() ? View.VISIBLE : View.INVISIBLE);
return itemView;
}
// 設定指定編號的記事資料
public void set(int index, Item item) {
if (index >= 0 && index < items.size()) {
items.set(index, item);
notifyDataSetChanged();
}
}
// 讀取指定編號的記事資料
public Item get(int index) {
return items.get(index);
}
}
~~~
完成這些程式碼與畫面配置檔以后,就完成基本的準備工作了。
## 9-2 使用自定畫面的ListView元件
為了讓ListView元件使用已經準備好的程式碼與資源,之前已經寫好的主畫面元件,就要執行比較大幅度的修改。開啟“net.macdidi.myandroidtutorial”套件下的“MainActivity.java”,修改字段變量的宣告:
~~~
private ListView item_list;
private TextView show_app_name;
// 刪除原來的宣告
//private ArrayList data = new ArrayList<>();
//private ArrayAdapter adapter;
// ListView使用的自定Adapter物件
private ItemAdapter itemAdapter;
// 儲存所有記事本的List物件
private List items;
// 選單項目物件
private MenuItem add_item, search_item, revert_item, share_item, delete_item;
// 已選擇項目數量
private int selectedCount = 0;
~~~
同樣在“MainActivity.java”,參考下列的說明,修改“onCreate”方法的程式碼:
~~~
@Override
protected void onCreate(Bundle savedInstanceState) {
super.onCreate(savedInstanceState);
setContentView(R.layout.activity_main);
processViews();
processControllers();
// 刪除原來的程式碼
//data.add("關于Android Tutorial的事情");
//data.add("一只非常可愛的小狗狗!");
//data.add("一首非常好聽的音樂!");
//int layoutId = android.R.layout.simple_list_item_1;
//adapter = new ArrayAdapter(this, layoutId, data);
//item_list.setAdapter(adapter);
// 加入范例資料
items = new ArrayList();
items.add(new Item(1, new Date().getTime(), Colors.RED, "關于Android Tutorial的事情.", "Hello content", "", 0, 0, 0));
items.add(new Item(2, new Date().getTime(), Colors.BLUE, "一只非常可愛的小狗狗!", "她的名字叫“大熱狗”,又叫\n作“奶嘴”,是一只非常可愛\n的小狗。", "", 0, 0, 0));
items.add(new Item(3, new Date().getTime(), Colors.GREEN, "一首非常好聽的音樂!", "Hello content", "", 0, 0, 0));
// 建立自定Adapter物件
itemAdapter = new ItemAdapter(this, R.layout.single_item, items);
item_list.setAdapter(itemAdapter);
}
~~~
執行上面的修改以后,會發現這個程式碼出現一些錯誤,這些錯誤會在“onActivityResult”與“processControllers”這兩個方法里面,你可以參考下列的作法,先把這兩的方法的所有程式碼加上注解,后面再慢慢修改它們:
~~~
@Override
protected void onActivityResult(int requestCode, int resultCode, Intent data) {
/*
...
*/
}
private void processControllers() {
/*
...
*/
}
~~~
使用上面介紹的方法處理程式碼以后,錯誤的情況就會消失了,先執行這個應用程式,看看是否可以正常的顯示應用程式畫面。
## 9-3 新增記事的資料傳送與接收
改用目前的方式處理記事資料以后,新增記事的作法就要執行一些必要的修改。開啟“net.macdidi.myandroidtutorial”套件下的“ItemActivity.java”,加入這些新的字段變量宣告:
~~~
// 啟動功能用的請求代碼
private static final int START_CAMERA = 0;
private static final int START_RECORD = 1;
private static final int START_LOCATION = 2;
private static final int START_ALARM = 3;
private static final int START_COLOR = 4;
// 記事物件
private Item item;
~~~
同樣在“ItemActivity.java”,參考下列的說明,修改“onCreate”方法的程式碼:
~~~
@Override
protected void onCreate(Bundle savedInstanceState) {
super.onCreate(savedInstanceState);
setContentView(R.layout.activity_item);
processViews();
// 取得Intent物件
Intent intent = getIntent();
// 讀取Action名稱
String action = intent.getAction();
// 如果是修改記事
if (action.equals("net.macdidi.myandroidtutorial.EDIT_ITEM")) {
// 接收與設定記事標題
String titleText = intent.getStringExtra("titleText");
title_text.setText(titleText);
}
// 新增記事
else {
item = new Item();
}
}
~~~
同樣在“ItemActivity.java”,參考下列的說明,修改“onSubmit”方法的程式碼,調整確認新增記事以后要執行的工作:
~~~
// 點擊確定與取消按鈕都會呼叫這個方法
public void onSubmit(View view) {
// 確定按鈕
if (view.getId() == R.id.ok_teim) {
// 讀取使用者輸入的標題與內容
String titleText = title_text.getText().toString();
String contentText = content_text.getText().toString();
// 設定記事物件的標題與內容
item.setTitle(titleText);
item.setContent(contentText);
// 如果是修改記事
if (getIntent().getAction().equals(
"net.macdidi.myandroidtutorial.EDIT_ITEM")) {
item.setLastModify(new Date().getTime());
}
// 新增記事
else {
item.setDatetime(new Date().getTime());
}
Intent result = getIntent();
// 設定回傳的記事物件
result.putExtra("net.macdidi.myandroidtutorial.Item", item);
setResult(Activity.RESULT_OK, result);
}
// 結束
finish();
}
~~~
回到“net.macdidi.myandroidtutorial”套件下的“MainActivity.java”,找到“onActivityResult”方法,移除之前加入的注解,參考下列的程式碼修改新增記事后需要處理的工作。因為修改記事的部份還沒有完成,所以先把它們設定為注解。
~~~
@Override
protected void onActivityResult(int requestCode, int resultCode, Intent data) {
// 如果被啟動的Activity元件傳回確定的結果
if (resultCode == Activity.RESULT_OK) {
// 讀取記事物件
Item item = (Item) data.getExtras().getSerializable(
"net.macdidi.myandroidtutorial.Item");
// 如果是新增記事
if (requestCode == 0) {
// 設定記事物件的編號與日期時間
item.setId(items.size() + 1);
item.setDatetime(new Date().getTime());
// 加入新增的記事物件
items.add(item);
// 通知資料改變
itemAdapter.notifyDataSetChanged();
}
/*
// 如果是修改記事
else if (requestCode == 1) {
...
}
*/
}
}
~~~
完成上面的工作以后,執行這個應用程式,測試新增記式資料的功能是否正確。
## 9-4 修改記事的資料傳送與接收
完成新增記事功能以后,接下來處理工作比較多一些的修改記事功能。開啟“net.macdidi.myandroidtutorial”套件下的“MainActivity.java”,找到“processControllers”方法,移除之前加入的注解。在這個方法中找到處理ListView項目長按事件的程式碼,先把它們設定為注解:
~~~
/*
// 建立選單項目長按監聽物件
OnItemLongClickListener itemLongListener = new OnItemLongClickListener() {
...
}
};
// 注冊選單項目長按監聽物件
item_list.setOnItemLongClickListener(itemLongListener);
*/
~~~
接下來參考下列的程式碼,修改處理ListView項目點擊事件的程式碼:
~~~
// 建立選單項目點擊監聽物件
AdapterView.OnItemClickListener itemListener = new AdapterView.OnItemClickListener() {
@Override
public void onItemClick(AdapterView parent, View view,
int position, long id) {
// 讀取選擇的記事物件
Item item = itemAdapter.getItem(position);
Intent intent = new Intent(
"net.macdidi.myandroidtutorial.EDIT_ITEM");
// 設定記事編號與記事物件
intent.putExtra("position", position);
intent.putExtra("net.macdidi.myandroidtutorial.Item", item);
startActivityForResult(intent, 1);
}
};
// 注冊選單項目點擊監聽物件
item_list.setOnItemClickListener(itemListener);
~~~
你可以注意到在點擊一個記事項目以后,傳送的資料已經修改為Item物件,所以修改記事元件也要執行對應的調整。開啟“net.macdidi.myandroidtutorial”套件下的“ItemActivity.java”,修改“onCreate”方法里面的程式碼:
~~~
@Override
protected void onCreate(Bundle savedInstanceState) {
super.onCreate(savedInstanceState);
setContentView(R.layout.activity_item);
processViews();
// 取得Intent物件
Intent intent = getIntent();
// 讀取Action名稱
String action = intent.getAction();
// 如果是修改記事
if (action.equals("net.macdidi.myandroidtutorial.EDIT_ITEM")) {
// 接收記事物件與設定標題、內容
item = (Item) intent.getExtras().getSerializable(
"net.macdidi.myandroidtutorial.Item");
title_text.setText(item.getTitle());
content_text.setText(item.getContent());
}
// 新增記事
else {
item = new Item();
}
}
~~~
修改記事元件在使用者確認內容以后,回到主畫面元件處理修改后的工作。開啟“net.macdidi.myandroidtutorial”套件下的“MainActivity.java”,修改“onActivityResult”方法里面的程式碼:
~~~
@Override
protected void onActivityResult(int requestCode, int resultCode, Intent data) {
// 如果被啟動的Activity元件傳回確定的結果
if (resultCode == Activity.RESULT_OK) {
// 讀取記事物件
Item item = (Item) data.getExtras().getSerializable(
"net.macdidi.myandroidtutorial.Item");
// 如果是新增記事
if (requestCode == 0) {
...
}
// 如果是修改記事
else if (requestCode == 1) {
// 讀取記事編號
int position = data.getIntExtra("position", -1);
if (position != -1) {
// 設定修改的記事物件
items.set(position, item);
itemAdapter.notifyDataSetChanged();
}
}
}
}
~~~
完成修改記事功能的調整工作,執行應用程式,點選一筆記事項目,修改內容并確定以后,看看功能是否正確。
## 9-5 設定記事顏色
像記事這類應用程式,使用一段時間以后,通常會儲存很多資料,為了讓使用者可以清楚的分類與查詢這些記事資料,所以為應用程式加入顏色分類的功能。使用者在新增或修改記事資料的時候,可以依照自己的需求為它設定一個顏色,為設定顏色的功能設計一個Activity元件,元件的名稱是“ColorActivity.java”,畫面配置檔的名稱是“activity_color.xml”。在最頂端的“app”目錄按鼠標左鍵,選擇“New -> Activity -> Blank Activity”,元件與畫面配置檔名稱依照上面的規劃。建立元件以后,開啟應用程式設定檔“AndroidManifest.xml”,參考下列的內容,加入對話框樣式的設定:
~~~
<activity
android:name="net.macdidi.myandroidtutorial.ColorActivity"
android:theme="@android:style/Theme.Dialog"
android:label="@string/title_activity_color" />
~~~
選擇顏色功能的畫面設計比較簡單一些,開啟在“res/layout”目錄下的“activity_color.xml”,把它修改為下面的內容:
~~~
<HorizontalScrollView
xmlns:android="http://schemas.android.com/apk/res/android"
xmlns:tools="http://schemas.android.com/tools"
android:layout_width="match_parent"
android:layout_height="match_parent"
android:padding="6sp"
android:spacing="3sp"
tools:context="net.macdidi.myandroidtutorial.ColorActivity">
<LinearLayout
android:id="@+id/color_gallery"
android:layout_width="match_parent"
android:layout_height="match_parent"
android:orientation="horizontal" />
</HorizontalScrollView>
~~~
開啟在“net.macdidi.myandroidtutorial”套件下的“ColorActivity.java”,把它修改為下面的內容:
~~~
package net.macdidi.myandroidtutorial;
import android.app.Activity;
import android.content.Intent;
import android.os.Bundle;
import android.view.View;
import android.view.View.OnClickListener;
import android.widget.Button;
import android.widget.LinearLayout;
public class ColorActivity extends Activity {
private LinearLayout color_gallery;
@Override
protected void onCreate(Bundle savedInstanceState) {
super.onCreate(savedInstanceState);
setContentView(R.layout.activity_color);
processViews();
ColorListener listener = new ColorListener();
for (Colors c : Colors.values()) {
Button button = new Button(this);
button.setId(c.parseColor());
LinearLayout.LayoutParams layout =
new LinearLayout.LayoutParams(128, 128);
layout.setMargins(6, 6, 6, 6);
button.setLayoutParams(layout);
button.setBackgroundColor(c.parseColor());
button.setOnClickListener(listener);
color_gallery.addView(button);
}
}
private void processViews() {
color_gallery = (LinearLayout) findViewById(R.id.color_gallery);
}
private class ColorListener implements OnClickListener {
@Override
public void onClick(View view) {
Intent result = getIntent();
result.putExtra("colorId", view.getId());
setResult(Activity.RESULT_OK, result);
finish();
}
}
}
~~~
完成準備工作以后,就可以回到記事元件加入需要的程式碼。開啟在“net.macdidi.myandroidtutorial”套件下的“ItemActivity.java”,參考下列的說明加入啟動元件的程式碼:
~~~
public void clickFunction(View view) {
int id = view.getId();
switch (id) {
case R.id.take_picture:
break;
case R.id.record_sound:
break;
case R.id.set_location:
break;
case R.id.set_alarm:
break;
case R.id.select_color:
// 啟動設定顏色的Activity元件
startActivityForResult(
new Intent(this, ColorActivity.class), START_COLOR);
break;
}
}
~~~
同樣在ItemActivity.java,參考下列的程式碼,執行選擇顏色后的設定工作:
~~~
@Override
protected void onActivityResult(int requestCode, int resultCode, Intent data) {
if (resultCode == Activity.RESULT_OK) {
switch (requestCode) {
case START_CAMERA:
break;
case START_RECORD:
break;
case START_LOCATION:
break;
case START_ALARM:
break;
// 設定顏色
case START_COLOR:
int colorId = data.getIntExtra(
"colorId", Colors.LIGHTGREY.parseColor());
item.setColor(getColors(colorId));
break;
}
}
}
private Colors getColors(int color) {
Colors result = Colors.LIGHTGREY;
if (color == Colors.BLUE.parseColor()) {
result = Colors.BLUE;
}
else if (color == Colors.PURPLE.parseColor()) {
result = Colors.PURPLE;
}
else if (color == Colors.GREEN.parseColor()) {
result = Colors.GREEN;
}
else if (color == Colors.ORANGE.parseColor()) {
result = Colors.ORANGE;
}
else if (color == Colors.RED.parseColor()) {
result = Colors.RED;
}
return result;
}
~~~
執行應用程式,在新增或修改記事資料的時候,執行設定顏色的測試。
## 9-6 選擇記事資料與主功能表
這一章最后的工作是完成讓使用者勾選記事資料、控制主功能表的顯示與刪除記事的功能。開啟在“net.macdidi.myandroidtutorial”套件下的“MainActivity.java”,找到“processControllers”方法,修改記事項目長按事件的程式碼,原來的點擊事件也要執行相關的修改。因為在使用者勾選事件項目以后,主功能表就要根據選擇的情況調整,所以也增加控制功能表顯示的方法processMenu:
~~~
private void processControllers() {
// 建立選單項目點擊監聽物件
AdapterView.OnItemClickListener itemListener = new AdapterView.OnItemClickListener() {
@Override
public void onItemClick(AdapterView parent, View view,
int position, long id) {
// 讀取選擇的記事物件
Item item = itemAdapter.getItem(position);
// 如果已經有勾選的項目
if (selectedCount > 0) {
// 處理是否顯示已選擇項目
processMenu(item);
// 重新設定記事項目
itemAdapter.set(position, item);
}
else {
Intent intent = new Intent(
"net.macdidi.myandroidtutorial.EDIT_ITEM");
// 設定記事編號與記事物件
intent.putExtra("position", position);
intent.putExtra("net.macdidi.myandroidtutorial.Item", item);
startActivityForResult(intent, 1);
}
}
};
// 注冊選單項目點擊監聽物件
item_list.setOnItemClickListener(itemListener);
// 建立記事項目長按監聽物件
AdapterView.OnItemLongClickListener itemLongListener = new AdapterView.OnItemLongClickListener() {
@Override
public boolean onItemLongClick(AdapterView parent, View view,
int position, long id) {
// 讀取選擇的記事物件
Item item = itemAdapter.getItem(position);
// 處理是否顯示已選擇項目
processMenu(item);
// 重新設定記事項目
itemAdapter.set(position, item);
return true;
}
};
// 注冊記事項目長按監聽物件
item_list.setOnItemLongClickListener(itemLongListener);
...
}
// 處理是否顯示已選擇項目
private void processMenu(Item item) {
// 如果需要設定記事項目
if (item != null) {
// 設定已勾選的狀態
item.setSelected(!item.isSelected());
// 計算已勾選數量
if (item.isSelected()) {
selectedCount++;
}
else {
selectedCount--;
}
}
// 根據選擇的狀況,設定是否顯示選單項目
add_item.setVisible(selectedCount == 0);
search_item.setVisible(selectedCount == 0);
revert_item.setVisible(selectedCount > 0);
share_item.setVisible(selectedCount > 0);
delete_item.setVisible(selectedCount > 0);
}
同樣在“MainActivity.java”,找到“onCreateOptionsMenu”方法,為了控制主功能表的顯示,參考下列的程式碼執行必要的修改:
@Override
public boolean onCreateOptionsMenu(Menu menu) {
MenuInflater menuInflater = getMenuInflater();
menuInflater.inflate(R.menu.menu_main, menu);
// 取得選單項目物件
add_item = menu.findItem(R.id.add_item);
search_item = menu.findItem(R.id.search_item);
revert_item = menu.findItem(R.id.revert_item);
share_item = menu.findItem(R.id.share_item);
delete_item = menu.findItem(R.id.delete_item);
// 設定選單項目
processMenu(null);
return true;
}
~~~
同樣在“MainActivity.java”,找到“clickMenuItem”方法,加入取消勾選與刪除記事資料的程式碼:
~~~
public void clickMenuItem(MenuItem item) {
// 使用參數取得使用者選擇的選單項目元件編號
int itemId = item.getItemId();
// 判斷該執行什么工作,目前還沒有加入需要執行的工作
switch (itemId) {
case R.id.search_item:
break;
// 使用者選擇新增選單項目
case R.id.add_item:
// 使用Action名稱建立啟動另一個Activity元件需要的Intent物件
Intent intent = new Intent("net.macdidi.myandroidtutorial.ADD_ITEM");
// 呼叫“startActivityForResult”,,第二個參數“0”表示執行新增
startActivityForResult(intent, 0);
break;
// 取消所有已勾選的項目
case R.id.revert_item:
for (int i = 0; i < itemAdapter.getCount(); i++) {
Item ri = itemAdapter.getItem(i);
if (ri.isSelected()) {
ri.setSelected(false);
itemAdapter.set(i, ri);
}
}
selectedCount = 0;
processMenu(null);
break;
// 刪除
case R.id.delete_item:
// 沒有選擇
if (selectedCount == 0) {
break;
}
// 建立與顯示詢問是否刪除的對話框
AlertDialog.Builder d = new AlertDialog.Builder(this);
String message = getString(R.string.delete_item);
d.setTitle(R.string.delete)
.setMessage(String.format(message, selectedCount));
d.setPositiveButton(android.R.string.yes,
new DialogInterface.OnClickListener() {
@Override
public void onClick(DialogInterface dialog, int which) {
// 刪除所有已勾選的項目
int index = itemAdapter.getCount() - 1;
while (index > -1) {
Item item = itemAdapter.get(index);
if (item.isSelected()) {
itemAdapter.remove(item);
}
index--;
}
// 通知資料改變
itemAdapter.notifyDataSetChanged();
selectedCount = 0;
processMenu(null);
}
});
d.setNegativeButton(android.R.string.no, null);
d.show();
break;
case R.id.googleplus_item:
break;
case R.id.facebook_item:
break;
}
}
~~~
完成這一章所有的工作了,執行應用程式,看看加入的功能是不是都可以正常的運作。
- 第一堂
- 第一堂(1)西游記里的那只猴子
- 第一堂(2)準備 Android Studio 開發環境
- 第一堂(3)開始設計 Android 應用程式
- 第一堂(4)開發 Android 應用程式的準備工作
- 第二堂
- 第二堂(1)規劃與建立應用程式需要的資源
- 第二堂(2)設計應用程式使用者界面
- 第二堂(3)應用程式與使用者的互動
- 第二堂(4)建立與使用 Activity 元件
- 第三堂
- 第三堂(1)為ListView元件建立自定畫面
- 第三堂(2)儲存與讀取應用程式資訊
- 第三堂(3)Android 內建的 SQLite 數據庫
- 第四堂
- 第四堂(1)使用照相機與麥克風
- 第四堂(2)設計地圖應用程式 - Google Maps Android API v2
- 第四堂(3)讀取裝置目前的位置 - Google Services Location
- 第五堂
- 第五堂(1)建立廣播接收元件 - BroadcastReceiver
- 第五堂(2)系統通知服務 - Notification
- 第五堂(3)設計小工具元件 - AppWidget
- 第六堂
- 第六堂(1)Material Design - Theme與Transition
- 第六堂(2)Material Design - RecylerView
- 第六堂(3)Material Design - Shared Element與自定動畫效果
