
[TOC]
>[success] # 初始組件
接下來講解一下如何創建組件以及如何封裝一個完整的組件
>[success] ## 創建組件
1. **使用指令創建組件**
~~~
// 創建組件指令
ng generate component 組件名(大駝峰形式)
// 簡寫
ng g c 組件名
~~~
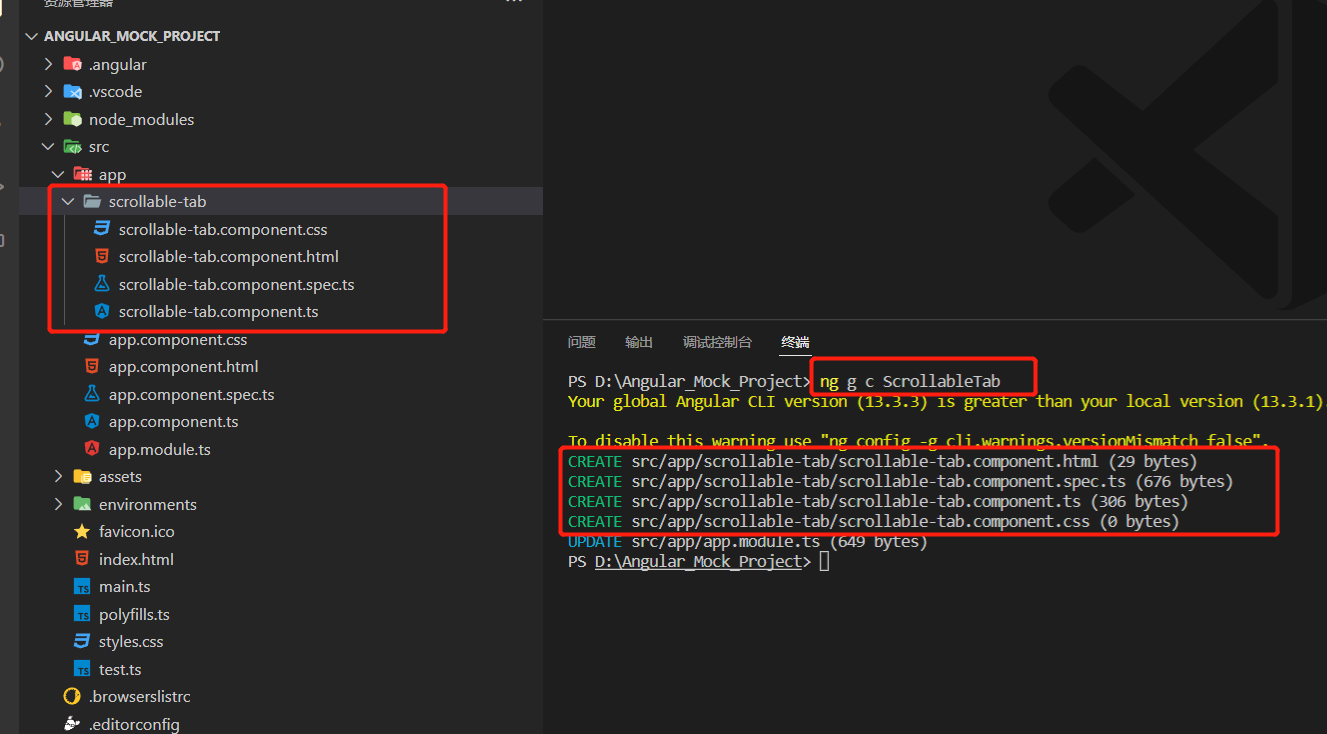
默認會在 **src\app** 文件夾下創建出來組件,總共有4個文件,樣式文件html文件邏輯文件,還有個測試文件如圖
如果不想直接在 **app** 下創建組件,而是在 **app/components/** 下進行創建,這樣寫指令即可
~~~
// 在conpoments文件下創建ScrollableTab組件
ng g c conpoments/ScrollableTab
~~~
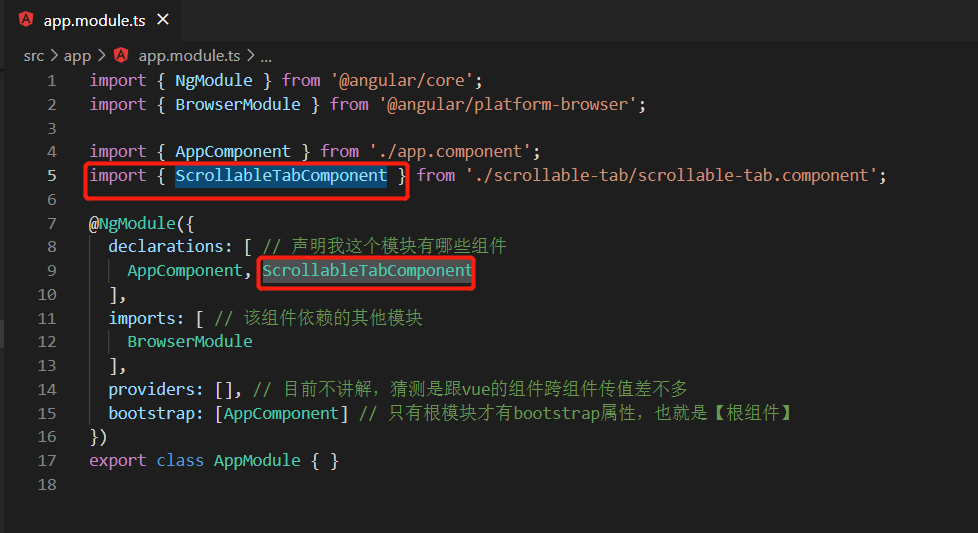
這里注意,如果是新創建的組件,都會自動在 **src\app\app.module.ts**文件中引入這個新創建的組件,如下圖
>[success] ## 在根(父組件)組件中引用子組件
1. **子組件代碼**
**src\app\components\scrollable-tab\scrollable-tab.component.html 頁面元素文件**
~~~
<ul>
<li *ngFor="let menu of menus; let i = index; let f= first; let even= even;">
<a href="#"
[class.active]="i == selectedIndex"
[class.first]="f"
[class.even]="even"
(click)="selectedIndex = i">{{ menu.title }}</a>
</li>
</ul>
~~~
**src\app\components\scrollable-tab\scrollable-tab.component.css 頁面樣式文件**
~~~
ul{
padding: 0;
margin: 0;
display: flex;
}
ul li {
display: inline-block;
margin: 0 5px;
white-space: nowrap;
}
a{
text-decoration: none;
}
::-webkit-scrollbar{
display: none;
}
.active{
color: red;
}
.first{
color: green;
}
.even{
color: pink;
}
~~~
**src\app\components\scrollable-tab\scrollable-tab.component.ts 頁面邏輯代碼文件**
~~~
import { Component, OnInit } from '@angular/core';
// 聲明菜單接口
interface TopMenu {
title: string;
link: string;
}
@Component({
selector: 'app-scrollable-tab',
templateUrl: './scrollable-tab.component.html',
styleUrls: ['./scrollable-tab.component.css']
})
export class ScrollableTabComponent implements OnInit {
selectedIndex = -1; // 高亮選中的顏色下標
menus:TopMenu[] = [ // 菜單列表
{
title:'熱門',
link: ''
},
{
title:'男裝',
link: ''
},
{
title:'百貨',
link: ''
},
{
title:'運動',
link: ''
},
{
title:'手機',
link: ''
},
{
title:'家紡',
link: ''
},
{
title:'食品',
link: ''
},
{
title:'電器',
link: ''
},
{
title:'鞋包',
link: ''
},
{
title:'汽車',
link: ''
},
{
title:'水果',
link: ''
},
{
title:'電腦',
link: ''
},
{
title:'內衣',
link: ''
},
{
title:'家裝',
link: ''
},
{
title:'母嬰',
link: ''
},
{
title:'美妝',
link: ''
},
{
title:'家具',
link: ''
},
]
constructor() {}
ngOnInit(): void {
}
}
~~~
這里其實還有一個測試文件,里面的代碼是生成時候的樣子沒有改動,就不在這里寫了,然后 **子組件** 的文件夾中還要創建一個 **index.ts** 文件,方便外部引入組件,
**src\app\components\scrollable-tab\index.ts 導出組件文件**
~~~
// 導出組件文件
export * from './scrollable-tab.component'
~~~
然后這個文件導出到 **components 文件夾** 中,這時在 **components** 也需要創建一個 **index.ts** 文件,向外導出組件
**src\app\components\index.ts(components文件夾中的index.ts文件)**
~~~
// 繼續把整個 scrollable-tab 組件導出
export * from './scrollable-tab'
~~~
2. **父組件引入子組件**
~~~
<!-- 引入組件 -->
<app-scrollable-tab></app-scrollable-tab>
~~~
3. **簡化 app.module.ts 中組件引入**
下面引入 **ScrollableTabComponent** 組件就會方便多了,這就是為什么創建組件時在組件中定義 **index.ts** 的原因了
**app.module.ts**
~~~
import { NgModule } from '@angular/core';
import { BrowserModule } from '@angular/platform-browser';
import { AppComponent } from './app.component';
// 之前的寫法
// import { ScrollableTabComponent } from './components/scrollable-tab/scrollable-tab.component';
// 簡化后的寫法
import { ScrollableTabComponent } from './components'; // 這樣就省了一層的引用操作
@NgModule({
declarations: [ // 聲明我這個模塊有哪些組件
AppComponent, ScrollableTabComponent
],
imports: [ // 該組件依賴的其他模塊
BrowserModule
],
providers: [], // 目前不講解,猜測是跟vue的組件跨組件傳值差不多
bootstrap: [AppComponent] // 只有根模塊才有bootstrap屬性,也就是【根組件】
})
export class AppModule { }
~~~
>[success] # 真機調試
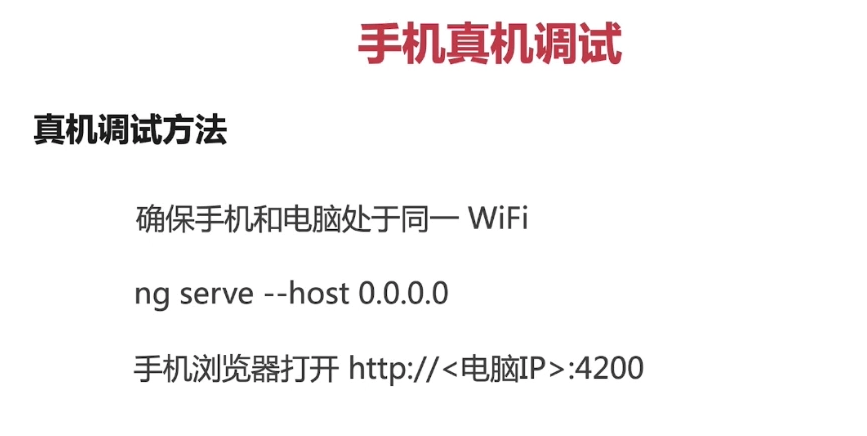
1. 首先到dos命令上執行ipconfig找到自己IP地址
2. 然后按照上圖操作
3. [編輯器寫html的快捷鍵方式](https://docs.emmet.io/cheat-sheet/)
>[success] # 總結
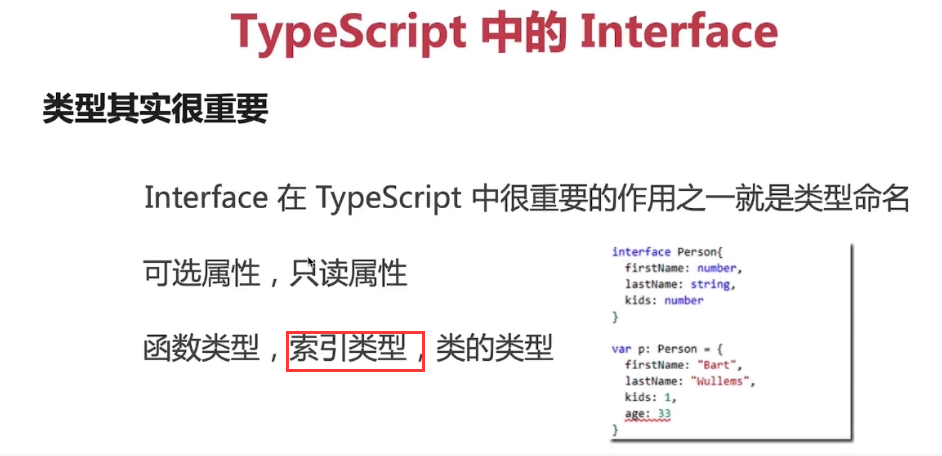
1. **索引類型** 就是給 **對象的屬性定義類型**
>[success] # 組件的概念
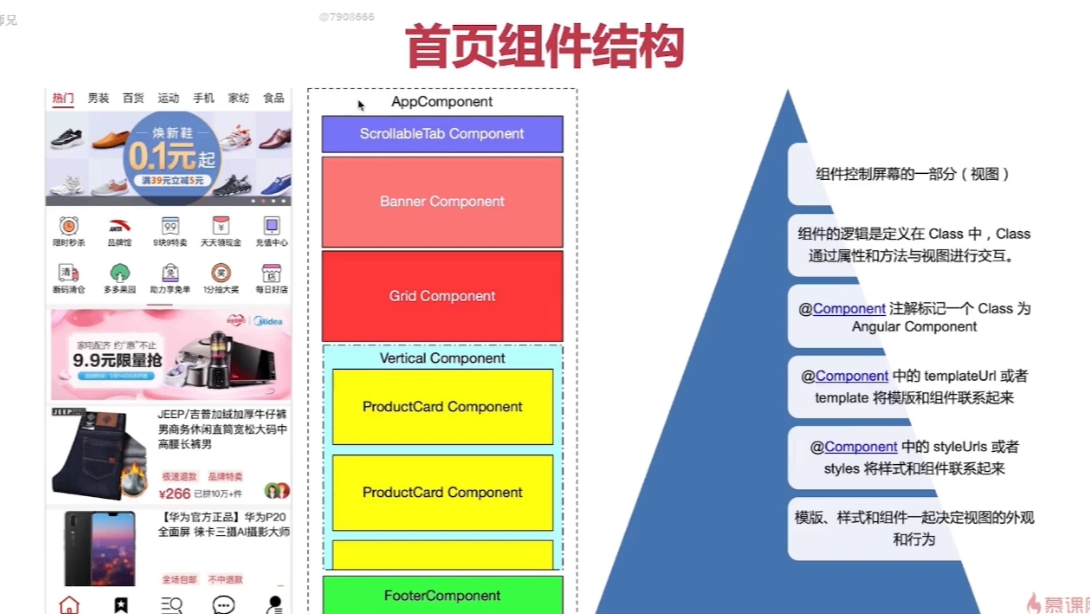
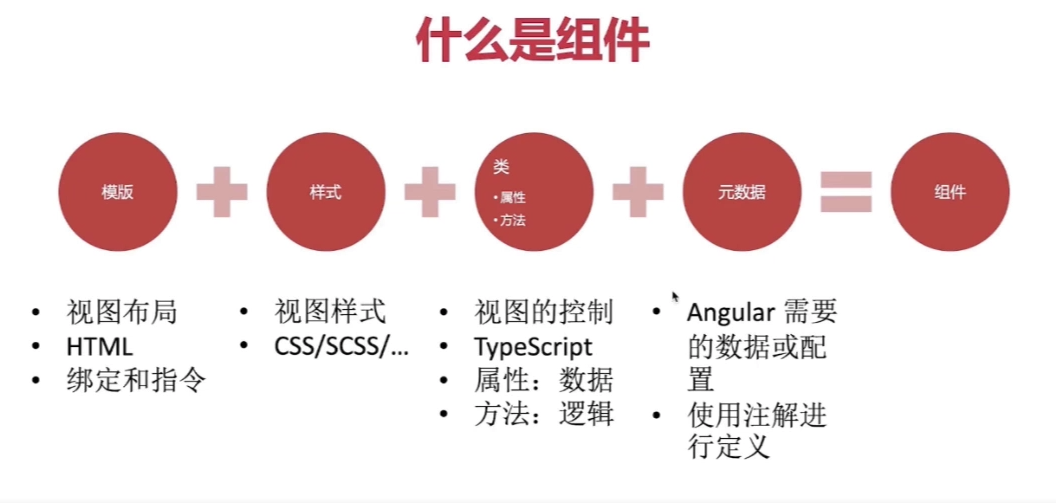
下面3張圖講一下接下來要開發的組件,以及組件的概念,以及ts接口的概念
- Angular8開發拼多多WebApp
- 框架對比
- 環境搭建與項目創建
- 開發工具配置
- 初始組件
- ngFor指令
- ngIf指令
- 樣式綁定的幾種方式
- 組件生命周期
- 在組件類中引用模版(類似vue 的 ref)
- 雙向綁定
- 什么是模塊
- 【以下目錄未完成】什么是注解(裝飾器)
- 指令的概念
- 組件的事件綁定和樣式綁定
- 組件嵌套和投影組件
- 路由概念
- 路由實戰
- 路由URL和參數
- 管道的概念
- 依賴注入
- 臟值檢測
- HTTP 概覽
- Postman 和 Rest Client 調試 HTTP
- Rest API
- HttpClient 修改
- Http 攔截器 HttpInterceptor
- 其他
- Angular終極課程
- RxJS快速入門