
[TOC]
>[success] # ngIf指令
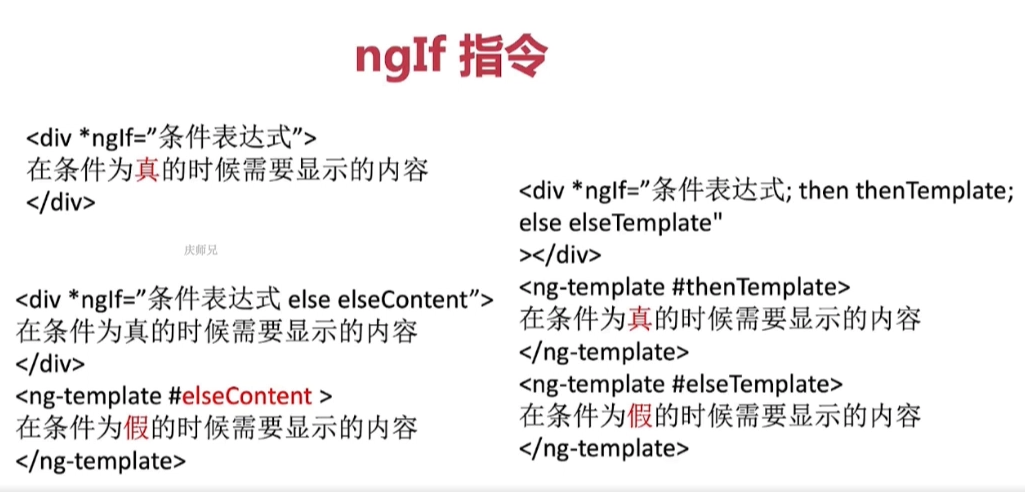
下面的代碼中通過 ***ngIf** 與 **else** 來實現顯示隱藏標簽
**src\app\components\scrollable-tab\scrollable-tab.component.html**
~~~
<ul>
<li *ngFor="let menu of menus; let i = index; let f= first; let even= even;">
<a href="#"
[class.active]="i == selectedIndex"
[class.first]="f"
[class.even]="even"
(click)="selectedIndex = i">
{{ menu.title }}
</a>
<span class="indicator" *ngIf="i == selectedIndex else elseTemp"></span>
</li>
<ng-template #elseTemp>
<span>hello</span>
</ng-template>
</ul>
~~~
>[success] # 組件傳值

接下來演示如何進行 **組件傳值**
>[success] ## 父傳子
1. **父組件代碼**
父組件通過 **[menu]** 屬性來把菜單列表 **topMenus** 傳給子組件
**html**
~~~
<!-- 引入組件 -->
<app-scrollable-tab [menus]="topMenus"></app-scrollable-tab>
~~~
**父組件** 要給 **子組件** 傳入 **子組件規定得數據格式得數據** ,所以就這里就引入子組件中定義好得接口
**js**
~~~
import { Component } from '@angular/core';
import { TopMenu } from './components' // 引入子組件中定義得接口
@Component({
selector: 'app-root', // 組件名稱
templateUrl: './app.component.html',
styleUrls: ['./app.component.css']
})
// 以下是類似vue的變量跟方法
export class AppComponent {
// selectedIndex = -1; // 高亮選中的顏色下標
topMenus:TopMenu[] = [ // 菜單列表
{
title:'熱門',
link: ''
},
{
title:'男裝',
link: ''
},
{
title:'百貨',
link: ''
},
{
title:'運動',
link: ''
},
{
title:'手機',
link: ''
},
{
title:'家紡',
link: ''
},
{
title:'食品',
link: ''
},
{
title:'電器',
link: ''
},
{
title:'鞋包',
link: ''
},
{
title:'汽車',
link: ''
},
{
title:'水果',
link: ''
},
{
title:'電腦',
link: ''
},
{
title:'內衣',
link: ''
},
{
title:'家裝',
link: ''
},
{
title:'母嬰',
link: ''
},
{
title:'美妝',
link: ''
},
{
title:'家具',
link: ''
},
]
}
~~~
2. **子組件代碼**
**子組件** 通過 **@input() 裝飾器** 來寫在屬性前面, **代表這個屬性是由父組件傳遞過來得** ,這里同時也要把 **TopMenu** 接口導出去,因為父組件使用了這個接口
**js**
~~~
import { Component, Input, OnInit } from '@angular/core';
// 聲明菜單接口
export interface TopMenu {
title: string;
link: string;
}
@Component({
selector: 'app-scrollable-tab',
templateUrl: './scrollable-tab.component.html',
styleUrls: ['./scrollable-tab.component.css']
})
export class ScrollableTabComponent implements OnInit {
selectedIndex = -1; // 高亮選中的顏色下標
@Input() menus:TopMenu[] = [] // 菜單列表
constructor() {}
ngOnInit(): void {
}
}
~~~
>[success] ## 子傳父
1. **父組件代碼**
父組件通過 **tabSelected** 自定義事件來接收子組件傳過來得值,并且接收得值要用 **$event** 來接收
**html**
~~~
<!-- 引入組件 -->
<app-scrollable-tab [menus]="topMenus" (tabSelected)="handleTabSeleted($event)"></app-scrollable-tab>
~~~
**js**
~~~
import { Component } from '@angular/core';
import { TopMenu } from './components' // 引入子組件中定義得接口
@Component({
selector: 'app-root', // 組件名稱
templateUrl: './app.component.html',
styleUrls: ['./app.component.css']
})
// 以下是類似vue的變量跟方法
export class AppComponent {
// selectedIndex = -1; // 高亮選中的顏色下標
topMenus:TopMenu[] = [ // 菜單列表
{
title:'熱門',
link: ''
},
{
title:'男裝',
link: ''
},
{
title:'百貨',
link: ''
},
{
title:'運動',
link: ''
},
{
title:'手機',
link: ''
},
{
title:'家紡',
link: ''
},
{
title:'食品',
link: ''
},
{
title:'電器',
link: ''
},
{
title:'鞋包',
link: ''
},
{
title:'汽車',
link: ''
},
{
title:'水果',
link: ''
},
{
title:'電腦',
link: ''
},
{
title:'內衣',
link: ''
},
{
title:'家裝',
link: ''
},
{
title:'母嬰',
link: ''
},
{
title:'美妝',
link: ''
},
{
title:'家具',
link: ''
},
]
handleTabSeleted(tabMenu: TopMenu){ // 接收子組件傳過來的值
console.log(tabMenu)
}
}
~~~
2. **子組件代碼**
子組件在通過點擊事件 **handleSelection** 時候,通過 **@Output()裝飾器** 向父組件傳遞選中的值
**html**
~~~
<ul>
<li *ngFor="let menu of menus; let i = index; let f= first; let even= even;">
<a href="#"
[class.active]="i == selectedIndex"
[class.first]="f"
[class.even]="even"
(click)="handleSelection(i)">
{{ menu.title }}
</a>
<span class="indicator" *ngIf="i == selectedIndex else elseTemp"></span>
</li>
<ng-template #elseTemp>
<span>hello</span>
</ng-template>
</ul>
~~~
**js代碼**
~~~
import { Component, EventEmitter, Input, OnInit, Output } from '@angular/core';
// 聲明菜單接口
export interface TopMenu {
title: string;
link: string;
}
@Component({
selector: 'app-scrollable-tab',
templateUrl: './scrollable-tab.component.html',
styleUrls: ['./scrollable-tab.component.css']
})
export class ScrollableTabComponent implements OnInit {
selectedIndex = -1; // 高亮選中的顏色下標
@Input() menus:TopMenu[] = []; // 菜單列表
@Output() tabSelected = new EventEmitter(); // 定義要回傳得數據
constructor() {}
ngOnInit(): void {
}
handleSelection(index: number){
this.selectedIndex = index;
// 子傳父
this.tabSelected.emit(this.menus[this.selectedIndex])
}
}
~~~
- Angular8開發拼多多WebApp
- 框架對比
- 環境搭建與項目創建
- 開發工具配置
- 初始組件
- ngFor指令
- ngIf指令
- 樣式綁定的幾種方式
- 組件生命周期
- 在組件類中引用模版(類似vue 的 ref)
- 雙向綁定
- 什么是模塊
- 【以下目錄未完成】什么是注解(裝飾器)
- 指令的概念
- 組件的事件綁定和樣式綁定
- 組件嵌套和投影組件
- 路由概念
- 路由實戰
- 路由URL和參數
- 管道的概念
- 依賴注入
- 臟值檢測
- HTTP 概覽
- Postman 和 Rest Client 調試 HTTP
- Rest API
- HttpClient 修改
- Http 攔截器 HttpInterceptor
- 其他
- Angular終極課程
- RxJS快速入門