
[TOC]
>[success] # 在組件類中引用模版(類似vue 的 ref)
>[success] ## 獲取普通dom 元素
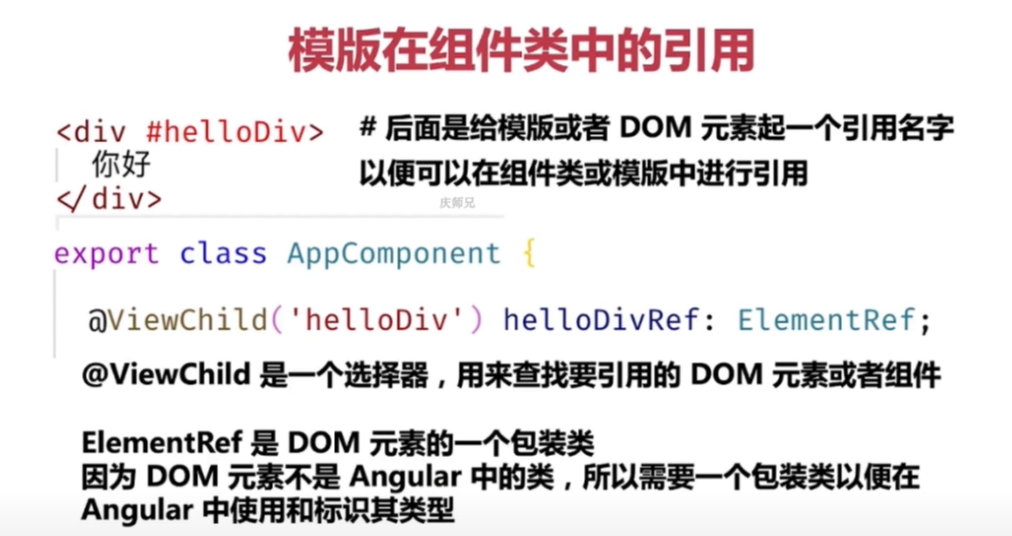
這個好像 **vue2.x** 中的根據 **ref 調用子組件方法** ,我們首先在想要獲取dom的標簽身上添加 `#名稱` ,例子:
**html代碼**
~~~
<div class="container">
<div class="image-slider" #imageSlider> // 名稱
<img
*ngFor="let slider of sliders"
[src]="slider.imgUrl"
[alt]="slider.caption"
/>
</div>
<div class="nav-section">
<span
*ngFor="let _ of sliders; let idx = index"
class="slide-button"
></span>
</div>
</div>
~~~
**ts代碼**
~~~
import { Component, ElementRef, Input, OnInit, ViewChild } from '@angular/core';
export interface ImageSlider {
imgUrl: string;
link: string;
caption: string;
}
@Component({
selector: 'app-image-slider',
templateUrl: './image-slider.component.html',
styleUrls: ['./image-slider.component.css']
})
export class ImageSliderComponent implements OnInit {
@Input() sliders: ImageSlider[] = [];
// 獲取dom元素
@ViewChild('imageSlider', { static: true }) imgSlider!: ElementRef;
constructor() {}
ngOnInit() {
// 對 dom 進行操作
this.imgSlider.nativeElement.innerHTML = `<span>Hello</span>`;
}
}
~~~
然后在獲取 **dom** 的 **ts** 代碼中,像上面這樣寫,用 **@ViewChild 裝飾器選擇** 我們定義好的 **#名稱** 的標簽,這里需要 **注意:如果我們獲取的這個 dom 元素在 ng-if 或者 ng-for 包含下,static 就需要設置為 false,如果沒有被 ng-if 或者 ng-for 包裹,就設置為 true,默認 false** ,然后起一個變量 **imgSlider** 來儲存這個接收 **dom元素** 的 **ref** ,然后 **ElementRef** 是 **dom元素** 的 **類型** 。
>[success] ## 獲取angular組件元素
>[success] ### 普通方式獲取
代碼如下:
**html代碼**
~~~
<!-- 引入組件 -->
<app-scrollable-tab
[menus]="topMenus"
(tabSelected)="handleTabSeleted($event)"
[backgroundColor]="scrollableTabBgColor"
titleColor="#fff"
titleActiveColor="yellow"
indicatorColor="yellow"
*ngIf="scrollableTabBgColor === 'red'"
>
</app-scrollable-tab>
<app-image-slider [sliders]="imageSliders" #imageSlider></app-image-slider>
~~~
**ts代碼**
~~~
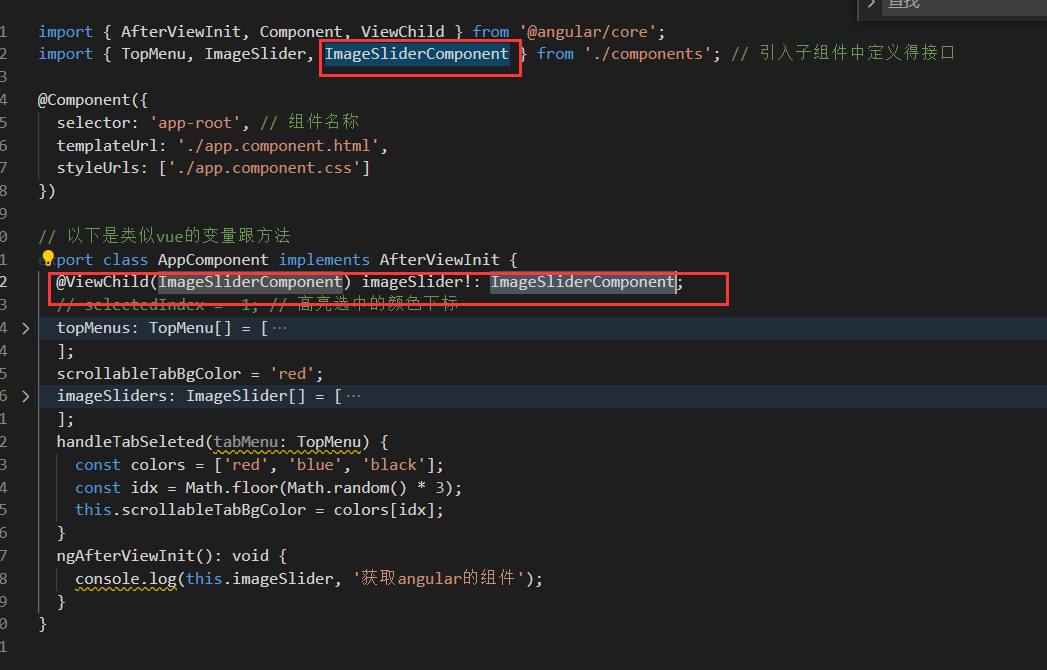
import { AfterViewInit, Component, ViewChild } from '@angular/core';
import { TopMenu, ImageSlider, ImageSliderComponent } from './components'; // 引入子組件中定義得接口
@Component({
selector: 'app-root', // 組件名稱
templateUrl: './app.component.html',
styleUrls: ['./app.component.css']
})
// 以下是類似vue的變量跟方法
export class AppComponent implements AfterViewInit {
@ViewChild('imageSlider') imageSlider!: ImageSliderComponent;
// selectedIndex = -1; // 高亮選中的顏色下標
topMenus: TopMenu[] = [
// 菜單列表
{
title: '熱門',
link: ''
},
{
title: '男裝',
link: ''
},
{
title: '百貨',
link: ''
},
{
title: '運動',
link: ''
},
{
title: '手機',
link: ''
},
{
title: '家紡',
link: ''
},
{
title: '食品',
link: ''
},
{
title: '電器',
link: ''
},
{
title: '鞋包',
link: ''
},
{
title: '汽車',
link: ''
},
{
title: '水果',
link: ''
},
{
title: '電腦',
link: ''
},
{
title: '內衣',
link: ''
},
{
title: '家裝',
link: ''
},
{
title: '母嬰',
link: ''
},
{
title: '美妝',
link: ''
},
{
title: '家具',
link: ''
}
];
scrollableTabBgColor = 'red';
imageSliders: ImageSlider[] = [
{
imgUrl:
'https://s.cn.bing.net/th?id=OIP-C.kB-Ovasi0GW67-rmwnAcwAHaEo&w=316&h=197&c=8&rs=1&qlt=90&o=6&pid=3.1&rm=2',
link: '',
caption: ''
},
{
imgUrl:
'https://s.cn.bing.net/th?id=OIP-C.nfC2tVNM9TgwQ5QuqECd6wHaFj&w=288&h=216&c=8&rs=1&qlt=90&o=6&pid=3.1&rm=2',
link: '',
caption: ''
},
{
imgUrl:
'https://s.cn.bing.net/th?id=OIP-C.rHuc8SKa0wLVwCqqA27uIwHaEt&w=313&h=199&c=8&rs=1&qlt=90&o=6&pid=3.1&rm=2',
link: '',
caption: ''
},
{
imgUrl:
'https://s.cn.bing.net/th?id=OIP-C.i0-ND27ia6sO-nZuY9f7qAHaEK&w=333&h=187&c=8&rs=1&qlt=90&o=6&pid=3.1&rm=2',
link: '',
caption: ''
}
];
handleTabSeleted(tabMenu: TopMenu) {
const colors = ['red', 'blue', 'black'];
const idx = Math.floor(Math.random() * 3);
this.scrollableTabBgColor = colors[idx];
}
ngAfterViewInit(): void {
console.log(this.imageSlider, '獲取angular的組件');
}
}
~~~
>[success] ### 快速方式獲取
區別:
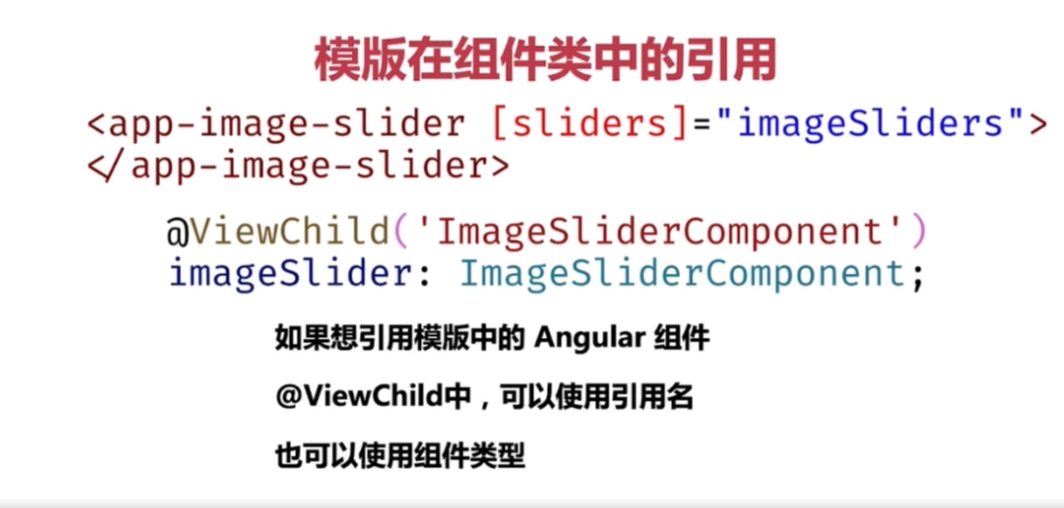
1. **html 代碼** 中的 **組件標簽上** 不用聲明 **#名稱**
2. **ts 代碼中** 的 **@ViewChild** 裝飾器不用傳入 **#名稱** ,**直接傳入組件** ,如下圖:
具體代碼如下:
**html代碼**
~~~
<!-- 引入組件 -->
<app-scrollable-tab
[menus]="topMenus"
(tabSelected)="handleTabSeleted($event)"
[backgroundColor]="scrollableTabBgColor"
titleColor="#fff"
titleActiveColor="yellow"
indicatorColor="yellow"
*ngIf="scrollableTabBgColor === 'red'"
>
</app-scrollable-tab>
<app-image-slider [sliders]="imageSliders"></app-image-slider>
~~~
**ts代碼**
~~~
import { AfterViewInit, Component, ViewChild } from '@angular/core';
import { TopMenu, ImageSlider, ImageSliderComponent } from './components'; // 引入子組件中定義得接口
@Component({
selector: 'app-root', // 組件名稱
templateUrl: './app.component.html',
styleUrls: ['./app.component.css']
})
// 以下是類似vue的變量跟方法
export class AppComponent implements AfterViewInit {
@ViewChild(ImageSliderComponent) imageSlider!: ImageSliderComponent;
// selectedIndex = -1; // 高亮選中的顏色下標
topMenus: TopMenu[] = [
// 菜單列表
{
title: '熱門',
link: ''
},
{
title: '男裝',
link: ''
},
{
title: '百貨',
link: ''
},
{
title: '運動',
link: ''
},
{
title: '手機',
link: ''
},
{
title: '家紡',
link: ''
},
{
title: '食品',
link: ''
},
{
title: '電器',
link: ''
},
{
title: '鞋包',
link: ''
},
{
title: '汽車',
link: ''
},
{
title: '水果',
link: ''
},
{
title: '電腦',
link: ''
},
{
title: '內衣',
link: ''
},
{
title: '家裝',
link: ''
},
{
title: '母嬰',
link: ''
},
{
title: '美妝',
link: ''
},
{
title: '家具',
link: ''
}
];
scrollableTabBgColor = 'red';
imageSliders: ImageSlider[] = [
{
imgUrl:
'https://s.cn.bing.net/th?id=OIP-C.kB-Ovasi0GW67-rmwnAcwAHaEo&w=316&h=197&c=8&rs=1&qlt=90&o=6&pid=3.1&rm=2',
link: '',
caption: ''
},
{
imgUrl:
'https://s.cn.bing.net/th?id=OIP-C.nfC2tVNM9TgwQ5QuqECd6wHaFj&w=288&h=216&c=8&rs=1&qlt=90&o=6&pid=3.1&rm=2',
link: '',
caption: ''
},
{
imgUrl:
'https://s.cn.bing.net/th?id=OIP-C.rHuc8SKa0wLVwCqqA27uIwHaEt&w=313&h=199&c=8&rs=1&qlt=90&o=6&pid=3.1&rm=2',
link: '',
caption: ''
},
{
imgUrl:
'https://s.cn.bing.net/th?id=OIP-C.i0-ND27ia6sO-nZuY9f7qAHaEK&w=333&h=187&c=8&rs=1&qlt=90&o=6&pid=3.1&rm=2',
link: '',
caption: ''
}
];
handleTabSeleted(tabMenu: TopMenu) {
const colors = ['red', 'blue', 'black'];
const idx = Math.floor(Math.random() * 3);
this.scrollableTabBgColor = colors[idx];
}
ngAfterViewInit(): void {
console.log(this.imageSlider, '獲取angular的組件');
}
}
~~~
>[success] ## 獲取 ng-for 循環添加的 ref 元素
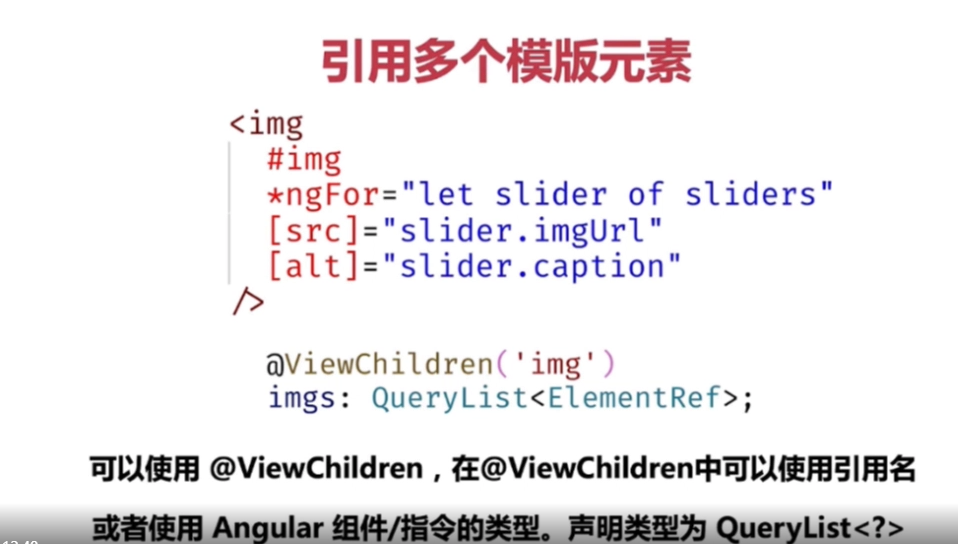
獲取 **ng-for 循環** 出來的 **dom 元素** ,需要使用 **@ViewChildren 裝飾器** ,定義類型時使用 **QueryList<ElementRef\>** 才可以,然后下面還使用了 **angular** 提供的注入中的 **Renderer2** 方法,來 **修改dom 元素樣式** 具體寫法如下:
**html代碼**
~~~
<div class="container">
<div class="image-slider" #imageSlider>
<img
#img // 定義dom選擇的名稱
*ngFor="let slider of sliders"
[src]="slider.imgUrl"
[alt]="slider.caption"
/>
</div>
<div class="nav-section">
<span
*ngFor="let _ of sliders; let idx = index"
class="slide-button"
></span>
</div>
</div>
~~~
**ts代碼**
~~~
import {
Component,
ElementRef,
Input,
OnInit,
QueryList,
ViewChild,
ViewChildren,
AfterViewInit,
Renderer2
} from '@angular/core';
export interface ImageSlider {
imgUrl: string;
link: string;
caption: string;
}
@Component({
selector: 'app-image-slider',
templateUrl: './image-slider.component.html',
styleUrls: ['./image-slider.component.css']
})
export class ImageSliderComponent implements OnInit, AfterViewInit {
@Input() sliders: ImageSlider[] = [];
// 獲取dom元素
@ViewChild('imageSlider', { static: true }) imgSlider!: ElementRef;
// 獲取循環出來的dom元素
@ViewChildren('img') imgs!: QueryList<ElementRef>;
// eslint-disable-next-line @typescript-eslint/no-empty-function
constructor(private rd2: Renderer2) {}
// 組件初始化
ngOnInit() {
// 對 dom 進行操作
// this.imgSlider.nativeElement.innerHTML = `<span>Hello</span>`;
}
// 視圖完全渲染完成(在這里才能打印出來所有dom元素,在ngOnInit里打印不出來 this.imgs ,因為還沒有渲染結束,如果想對dom操作還是在 ngAfterViewInit中操作比較穩妥)
ngAfterViewInit(): void {
// 原生js方式修改樣式
// this.imgs.forEach((item) => {
// item.nativeElement.style.height = '100px';
// });
// angular推薦方式修改樣式
this.imgs.forEach((item) => {
this.rd2.setStyle(item.nativeElement, 'height', '100px');
});
}
}
~~~
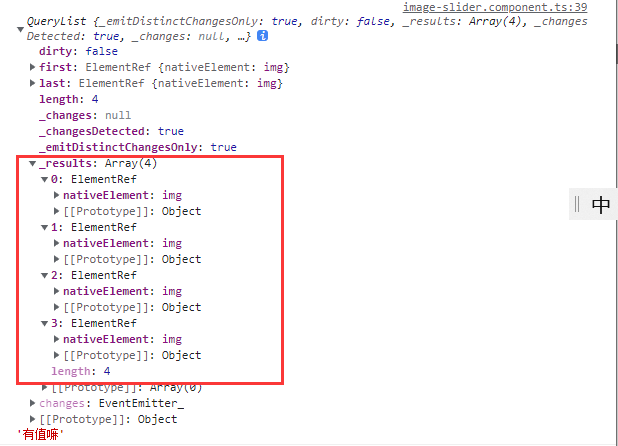
**dom元素** 的打印結果:
>[success] ## 總結

- Angular8開發拼多多WebApp
- 框架對比
- 環境搭建與項目創建
- 開發工具配置
- 初始組件
- ngFor指令
- ngIf指令
- 樣式綁定的幾種方式
- 組件生命周期
- 在組件類中引用模版(類似vue 的 ref)
- 雙向綁定
- 什么是模塊
- 【以下目錄未完成】什么是注解(裝飾器)
- 指令的概念
- 組件的事件綁定和樣式綁定
- 組件嵌套和投影組件
- 路由概念
- 路由實戰
- 路由URL和參數
- 管道的概念
- 依賴注入
- 臟值檢測
- HTTP 概覽
- Postman 和 Rest Client 調試 HTTP
- Rest API
- HttpClient 修改
- Http 攔截器 HttpInterceptor
- 其他
- Angular終極課程
- RxJS快速入門