
[TOC]
>[success] # cookie用于登錄驗證
接下來了解一下通過 **nodejs** 操作 **cookie** :
* **查看 cookie**
* **修改 cookie**
* **實現登陸驗證**
>[success] ## 查看 cookie
我們在 **app.js** 中來 **解析 cookie** ,首先從 **請求頭中獲取 cookie** ,**cookie 格式: k1=v1;k2=v2;k3=v3** ,這種格式要取出這里某一個信息比較麻煩,所以 **需要通過 split 來分割一下,然后組裝成 js對象的數據**,存入到 **res.cookie** 中 ,代碼如下:
**blog-1/app.js**
~~~
const querystring = require('querystring')
// 引入處理路由文件
const handleBlogRouter = require('./src/router/blog')
const handleUserRouter = require('./src/router/user')
// 用于處理 post data
const getPostData = (req) => {
const promise = new Promise((resolve, reject) => {
if(req.method !== 'POST'){ // 不等于 post 請求
resolve({})
return
}
if(req.headers['content-type'] !== 'application/json'){ // 傳入的數據格式不是 application/json ,可能是form-data的參數
resolve({})
return
}
// 1. POST通過數據流方式接收數據
let postData = ''
// 2. 給req注冊data事件,當有數據提交過來就會觸發,事件的作用是接收數據,接收大量數據的時候,是分塊接收的
req.on('data', chunk => {
postData += chunk.toString()
})
// 3. 給req注冊end事件,當數據全部接收完畢,會觸發
req.on('end', () => {
if(!postData){ // 無數據返回空對象
resolve({})
return
}
resolve(
JSON.parse(postData)
)
})
})
return promise
}
const serverHandle = (req, res) => {
// 設置返回格式 JSON
res.setHeader('Content-type', 'application/json')
// 獲取 path
const url = req.url
req.path = url.split('?')[0]
// 解析query 參數
req.query = querystring.parse(url.split('?')[1])
// 解析 cookie
req.cookie = {}
const cookieStr = req.headers.cookie || '' // 格式: k1=v1;k2=v2;k3=v3
cookieStr.split(';').forEach(item => {
if(!item){
return
}
const arr = item.split('=')
const key = arr[0].trim()
const value = arr[1].trim()
req.cookie[key] = value
});
// 處理 post data 參數
getPostData(req).then(postData => {
req.body = postData
// 處理 blog 路由
const blogResult = handleBlogRouter(req, res)
if(blogResult){
blogResult.then(blogData => {
res.end(
JSON.stringify(blogData)
)
})
return // 這里需要return,不然返回數據后還會往下走
}
// 處理 user 路由
const userResult = handleUserRouter(req, res)
if(userResult){
userResult.then(userData => {
res.end(
JSON.stringify(userData)
)
})
return
}
// 未命中路由,返回 404
res.writeHead(404, {"Content-type": "text/plain"}) // 把響應頭狀態碼設置為404,然后Content-type: text/plain是純文本,為了覆蓋上面的json類型
// 返回內容
res.write('404 Not Found\n')
res.end()
})
}
module.exports = serverHandle
~~~
然后我們可以打印一下 **res.cookie** 是什么,然后輸入 **http://localhost:8000/api/blog/list** 訪問我們寫好的接口,此時控制臺如果沒有 **cookie** ,我們可以通過之前學的 `document.cookie` 手動去控制臺添加一個 **cookie** ,如圖:
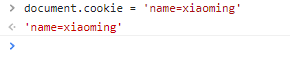
我們在瀏覽器通過手動添加的方式添加了一個 **name=xiaoming;** 的 **cookie** ,此時我們的 **nodejs** 控制臺打印結果就是
~~~
{
name: 'xiaoming'
}
~~~
這時候就可以看到我們添加的 **cookie** 了。
>[success] ## 實現登陸驗證
首先我們模擬寫一個 **簡單的登陸驗證** ,然后熟悉了后,再寫一個真正的登陸驗證
>[success] ### 登陸驗證 demo
接下來實現一個簡單的 **登陸驗證 demo** ,**前端把 cookie 傳給后端,后端查看 cookie 中是否有 username ,如果有 username 就證明已登陸,如果沒有就是未登錄** ,這樣就是一個最簡單的登陸驗證,在 **blog-1/src/router/user.js** 中新增一個測試接口 **/api/user/login-test** 來測試一下,代碼如下:
**blog-1/src/router/user.js**
~~~
// 從 controller 中獲取數據
const { login } = require('../controller/user')
// 引入數據模型
const { SuccessModel, ErrorModel } = require('../model/resModel')
const handleUserRouter = (req, res) => {
const method = req.method // GET POST
// 登陸
if(method === 'POST' && req.path === '/api/user/login'){
const { username, password } = req.body
const result = login(username, password)
return result.then(data => {
if(data.username){ // 登陸成功
return new SuccessModel()
} else {
return new ErrorModel('登陸失敗')
}
})
}
// 登陸驗證的測試
if(method === 'GET' && req.path === '/api/user/login-test'){
if(req.cookie.username){ // 如果有用戶名,登陸成功,如果沒有尚未登錄
return Promise.resolve(new SuccessModel())
}
return Promise.resolve(new ErrorModel('尚未登錄'))
}
}
module.exports = handleUserRouter
~~~
這里的 **/api/user/login-test** 接口就是我們測試用的的 **登陸驗證接口**,因為外層需要返回一個 **Promise** 對象,這里如果不想封裝嫌麻煩的話可以直接使用 **Promise.resolve** ,然后我們接下來在瀏覽器訪問 `http://localhost:8000/api/user/login-test` ,頁面顯示如下:
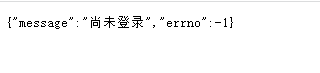
這時候是沒有 **cookie** 的,所以我們先手動添加一個有 **username** 的 **cookie**
~~~
document.cookie = 'username=xiaoming;'
~~~
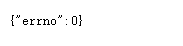
**添加成功** 后再次 **刷新瀏覽器**,就會看到 **請求接口時候通過請求頭** 傳給后端了
然后頁面就顯示顯示 **errno:0** 代表成功了
>[success] ### 實戰登陸驗證 與 修改 cookie
剛才的上面的 **登陸驗證 demo** 中使用到的 **cookie** 是我們手動在瀏覽器上添加的,**實際項目場景中,應該是后端人員進行添加的** ,接下來就來實現在 **nodejs** 中進行添加 **cookie** ,首先在 **blog-1/src/router/user.js** 中進行修改,通過 `res.setHeader('Set-Cookie', `username=${data.username}; path=/`)` 來添加 **cookie** ,這里的 **path=/** 意思是 **cookie 在根目錄下都有效 ,如果不寫 path=/ ,path 默認是 path=/api/user 這樣就會導致只有 user 下的接口好用,其他接口都不好用,** 代碼如下:
**blog-1/src/router/user.js**
~~~
// 從 controller 中獲取數據
const { login } = require('../controller/user')
// 引入數據模型
const { SuccessModel, ErrorModel } = require('../model/resModel')
const handleUserRouter = (req, res) => {
const method = req.method // GET POST
// GET 方式登陸(為了測試在瀏覽器看更直觀,所以用的get請求,正常項目開發中使用post請求)
if(method === 'GET' && req.path === '/api/user/login'){
const { username, password } = req.query
const result = login(username, password)
return result.then(data => {
if(data.username){ // 登陸成功
// 添加 cookie,path=/適用于根目錄下所有接口,如果不寫path=/,默認是path=/api/user
res.setHeader('Set-Cookie', `username=${data.username}; path=/`)
return new SuccessModel()
} else {
return new ErrorModel('登陸失敗')
}
})
}
// // POST 登陸(正常用POST方式登陸)
// if(method === 'POST' && req.path === '/api/user/login'){
// const { username, password } = req.body
// const result = login(username, password)
// return result.then(data => {
// if(data.username){ // 登陸成功
// // 添加 cookie,path=/適用于根目錄下所有接口,如果不寫path=/,默認是path=/api/user
// res.setHeader('Set-Cookie', `username=${data.username}; path=/`)
// return new SuccessModel()
// } else {
// return new ErrorModel('登陸失敗')
// }
// })
// }
// 登陸驗證的測試
// if(method === 'GET' && req.path === '/api/user/login-test'){
// if(req.cookie.username){ // 如果有用戶名,登陸成功,如果沒有尚未登錄
// return Promise.resolve(new SuccessModel())
// }
// return Promise.resolve(new ErrorModel('尚未登錄'))
// }
}
module.exports = handleUserRouter
~~~
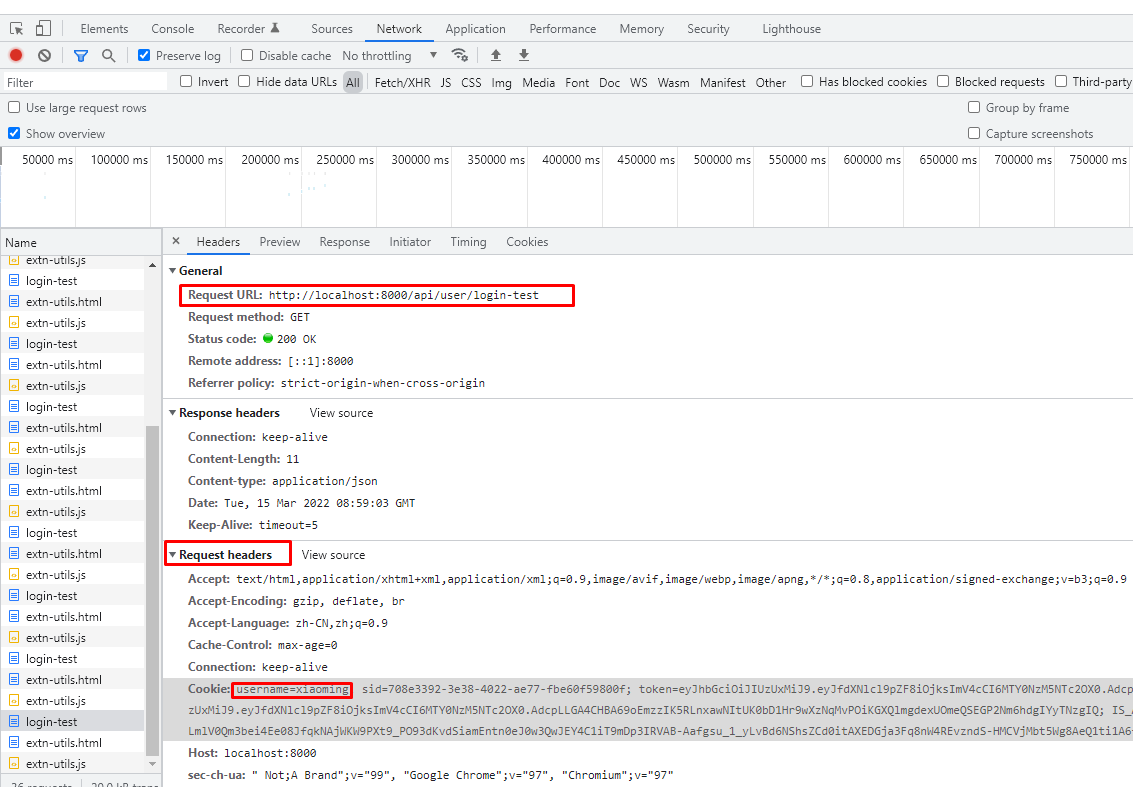
代碼中把剛才的 **登陸驗證的測試** 代碼注釋上了,因為這個只是暫時用來做測試的,正常情況下用不到這個,然后把 **/api/user/login** 接口復制了一份,并且改成了 **GET 請求** ,因為 **POST請求** 時,需要用 **postman** 來請求,在 **postman** 上無法查看 **后臺添加 Set-Cookie** 的信息,用 **GET 請求** 在 **瀏覽器上查看比較更直觀** ,但是在真正項目中登陸還是要用 **POST請求** ,這里做演示就先使用 **GET請求** 接下來我們訪問 `http://localhost:8000/api/user/login` 頁面,會直接提示 **登陸失敗**

此時我們在通過 **GET請求的方式在 URL** 后面拼接上 **username 跟 password** `http://localhost:8000/api/user/login?username=lisi&password=123` ,頁面就會顯示登陸成功的樣式了,并且還可以看到 **響應頭** 中顯示了后端通過 **Set-Cookie** 添加了 **cookie**
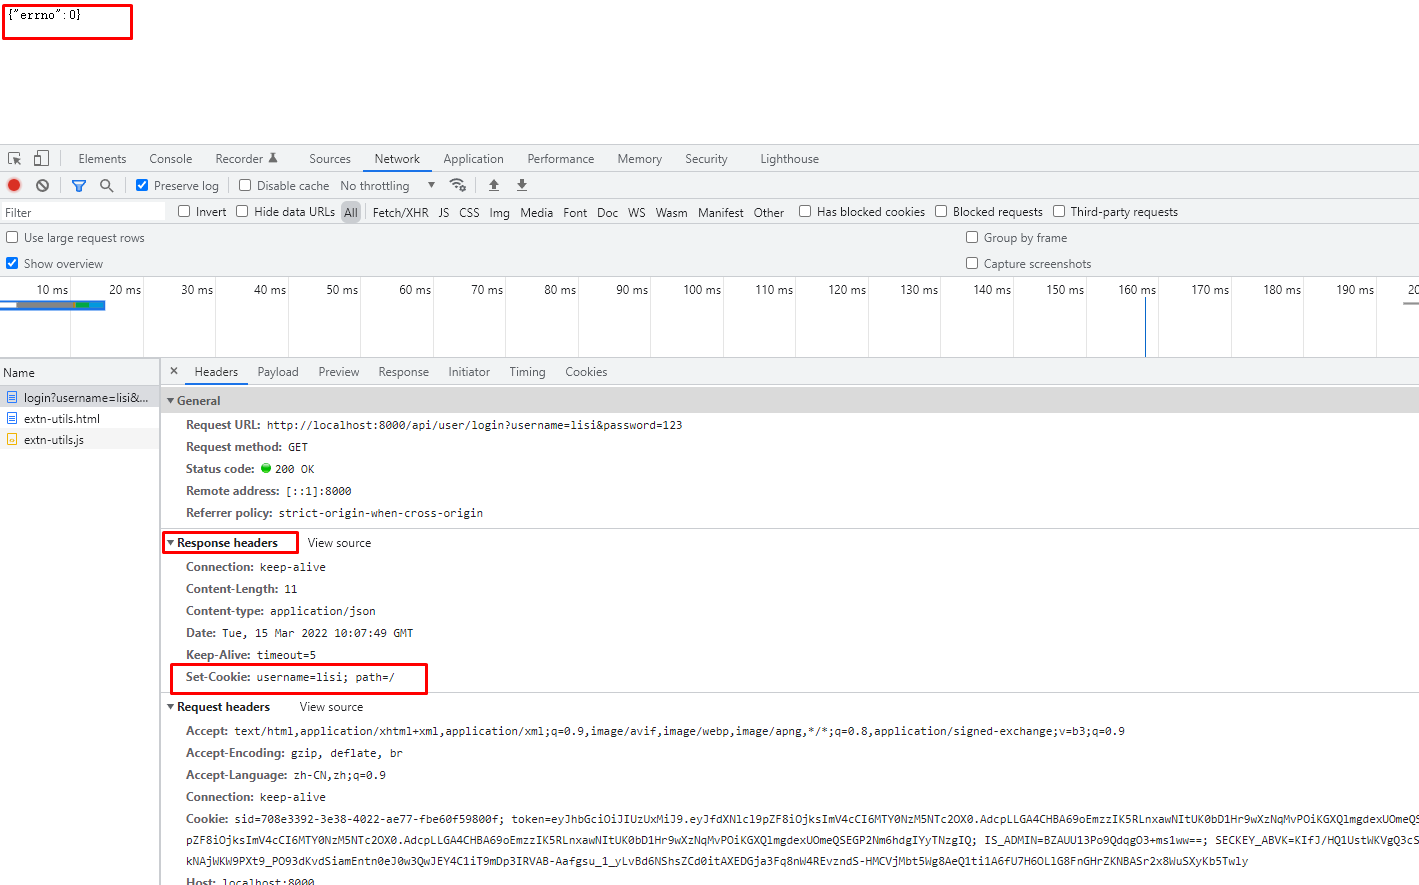
這個時候可以 **嘗試訪問其他接口查看 cookie 是否在請求頭中攜帶** 。
>[success] ## 總結
1. **查看 cookie:在 req.headers.cookie 中就可以查看傳過來的 cookie**
2. **修改 cookie:通過 res.setHeader 來添加 Set-Cookie 即可,只不過需要設置一些 cookie 的參數**
3. **驗證登陸:登陸時去數據庫查詢是否存在該用戶,如果存在就把該用戶的 username 通過 Set-Cookie 存入到 cookie 中**
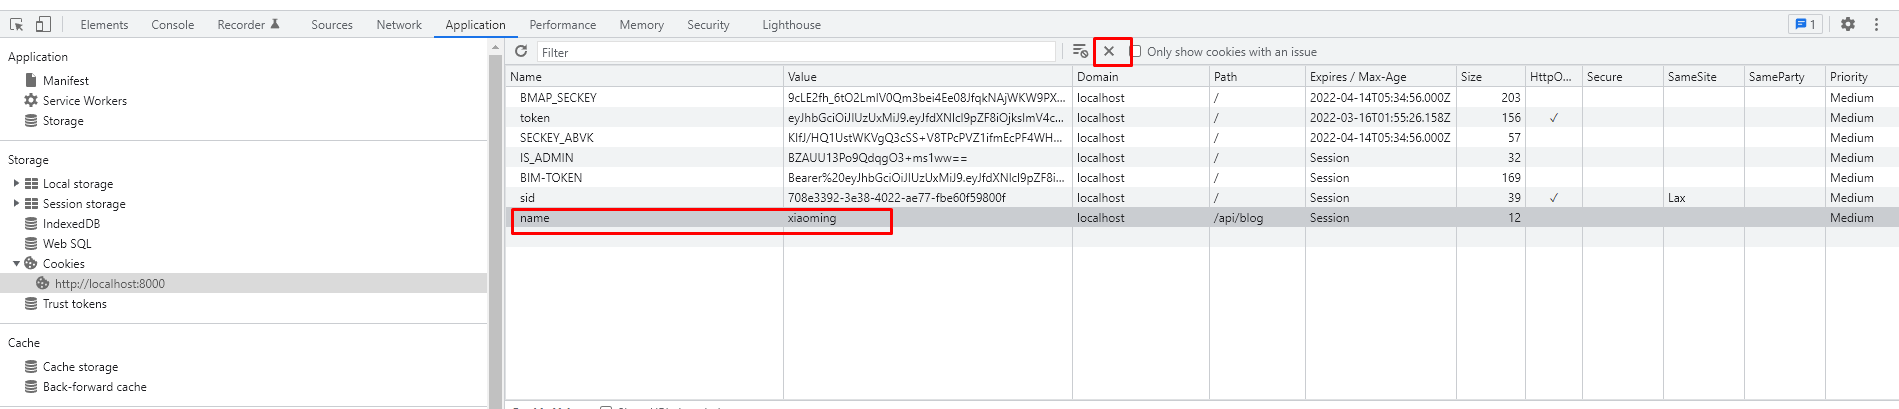
4. 如果想手動刪除 **cookie**,可以去瀏覽器的 **application** 手動把 **cookie 刪掉**
- NodeJS基礎
- 什么是NodeJS
- npm
- Node.js+Express+Koa2+開發Web Server博客
- 下載和安裝node
- nodejs和js的區別
- commonjs-演示
- nodejs如何debugger
- server端與前端的區別
- 項目需求分析
- 開發接口(不使用任何框架)
- http-概述
- 處理get請求
- 處理post請求
- 處理http請求的綜合示例
- 搭建開發環境
- 初始化并且開發路由
- 開發博客項目之數據存儲
- MySql介紹
- 數據庫操作(創建和增、刪、查)
- Nodejs 操作 Mysql
- Nodejs 鏈接 mysql 做成工具
- API 對接 MySQL
- 開發博客項目之登陸
- cookie-介紹
- cookie用于登錄驗證
- cookie做限制