
# 4.1\. Fork + Pull模式
參與GitHub中的項目開發,最常用和推薦的首選方式是“Fork + Pull”模式。在“Fork + Pull”模式下,項目參與者不必向項目創建者申請提交權限,而是在自己的托管空間下建立項目的派生(Fork)。
如果一個開源項目派生出另外的項目,通常意味著項目的分裂和開發團隊的削弱,而GitHub中的項目派生則不會,而且正好相反,GitHub中的項目派生是項目壯大的體現。所有的派生項目都會有鏈接指向原始項目,派生項目沒有獨立的缺陷追蹤系統(ISSUE),而是必須利用創建者本人的項目中的缺陷追蹤系統。至于在派生項目中創建的提交,可以非常方便地利用GitHub的Pull Request工具向原始項目的維護者發送Pull Request。
下面以GotGit版本庫為例,介紹如何利用GitHub提供的Fork和Pull Request工具實現工作協同。
## 4.1.1\. 版本庫派生
GotGit版本庫[[1]](https://github.com/gotgit/gotgit/)用于維護《Git權威指南》一書的官網和勘誤,下面演示的勘誤表修改是由王勝[[2]](https://github.com/wangsheng/)通過GitHub之外的一個缺陷追蹤平臺報告的[[3]](http://redmine.ossxp.com/redmine/issues/161)。他在報告中,甚至直接用GNU diff格式告訴我該如何修改。
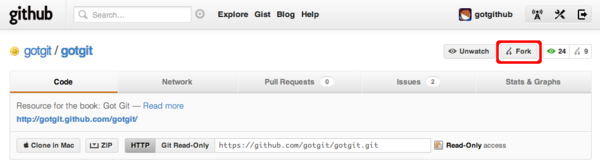
下面就以用戶gotgithub身份,訪問版本庫?[](https://github.com/gotgit/gotgit/)[https://github.com/gotgit/gotgit/](https://github.com/gotgit/gotgit/)?,添加新的勘誤。如圖4-1所示,gotgit項目在之前的示例中已經被我們關注但尚未Fork。
[](https://box.kancloud.cn/2015-07-09_559de342e98b2.png)
圖4-1:原gotgit項目
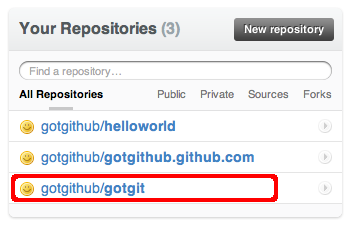
點擊項目名稱右側的Fork按鈕,便在gotgithub用戶自己的托管空間下創建項目派生,派生項目版本庫出現在版本庫列表中,如圖4-2。
[](https://box.kancloud.cn/2015-07-09_559de344b3dce.png)
圖4-2:gotgithub用戶的項目列表
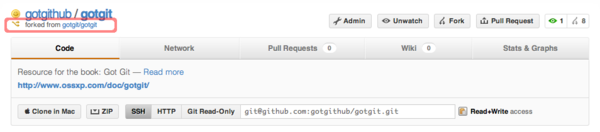
訪問派生后的版本庫,會發現和派生前的幾乎相同,除了沒有缺陷跟蹤(ISSUE),以及標識了該項目派生之前的原路徑等。如圖4-3所示。
[](https://box.kancloud.cn/2015-07-09_559de34550c4e.png)
圖4-3:派生的gotgit項目
現在gotgithub用戶就在本地派生的版本庫中提交。
* 克隆 gotgithub/gotgit 版本庫。
```
$ git clone git@github.com:gotgithub/gotgit.git
$ cd gotgit
```
* 為了向問題的發現者致敬,并經王勝同意,以他的身份進行提交。
```
$ git config user.name "Wang Sheng"
$ git config user.email wangsheng@ossxp.com
```
* 編輯errata.mkd文件(版本庫 gotgit/gotgit 已將勘誤文件重命名為errata.md。),錄入新發現的書中的文字錯誤。
```
$ vi errata.mkd
```
* 對error.mkd的改動如下:
```
$ git diff
diff --git a/errata.mkd b/errata.mkd
index b0b68fb..29e40cf 100644
--- a/errata.mkd
+++ b/errata.mkd
@@ -14,5 +14,6 @@
| 66 | 倒數第11行 | Author(提交者) | Author(作者) | [Github#2](http://github.com/gotgit/gotgit/issues/2) |
| 144 | 第1行 | \`$ **git rev-parse A^{tree} A:** | $ **git rev-parse A^{tree} A:** | [#153](http://redmine.ossxp.com/redmine/issues/153) |
| 218 | 第8行 | 況下,Gits標識出合并沖突, | 況下,Git標識出合并沖突, | [#159](http://redmine.ossxp.com/redmine/issues/159) |
+| 369 | 第21行 | 但 `-i` 參數僅當對一個項執行時才有效。 | 但 `-i` 參數僅當對一個項目執行時才有效。 | [Github#3](http://github.com/gotgit/gotgit/issues/3) |
| 516 | 倒數第15行 | **oldtag="cat"** | **oldtag=\`cat\`** | [#151](http://redmine.ossxp.com/redmine/issues/151) |
```
* 提交修改。至于提交說明中出現的編號,是為了和缺陷跟蹤系統關聯,會在后面章節介紹。
```
$ git add -u
$ git commit -m "Fixed #3: should be 項目, not 項."
```
* 推送提交到GitHub。
```
$ git push
```
訪問GitHub上的派生項目頁面,會看到以用戶whangsheng在master分支[[5]](%E7%89%88%E6%9C%AC%E5%BA%93%20gotgit/gotgit%20%E5%8E%9Fmaster%E5%88%86%E6%94%AF%E5%86%85%E5%AE%B9%E5%B7%B2%E8%BD%AC%E7%A7%BB%E8%87%B3gh-pages%E5%88%86%E6%94%AF%EF%BC%8C%E9%80%9A%E8%BF%87GitHub%E6%8F%90%E4%BE%9B%E7%9A%84%E7%BD%91%E7%AB%99%E9%83%A8%E7%BD%B2%E6%9C%BA%E5%88%B6%E5%AE%8C%E6%88%90%E7%BD%91%E9%A1%B5%E7%9A%84%E7%BC%96%E8%AF%91%E5%92%8C%E9%83%A8%E7%BD%B2%E3%80%82)創建的提交。如圖4-4所示。
[](https://box.kancloud.cn/2015-07-09_559de3466960d.png)
圖4-4:派生版本庫中的新提交
## 4.1.2\. Pull Request
那么如何能夠讓gotgit原始項目的創建者知道這個派生項目及新的提交呢?GitHub提供的工具就是“Pull Request”。注意到圖4-3右上方“Pull Request”按鈕了么?點擊該按鈕進入Pull Request創建界面。
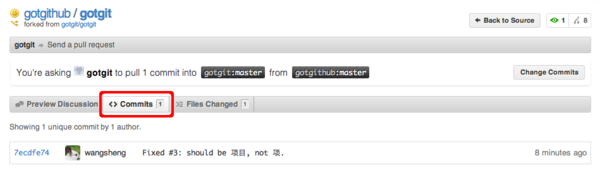
在彈出的Pull Request創建界面中,點擊菜單中的“Commits”,查看所包含的提交。如圖4-5所示。
[](https://box.kancloud.cn/2015-07-09_559de347923e1.png)
圖4-5:Pull Request包含的提交
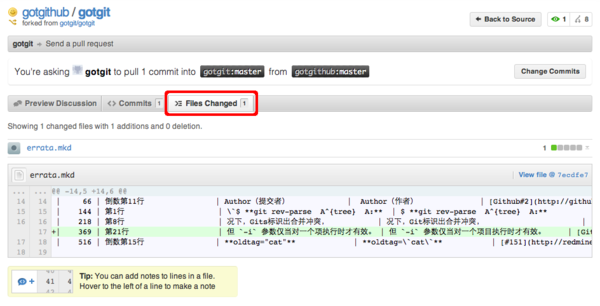
點擊菜單中的“Files Changed”,查看所包含的提交。如圖4-6所示。
[](https://box.kancloud.cn/2015-07-09_559de3490d978.png)
圖4-6:Pull Request包含的改動差異
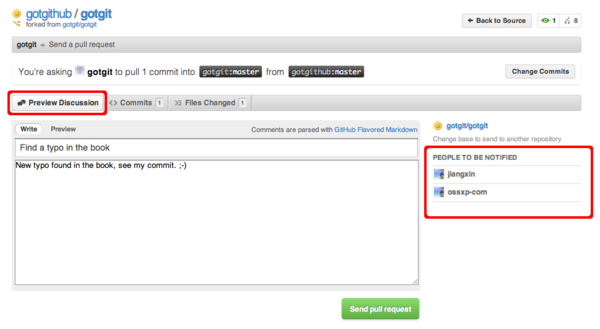
點擊菜單中的“Preview Discussion”,填寫Pull Request的標題和內容,完成Pull Request的創建。如圖4-7所示。
[](https://box.kancloud.cn/2015-07-09_559de34ce80cb.png)
圖4-7:Pull Request的提交界面
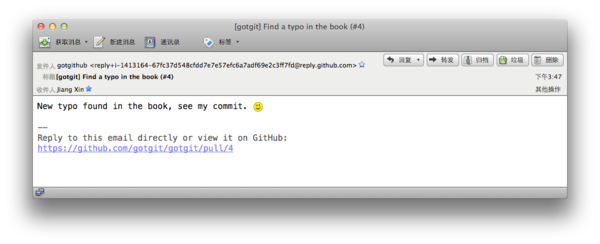
當Pull Request發出后,項目gotgit的開發者會收到通知郵件,如圖4-8所示。
[](https://box.kancloud.cn/2015-07-09_559de34f7043b.png)
圖4-8:Pull Request的通知郵件
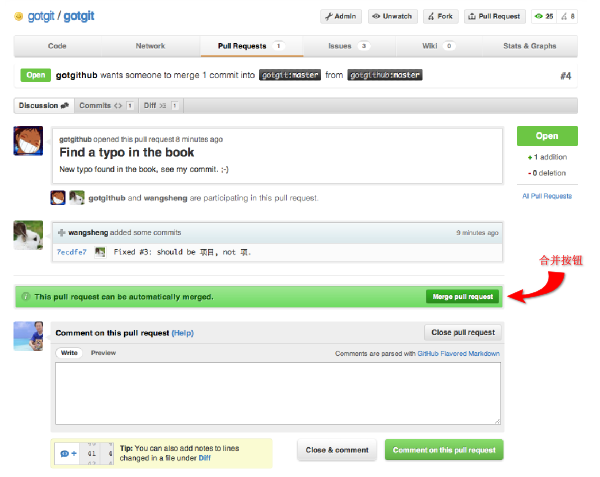
點擊郵件中的URL鏈接,以項目gotgit的開發者(如ossxp-com)身份登錄,看到如圖4-9的視圖。之所以看到有兩個用戶參與到此Pull Request,是因為Pull Request創建者和提交的作者是不同的用戶。圖4-9下方的表單可以向Pull Request追加評論,或者關閉此Pull Request。
[](https://box.kancloud.cn/2015-07-09_559de35462d3d.png)
圖4-9:Pull Request接收者視圖
GitHub如果檢測到Pull Request中包含的提交可以直接合并,會顯示自動合并的提示信息,點擊圖4-9中提示信息中的自動合并按鈕,顯示圖4-10的自動合并對話框。
[](https://box.kancloud.cn/2015-07-09_559de35a0c812.png)
圖4-10:Pull Request的通知郵件
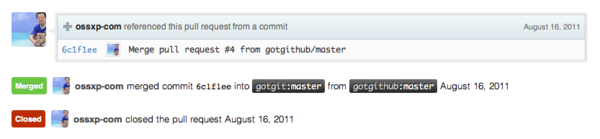
點擊“Confirm Merge”按鈕即完成Pull Request中所含提交的自動合并。自動合并完成后,Pull Request頁面下方會以評論的形式出現相關提示,并自動關閉Pull Request。如圖4-11所示。
[](https://box.kancloud.cn/2015-07-09_559de35b1cb6d.png)
圖4-11:Pull Request關閉
## 4.1.3\. 手工合并
Pull Request提供的自動合并顯示在提交日志中是什么樣子的呢?以用戶ossxp-com身份檢出版本庫,會看到用戶wangsheng的提交已經合并到版本庫中。
```
$ git clone git@github.com:gotgit/gotgit.git
$ cd gotgit
$ git log --graph -3
* commit 6c1f1ee152629fd2f8d00ebe92c27a32d068d756
|\ Merge: 00c6c4b 7ecdfe7
| | Author: OpenSourceXpress
| | Date: Tue Aug 16 01:23:47 2011 -0700
| |
| | Merge pull request #4 from gotgithub/master
| |
| | Find a typo in the book
| |
| * commit 7ecdfe7451412cfb2e65bb47c12cf2162e21c841
|/ Author: Wang Sheng
| Date: Tue Aug 16 10:17:53 2011 +0800
|
| Fixed #3: should be 項目, not 項.
|
* commit 00c6c4bfab9824bd967440902ce87440f9e87852
| Author: Jiang Xin
| Date: Wed Aug 3 11:50:31 2011 +0800
|
| Change font color for stronger text from red to brown.
```
可以看出GitHub的自動合并產生了一個合并提交,類似執行git?merge?--no-ff命令。也就是說即使用戶wangsheng的提交是一個“快進式提交”(基于gotgit/gotgit版本庫最新提交所做的提交),也要產生一個合并提交。
可能有人并不喜歡這種用--no-ff參數的非標準的合并方式,因為這種合并產生了一個多余的提交,可能增加代碼評審的負擔。若要取消GitHub的自動合并也很簡單,因為Git無所不能:
```
$ git reset --hard HEAD^ # 回退一個提交,即回退到當前提交的第一個父提交
$ git rev-parse HEAD # 檢查是否正確的回退
00c6c4bfab9824bd967440902ce87440f9e87852
$ git push -f # 強制推送回退的 master 分支
```
下面就演示一下當收到他人的Pull Request后,該如何手動合并。實際上在很多情況下,Pull Request所含提交有可能造成合并沖突,那樣的話GitHub不再、也不能提供自動合并功能,就必須采用手工合并的方式。
* 將Pull Request發出者的派生版本庫添加為一個新的源。
例如收到來自gotgithub用戶的Pull Request,不妨以gotgithub為名添加新的源。
```
$ git remote add gotgithub https://github.com/gotgithub/gotgit.git
```
* 此時版本庫中有兩個源,一個克隆時自動建立的origin,另外一個就是新增加的gotgithub。
```
$ git remote -v
gotgithub https://github.com/gotgithub/gotgit.git (fetch)
gotgithub https://github.com/gotgithub/gotgit.git (push)
origin git@github.com:gotgit/gotgit.git (fetch)
origin git@github.com:gotgit/gotgit.git (push)
```
* 獲取遠程版本庫gotgithub的分支和提交。
```
$ git fetch gotgithub
From https://github.com/gotgithub/gotgit
* [new branch] gh-pages -> gotgithub/gh-pages
* [new branch] master -> gotgithub/master
```
* 現在除了本地分支master外,還有若干遠程分支,如下:
```
$ git branch -a
* master
remotes/gotgithub/gh-pages
remotes/gotgithub/master
remotes/origin/HEAD -> origin/master
remotes/origin/gh-pages
remotes/origin/master
```
* 將遠程分支remotes/gotgithub/master(可簡寫為gotgithub/master)合并到當前分支中。
```
$ git merge gotgithub/master
Updating 00c6c4b..7ecdfe7
Fast-forward
errata.mkd | 1 +
1 files changed, 1 insertions(+), 0 deletions(-)
```
* 查看提交說明,看到此次合并沒有產生不必要的合并提交。
```
$ git log --graph -2
* commit 7ecdfe7451412cfb2e65bb47c12cf2162e21c841
| Author: Wang Sheng
| Date: Tue Aug 16 10:17:53 2011 +0800
|
| Fixed #3: should be 項目, not 項.
|
* commit 00c6c4bfab9824bd967440902ce87440f9e87852
| Author: Jiang Xin
| Date: Wed Aug 3 11:50:31 2011 +0800
|
| Change font color for stronger text from red to brown.
```
* 將合并推送到GitHub版本庫中。
```
$ git push
```
## 4.1.4\. 在線編輯
GitHub提供了在線編輯功能,這樣可以無需克隆版本庫、無需使用Git即可完成對版本庫中文件的修改,甚至可以在你的iPad甚至iPhone上完成對文件的修改。
以gotgithub賬戶身份登錄GitHub,訪問之前派生而來的版本庫gotgithub/gotgit中的文件,例如文件errata.md(版本庫 gotgit/gotgit 已重構。分支gh-pages中文件errata.md文件來自于原master分支的errata.mkd文件,地址:[](https://github.com/gotgithub/gotgit/blob/gh-pages/errata.md)[https://github.com/gotgithub/gotgit/blob/gh-pages/errata.md](https://github.com/gotgithub/gotgit/blob/gh-pages/errata.md)),會看到其中一個“Edit this file”的按鈕,如圖4-12所示。
[](https://box.kancloud.cn/2015-07-09_559de35c55d5d.png)
圖4-12:瀏覽自己版本庫中文件
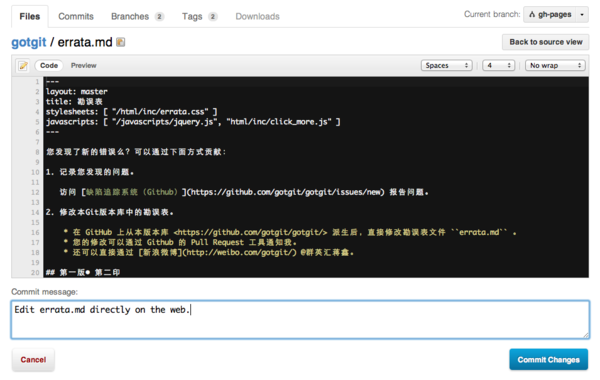
點擊圖4-12中的“Edit this file”按鈕,開始在線編輯文件errata.md,編輯器還支持語法加亮,如圖4-13所示。
[](https://box.kancloud.cn/2015-07-09_559de35ede088.png)
圖4-13:編輯文件
## 4.1.5\. 簡化的 Fork + Pull Request
到目前,我們已經了解了GitHub的三大武器:Fork、Pull Request和在線編輯。對于最常用的“Fork + Pull Request”操作,GitHub還提供了一個快捷模式。即GitHub對于無權更改的他人版本庫中的文件,提供了一個類似在線編輯的按鈕,名為“Fork and edit this file”按鈕,自動完成版本庫派生和在線編輯,即將三大武器一勺燴。
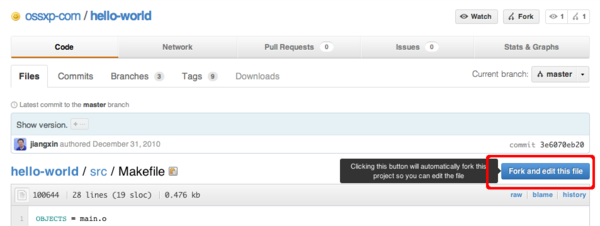
訪問他人版本庫(尚未在自己空間派生)中的文件,例如訪問下面地址:[](http://git.io/hello-world-makefile)[http://git.io/hello-world-makefile](http://git.io/hello-world-makefile)(即地址?[](https://github.com/ossxp-com/hello-world/blob/master/src/Makefile)[https://github.com/ossxp-com/hello-world/blob/master/src/Makefile](https://github.com/ossxp-com/hello-world/blob/master/src/Makefile))。顯示他人(ossxp-com)版本庫hello-world中的src/Makefile文件,如圖4-14所示。
[](https://box.kancloud.cn/2015-07-09_559de3666e915.png)
圖4-14:瀏覽他人版本庫中文件
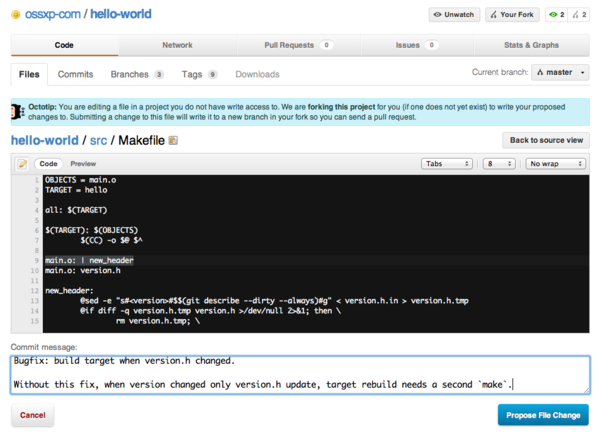
點擊圖4-14中的“Fork and edit this file”按鈕,會自動在自己托管空間創建派生版本庫,并開始在線編輯文件src/Makefile,如圖4-15所示。
[](https://box.kancloud.cn/2015-07-09_559de36a50c35.png)
圖4-15:派生并編輯文件
文件修改完畢,點擊“Propose File Change”按鈕,會將改動作提交到派生的版本庫中,并馬上開啟一個新的Pull Request。如圖4-16所示。
[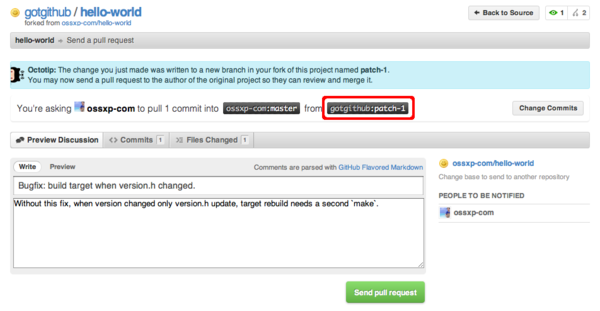](https://box.kancloud.cn/2015-07-09_559de37807da4.png)
圖4-16:編輯完畢自動開啟Pull Request
點擊“Send pull request”按鈕完成Pull Request的創建。如果仔細查看圖4-16,會發現Pull Request所包含的修改發生在gotgithub/hello-world派生版本庫中的patch-1分支中,并非通常的master分支。
原版本庫ossxp-com/hello-world的開發者會收到一封郵件,通知有新的Pull Request,如下所示(前四行為信頭):
```
From: GotGitHub
Date: 2011/12/17
Subject: [hello-world] Bugfix: build target when version.h changed. (#1)
To: Jiang Xin
Without this fix, when version changed only version.h update, target rebuild needs a second `make`.
You can merge this Pull Request by running:
git pull https://github.com/gotgithub/hello-world patch-1
Or you can view, comment on it, or merge it online at:
https://github.com/ossxp-com/hello-world/pull/1
-- Commit Summary --
* Bugfix: build target when version.h changed.
-- File Changes --
M src/Makefile (3)
-- Patch Links --
https://github.com/ossxp-com/hello-world/pull/1.patch
https://github.com/ossxp-com/hello-world/pull/1.diff
---
Reply to this email directly or view it on GitHub:
https://github.com/ossxp-com/hello-world/pull/1
```
版本庫ossxp-com/hello-world的管理員既可以通過GitHub提供的圖形化界面完成對 Pull Request 的審核和合并,也可以在命令行下完成。正如郵件中所述若使用命令行,操作如下:
```
$ git pull https://github.com/gotgithub/hello-world patch-1
```
- 前言
- 1. 探索GitHub
- 1.1. 什么是GitHub
- 1.2. GitHub亮點
- 1.3. 探索GitHub
- 2. 加入GitHub
- 2.1. 創建GitHub賬號
- 2.2. 瀏覽托管項目
- 2.3. 社交網絡
- 3. 項目托管
- 3.1. 創建新項目
- 3.2. 操作版本庫
- 3.3. 公鑰認證管理
- 3.4. 版本庫鉤子擴展
- 3.5. 建立主頁
- 4. 工作協同
- 4.1. Fork + Pull模式
- 4.2. 共享版本庫
- 4.3. 組織和團隊
- 4.4. 代碼評注
- 4.5. 缺陷跟蹤
- 4.6. 維基
- 5. 付費服務
- 5.1. GitHub收費方案
- 5.2. GitHub企業版
- 6. GitHub副產品
- 6.1. GitHub:Gist
- 6.2. 其他版本控制工具支持
- 6.2.1. 用SVN操作GitHub
- 6.2.2. 用Hg操作GitHub
- 6.3. 客戶端工具
- 6.4. 其他
- 7. 附錄:輕量級標記語言
- 貢獻者列表