
# 4.6\. 維基
維基是Web協同著作平臺,可以讓任何瀏覽網頁的人都能夠方便地參與網頁的編輯和創建。這源自于維基如下魔力:
* 快速更改。修改網頁無需復雜的后臺修改和網頁部署流程,瀏覽的網頁直接提供編輯按鈕,任何查看網頁的用戶均可在線編輯網頁。
* 簡潔語法。編寫網頁不需要學習復雜的HTML,取而代之的是易學易用的格式化文本(維基語法),有的維基還提供圖形化編輯界面。
* 版本控制。熟悉Git的人,可以把維基看作是Web的版本控制。歷次修改都記錄在案,歷史修訂可進行比較,可恢復到歷史版本等。
* 維基鏈接。頁面鏈接使用[[頁面名稱]]語法,可以非常方便地創建新頁面,并實現頁面間的互聯。
GitHub提供了維基模塊,方便項目團隊創建社區驅動和維護的項目文檔。
## 4.6.1\. 維基初始化
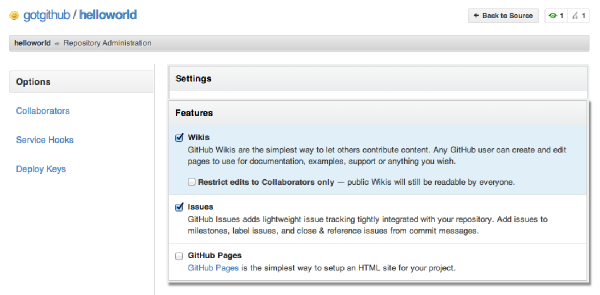
GitHub的維基模塊可以通過項目管理頁面控制開啟或關閉,默認開啟,如圖4-70所示。因為GitHub提供了項目展示的多種途徑,一些小項目如果覺得用README文件構建項目說明,或者用gh-pages分支維護項目主頁就足夠了,大可關閉維基模塊。
[](https://box.kancloud.cn/2015-07-09_559de501d2795.png)
圖4-70:開啟或關閉Wiki模塊
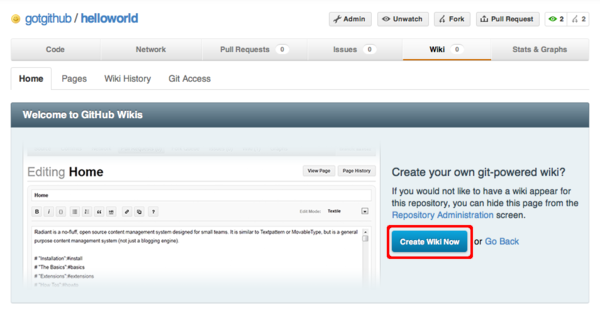
項目啟用維基后,進入維基頁面,如圖4-71所示,會發現維基頁面并沒有自動創建,還需要進行初始化。
[](https://box.kancloud.cn/2015-07-09_559de507210cd.png)
圖4-71:尚未初始化的維基界面
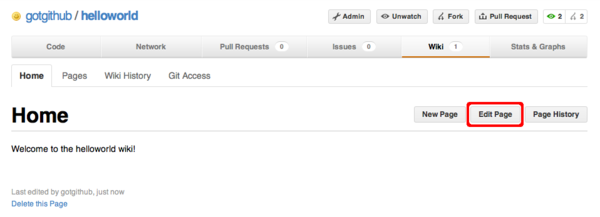
點擊“Create Wiki Now”按鈕,自動創建維基首頁,如圖4-72所示。
[](https://box.kancloud.cn/2015-07-09_559de50a8493d.png)
圖4-72:自動創建的維基首頁
## 4.6.2\. 使用維基
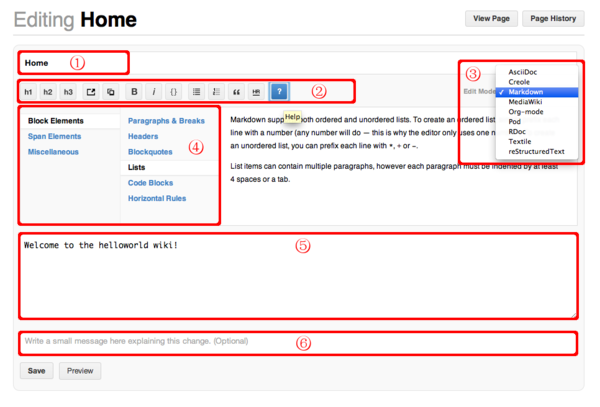
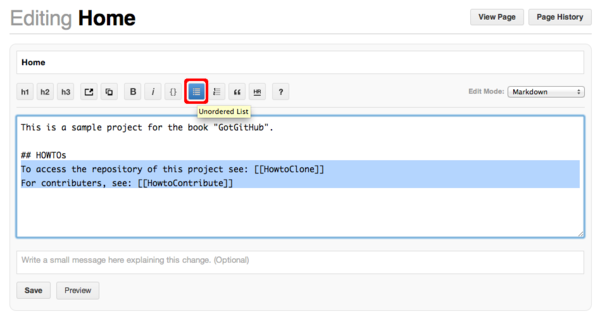
自動創建的維基首頁只有非常簡單的信息,點擊編輯按鈕,修改維基首頁。編輯界面如圖4-73所示。
[](https://box.kancloud.cn/2015-07-09_559de513d7959.png)
圖4-73:編輯維基首頁
編輯界面有6個部分需要重點說明:
1. 頁面名稱。首頁的頁面名稱為“Home”,不能隨意更改,否則無法找到首頁,或者頁面之間的跳轉會失效。
2. 工具條。從左至右分別是設置一級標題、二級標題、三級標題、插入鏈接、圖片、字體加粗、斜體、代碼塊、列表、編號列表、引用、水平分割線等。
3. 頁面語法格式。默認采用Markdown語法,還可以選用AsciiDoc、Creole等語法。注意如果改變語法格式,該維基頁面的內容需要手工進行調整,而且頁面的實際存儲文件的文件擴展名會改變。
4. 語法幫助。當按下工具條中的幫助按鈕會顯示本語法幫助表格。
5. 維基內容編輯框。整個維基頁面的內容都在這個編輯框中。鼠標拖動該編輯框右下角可以對編輯框大小進行縮放。
6. 可選的修改說明。修改頁面時提供說明便于跟蹤對頁面的歷史修訂。
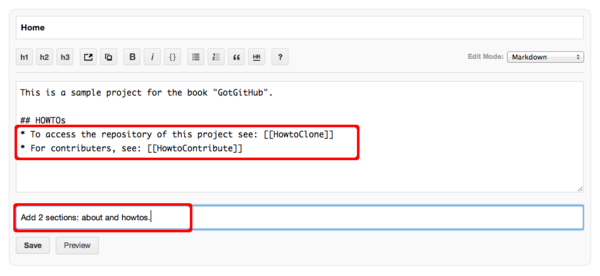
對初始創建的首頁進行更改,如圖4-74所示。
[](https://box.kancloud.cn/2015-07-09_559de51603e78.png)
圖4-74:修改選中文本樣式
圖4-74中,在維基內容編輯框中選擇兩行文本,然后點擊工具欄中的列表按鈕,為選中內容應用列表樣式。應用新樣式后的效果如圖4-75所示。然后填寫提交說明,點擊“Save”按鈕保存更改。
[](https://box.kancloud.cn/2015-07-09_559de516edff6.png)
圖4-75:填寫提交說明保存更改
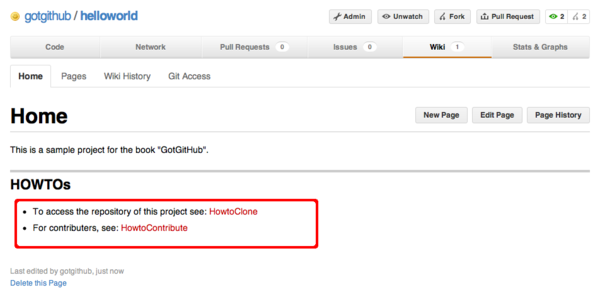
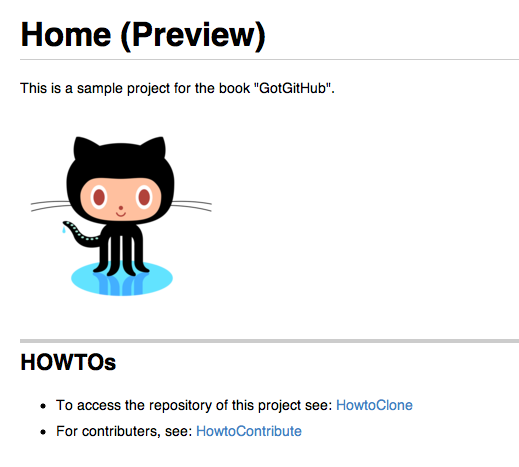
注意圖4-75的維基內容中有[[頁面名稱]]樣式的語法,這個語法是維基特色的頁面鏈接語法,指向另外的維基頁面。實際頁面輸出如圖4-76所示。
[](https://box.kancloud.cn/2015-07-09_559de5183948c.png)
圖4-76:保存更改后的維基首頁
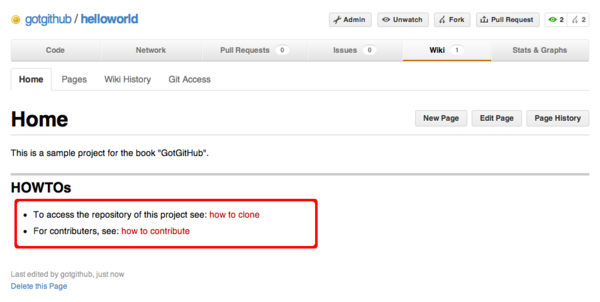
如果對維基語法[[頁面名稱]]生成的鏈接標題不滿意,還可以用[[鏈接標題|頁面名稱]]格式創建維基鏈接。對首頁重新做一次修改,修改如下:
* 將[[HowtoClone]]改為[[how?to?clone|HowtoClone]]。
* 將[[HowtoContribute]]改為[[how?to?contribute|HowtoContribute]]。
修改后的首頁效果如圖4-77所示。
[](https://box.kancloud.cn/2015-07-09_559de51943add.png)
圖4-77:修改維基鏈接標題后的首頁
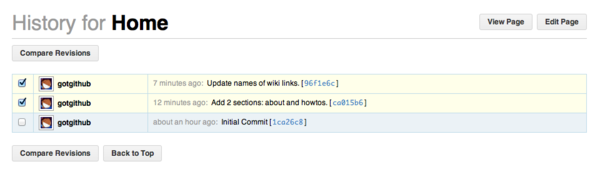
無論怎樣更改維基頁面都不怕內容丟失,因為維基記錄了每一次修訂歷史,并可以回退任意一次修改。點擊維基頁面中的“Page History”按鈕,查看頁面修訂歷史,如圖4-78所示。
[](https://box.kancloud.cn/2015-07-09_559de51a2a6ec.png)
圖4-78:頁面修訂歷史
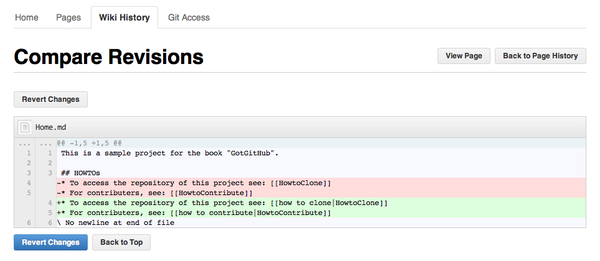
首頁的修訂歷史記錄著維基初始化以來所有的修改,包括修改者、修改時間、提交說明,以及一個可點擊的對象ID。點擊對象ID查看對應版本的頁面。還可以對不同版本的頁面進行比較,選中兩個版本點擊“Compare Revisions”按鈕,如圖4-79所示。
[](https://box.kancloud.cn/2015-07-09_559de51cebf01.png)
圖4-79:頁面版本間比較
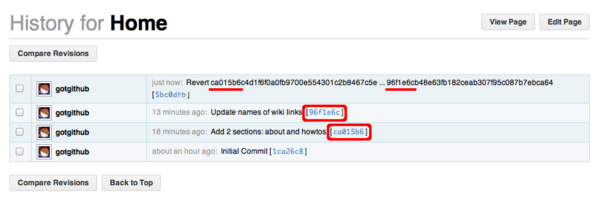
在頁面版本間的比較界面中,提供回退此次修改的按鈕。點擊“Revert Changes”按鈕(圖4-79所示),可以回退對首頁的修改。查看首頁的修訂歷史,會看到回退記錄也顯示其中,如圖4-80所示。
[](https://box.kancloud.cn/2015-07-09_559de51e652c0.png)
圖4-80:包含回退記錄的頁面修訂歷史
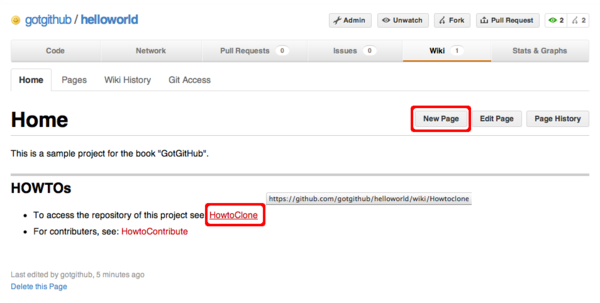
在維基中創建新頁面有多種方法,可以點擊頁面中的“New Page”按鈕,也可以像我們之前做的那樣先在頁面中用[[頁面名稱]]格式嵌入維基鏈接,然后在生成的頁面中可以看到指向新頁面的鏈接,當然這些鏈接所指向的頁面并不存在。
[](https://box.kancloud.cn/2015-07-09_559de51f366e1.png)
圖4-81:頁面中的維基鏈接
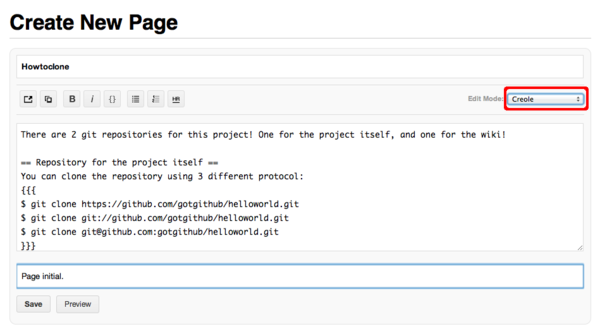
如圖4-81所示,點擊頁面中指向不存在維基頁面的鏈接,會自動開啟創建新頁面的對話框,如圖4-82所示。
[](https://box.kancloud.cn/2015-07-09_559de52677fa8.png)
圖4-82:創建新維基頁面
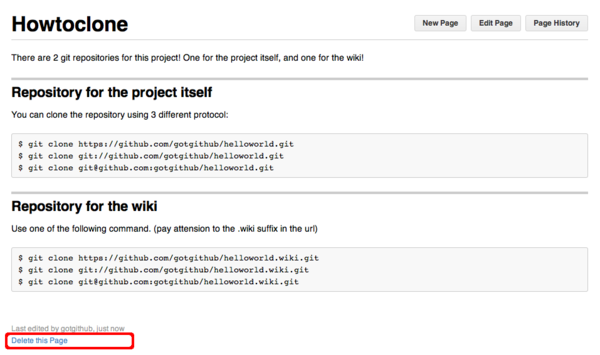
輸入維基頁面的內容,然后填寫提交說明,點擊“Save”按鈕,保存新頁面。生成的新頁面如圖4-83所示。
[](https://box.kancloud.cn/2015-07-09_559de527d13e1.png)
圖4-83:生成的新頁面
如果當前用戶對頁面具有寫權限,則在頁面左下角會看到一個刪除本頁面的鏈接。點擊“Delete this page”鏈接并經確認后會刪除頁面。然后繼續在維基中操作,如創建另外一個新頁面HowtoContribute。
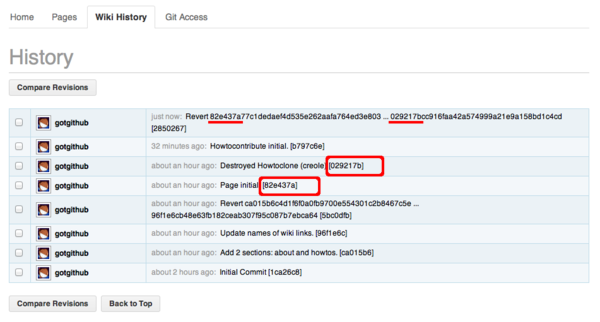
如果對之前刪除頁面Howtoclone的操作后悔,可以通過下面方法找回。
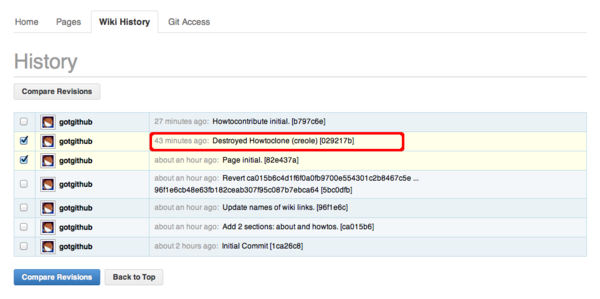
* 訪問菜單中的“Wiki History”項,顯示整個維基的修訂記錄(不是某個頁面的修訂記錄)。如圖4-84所示。
[](https://box.kancloud.cn/2015-07-09_559de529dbfea.png)
圖4-84:維基修訂記錄
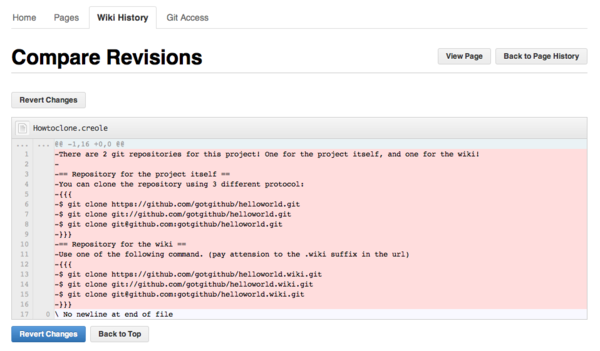
* 從圖4-84可見上面第二條記錄就是刪除HowtoClone頁面的操作,選擇該記錄及前一次記錄,執行版本比較,如圖4-85所示。
[](https://box.kancloud.cn/2015-07-09_559de52b59fac.png)
圖4-85:版本比較
* 點擊“Revert Changes”按鈕,可以取消頁面刪除動作。更新后的維基修訂歷史如圖4-86所示。
[](https://box.kancloud.cn/2015-07-09_559de53a4fb6d.png)
圖4-86:還原修訂后的維基修訂記錄
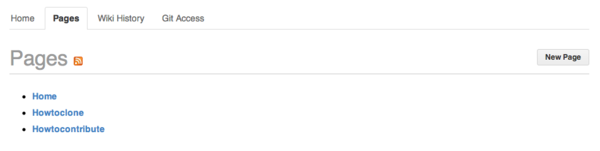
* 查看維基頁面列表,可以看到頁面Howtoclone已經被找回。
[](https://box.kancloud.cn/2015-07-09_559de53c273ef.png)
圖4-87:維基頁面列表
## 4.6.3\. 維基與Git
隨著對GitHub維基的深入使用,可能會遇到下面的問題:如何嵌入圖片?多人編輯時如何避免沖突?解決這幾個問題的辦法就是用Git操作維基。在之前查看維基修訂歷史,以及進行版本間比較時可能已經看出和Git是如何的相似,實際上GitHub的維基頁面就是用Git版本庫實現的。
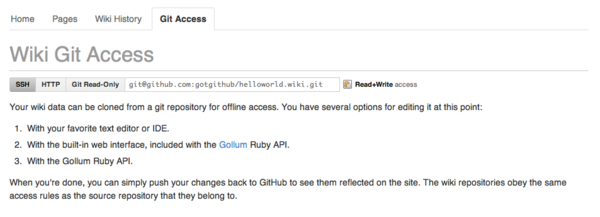
在維基頁面訪問菜單中的“Git Access”項,會看到用Git訪問維基頁面的方法。如圖4-88所示。
[](https://box.kancloud.cn/2015-07-09_559de53dd869c.png)
圖4-88:用Git訪問維基
對于項目gotgithub/helloworld來說,用Git克隆其維基,用如下命令:
```
$ git clone git@github.com:gotgithub/helloworld.wiki.git
```
進入到剛剛克隆的helloworld.wiki工作區中,查看包含的文件,會看到有三個文件。
```
$ cd helloworld.wiki
$ ls
Home.md Howtoclone.creole Howtocontribute.md
```
三個文件對應于三個維基頁面,文件名就是維基的頁面名稱,而擴展名對應于采用的維基語法。以.md擴展名結尾的頁面采用Markdown語法,而以.creole結尾的文件采用Creole標準維基語法。
下面就通過Git在維基版本庫中添加一個圖片。添加圖片的操作只通過GitHub維基的Web界面是很難實現的,而使用Git則易如反掌。
* 創建一個名為images目錄。這個目錄并非必須,只是為了易于管理。
```
$ mkdir images
$ cd images
```
* 在images目錄中添加圖片。
下面的操作從GitHub官方版本庫中下載圖片octocat.png并進行適當縮放。
```
$ wget https://github.com/github/media/raw/master/octocats/octocat.png
$ mogrify -resize '200' octocat.png
```
* 將圖片添加到暫存區并提交。
```
$ git add octocat.png
$ git commit -m "add sample image."
```
* 將本地提交推送到GitHub遠程版本庫。
```
$ git push
```
完成推送后,訪問下面的網址可以看到剛剛上傳的圖片:
[https://github.com/gotgithub/helloworld/wiki/images/octocat.png](https://github.com/gotgithub/helloworld/wiki/images/octocat.png)
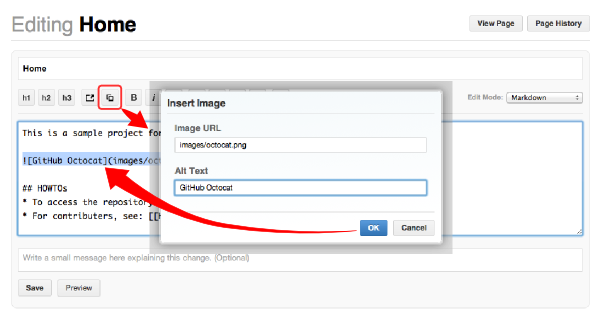
接下來在維基頁面中引用圖片。嵌入圖片的Markdown語法是:。當然可以通過編輯本地版本庫gotgithub/helloworld.wiki.git中的文件,但通過GitHub維基編輯界面嵌入圖片無需記憶復雜的語法。如圖4-89所示。
[](https://box.kancloud.cn/2015-07-09_559de53f12e9b.png)
圖4-89:在維基頁面中嵌入圖片
點擊“Preview”按鈕,可以在保存前查看效果。在圖4-90所示的預覽界面中可以看到修改后的效果。
[](https://box.kancloud.cn/2015-07-09_559de5406159f.png)
圖4-90:預覽效果
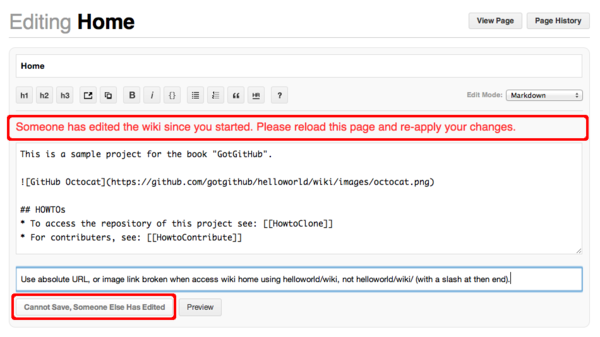
多人同時編輯一個維基頁面會引起沖突,先提交的用戶會成功,其他用戶的編輯界面馬上會顯示沖突警告,并且保存按鈕也被置灰,如圖4-91所示。
[](https://box.kancloud.cn/2015-07-09_559de54195384.png)
圖4-91:編輯沖突
GitHub的維基編輯界面沒有提供沖突解決的工具,而利用Git本身強大的沖突解決功能可以很容易地解決這一難題。
例如用戶gotgithub編輯維基首頁Home遇到編輯沖突,為防止數據丟失,先將編輯框中的維基文本拷貝并粘貼到一個臨時文件中,如文件中/path/to/draft.md。然后進行如下操作將draft.md中內容合并到維基頁面中。
* 如果本地已經克隆維基版本庫,則執行下面命令更新。
```
$ cd helloworld.wiki
$ git pull
```
* 如果沒有,則克隆維基版本庫。
```
$ git clone git@github.com:gotgithub/helloworld.wiki.git
$ cd helloworld.wiki
```
* 用Git命令查看版本庫的歷史,以便找出發生沖突的原始版本。
從下面的輸出可以看出我們編輯的版本是基于提交fbb4bb4,由于用戶incredible先于我們完成了對維基頁面的修改以致發生了沖突。
```
$ git log -3 --pretty=short
commit 5ff5d998bb6cf99337813915282df94701d17ea0
Author: incredible
Add a note as image link broken if url without a end slash.
commit fbb4bb4f330bacf765d51736359b0a3e81ed945b
Author: gotgithub
Insert image in page.
commit 94182c2b57ebce1f1bf8a310f78df87ae8e8219a
Author: gotgithub
add sample image.
```
* 基于提交fbb4bb4建立分支,如分支mywiki。
```
$ git checkout -b mywiki fbb4bb4
```
* 將保存的draft.md覆蓋欲修改的文件,如Home.md。
```
$ cp /path/to/draft.md Home.md
```
* 提交修改。
```
$ git add -u
$ git commit -m "Use absolute image link."
```
* 切換到master分支。
```
$ git checkout master
```
* 合并我們在mywiki分支的修改。
```
$ git merge mywiki
Auto-merging Home.md
CONFLICT (content): Merge conflict in Home.md
Automatic merge failed; fix conflicts and then commit the result.
```
* 調用圖形工具解決沖突。
```
$ git mergetool
```
* 提交并查看合并后的提交關系圖。
```
$ git commit -m "merge with incredible's edit."
$ git log --oneline --graph -4
* d33b55a merge with incredible's edit.
|\
| * 121c3b2 Use absolute image link.
* | 5ff5d99 Add a note as image link broken if url without a end slash.
|/
* fbb4bb4 Insert image in page.
```
* 查看用戶incredible的修改。
```
$ git show --oneline HEAD^1
5ff5d99 Add a note as image link broken if url without a end slash.
diff --git a/Home.md b/Home.md
index 6ada8e8..0bca3ec 100644
--- a/Home.md
+++ b/Home.md
@@ -1,5 +1,7 @@
This is a sample project for the book "GotGitHub".
+**Note**: if can not see the following image, add a slash('/') at the end of the URL.
+

## HOWTOs
```
* 查看用戶gotgithub的修改。
```
$ git show --oneline HEAD^2
121c3b2 Use absolute image link.
diff --git a/Home.md b/Home.md
index 6ada8e8..cdb9167 100644
--- a/Home.md
+++ b/Home.md
@@ -1,6 +1,6 @@
This is a sample project for the book "GotGitHub".
-
+
## HOWTOs
* To access the repository of this project see: [[HowtoClone]]
```
* 將本地合并后的版本庫推送到GitHub。
```
$ git push
```
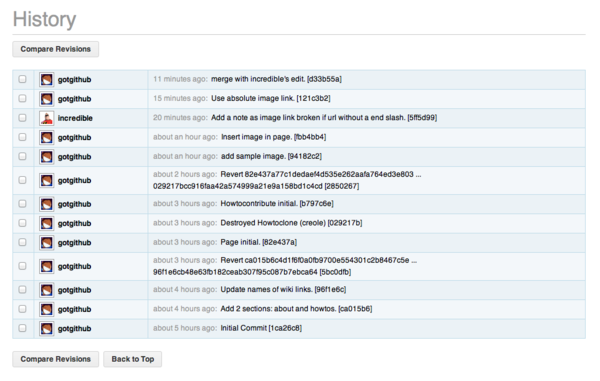
再來看看推送后GitHub的維基修訂歷史,和本地版本庫看到的歷史是一致的,如圖4-92所示。
[](https://box.kancloud.cn/2015-07-09_559de5432437f.png)
圖4-92:推送后的維基修訂歷史
GitHub維基背后的引擎名為Gollum,GitHub已將其開源,項目網址:[](https://github.com/github/gollum)[https://github.com/github/gollum](https://github.com/github/gollum)?。安裝Gollum,在克隆的維基版本庫中運行gollum就可以在本地啟動維基服務。
- 前言
- 1. 探索GitHub
- 1.1. 什么是GitHub
- 1.2. GitHub亮點
- 1.3. 探索GitHub
- 2. 加入GitHub
- 2.1. 創建GitHub賬號
- 2.2. 瀏覽托管項目
- 2.3. 社交網絡
- 3. 項目托管
- 3.1. 創建新項目
- 3.2. 操作版本庫
- 3.3. 公鑰認證管理
- 3.4. 版本庫鉤子擴展
- 3.5. 建立主頁
- 4. 工作協同
- 4.1. Fork + Pull模式
- 4.2. 共享版本庫
- 4.3. 組織和團隊
- 4.4. 代碼評注
- 4.5. 缺陷跟蹤
- 4.6. 維基
- 5. 付費服務
- 5.1. GitHub收費方案
- 5.2. GitHub企業版
- 6. GitHub副產品
- 6.1. GitHub:Gist
- 6.2. 其他版本控制工具支持
- 6.2.1. 用SVN操作GitHub
- 6.2.2. 用Hg操作GitHub
- 6.3. 客戶端工具
- 6.4. 其他
- 7. 附錄:輕量級標記語言
- 貢獻者列表