
# 6.3\. 客戶端工具
GitHub提供的Web服務,在客戶端通常只需要瀏覽器及Git命令行工具就可以滿足需要了。而GitHub還開發了一些客戶端工具,以便用戶有更好的客戶端體驗。
## 6.3.1\. github:mac
GitHub專為Mac用戶開發了一款圖形化客戶端應用github:mac,在Mac下操作GitHub更簡單。軟件下載地址:?[](http://mac.github.com/)[http://mac.github.com/](http://mac.github.com/)?。
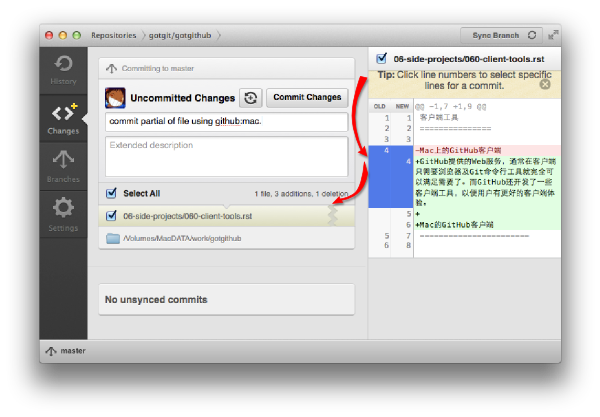
github:mac?可以實現版本庫克隆、查看歷史、提交、分支管理、與GitHub同步等功能。圖6-12展示的是提交界面,在提交界面中同時顯示了變更的差異比較,用戶可以挑選文件中的部分變更進行提交,顯然這個操作要比在命令行中執行**git add –patch**或**git commit –patch**要更加直觀。
[](https://box.kancloud.cn/2015-07-09_559de6e25fdb3.png)
圖6-12:篩選文件中的部分更改進行提交
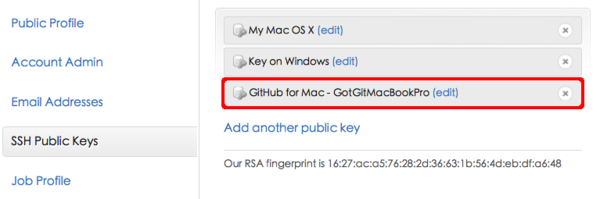
github:mac和GitHub深度集成,當配置好關聯的GitHub賬號后,會自動在本地創建專用的SSH公鑰/私鑰對文件?~/.ssh/github_rsa?(如果該文件不存在的話),然后將公鑰文件傳遞到GitHub網站并自動完成配置。新增的SSH公鑰文件顯示在GitHub網站的賬號設置中,如圖6-13所示:
[](https://box.kancloud.cn/2015-07-09_559de6f520c12.png)
圖6-13:在GitHub上自動添加的SSH公鑰
同時github:mac還在本地將新生成的私鑰文件添加到ssh-agent認證代理中,這樣一旦通過 SSH 協議連接GitHub,首先采用該公鑰/私鑰對進行身份認證。用下面的命令可以查看添加到ssh-agent中的私鑰文件。
```
$ ssh-add -l
2048 aa:01:4f:d2:14:ba:5f:9f:8c:dc:b5:9d:44:cd:8e:18 /Users/jiangxin/.ssh/github_rsa (RSA)
```
這種透明的公鑰認證管理非常酷,對于大多數只使用唯一一個GitHub賬號的用戶來說是非常方便的。但如果用戶擁有多個GitHub賬號并需要不時切換賬號,這種實現卻很糟糕,會導致認證錯誤。因為當ssh-agent認證代理緩存了私鑰后,連接由文件~/.ssh/config?設置的 SSH 別名主機無法使用指定的公鑰/私鑰對進行認證,導致認證失敗。
遇到 GitHub 賬戶 SSH 認證問題,可以運行下面命令清空ssh-agent緩存的私鑰。
```
$ ssh-add -d ~/.ssh/github_rsa
Identity removed: /Users/jiangxin/.ssh/github_rsa (/Users/jiangxin/.ssh/github_rsa.pub)
```
## 6.3.2\. hub
對于命令行用戶,GitHub提供了名為hub的命令行工具,對Git進行了簡單的封裝。該項目在GitHub上的地址為:?[](https://github.com/defunkt/hub)[https://github.com/defunkt/hub](https://github.com/defunkt/hub)?。
使用hub可以在命令行中簡化對GitHub的操作。例如克隆本電子書的版本庫,若用hub命令,地址可大大簡化:
```
$ hub clone gotgit/gotgithub
```
若要在自己賬號下創建派生項目,無需登錄GitHub網站,直接通過命令行即可實現:
```
$ cd gotgithub
$ hub fork
```
安裝hub很簡單,可使用如下方法任意一種方法。
* 克隆hub的版本庫,從源碼安裝。安裝步驟如下:
```
$ git clone git://github.com/defunkt/hub.git
$ cd hub
$ rake install prefix=/usr/local
```
* 用 RubyGems 包方式安裝。
hub用 Ruby 開發,也可用 RubyGems 包方式安裝。需要注意,在安裝完畢后最好將hub打包為一獨立運行腳本,以便運行時不再靠 RubyGems 加載,提高加載速度。安裝步驟如下:
```
$ gem install hub
$ hub hub standalone > ~/bin/hub && chmod 755 ~/bin/hub
```
安裝完畢后,還需要對hub進行設置。定義兩個Git風格的配置變量,以便hub命令能確定當前GitHub用戶賬號,并能夠完成所需的 GitHub API 認證。
```
$ git config --global github.user "your-github-username"
$ git config --global github.token "your-github-token"
```
其中github.token中保存的是用戶的API TOKEN,這在“2.1 創建GitHub賬號”一節有過介紹。
在使用hub過程中,如果要為區分哪些命令是git的,哪些是hub的,而不斷在兩個命令間切換顯然太不方便了。hub?命令支持以系統別名git的方式運行,即設置hub的系統別名為git,然后只需執行git命令,這樣無論是git本身的命令還是hub擴展的命令都可正常運行。但要注意要用系統提供的別名方式,而不能把hub腳本改名為git,因為hub只是簡單地對Git進行封裝,運行時仍依賴git命令。在 bash 環境下建立別名可運行如下命令:
```
$ alias git=hub
```
其他 shell 環境下如何建立系統別名呢?運行hub?alias?命令查看相關 shell 環境下建立別名的方法。例如對于 csh:
```
$ hub alias csh
Run this in your shell to start using `hub` as `git`:
alias git hub
```
下面介紹hub的常用命令,節選自hub的項目頁[[1]](https://github.com/defunkt/hub#readme)。示例使用了別名命令git調用,并把對應的原始的git命令寫在命令的下面(用提示符>表示,方括號中是說明)。
* git create
在GitHub上創建項目。
```
$ git create -d '項目表述'
> [ 在GitHub上創建版本庫 ]
> git remote add origin git@github.com:YOUR_USER/CURRENT_REPO.git
$ git create recipes
> [ 在GitHub上創建版本庫 ]
> git remote add origin git@github.com:YOUR_USER/recipes.git
$ git create sinatra/recipes
> [ 在組織賬號 sinatra 下創建版本庫 ]
> git remote add origin git@github.com:sinatra/recipes.git
```
* git clone
克隆版本庫可使用URL簡寫,即“用戶名/版本庫”格式地址會自動擴展為Git協議(只讀)地址或SSH協議(可寫)地址。
```
$ git clone schacon/ticgit
> git clone git://github.com/schacon/ticgit.git
$ git clone -p schacon/ticgit
> git clone git@github.com:schacon/ticgit.git
$ git clone resque
> git clone git@github.com/YOUR_USER/resque.git
```
* git fork
在GitHub自己賬號下建立派生項目。
```
$ git fork
> [ 先在GitHub 上建立派生項目 ]
> git remote add -f YOUR_USER git@github.com:YOUR_USER/CURRENT_REPO.git
```
* git pull-request
打開編輯器輸入標題和內容,然后在 GitHub 上創建 Pull Request。
* git remote add
設置遠程版本庫。和git?clone命令一樣支持URL簡寫。
```
$ git remote add rtomayko
> git remote add rtomayko git://github.com/rtomayko/CURRENT_REPO.git
$ git remote add -p rtomayko
> git remote add rtomayko git@github.com:rtomayko/CURRENT_REPO.git
$ git remote add origin
> git remote add origin git://github.com/YOUR_USER/CURRENT_REPO.git
```
* git fetch
獲取他人同名版本庫。自動建立遠程版本庫并獲取提交。
```
$ git fetch mislav
> git remote add mislav git://github.com/mislav/REPO.git
> git fetch mislav
$ git fetch mislav,xoebus
> git remote add mislav ...
> git remote add xoebus ...
> git fetch --multiple mislav xoebus
```
* git cherry-pick
獲取遠程提交,并揀選至本地版本庫。
```
$ git cherry-pick http://github.com/mislav/REPO/commit/SHA
> git remote add -f mislav git://github.com/mislav/REPO.git
> git cherry-pick SHA
```
* git am, git apply
獲取 Pull Request,并應用于本地版本庫。
```
$ git am https://github.com/defunkt/hub/pull/55
> curl https://github.com/defunkt/hub/pull/55.patch -o /tmp/55.patch
> git am /tmp/55.patch
```
* git browse
打開瀏覽器訪問相應的URL地址。
```
$ git browse
> open https://github.com/YOUR_USER/CURRENT_REPO
$ git browse -- commit/SHA
> open https://github.com/YOUR_USER/CURRENT_REPO/commit/SHA
$ git browse -- issues
> open https://github.com/YOUR_USER/CURRENT_REPO/issues
$ git browse resque
> open https://github.com/YOUR_USER/resque
$ git browse schacon/ticgit
> open https://github.com/schacon/ticgit
$ git browse schacon/ticgit commit/SHA
> open https://github.com/schacon/ticgit/commit/SHA
```
* git help hub
查看hub命令的幫助。
## 6.3.3\. iOS應用
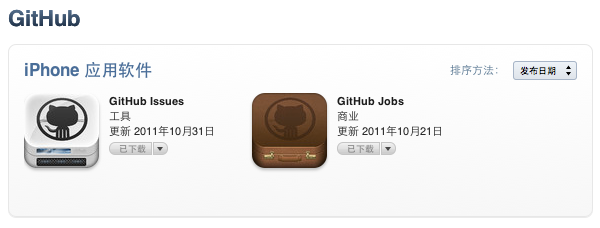
GitHub還為iOS平臺開發了應用,這樣就可以在 iPhone、iPad 等蘋果設備上實時跟蹤GitHub上的項目了。在蘋果AppStore上搜索GitHub公司的應用,可以找到GitHub Issues和GitHub Jobs等應用,如圖6-14所示。
[](https://box.kancloud.cn/2015-07-09_559de72abe08f.png)
圖6-14:iPhone上的issues應用
在iPhone中安裝GitHub Issues應用,就可以隨時查看所關注的GitHub項目的問題報告和Pull Request等,如圖6-15所示。

圖6-15:iPhone上的GitHub Issues應用
而GitHub Jobs應用則和即將要介紹的GitHub招聘網站有關,用于瀏覽招聘信息。
- 前言
- 1. 探索GitHub
- 1.1. 什么是GitHub
- 1.2. GitHub亮點
- 1.3. 探索GitHub
- 2. 加入GitHub
- 2.1. 創建GitHub賬號
- 2.2. 瀏覽托管項目
- 2.3. 社交網絡
- 3. 項目托管
- 3.1. 創建新項目
- 3.2. 操作版本庫
- 3.3. 公鑰認證管理
- 3.4. 版本庫鉤子擴展
- 3.5. 建立主頁
- 4. 工作協同
- 4.1. Fork + Pull模式
- 4.2. 共享版本庫
- 4.3. 組織和團隊
- 4.4. 代碼評注
- 4.5. 缺陷跟蹤
- 4.6. 維基
- 5. 付費服務
- 5.1. GitHub收費方案
- 5.2. GitHub企業版
- 6. GitHub副產品
- 6.1. GitHub:Gist
- 6.2. 其他版本控制工具支持
- 6.2.1. 用SVN操作GitHub
- 6.2.2. 用Hg操作GitHub
- 6.3. 客戶端工具
- 6.4. 其他
- 7. 附錄:輕量級標記語言
- 貢獻者列表