
## 1.發布H5端
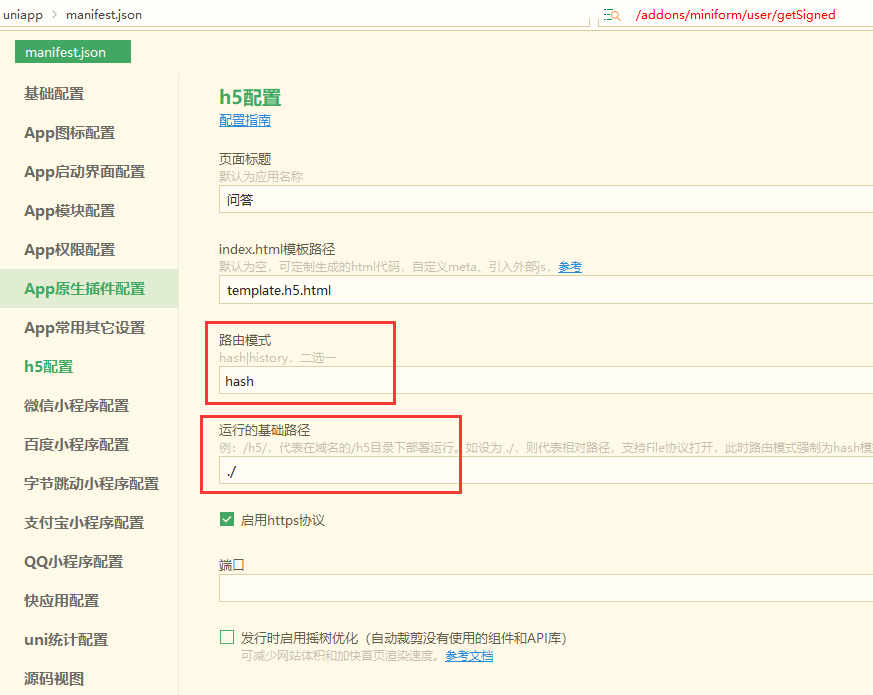
## 1、路由模式為 history,運行的基礎路徑為/h5/
在HbuilderX打開`manifest.json`\->`h5配置`\->路由模式設置為`history`,運行的基礎路徑填寫為`/h5/`
如以下圖片所示:

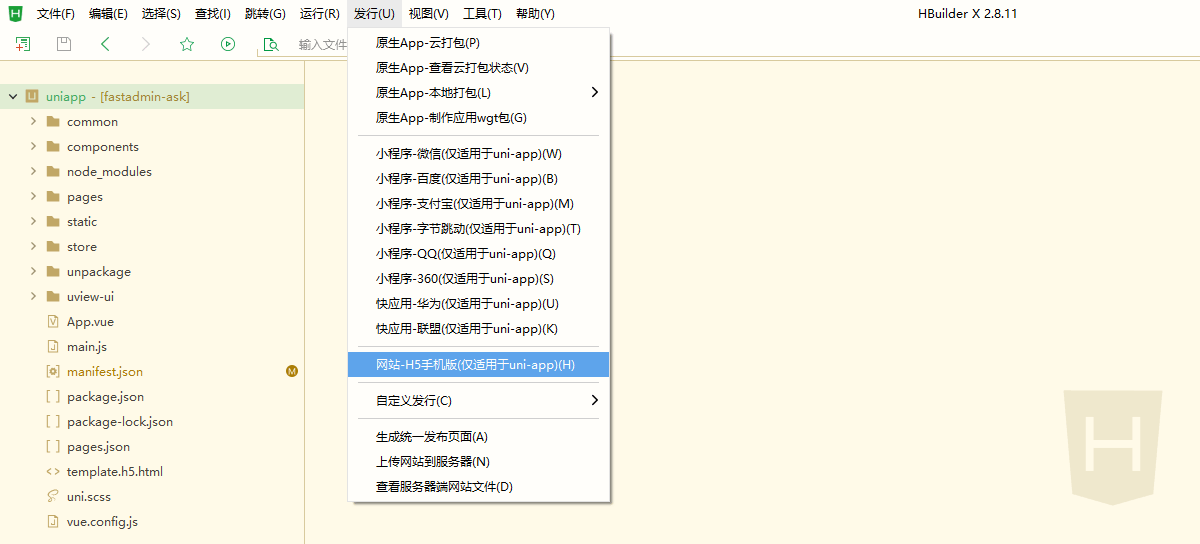
點擊HBuilderx`工具欄`→`發行`→`網站-H5手機版(僅適用于uni-app)(H)`
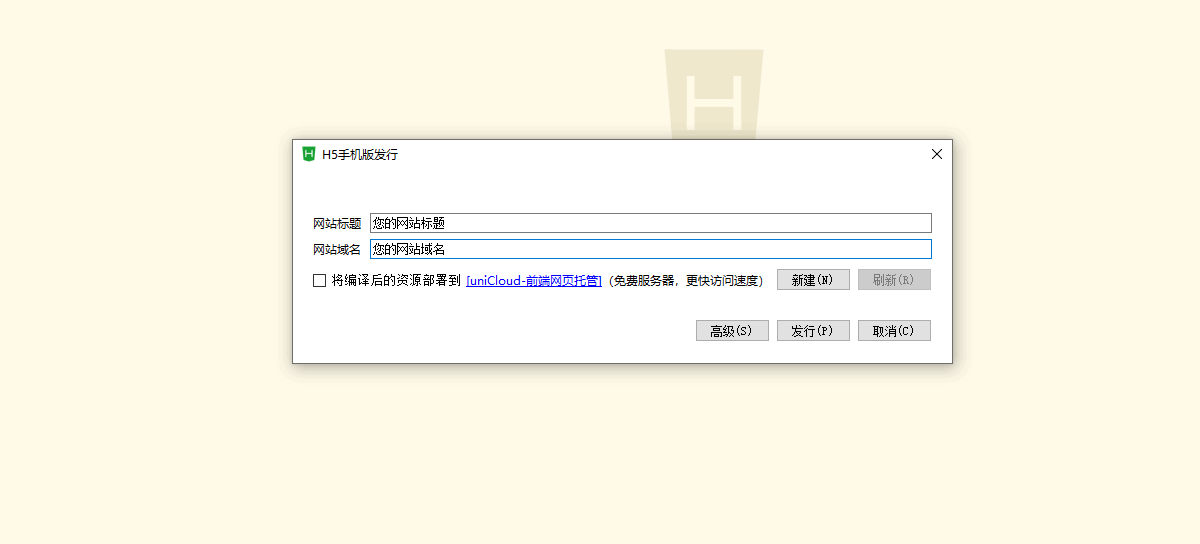
請填寫您的網站標題 和 網站域名后點擊`發行`即可。
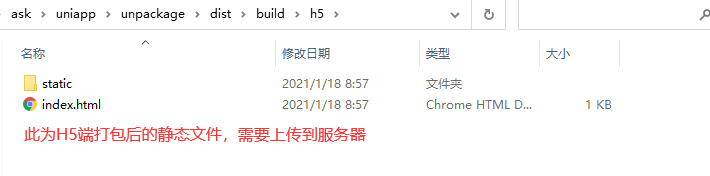
編譯成功后。在HBuilderX的控制臺會輸出:

#### 服務器安裝:
在你的項目的`根目錄/public`下新建一個目錄為`h5`(演示目錄,以實際項目為準),把剛剛打包好的`static`文件夾和`index.html`上傳到`h5`目錄下。
接著,我們需要設置偽靜態。保證可以正常的刷新或直接打開非首頁。
如果你用的是`nginx`,則其偽靜態為:
~~~bash
location /h5/ {
try_files $uri /h5/index.html;
}
location / {
if (!-e $request_filename){
rewrite ^(.*)$ /index.php?s=$1 last; break;
}
}
~~~
訪問路徑:`域名/h5/`
如果你用的是`apache`則其偽靜態為:
~~~apache
<IfModule mod_rewrite.c>
RewriteEngine On
RewriteBase /
RewriteCond %{REQUEST_FILENAME} !-d
RewriteCond %{REQUEST_FILENAME} !-f
RewriteRule ^h5/(.*) /h5/index.html [QSA,PT,L]
RewriteCond %{REQUEST_FILENAME} !-d
RewriteCond %{REQUEST_FILENAME} !-f
RewriteCond $1 !^(h5)
RewriteRule ^(.*)$ index.php?s=/$1 [QSA,PT,L]
</IfModule>
~~~
> ### 溫馨提示:配置完后記得重啟下服務。
>
## 2、路由模式為 hash,運行的基礎路徑為./
在HbuilderX打開`manifest.json`\->`h5配置`\->路由模式設置為`hash`,運行的基礎路徑填寫為`./`
如以下圖片所示:
點擊HBuilderx`工具欄`→`發行`→`網站-H5手機版(僅適用于uni-app)(H)`

請填寫您的網站標題 和 網站域名后點擊`發行`即可。

編譯成功后。在HBuilderX的控制臺會輸出:


#### 服務器安裝:
在項目的 根目錄/public 下新建一個目錄為h5(演示目錄,以實際項目為準),把剛剛打包好的static文件夾和index.html上傳到h5目錄下。
訪問路徑:`域名/h5/`
- 概述
- 安裝
- 配置
- 模板
- 標簽
- 全局標簽
- 文檔/文檔列表
- 專題/專題列表
- 欄目/欄目列表
- 公共參數
- 單頁/單頁列表
- 特殊標簽
- 欄目列表頁
- 分頁標簽
- 自定義字段
- ThinkPHP5標簽
- 自定義表單數據列表
- 自定義過濾條件
- 用戶信息
- 模板目錄
- API
- 小程序
- 控制器
- Archives.php
- Base.php
- Common.php
- Index.php
- My.php
- User.php
- 準備工作
- 導入項目
- 修改配置
- 測試數據
- 多語言
- 常見問題
- Uniapp版
- 1.準備工作
- 1.HbuilderX安裝
- 2.Hbuilder 插件安裝
- 2.導入項目
- 3.運行項目
- 1.運行前的配置
- 2.運行為H5
- 3.運行為微信小程序
- 4.運行為APP
- 4.項目發布
- 1.發布H5端
- 2.發布微信小程序
- 3.發布APP
- 5.登錄配置
- 6.常見問題
- 1.關于自定義導航欄切換閃爍問題
- 2.關于后臺移動端樣式預覽問題
- 3.關于支付配置的問題
- 4.前端跨域的問題
- 5.關于各端內容分享的問題
- 6.關于簽到問題
- 7.關于公眾號授權登錄問題
- 8.關于底部導航的追加或刪除問題
- 9.運行微信小程序,進入微信小程序客戶端后,沒有底部菜單
- 10.關于首頁焦點圖的修改
- 11.關于發布小程序代碼大小超出的問題
- 12.前端顯示空白或白屏或提示網絡請求錯誤的問題
- 13.關于如何在非tabbar配置頁面顯示tabbar導航
- 14.關于更換資訊頁為主頁的問題
- 15.關于更新1.4.4版本分包問題
- 16.Tabbar底部高亮顯示問題
- 17.微信小程序獲取手機號失敗
- 18.微信小程序從頁面側滑返回或按鍵返回時Tabbar丟失的問題
- 19.Tabbar底部不支持外部鏈接的修復方法
- API文檔
- 公共接口(Common)
- 文檔接口(Archives)
- 評論接口(Comment)
- 自定義表單(Diyform)
- 短信驗證碼(Sms)
- 郵箱驗證碼(Ems)
- 登錄/注冊(Login)
- 我的接口(My)
- 搜索文檔(Search)
- 標簽文檔(Tag)
- 日志中心(TheLogs)
- 會員中心(User)
- 專題接口(Special)
- 功能解說
- 自動內鏈
- 自定義表單
- 區塊管理
- 欄目管理
- 模型管理
- 偽靜態
- Sitemap
- 安全更新