
# GraphQL
## 駕馭 TypeScript 和 GraphQL 的強大功能
[<span style="color:red">GraphQL</span>](https://graphql.org/) 是一種用于 API 的強大查詢語言,是使用現有數據來完成這些查詢的運行時。這是一種優雅的方法,可以解決我們在典型REST APIs 中遇到的許多問題 。為了解背景,我們建議你閱讀一下 GraphQL 和 REST 之間的[<span style="color:red">比較</span>](https://dev-blog.apollodata.com/graphql-vs-rest-5d425123e34b) 。GraphQL 與 [<span style="color:red">TypeScript</span>](https://www.typescriptlang.org/) 相結合,能幫你在 GraphQL 查詢中開發出更好的類型安全性,從而為你提供端到端的輸入。
在本章中, 我們假設你對 GraphQL 已經有了基本的了解,我們將不解釋什么是 GraphQL, 而是重點介紹如何使用內置的 `@nestjs/graphql` 模塊。`GraphQLModule` 僅僅是 [<span style="color:red">Apollo</span>](https://www.apollographql.com) Server 的包裝器。我們沒有造輪子, 而是提供一個現成的模塊, 這讓 GraphQL 和 Nest 有了比較簡潔的融合方式。
### 安裝
首先,我們需要安裝以下依賴包:
~~~bash
# For Express and Apollo (default)
$ npm i @nestjs/graphql @nestjs/apollo graphql apollo-server-express
# For Fastify and Apollo
# npm i @nestjs/graphql @nestjs/apollo graphql apollo-server-fastify
# For Fastify and Mercurius
# npm i @nestjs/graphql @nestjs/mercurius graphql mercurius
~~~
> 如果你使用 Fastify,則安裝 `apollo-server-fastify`,替代安裝 `apollo-server-express`。
### 概述
Nest 提供了兩種構建 GraphQL 應用程序的方式,**模式優先**和**代碼優先**。你可以選擇一個適合自己的最佳方案。在 GraphQL 一章中的大部分章節將被分為兩個主要部分:一部分采用**代碼優先**,另一部分采用**模式優先**。
在**代碼優先**的方式中,你將僅使用裝飾器和 TypeScript 類來生成相應的 GraphQL schema。如果您更喜歡使用 TypeScript 來工作并想要避免語言語法之間的上下文切換,那這種方式會更有效。
**模式優先**的方式,本質是 GraphQL SDL(模式定義語言)。它以一種與語言無關的方式,基本允許您在不同平臺之間共享模式文件。此外,Nest 將根據GraphQL 模式(通過類或接口)自動生成 TypeScript 定義,以減少冗余。
### 入門
依賴包安裝完成后,我們就可以加載 `GraphQLModule` 并通過 `forRoot()` 靜態方法來配置它。
> app.module.ts
~~~typescript
import { Module } from '@nestjs/common';
import { GraphQLModule } from '@nestjs/graphql';
import { ApolloDriver, ApolloDriverConfig } from '@nestjs/apollo';
@Module({
imports: [
GraphQLModule.forRoot<ApolloDriverConfig>({
driver: ApolloDriver,
}),
],
})
export class AppModule {}
~~~
>**提示**:對于 `mercurius` 集成,您應該改用 `MercuriusDriver` 和 `MercuriusDriverConfig`。 兩者都是從 `@nestjs/mercurius` 包中導出的。
該 `.forRoot()` 函數將選項對象作為參數。這些選項將傳遞給底層的 Apollo 實例(請在[此處](https://www.apollographql.com/docs/apollo-server/v2/api/apollo-server.html#constructor-options-lt-ApolloServer-gt)閱讀有關可用設置的更多信息)。例如,如果要禁用`playground`并關閉`debug`模式,只需傳遞以下選項:
```typescript
import { Module } from '@nestjs/common';
import { GraphQLModule } from '@nestjs/graphql';
import { ApolloDriver } from '@nestjs/apollo';
@Module({
imports: [
GraphQLModule.forRoot<ApolloDriverConfig>({
driver: ApolloDriver,
debug: false,
playground: false,
}),
],
})
export class AppModule {}
```
如上所述,所有這些設置都將傳遞給`ApolloServer`構造函數。
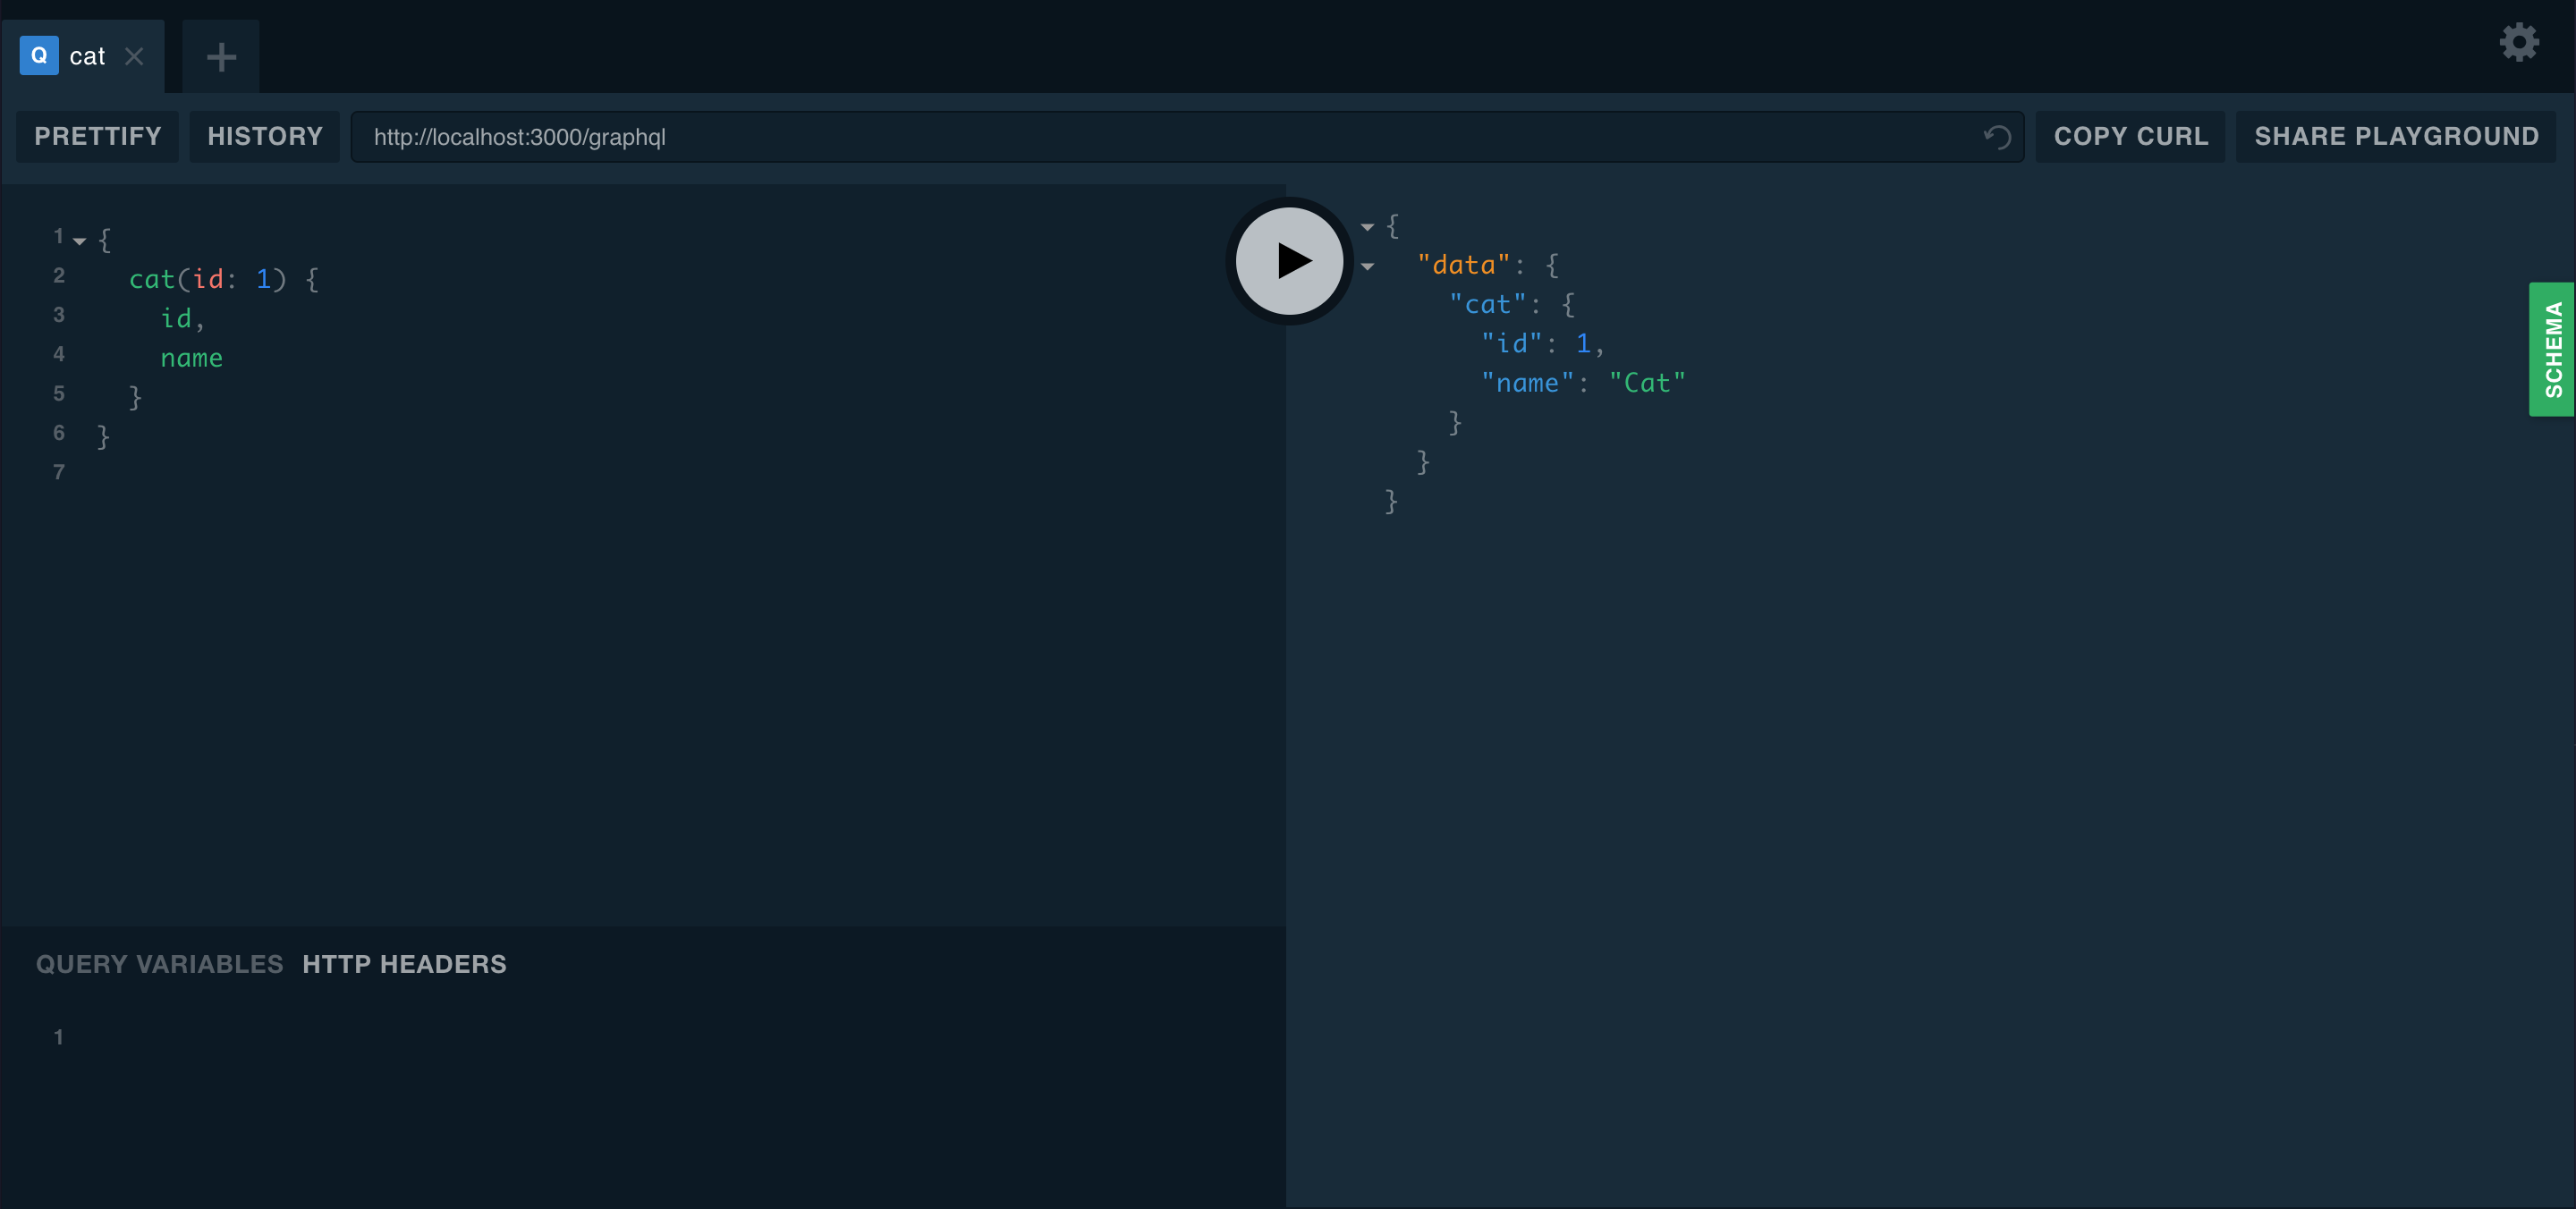
### GraphQL playground
`Playground` 是一個圖形化的,交互式的瀏覽器內 GraphQL IDE,默認情況下可與 GraphQL 服務器本身 URL 相同。為了進入 playground,你需要進行基礎的 GraphQL 服務配置并且運行它。現在看,你可以用這里的[示例代碼](https://github.com/nestjs/nest/tree/master/sample/23-graphql-code-first)進行安裝和構建。或者,如果你遵循這些代碼示例,一旦你完成了[解析器章節]()中的步驟,你就可以進入 `playground` 了。
當您的應用程序在后臺運行時,打開 Web 瀏覽器并訪問: `http://localhost:3000/graphql` (主機和端口可能因您的配置而異)。你將看到 `GraphQL playground`,如下所示。
>**筆記**:`@nestjs/mercurius` 集成不附帶內置的 `GraphQL Playground` 集成。 相反,您可以使用 GraphiQL(設置 `graphiql: true`)。
### 多個端點
該模塊的另一個有用功能是能夠同時為多個端點提供服務。多虧了這一點,您可以決定哪個模塊應該包含在哪個端點中。默認情況下,`GraphQL` 在整個應用程序中搜索解析器。要僅限制模塊的子集,可以使用該 `include` 屬性。
```typescript
GraphQLModule.forRoot({
include: [CatsModule],
}),
```
> 如果你在單個應用中使用具有多個 GraphQL 端點的 `apollo-server-fastify` 包,請確保在 GraphQLModule 配置中啟用 `disableHealthcheck` 設置。
<!-- tabs:start -->
#### ** 模式優先 **
使用模式優先的方式,首先要在配置對象中添加 `typePaths`屬性。該 `typePaths` 屬性指示 `GraphQLModule` 應該查找 GraphQL SDL schema 文件的位置。所有這些文件最終將合并到內存中,這意味著您可以將模式拆分為多個文件并將它們放在靠近解析器的位置。
```typescript
GraphQLModule.forRoot({
typePaths: ['./**/*.graphql'],
}),
```
你通常也需要有對應于 GraphQL SDL 類型的 TypeScripts 定義(類和接口)。手動創建相應的 TypeScript 定義是多余且乏味的。它讓我們沒有單一的事實來源-- SDL 中所做的每一次更改都迫使它們也調整 TypeScript 定義。為解決這個問題,該 `@nestjs/graphql` 包可以使用抽象語法樹([AST](https://en.wikipedia.org/wiki/Abstract_syntax_tree))**自動生成** TypeScript 定義。要啟用這個功能,只需在配置 `GraphQLModule`時 添加 `definitions` 屬性即可。
```typescript
GraphQLModule.forRoot({
typePaths: ['./**/*.graphql'],
definitions: {
path: join(process.cwd(), 'src/graphql.ts'),
},
}),
```
`defintions` 對象中的 path 屬性,指示在哪里保存生成的 TypeScript 輸出文件。默認情況下,所有生成的 TypeScript 被轉換為接口類型。若要轉換為類,則要將 `outputAs` 屬性指定為 `class`。
```typescript
GraphQLModule.forRoot({
typePaths: ['./**/*.graphql'],
definitions: {
path: join(process.cwd(), 'src/graphql.ts'),
outputAs: 'class',
},
}),
```
每次應用程序啟動時,上述方式都會自動生成 TypeScript 定義。或者,構建一個簡單的腳本來按需生成這些定義會更好。舉例來說,假設我們創建如下的腳本 `generate-typings.ts`:
```typescript
import { GraphQLDefinitionsFactory } from '@nestjs/graphql';
import { join } from 'path';
const definitionsFactory = new GraphQLDefinitionsFactory();
definitionsFactory.generate({
typePaths: ['./src/**/*.graphql'],
path: join(process.cwd(), 'src/graphql.ts'),
outputAs: 'class',
});
```
現在你可以按需運行此腳本:
```bash
$ ts-node generate-typings
```
?> 您也可以預先編譯腳本(例如,使用 `tsc`)并使用 `node` 去執行它。
當需要切換到文件監聽模式(當任何 `.graphql` 文件更改時自動生成類型定義),將 `watch` 選項傳遞給 `generate()` 方法。
```typescript
definitionsFactory.generate({
typePaths: ['./src/**/*.graphql'],
path: join(process.cwd(), 'src/graphql.ts'),
outputAs: 'class',
watch: true,
});
```
要為每個對象類型自動生成額外的 `__typename` 字段,需開啟 `emitTypenameField` 選項。
```typescript
definitionsFactory.generate({
// ...,
emitTypenameField: true,
});
```
要將解析器(查詢、變更、訂閱)生成不帶參數的普通字段,需開啟 `skipResolverArgs` 選項。
```typescript
definitionsFactory.generate({
// ...,
skipResolverArgs: true,
});
```
[這里](https://github.com/nestjs/nest/tree/master/sample/12-graphql-apollo) 提供完整的例子。
#### ** 代碼優先 **
要使用模式優先方法,首先將 typePaths 屬性添加到選項對象。 typePaths 屬性指示 GraphQLModule 應在何處查找您將要編寫的 GraphQL SDL 模式定義文件。 這些文件將在內存中合并; 這允許您將架構拆分為多個文件并將它們定位在它們的解析器附近。
在代碼優先方式中,您將只使用裝飾器和 TypeScript 類來生成相應的 `GraphQL schema`。
使用代碼優先方式,首先要在配置對象里添加 `autoSchemaFile` 這個屬性:
```typescript
GraphQLModule.forRoot({
autoSchemaFile: join(process.cwd(), 'src/schema.gql'),
}),
```
這里 `autoSchemaFile` 屬性值是您自動生成的 schema 文件將被創建的路徑。或者,schema 也可以被實時創建在內存里。要開啟它,需要設置 `autoSchemaFile` 屬性為 `true`:
```typescript
GraphQLModule.forRoot({
autoSchemaFile: true,
}),
```
默認情況下,生成的 schema 中的類型將按照它們在包含的模塊中定義的順序。要按照字典順序對 schema 進行排序,需設置 `sortSchema` 屬性為 `true`。
```typescript
GraphQLModule.forRoot({
autoSchemaFile: join(process.cwd(), 'src/schema.gql'),
sortSchema: true,
}),
```
上述方法在應用程序每次啟動時動態生成 TypeScript 定義。或者,最好構建一個簡單的腳本來按需生成這些腳本。例如,假設我們創建以下腳本`generate-typings.ts`:
~~~typescript
import { GraphQLDefinitionsFactory } from '@nestjs/graphql';
import { join } from 'path';
const definitionsFactory = new GraphQLDefinitionsFactory();
definitionsFactory.generate({
typePaths: ['./src/**/*.graphql'],
path: join(process.cwd(), 'src/graphql.ts'),
outputAs: 'class',
});
~~~
現在您可以按需運行此腳本:
~~~bash
$ ts-node generate-typings
~~~
>您可以預先編譯腳本(例如,使用`tsc`)并使用`node`它來執行它。
`.graphql`要為腳本啟用監視模式(以在任何文件更改時自動生成類型),請將`watch`選項傳遞給該`generate()`方法。
~~~typescript
definitionsFactory.generate({
typePaths: ['./src/**/*.graphql'],
path: join(process.cwd(), 'src/graphql.ts'),
outputAs: 'class',
watch: true,
});
~~~
`__typename`要為每種對象類型自動生成附加字段,請啟用該`emitTypenameField`選項。
~~~typescript
definitionsFactory.generate({
// ...,
emitTypenameField: true,
});
~~~
要將解析器(查詢、突變、訂閱)生成為不帶參數的普通字段,請啟用該`skipResolverArgs`選項。
~~~typescript
definitionsFactory.generate({
// ...,
skipResolverArgs: true,
});
~~~
[這里](https://github.com/nestjs/nest/tree/master/sample/23-graphql-code-first)提供代碼優先的完整例子。
### Apollo Sandbox (阿波羅沙盒)[#](#apollo-sandbox)
要使用[Apollo Sandbox](https://www.apollographql.com/blog/announcement/platform/apollo-sandbox-an-open-graphql-ide-for-local-development/)而不是`graphql-playground`GraphQL IDE 進行本地開發,請使用以下配置:
~~~typescript
import { ApolloDriver, ApolloDriverConfig } from '@nestjs/apollo';
import { Module } from '@nestjs/common';
import { GraphQLModule } from '@nestjs/graphql';
import { ApolloServerPluginLandingPageLocalDefault } from 'apollo-server-core';
@Module({
imports: [
GraphQLModule.forRoot<ApolloDriverConfig>({
driver: ApolloDriver,
playground: false,
plugins: [ApolloServerPluginLandingPageLocalDefault()],
}),
],
})
export class AppModule {}
~~~
#### 示例[#](https://docs.nestjs.com/graphql/quick-start#example-1)
[此處](https://github.com/nestjs/nest/tree/master/sample/12-graphql-schema-first)提供了一個完整工作的模式第一個示例。
<!-- tabs:end -->
### 訪問生成的 schema
在某些情況下(例如端到端的測試),你可能希望引用生成的 schema 對象。在端到端的測試中,你可以使用 `graphql` 對象運行查詢,而無需使用任何 HTTP 監聽器。
你可以使用 `GraphQLSchemaHost` 類,訪問生成的 schema(無論是代碼優先還是模式優先方式)。
```typescript
const { schema } = app.get(GraphQLSchemaHost);
```
> 你必須在應用初始化之后(在 `onModuleInit` 鉤子被 `app.listen()` 或 `app.init()` 方法觸發之后)才能調用 `GraphQLSchemaHost` 的 getter 方法。
### 異步配置
當你需要異步而不是靜態地傳遞模塊選項時,請使用 `forRootAsync()` 方法。與大多數動態模塊一樣,Nest 提供了多種技術來處理異步配置。
第一種技術是使用工廠函數:
~~~typescript
GraphQLModule.forRootAsync<ApolloDriverAsyncConfig>({
driver: ApolloDriver,
useFactory: () => ({
typePaths: ['./**/*.graphql'],
}),
}),
~~~
像其他工廠提供者一樣,我們的工廠函數可以是[異步](https://docs.nestjs.com/fundamentals/custom-providers#factory-providers-usefactory)的, 并且能夠通過 `inject` 注入依賴關系。
~~~typescript
GraphQLModule.forRootAsync<ApolloDriverAsyncConfig>({
driver: ApolloDriver,
imports: [ConfigModule],
useFactory: async (configService: ConfigService) => ({
typePaths: configService.getString('GRAPHQL_TYPE_PATHS'),
}),
inject: [ConfigService],
}),
~~~
另外,你也可以在配置 `GraphQLModule` 時用類替代工廠,如下所示:
~~~typescript
GraphQLModule.forRootAsync<ApolloDriverAsyncConfig>({
driver: ApolloDriver,
useClass: GqlConfigService,
}),
~~~
上面的構造將在 `GraphQLModule` 內部實例化 `GqlConfigService` , 并將利用它來創建選項對象。注意在這個例子中,`GqlConfigService` 必須實現 `GqlOptionsFactory` 接口,如下所示。該 `GraphQLModule` 模塊將在提供的類實例化對象上調用 `createGqlOptions()` 方法。
~~~typescript
@Injectable()
class GqlConfigService implements GqlOptionsFactory {
createGqlOptions(): ApolloDriverConfig {
return {
typePaths: ['./**/*.graphql'],
};
}
}
~~~
如果你想重用現有的選項提供者而不是在 `GraphQLModule` 內創建私有副本,請使用 `useExisting` 語法。
```typescript
GraphQLModule.forRootAsync({
imports: [ConfigModule],
useExisting: ConfigService,
}),
```
### 整合Mercurius
除了使用 Apollo,Fastify 用戶([在此處](https://docs.nestjs.com/techniques/performance)閱讀更多內容)也可以使用`@nestjs/mercurius`驅動程序。
~~~typescript
import { Module } from '@nestjs/common';
import { GraphQLModule } from '@nestjs/graphql';
import { MercuriusDriver, MercuriusDriverConfig } from '@nestjs/mercurius';
@Module({
imports: [
GraphQLModule.forRoot<MercuriusDriverConfig>({
driver: MercuriusDriver,
graphiql: true,
}),
],
})
export class AppModule {}
~~~
> **提示**:應用程序運行后,打開瀏覽器并導航到`http://localhost:3000/graphiql`.您應該會看到[`GraphQL IDE`](https://github.com/graphql/graphiql)。
該`forRoot()`方法將選項對象作為參數。這些選項被傳遞到底層驅動程序實例。[在此處](https://github.com/mercurius-js/mercurius/blob/master/docs/api/options.md#plugin-options)閱讀有關可用設置的更多信息。
- 介紹
- 概述
- 第一步
- 控制器
- 提供者
- 模塊
- 中間件
- 異常過濾器
- 管道
- 守衛
- 攔截器
- 自定義裝飾器
- 基礎知識
- 自定義提供者
- 異步提供者
- 動態模塊
- 注入作用域
- 循環依賴
- 模塊參考
- 懶加載模塊
- 應用上下文
- 生命周期事件
- 跨平臺
- 測試
- 技術
- 數據庫
- Mongo
- 配置
- 驗證
- 緩存
- 序列化
- 版本控制
- 定時任務
- 隊列
- 日志
- Cookies
- 事件
- 壓縮
- 文件上傳
- 流式處理文件
- HTTP模塊
- Session(會話)
- MVC
- 性能(Fastify)
- 服務器端事件發送
- 安全
- 認證(Authentication)
- 授權(Authorization)
- 加密和散列
- Helmet
- CORS(跨域請求)
- CSRF保護
- 限速
- GraphQL
- 快速開始
- 解析器(resolvers)
- 變更(Mutations)
- 訂閱(Subscriptions)
- 標量(Scalars)
- 指令(directives)
- 接口(Interfaces)
- 聯合類型
- 枚舉(Enums)
- 字段中間件
- 映射類型
- 插件
- 復雜性
- 擴展
- CLI插件
- 生成SDL
- 其他功能
- 聯合服務
- 遷移指南
- Websocket
- 網關
- 異常過濾器
- 管道
- 守衛
- 攔截器
- 適配器
- 微服務
- 概述
- Redis
- MQTT
- NATS
- RabbitMQ
- Kafka
- gRPC
- 自定義傳輸器
- 異常過濾器
- 管道
- 守衛
- 攔截器
- 獨立應用
- Cli
- 概述
- 工作空間
- 庫
- 用法
- 腳本
- Openapi
- 介紹
- 類型和參數
- 操作
- 安全
- 映射類型
- 裝飾器
- CLI插件
- 其他特性
- 遷移指南
- 秘籍
- CRUD 生成器
- 熱重載
- MikroORM
- TypeORM
- Mongoose
- 序列化
- 路由模塊
- Swagger
- 健康檢查
- CQRS
- 文檔
- Prisma
- 靜態服務
- Nest Commander
- 問答
- Serverless
- HTTP 適配器
- 全局路由前綴
- 混合應用
- HTTPS 和多服務器
- 請求生命周期
- 常見錯誤
- 實例
- 遷移指南
- 發現
- 誰在使用Nest?