## 3.2.1\. 強制推送
細心的讀者可能從圖3-4已經看出,顯示的提交者并非gotgithub用戶,而是一個名為ossxp-com的用戶,這是因為GitHub是通過提交中的郵件地址來對應到GitHub用戶的。看看提交說明:
~~~
$ git log --pretty=fuller
commit 92dee9b8125afc9a606394ed463f9f264f2d3d58
Author: Jiang Xin
AuthorDate: Wed Dec 14 14:52:40 2011 +0800
Commit: Jiang Xin
CommitDate: Wed Dec 14 14:52:40 2011 +0800
README for this project.
~~~
原來提交用戶設置的郵件地址并非gotgithub用戶設置的郵件地址。補救辦法就是對此提交進行修改,然后強制推送到GitHub。
* 重新設置user.name和user.email配置變量。
因為gotgithub是一個僅在本書使用的示例賬號,我可不想影響本地其他項目的提交,因此下面的設置命令沒有使用--global參數,只對本地helloworld版本庫進行設置。
~~~
$ git config user.name "Jiang Xin"
$ git config user.email "gotgithub@gmail.com"
~~~
* 執行Git修補提交命令。
注意使用參數--reset-author會將提交信息中的屬性Author連同AuthorDate一并修改,否則只修改Commit和CommitDate。參數-C?HEAD維持提交說明不變。
~~~
$ git commit --amend --reset-author -C HEAD
~~~
* 查看提交日志,發現提交者信息和作者信息都已經更改。
~~~
$ git log --pretty=fuller
commit e1e52d99fa71fd6f606903efa9da04fd0055fca9
Author: Jiang Xin
AuthorDate: Wed Dec 14 15:05:47 2011 +0800
Commit: Jiang Xin
CommitDate: Wed Dec 14 15:05:47 2011 +0800
README for this project.
~~~
* 直接推送會報錯。
錯誤信息中出現non-fast-forword(非快進式推送),含義為要推送的提交并非繼遠程版本庫最新提交之后的提交,推送會造成覆蓋導致服務器端有數據(提交)會丟失。
~~~
$ git push
To git@github.com:gotgithub/helloworld.git
! [rejected] master -> master (non-fast-forward)
error: failed to push some refs to 'git@github.com:gotgithub/helloworld.git'
To prevent you from losing history, non-fast-forward updates were rejected
Merge the remote changes (e.g. 'git pull') before pushing again. See the
'Note about fast-forwards' section of 'git push --help' for details.
~~~
* 使用強制推送。
對于此例,考慮到還沒有其他人關注helloworld這個剛剛建立的示例項目,顯然不需要向上面命令的錯誤信息所提示的那樣先執行git?pull合并上游版本庫再推送,而是選擇強制推送,以新的修補提交覆蓋包含錯誤提交者ID的提交。
~~~
$ git push -f
Counting objects: 3, done.
Delta compression using up to 2 threads.
Compressing objects: 100% (2/2), done.
Writing objects: 100% (3/3), 629 bytes, done.
Total 3 (delta 0), reused 0 (delta 0)
To git@github.com:gotgithub/helloworld.git
+ 92dee9b...e1e52d9 master -> master (forced update)
~~~
完成強制推送后,再查看GitHub項目頁面,會發現提交者已經顯示為gotgithub用戶。如圖3-7所示。
[](https://box.kancloud.cn/2015-07-09_559de2a491e91.png)
圖3-7:強制更新后,提交者已更改
## 3.2.2\. 新建分支
Git的分支就是保存在`.git/refs/heads/`命名空間下的引用。引用文件的內容是該分支對應的提交ID。當前版本庫中的默認分支master就對應于文件`.git/refs/heads/master`。
若在GitHub版本庫中創建分支,首先要在本地版本庫中創建新的分支(即引用),然后用推送命令將本地創建的新的引用連同所指向的提交推送到GitHub版本庫中完成GitHub上分支的創建。操作如下:
* 本地版本庫中建立新分支mybranch1。
創建分支有多種方法,如使用git?branch命令,但最為便捷的就是git?checkout-b命令,同時完成新分支的創建和分支切換。
~~~
$ git checkout -b mybranch1
Switched to a new branch 'mybranch1'
~~~
* 為了易于識別,添加一個新文件hello1,并提交。
~~~
$ touch hello1
$ git add hello1
$ git commit -m "add hello1 for mark."
[mybranch1 f46a284] add hello1 for mark.
0 files changed, 0 insertions(+), 0 deletions(-)
create mode 100644 hello1
~~~
* 通過推送命令,將本地分支mybranch1推送到GitHub遠程版本庫,完成在GitHub上的新分支創建。
~~~
$ git push -u origin mybranch1
Counting objects: 4, done.
Delta compression using up to 2 threads.
Compressing objects: 100% (2/2), done.
Writing objects: 100% (3/3), 281 bytes, done.
Total 3 (delta 0), reused 0 (delta 0)
To git@github.com:gotgithub/helloworld.git
* [new branch] mybranch1 -> mybranch1
Branch mybranch1 set up to track remote branch mybranch1 from origin.
~~~
在GitHub上查看版本庫,會看到新增了一個分支mybranch1,不過默認分支仍為master,如圖3-8所示。
[](https://box.kancloud.cn/2015-07-09_559de2ab6292a.png)
圖3-8:版本庫新增了一個分支
## 3.2.3\. 設置默認分支
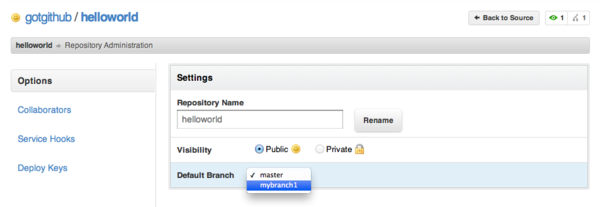
可以改變GitHub上版本庫顯示的默認分支,如果版本庫包含多個分支的話。例如修改版本庫的默認分支為mybranch1,點擊項目名稱旁邊的“Admin”按鈕,修改項目的默認分支。如圖3-9所示。
[](https://box.kancloud.cn/2015-07-09_559de2ae7d6f5.png)
圖3-9:設置缺省分支
設置了GitHub默認分支后,如果再從GitHub克隆版本庫,本地克隆后版本庫的默認分支也將改變。
~~~
$ git clone git@github.com:gotgithub/helloworld.git helloworld-nb
Cloning into 'helloworld-nb'...
remote: Counting objects: 6, done.
remote: Compressing objects: 100% (4/4), done.
remote: Total 6 (delta 0), reused 6 (delta 0)
Receiving objects: 100% (6/6), done.
$ cd helloworld-nb
$ git branch
* mybranch1
~~~
實際上修改GitHub上版本庫的默認分支,就是將GitHub版本庫的頭指針HEAD指向了其他分支,如mybranch1分支。這可以從下面命令看出。
~~~
$ git branch -r
origin/HEAD -> origin/mybranch1
origin/master
origin/mybranch1
~~~
也可以從git?ls-remote命令看出頭指針HEAD和引用refs/heads/mybranch1指向同一個對象的哈希值。
~~~
$ git ls-remote
From git@github.com:gotgithub/helloworld.git
f46a28484adb6c1b4830eb4df582325c740e9d6c HEAD
e1e52d99fa71fd6f606903efa9da04fd0055fca9 refs/heads/master
f46a28484adb6c1b4830eb4df582325c740e9d6c refs/heads/mybranch1
~~~
## 3.2.4\. 刪除分支
刪除當前工作分支會報錯。例如下面的命令試圖分支mybranch1,但沒有成功:
~~~
$ git branch -d mybranch1
error: Cannot delete the branch 'mybranch1' which you are currently on.
~~~
錯誤信息顯示不能刪除當前工作分支。因此先切換到其他分支,例如從GitHub版本庫中取出master分支并切換。
~~~
$ git checkout master
~~~
可以看出新的工作分支為master分支。
~~~
$ git branch
* master
mybranch1
~~~
現在可以刪除mybanch1分支。下面的命令之所以使用-D參數,而非-d參數,是因為Git在刪除分支時為避免數據丟失,默認禁止刪除尚未合并的分支。參數-D則可強制刪除尚未合并的分支。
~~~
$ git branch -D mybranch1
Deleted branch mybranch1 (was f46a284).
~~~
現在只是本地分支被刪除了,遠程GitHub服務器上的mybranch1分支尚在。刪除遠程GitHub版本庫中的分支就不能使用git?branch命令,而是要使用git?push命令,不過在使用推送分支命令時要使用一個特殊的引用表達式(冒號前為空)。如下:
~~~
$ git push origin :mybranch1
remote: error: refusing to delete the current branch: refs/heads/mybranch1
To git@github.com:gotgithub/helloworld.git
! [remote rejected] mybranch1 (deletion of the current branch prohibited)
error: failed to push some refs to 'git@github.com:gotgithub/helloworld.git'
~~~
為什么刪除遠程分支出錯了呢?是因為沒有使用強制推送么?
實際上即使使用強制推送也會遇到上面的錯誤。GitHub發現要刪除的mybranch1分支是遠程版本庫的缺省分支,因而禁止刪除。重新訪問GitHub的項目管理頁面,將缺省分支設置回master分支,參照圖3-9。然后再次執行如下命令,即可成功刪除分支。
~~~
$ git push origin :mybranch1
To git@github.com:gotgithub/helloworld.git
- [deleted] mybranch1
~~~
執行git?ls-remote命令可以看到GitHub遠程版本庫已經不存在分支mybranch1。
~~~
$ git ls-remote git@github.com:gotgithub/helloworld.git
From git@github.com:gotgithub/helloworld.git
e1e52d99fa71fd6f606903efa9da04fd0055fca9 HEAD
e1e52d99fa71fd6f606903efa9da04fd0055fca9 refs/heads/master
~~~
## 3.2.5\. 里程碑管理
里程碑即tag,其管理和分支管理非常類似。里程碑和分支一樣也是以引用的形式存在的,保存在.git/refs/tags/路徑下。引用可能指向一個提交,但也可能是其他類型(Tag對象)。
* 輕量級里程碑:用git?tag??[]?命令創建,引用直接指向一個提交對象。
* 帶說明的里程碑:用git?tag?-a??[]?命令創建,并且在創建時需要提供創建里程碑的說明。Git會創建一個tag對象保存里程碑說明、里程碑的指向、創建里程碑的用戶等信息,里程碑引用指向該Tag對象。
* 帶簽名的里程碑:用git?tag?-s??[]?命令創建。是在帶說明的里程碑的基礎上引入了PGP簽名,保證了所創建的里程碑的完整性和不可拒絕性。
下面演示一下里程碑的創建和管理。
* 先在本地創建一個新提交。
~~~
$ touch hello1
$ git add hello1
$ git commit -m "add hello1 for mark."
~~~
* 本地創建里程碑mytag1、mytag2和mytag3。
~~~
$ git tag -m "Tag on initial commit" mytag1 HEAD^
$ git tag -m "Tag on new commit" mytag2
$ git tag mytag3
~~~
* 查看新建立的里程碑。
~~~
$ git tag -l -n1
mytag1 Tag on initial commit
mytag2 Tag on new commit
mytag3 add hello1 for mark.
~~~
* 將本地里程碑推送到GitHub遠程版本庫。
~~~
$ git push origin refs/tags/*
Counting objects: 6, done.
Delta compression using up to 2 threads.
Compressing objects: 100% (4/4), done.
Writing objects: 100% (5/5), 548 bytes, done.
Total 5 (delta 0), reused 0 (delta 0)
To git@github.com:gotgithub/helloworld.git
* [new tag] mytag1 -> mytag1
* [new tag] mytag2 -> mytag2
* [new tag] mytag3 -> mytag3
~~~
* 刪除本地里程碑。
~~~
$ git tag -d mytag3
Deleted tag 'mytag3' (was c71231c)
~~~
* 刪除GitHub遠程版本庫中的里程碑。
~~~
$ git push origin :mytag3
To git@github.com:gotgithub/helloworld.git
[deleted] mytag3
~~~
此時查看GitHub上的項目頁,會看到已有兩個里程碑,如圖3-10所示。
[](https://box.kancloud.cn/2015-07-09_559de2afeabd7.png)
圖3-10:里程碑列表
- 前言
- 1. 探索GitHub
- 1.1. 什么是GitHub
- 1.2. GitHub亮點
- 1.3. 探索GitHub
- 2. 加入GitHub
- 2.1. 創建GitHub賬號
- 2.2. 瀏覽托管項目
- 2.3. 社交網絡
- 3. 項目托管
- 3.1. 創建新項目
- 3.2. 操作版本庫
- 3.3. 公鑰認證管理
- 3.4. 版本庫鉤子擴展
- 3.5. 建立主頁
- 4. 工作協同
- 4.1. Fork + Pull模式
- 4.2. 共享版本庫
- 4.3. 組織和團隊
- 4.4. 代碼評注
- 4.5. 缺陷跟蹤
- 4.6. 維基
- 5. 付費服務
- 5.1. GitHub收費方案
- 5.2. GitHub企業版
- 6. GitHub副產品
- 6.1. GitHub:Gist
- 6.2. 其他版本控制工具支持
- 6.3. 客戶端工具
- 6.4. 其他
- 7. 附錄:輕量級標記語言
- 貢獻者列表
