
在GitHub網站的導航條上就有Gist子網站的鏈接:?[https://gist.github.com/](https://gist.github.com/)?,在本節我們就揭開其面紗。
[](https://box.kancloud.cn/2015-07-09_559de645bc10a.png)
圖6-1:GitHub上的Gist鏈接
Gist作為一個粘貼數據的工具,就像 Pastie 網站[[1]](http://pastie.org/)一樣,可以很容易地將數據粘貼在Gist網站中,并在其他網頁中引用Gist中粘貼的數據。作為GitHub的一個子網站,很自然地,Gist使用Git版本庫對粘貼數據進行維護,這非常酷。
## 6.1.1\. 數據的粘貼和引用
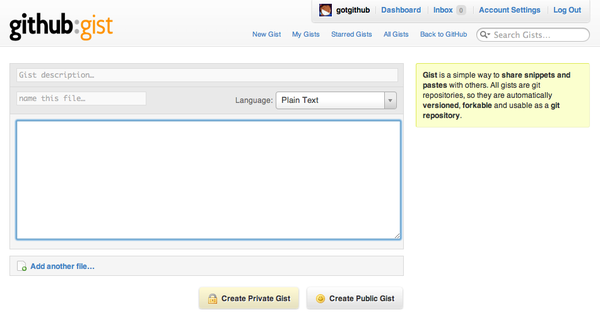
進入Gist網站的首頁,就會看到一個大大的數據粘貼對話框,如圖6-2所示。
[](https://box.kancloud.cn/2015-07-09_559de6474a0d2.png)
圖6-2:Gist網站首頁
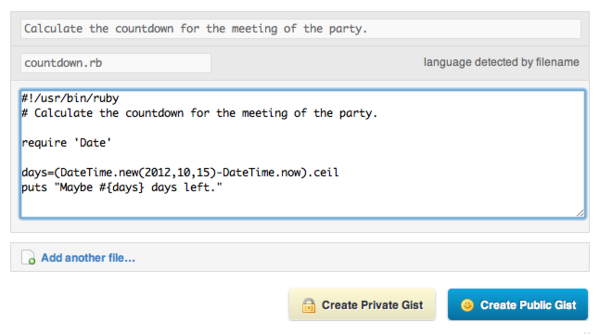
只要提供一行簡單的描述、文件名,并粘貼文件內容,即可創建一個新的粘貼。創建新的粘貼時,如果不指定文件名,將由系統自動指派。如圖6-3所示。
[](https://box.kancloud.cn/2015-07-09_559de6487345c.png)
圖6-3:創建新的Gist
每一個新的粘貼稱為一個Gist,并擁有唯一的URL。如果選擇創建公開的Gist,URL中將使用順序遞增的ID號,如本例創建的Gist的URL地址為:[https://gist.github.com/1202870](https://gist.github.com/1202870)。
若選擇創建私有Gist,URL中則采用20位十六進制數字的ID,例如私密Gist:[https://gist.github.com/78d67164131ec9e08dfe](https://gist.github.com/78d67164131ec9e08dfe)。需要指出的是,私有Gist的私密性并不像GitHub私有版本庫的私密性那么強,只是其URL沒有在用戶Gist列表中列出,也不能通過Gist網站搜索到而已。如果用戶知道某私密Gist的URL地址,同樣可以訪問、克隆該私密Gist,甚至創建基于該Gist創建分支(fork)。
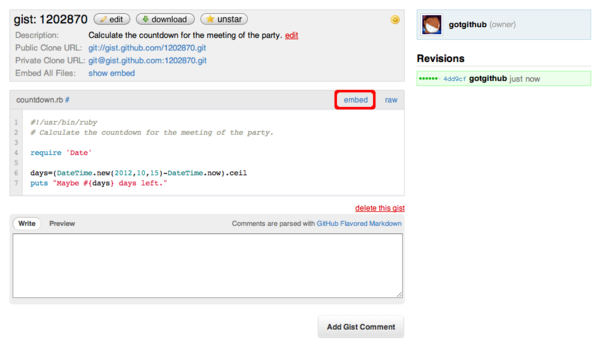
當一個粘貼創建完畢后,會顯示新建立的Gist頁面,如圖6-4所示。
[](https://box.kancloud.cn/2015-07-09_559de64c9de03.png)
圖6-4:新創建的Gist
點擊其中的“embed”(嵌入)按鈕,就會顯示一段用于嵌入其他網頁的JavaScript代碼,如圖6-5所示。
[](https://box.kancloud.cn/2015-07-09_559de64ee275a.png)
圖6-5:顯示嵌入Java
對應的嵌入JavaScript代碼如下:
~~~
<script src="https://gist.github.com/1202870.js?file=countdown.rb"></script>
~~~
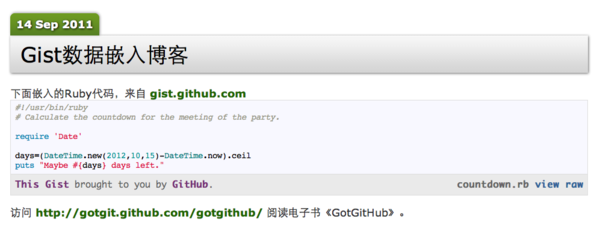
將上面的JavaScript代碼嵌入到網頁(如博客[[2]](http://www.worldhello.net/2011/09/14/2521.html))中,即可在相應的網頁中嵌入來自Gist的數據,并保持語法加亮等功能,如圖6-6所示。
[](https://box.kancloud.cn/2015-07-09_559de6548b006.png)
圖6-6:博客中引用Gist數據
## 6.1.2\. Gist背后的Git庫
創建的每一個Gist的背后都對應著一個Git版本庫。例如之前創建的ID為1202870的Gist對應的Git版本庫,可以使用兩種協議進行訪問:
* Git協議:git://gist.github.com/1202870.git
* SSH協議:git@gist.github.com:1202870.git
可以通過Git命令克隆和操作該版本庫。
* 克隆該Gist對應的版本庫。
~~~
$ git clone git@gist.github.com:1202870.git
$ cd 1202870
~~~
* 查看修改日志。每一次對Gist中文件的修改對應于一次提交。
~~~
$ git log
commit 993d28a1319eca314ab2e3f4c46882cf328e5ff9
Author: GotGitHub <gotgithub@gmail.com>
Date: Thu Sep 15 15:41:10 2011 +0800
commit 4dd9cfd54e1522d0b62d92dd5f705a61e3fe8778
Author: GotGitHub <gotgithub@gmail.com>
Date: Thu Sep 8 00:46:50 2011 -0700
~~~
* 查看最近一次更改。
~~~
$ git show HEAD
commit 993d28a1319eca314ab2e3f4c46882cf328e5ff9
Author: GotGitHub <gotgithub@gmail.com>
Date: Thu Sep 15 15:41:10 2011 +0800
diff --git a/countdown.rb b/countdown.rb
index a9d747b..9045738 100644
--- a/countdown.rb
+++ b/countdown.rb
@@ -4,4 +4,8 @@
require 'Date'
days=(DateTime.new(2012,10,15)-DateTime.now).ceil
-puts "Maybe #{days} days left."
\ No newline at end of file
+if days >= 0
+ puts "Maybe #{days} days left."
+else
+ puts "Passed for #{days.abs} days."
+end
\ No newline at end of file
~~~
Gist網站并沒有像GitHub網站那樣對于Git版本庫提供完整的、近乎復雜的操作界面和工作流支持,而只提供了最基本的操作界面。如圖6-7所示。
[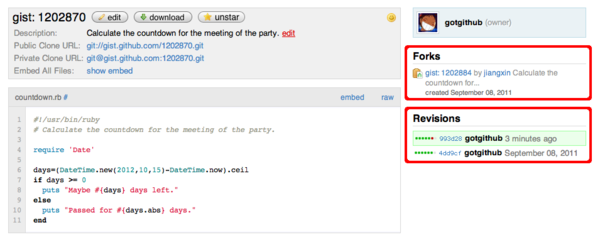](https://box.kancloud.cn/2015-07-09_559de6558578a.png)
圖6-7:Gist版本庫簡易操作界面
在這個簡易的Git版本庫操作界面中,左側是版本庫的簡介、文件預覽以及在線編輯、下載、加注星標(對感興趣的Gist進行收藏,參見博客?[https://github.com/blog/673-starring-gists](https://github.com/blog/673-starring-gists))、版本庫分支(訪問他人創建的Gist時,提供分支功能按鈕。)等相關操作按鈕。若以Gist創建者登錄,會在右側看到他人基于該Gist創建分支的情況,但是并不提供GitHub才有的Pull Request等功能。在界面的右側還顯示了Gist修訂歷史,和之前通過git?log命令從Git版本庫看到的一樣。
## 6.1.3\. Greasemonkey
Gist除了被用于粘貼數據(如代碼塊)并在網頁中引用之外,還被用戶挖掘出了新的應用模式,例如用作Greasemonkey腳本的維護[[5]](https://github.com/blog/302-gist-for-greasemonkey)。
Greasemonkey[[6]](https://addons.mozilla.org/en-US/firefox/addon/greasemonkey/)或類似插件為瀏覽器提供用戶端JavaScript擴展功能,最早出現于FireFox瀏覽器中。其他瀏覽器也陸續增加了對用戶端JavaScript的支持,如Safari的 NinjaKit[[7]](http://ss-o.net/safari/extension/NinjaKit.safariextz)插件,IE的Trixie[[8]](http://www.bhelpuri.net/Trixie/)插件,以及Chrome的Greasemetal插件(版本4之后的Chrome內置了Greasemonkey類似功能,無需額外插件。)。關于如何在瀏覽器中安裝并啟用相應的插件,參照相關插件網站的介紹,在此不做過多敘述。
當瀏覽器安裝了 Greasemonkey 或類似插件之后,當訪問擴展名為.user.js的URL時,會將該URL指向的JavaScript腳本安裝在瀏覽器中,當訪問指定的網址時會自動調用相應的JavaScript腳本,修改相關網頁內容或添加特效等等。
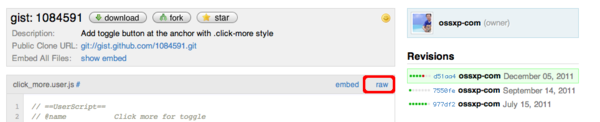
我針對《Git權威指南》官網的測試網頁寫了一個Greasemonkey示例腳本,可以展示用戶端JavaScript的魔法,這個用戶端JavaScript腳本保存在Gist中:[https://gist.github.com/1084591](https://gist.github.com/1084591),如圖6-8所示。
[](https://box.kancloud.cn/2015-07-09_559de6566030c.png)
圖6-8:保存Greasemonkey用戶端腳本的Gist
該Greasemonkey腳本的文件名為click_more.user.js,該文件的文件頭使用特殊的注釋語句為Greasemonkey提供相關的安裝和注冊信息,內容如下(為方便描述添加了行號):
~~~
1 // ==UserScript==
2 // @name Click more for toggle
3 // @namespace gotgit
4 // @description Add a toogle effect at the location where anchor with a click-more css.
5 // @include http://www.worldhello.net/gotgit/demo*
6 // @include http://gotgit.github.com/gotgit/demo*
7 // @include http://www.ossxp.com/doc/gotgit/demo*
8 // @require http://code.jquery.com/jquery-1.6.2.min.js
9 // ==/UserScript==
~~~
其中第5、6、7行三條include語句限定了此用戶端JavaScript腳本的應用范圍,即只針對指定的URL(使用通配符)執行該腳本。第8行設定腳本依賴,即該腳本依賴jQuery,會在運行前到指定的URL地址加載jQuery腳本。
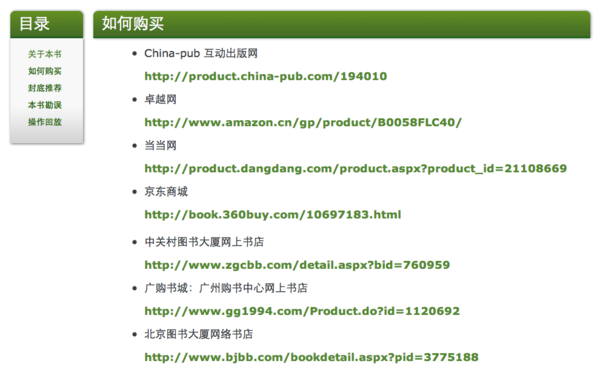
在安裝該腳本前,先用瀏覽器訪問網址[http://www.worldhello.net/gotgit/demo.html](http://www.worldhello.net/gotgit/demo.html),看看不加載用戶端JavaScript腳本時網頁的模樣。該網頁中包含一個長長的網上書店列表,如圖6-9所示。
[](https://box.kancloud.cn/2015-07-09_559de658518b9.png)
圖6-9:應用用戶端JavaScript腳本前的網頁內容
接下來開始安裝該用戶端JavaScript腳本。安裝非常簡單,只要點擊圖6-8的Gist當中的腳本文件對應的“raw”鏈接,即點擊腳本文件原始內容鏈接[[10]](https://gist.github.com/raw/1084591/73c3e4dfc827732241ca753fe7bb985c14c9d7ab/click_more.user.js)即可開啟安裝。這是因為該URL以.user.js結尾,會被Greasemonkey(或類似插件)識別并安裝,如圖6-10是Greasemonkey彈出的用戶端腳本安裝界面。
[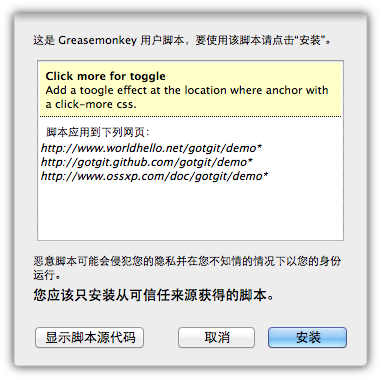](https://box.kancloud.cn/2015-07-09_559de65ae95d1.png)
圖6-10:安裝用戶端JavaScript腳本
用戶端腳本安裝完畢后,再訪問同樣的測試網頁[http://www.worldhello.net/gotgit/demo.html](http://www.worldhello.net/gotgit/demo.html),會發現網頁中出現了一個名為“更多”的可點擊鏈接,長長的網上書店列表不見了。如圖6-11所示。
[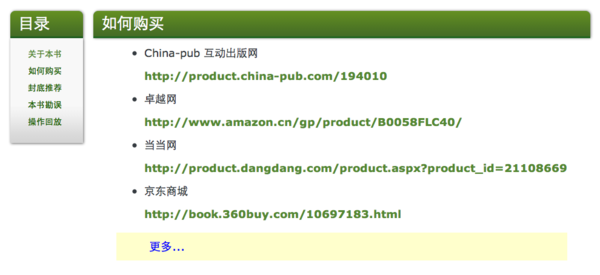](https://box.kancloud.cn/2015-07-09_559de65cd5e01.png)
圖6-11:應用用戶端JavaScript腳本后的網頁內容
如果查看網頁源碼,會發現該網頁中根本沒有包含和調用任何JavaScript腳本,只是在頁面源碼中包含著一個沒有任何實質輸出的標簽:
~~~
<p><a class="click-more"></a></p>
~~~
實際上正是這個特殊的標簽被Greasemonkey所加載的用戶端腳本識別,為HTML網頁添加了特效。
## 6.1.4\. 命令行操作Gist
GitHub開發者還寫了一個名為gist的命令行工具對Gist進行操作,地址見[https://github.com/defunkt/gist](https://github.com/defunkt/gist)。
該工具使用Ruby開發,對兩個特定的Git風格的配置變量進行如下設置后,即可實現在命令行中自動以特定用戶身份登錄操作Gist。
~~~
$ git config --global github.user "your-github-username"
$ git config --global github.token "your-github-token"
~~~
其中github.token中保存的是用戶的API TOKEN,這在“2.1 創建GitHub賬號”一節有過介紹。
使用gist命令行工具創建新的Gist非常簡單。
* 創建包含一個文件(如script.py)的Gist,使用如下命令。
~~~
$ gist script.py
~~~
* 創建包含多個文件的Gist,使用類似如下的命令。
~~~
$ gist script.js notes.txt
~~~
如果對命令行操作方式感興趣,參考gist工具網站的README文件。
- 前言
- 1. 探索GitHub
- 1.1. 什么是GitHub
- 1.2. GitHub亮點
- 1.3. 探索GitHub
- 2. 加入GitHub
- 2.1. 創建GitHub賬號
- 2.2. 瀏覽托管項目
- 2.3. 社交網絡
- 3. 項目托管
- 3.1. 創建新項目
- 3.2. 操作版本庫
- 3.3. 公鑰認證管理
- 3.4. 版本庫鉤子擴展
- 3.5. 建立主頁
- 4. 工作協同
- 4.1. Fork + Pull模式
- 4.2. 共享版本庫
- 4.3. 組織和團隊
- 4.4. 代碼評注
- 4.5. 缺陷跟蹤
- 4.6. 維基
- 5. 付費服務
- 5.1. GitHub收費方案
- 5.2. GitHub企業版
- 6. GitHub副產品
- 6.1. GitHub:Gist
- 6.2. 其他版本控制工具支持
- 6.3. 客戶端工具
- 6.4. 其他
- 7. 附錄:輕量級標記語言
- 貢獻者列表