
## 目標
建立一個 lesson5 項目,在其中編寫代碼。
代碼的入口是?`app.js`,當調用?`node app.js`?時,它會輸出 CNode([https://cnodejs.org/](https://cnodejs.org/)?) 社區首頁的所有主題的標題,鏈接和第一條評論,以 json 的格式。
注意:與上節課不同,并發連接數需要控制在 5 個。
輸出示例:
~~~
[
{
"title": "【公告】發招聘帖的同學留意一下這里",
"href": "http://cnodejs.org/topic/541ed2d05e28155f24676a12",
"comment1": "呵呵呵呵"
},
{
"title": "發布一款 Sublime Text 下的 JavaScript 語法高亮插件",
"href": "http://cnodejs.org/topic/54207e2efffeb6de3d61f68f",
"comment1": "沙發!"
}
]
~~~
## [](https://github.com/alsotang/node-lessons/tree/master/lesson5#知識點)知識點
1. 學習 async([https://github.com/caolan/async](https://github.com/caolan/async)?) 的使用。這里有個詳細的 async demo 演示:[https://github.com/alsotang/async_demo](https://github.com/alsotang/async_demo)
2. 學習使用 async 來控制并發連接數。
## [](https://github.com/alsotang/node-lessons/tree/master/lesson5#課程內容)課程內容
lesson4 的代碼其實是不完美的。為什么這么說,是因為在 lesson4 中,我們一次性發了 40 個并發請求出去,要知道,除去 CNode 的話,別的網站有可能會因為你發出的并發連接數太多而當你是在惡意請求,把你的 IP 封掉。
我們在寫爬蟲的時候,如果有 1000 個鏈接要去爬,那么不可能同時發出 1000 個并發鏈接出去對不對?我們需要控制一下并發的數量,比如并發 10 個就好,然后慢慢抓完這 1000 個鏈接。
用 async 來做這件事很簡單。
這次我們要介紹的是 async 的?`mapLimit(arr, limit, iterator, callback)`?接口。另外,還有個常用的控制并發連接數的接口是?`queue(worker, concurrency)`,大家可以去?[https://github.com/caolan/async#queueworker-concurrency](https://github.com/caolan/async#queueworker-concurrency)?看看說明。
這回我就不帶大家爬網站了,我們來專注知識點:并發連接數控制。
對了,還有個問題是,什么時候用 eventproxy,什么時候使用 async 呢?它們不都是用來做異步流程控制的嗎?
我的答案是:
當你需要去多個源(一般是小于 10 個)匯總數據的時候,用 eventproxy 方便;當你需要用到隊列,需要控制并發數,或者你喜歡函數式編程思維時,使用 async。大部分場景是前者,所以我個人大部分時間是用 eventproxy 的。
正題開始。
首先,我們偽造一個?`fetchUrl(url, callback)`?函數,這個函數的作用就是,當你通過
~~~
fetchUrl('http://www.baidu.com', function (err, content) {
// do something with `content`
});
~~~
調用它時,它會返回?`http://www.baidu.com`?的頁面內容回來。
當然,我們這里的返回內容是假的,返回延時是隨機的。并且在它被調用時,會告訴你它現在一共被多少個地方并發調用著。
~~~
// 并發連接數的計數器
var concurrencyCount = 0;
var fetchUrl = function (url, callback) {
// delay 的值在 2000 以內,是個隨機的整數
var delay = parseInt((Math.random() * 10000000) % 2000, 10);
concurrencyCount++;
console.log('現在的并發數是', concurrencyCount, ',正在抓取的是', url, ',耗時' + delay + '毫秒');
setTimeout(function () {
concurrencyCount--;
callback(null, url + ' html content');
}, delay);
};
~~~
我們接著來偽造一組鏈接
~~~
var urls = [];
for(var i = 0; i < 30; i++) {
urls.push('http://datasource_' + i);
}
~~~
這組鏈接的長這樣:
[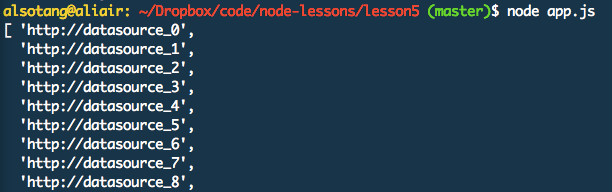](https://box.kancloud.cn/2015-08-03_55bf0c86be631.png)
接著,我們使用?`async.mapLimit`?來并發抓取,并獲取結果。
~~~
async.mapLimit(urls, 5, function (url, callback) {
fetchUrl(url, callback);
}, function (err, result) {
console.log('final:');
console.log(result);
});
~~~
運行輸出是這樣的:
[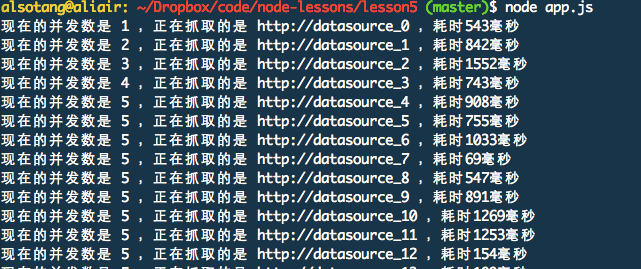](https://box.kancloud.cn/2015-08-03_55bf0c8e7d1dd.png)
可以看到,一開始,并發鏈接數是從 1 開始增長的,增長到 5 時,就不再增加。當其中有任務完成時,再繼續抓取。并發連接數始終控制在 5 個。
完整代碼請參見 app.js 文件。
- 關于
- Lesson 0: 《搭建 Node.js 開發環境》
- Lesson 1: 《一個最簡單的 express 應用》
- Lesson 2: 《學習使用外部模塊》
- Lesson 3: 《使用 superagent 與 cheerio 完成簡單爬蟲》
- Lesson 4: 《使用 eventproxy 控制并發》
- Lesson 5: 《使用 async 控制并發》
- Lesson 6: 《測試用例:mocha,should,istanbul》
- Lesson 7: 《瀏覽器端測試:mocha,chai,phantomjs》
- Lesson 8: 《測試用例:supertest》
- Lesson 9: 《正則表達式》
- Lesson 10: 《benchmark 怎么寫》
- Lesson 11: 《作用域與閉包:this,var,(function () {})》
- Lesson 12: 《線上部署:heroku》
- Lesson 13: 《持續集成平臺:travis》
- Lesson 14: 《js 中的那些最佳實踐》
- Lesson 15: 《Mongodb 與 Mongoose 的使用》
- Lesson 16: 《cookie 與 session》
- Lesson 17: 《使用 promise 替代回調函數》