
## 目標
建立一個 lesson6 項目,在其中編寫代碼。
main.js: 其中有個 fibonacci 函數。fibonacci 的介紹見:[http://en.wikipedia.org/wiki/Fibonacci_number](http://en.wikipedia.org/wiki/Fibonacci_number)?。
此函數的定義為?`int fibonacci(int n)`
* 當 n === 0 時,返回 0;n === 1時,返回 1;
* n > 1 時,返回?`fibonacci(n) === fibonacci(n-1) + fibonacci(n-2)`,如?`fibonacci(10) === 55`;
* n 不可大于10,否則拋錯,因為 Node.js 的計算性能沒那么強。
* n 也不可小于 0,否則拋錯,因為沒意義。
* n 不為數字時,拋錯。
test/main.test.js: 對 main 函數進行測試,并使行覆蓋率和分支覆蓋率都達到 100%。
## [](https://github.com/alsotang/node-lessons/tree/master/lesson6#知識點)知識點
1. 學習使用測試框架 mocha :?[http://mochajs.org/](http://mochajs.org/)
2. 學習使用斷言庫 should :?[https://github.com/tj/should.js](https://github.com/tj/should.js)
3. 學習使用測試率覆蓋工具 istanbul :?[https://github.com/gotwarlost/istanbul](https://github.com/gotwarlost/istanbul)
4. 簡單 Makefile 的編寫 :?[http://blog.csdn.net/haoel/article/details/2886](http://blog.csdn.net/haoel/article/details/2886)
## [](https://github.com/alsotang/node-lessons/tree/master/lesson6#課程內容)課程內容
首先,作為一個 Node.js 項目,先執行?`npm init`?創建 package.json。
其次,建立我們的 main.js 文件,編寫?`fibonacci`?函數。
~~~
var fibonacci = function (n) {
if (n === 0) {
return 0;
}
if (n === 1) {
return 1;
}
return fibonacci(n-1) + fibonacci(n-2);
};
if (require.main === module) {
// 如果是直接執行 main.js,則進入此處
// 如果 main.js 被其他文件 require,則此處不會執行。
var n = Number(process.argv[2]);
console.log('fibonacci(' + n + ') is', fibonacci(n));
}
~~~
OK,這只是個簡單的實現。
我們可以執行試試
`$ node main.js 10`
[](https://box.kancloud.cn/2015-08-03_55bf0d44d55de.png)
嗯,結果是 55,符合預期。
接下來我們開始測試驅動開發,現在簡單的實現已經完成,那我們就對它進行一下簡單測試吧。
我們先得把 main.js 里面的 fibonacci 暴露出來,這個簡單。加一句
`exports.fibonacci = fibonacci;`(要是看不懂這句就去補補 Node.js 的基礎知識吧)
就好了。
然后我們在?`test/main.test.js`?中引用我們的 main.js,并開始一個簡單的測試。
~~~
// file: test/main.test.js
var main = require('../main');
var should = require('should');
describe('test/main.test.js', function () {
it('should equal 55 when n === 10', function () {
main.fibonacci(10).should.equal(55);
});
});
~~~
把測試先跑通,我們再講這段測試代碼的含義。
裝個全局的 mocha:?`$ npm install mocha -g`。
`-g`?與 非`-g`?的區別,就是安裝位置的區別,g 是 global 的意思。如果不加的話,則安裝 mocha 在你的項目目錄下面;如果加了,則這個 mocha 是安裝在全局的,如果 mocha 有可執行命令的話,那么這個命令也會自動加入到你系統 $PATH 中的某個地方(在我的系統中,是這里?`/Users/alsotang/.nvm/v0.10.29/bin`)
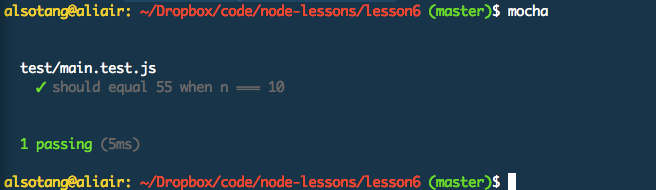
在 lesson6 目錄下,直接執行
`$ mocha`
輸出應如下
[](https://box.kancloud.cn/2015-08-03_55bf0d4c0eece.png)
那么,代碼中的 describe 和 it 是什么意思呢?其實就是 BDD 中的那些意思,把它們當做語法來記就好了。
大家來看看 nodeclub 中,關于 topicController 的測試文件:
[https://github.com/cnodejs/nodeclub/blob/master/test/controllers/topic.test.js](https://github.com/cnodejs/nodeclub/blob/master/test/controllers/topic.test.js)
這文件的內容沒有超出之前課程的范圍吧。
`describe`?中的字符串,用來描述你要測的主體是什么;`it`?當中,描述具體的 case 內容。
而引入的那個 should 模塊,是個斷言庫。玩過 ruby 的同學應該知道?`rspec`,rspec 它把測試框架和斷言庫的事情一起做了,而在 Node.js 中,這兩樣東西的作用分別是 mocha 和 should 在協作完成。
should 在 js 的 Object “基類”上注入了一個?`#should`?屬性,這個屬性中,又有著許許多多的屬性可以被訪問。
比如測試一個數是不是大于3,則是?`(5).should.above(3)`;測試一個字符串是否有著特定前綴:`'foobar'.should.startWith('foo');`。should.js API 在:[https://github.com/tj/should.js](https://github.com/tj/should.js)
should.js 如果現在還是 version 3 的話,我倒是推薦大家去看看它的 API 和 源碼;現在 should 是 version 4 了,API 丑得很,但為了不掉隊,我還是一直用著它。我覺得 expect 麻煩,所以不用 expect,對了,expect 也是一個斷言庫:[https://github.com/LearnBoost/expect.js/](https://github.com/LearnBoost/expect.js/)?。
回到正題,還記得我們 fibonacci 函數的幾個要求嗎?
~~~
* 當 n === 0 時,返回 0;n === 1時,返回 1;
* n > 1 時,返回 `fibonacci(n) === fibonacci(n-1) + fibonacci(n-2)`,如 `fibonacci(10) === 55`;
* n 不可大于10,否則拋錯,因為 Node.js 的計算性能沒那么強。
* n 也不可小于 0,否則拋錯,因為沒意義。
* n 不為數字時,拋錯。
~~~
我們用測試用例來描述一下這幾個要求,更新后的 main.test.js 如下:
~~~
var main = require('../main');
var should = require('should');
describe('test/main.test.js', function () {
it('should equal 0 when n === 0', function () {
main.fibonacci(0).should.equal(0);
});
it('should equal 1 when n === 1', function () {
main.fibonacci(1).should.equal(1);
});
it('should equal 55 when n === 10', function () {
main.fibonacci(10).should.equal(55);
});
it('should throw when n > 10', function () {
(function () {
main.fibonacci(11);
}).should.throw('n should <= 10');
});
it('should throw when n < 0', function () {
(function () {
main.fibonacci(-1);
}).should.throw('n should >= 0');
});
it('should throw when n isnt Number', function () {
(function () {
main.fibonacci('呵呵');
}).should.throw('n should be a Number');
});
});
~~~
還是比較清晰的吧?
我們這時候跑一下?`$ mocha`,會發現后三個 case 都沒過。
于是我們更新 fibonacci 的實現:
~~~
var fibonacci = function (n) {
if (typeof n !== 'number') {
throw new Error('n should be a Number');
}
if (n < 0) {
throw new Error('n should >= 0')
}
if (n > 10) {
throw new Error('n should <= 10');
}
if (n === 0) {
return 0;
}
if (n === 1) {
return 1;
}
return fibonacci(n-1) + fibonacci(n-2);
};
~~~
再跑一次?`$ mocha`,就過了。這就是傳說中的測試驅動開發:先把要達到的目的都描述清楚,然后讓現有的程序跑不過 case,再修補程序,讓 case 通過。
安裝一個 istanbul :?`$ npm i istanbul -g`
執行?`$ istanbul cover _mocha`
這會比直接使用 mocha 多一行覆蓋率的輸出,
[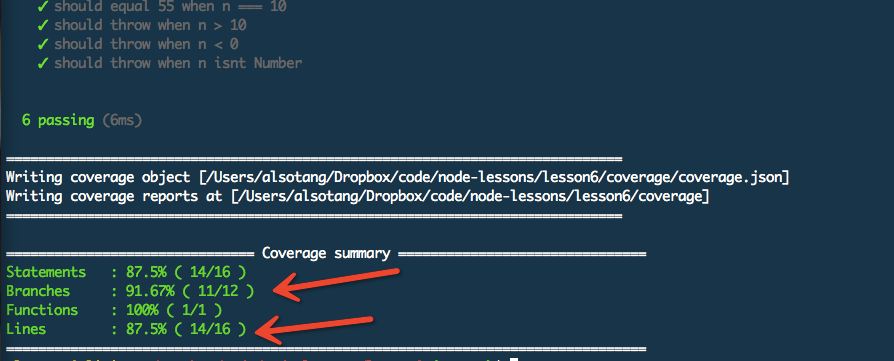](https://box.kancloud.cn/2015-08-03_55bf0d4e6b11d.png)
可以看到,我們其中的分支覆蓋率是 91.67%,行覆蓋率是 87.5%。
打開?`open coverage/lcov-report/index.html`?看看
[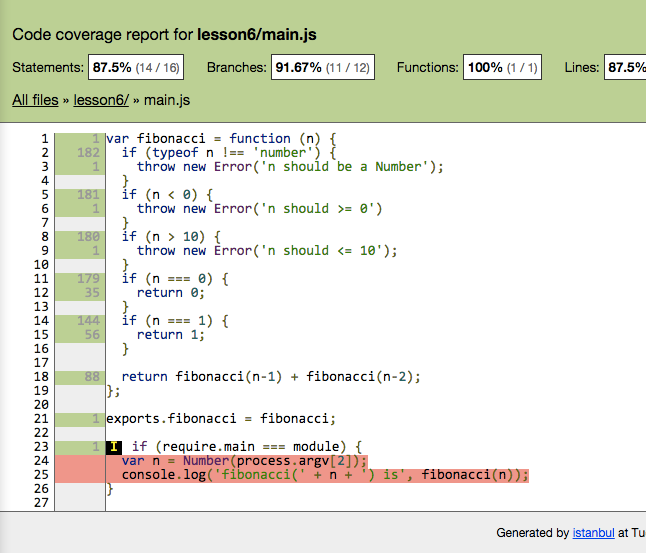](https://box.kancloud.cn/2015-08-03_55bf0d5688228.png)
其實這覆蓋率是 100% 的,24 25 兩行沒法測。
mocha 和 istanbul 的結合是相當無縫的,只要 mocha 跑得動,那么 istanbul 就接得進來。
到此這門課其實就完了,剩下要說的內容,都是些比較細節的。比較懶的同學可以踩坑了之后再回來看。
上面的課程,不完美的地方就在于 mocha 和 istanbul 版本依賴的問題,但為了不引入不必要的復雜性,所以上面就沒提到這點了。
假設你有一個項目A,用到了 mocha 的 version 3,其他人有個項目B,用到了 mocha 的 version 10,那么如果你?`npm i mocha -g`?裝的是 version 3 的話,你用?`$ mocha`?是不兼容B項目的。因為 mocha 版本改變之后,很可能語法也變了,對吧。
這時,跑測試用例的正確方法,應該是
1. `$ npm i mocha --save-dev`,裝個 mocha 到項目目錄中去
2. `$ ./node_modules/.bin/mocha`,用剛才安裝的這個特定版本的 mocha,來跑項目的測試代碼。
`./node_modules/.bin`?這個目錄下放著我們所有依賴自帶的那些可執行文件。
每次輸入這個很麻煩對吧?所以我們要引入 Makefile,讓 Makefile 幫我們記住復雜的配置。
~~~
test:
./node_modules/.bin/mocha
cov test-cov:
./node_modules/.bin/istanbul cover _mocha
.PHONY: test cov test-cov
~~~
這時,我們只需要調用?`make test`?或者?`make cov`,就可以跑我們相應的測試了。
至于 Makefile 怎么寫?以及 .PHONY 是什么意思,請看這里:[http://blog.csdn.net/haoel/article/details/2886](http://blog.csdn.net/haoel/article/details/2886)?,左耳朵耗子陳皓2004年的文章。
- 關于
- Lesson 0: 《搭建 Node.js 開發環境》
- Lesson 1: 《一個最簡單的 express 應用》
- Lesson 2: 《學習使用外部模塊》
- Lesson 3: 《使用 superagent 與 cheerio 完成簡單爬蟲》
- Lesson 4: 《使用 eventproxy 控制并發》
- Lesson 5: 《使用 async 控制并發》
- Lesson 6: 《測試用例:mocha,should,istanbul》
- Lesson 7: 《瀏覽器端測試:mocha,chai,phantomjs》
- Lesson 8: 《測試用例:supertest》
- Lesson 9: 《正則表達式》
- Lesson 10: 《benchmark 怎么寫》
- Lesson 11: 《作用域與閉包:this,var,(function () {})》
- Lesson 12: 《線上部署:heroku》
- Lesson 13: 《持續集成平臺:travis》
- Lesson 14: 《js 中的那些最佳實踐》
- Lesson 15: 《Mongodb 與 Mongoose 的使用》
- Lesson 16: 《cookie 與 session》
- Lesson 17: 《使用 promise 替代回調函數》