
**1. 拆分Spring配置文件的目的**
(1)項目規模大,配置文件的可讀性、維護性差。
(2)團隊開發,多人修改同一個配置文件,易發生沖突。
<br/>
**2. 拆分策略有兩種**
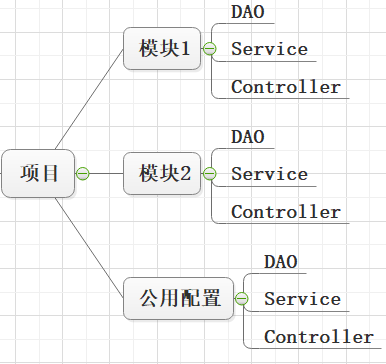
(1)公用配置 + 每個系統模塊單獨一個配置文件(DAO + Service + Web控制器),適用于多人開發的團隊。
:-: 
(2)公用配置 + DAO層的Bean配置 + Service層的Bean配置 + Web控制器層的Bean配置,適用于個人開發或少數人團隊開發。
:-: 
<br/>
**3. 配置文件拆分演示**
下面演示第2種拆分策略,步驟如下:
(1)將一些公共配置放在`ApplicationContext.xml`文件中,如數據源、事務管理等。
```xml
<?xml version="1.0" encoding="UTF-8"?>
<beans ...>
<!-- 配置數據源 -->
<bean id="dataSource" class="org.apache.commons.dbcp.BasicDataSource">
<property name="driverClassName" value="com.mysql.jdbc.Driver"/>
<property name="url" value="jdbc:mysql://localhost:3306/mybatis?useUnicode=true&characterEncoding=UTF-8"/>
<property name="username" value="root"/>
<property name="password" value="admin"/>
</bean>
<!-- 創建sqlSessionFactory -->
<bean id="sqlSessionFactory" class="org.mybatis.spring.SqlSessionFactoryBean">
<property name="dataSource" ref="dataSource"/>
<!-- 注入mapper.xml -->
<property name="mapperLocations">
<list>
<value>classpath:mapper/StudentMapper.xml</value>
</list>
</property>
</bean>
</beans>
```
(2)將dao層配置放在`ApplicationContext-dao.xml`文件中。
```xml
<?xml version="1.0" encoding="UTF-8"?>
<beans ...>
<!-- 創建dao層-->
<bean class="org.mybatis.spring.mapper.MapperScannerConfigurer">
<!-- 該配置會將dao層下的所有xxxMapper接口注入到basePackage中 -->
<property name="basePackage" value="dao"/>
</bean>
</beans>
```
(3)將service層的配置放在`ApplicationContext-service.xml`文件中。
```xml
<?xml version="1.0" encoding="UTF-8"?>
<!-- default-autowire="byName"表示全局的Service采用按名字自動裝配 -->
<beans default-autowire="byName" ...>
<!-- 創建service層 -->
<bean id="studentService" class="service.imp.StudentServiceImpl">
<!--<property name="studentMapper" ref="studentMapper"/>-->
</bean>
</beans>
```
(4)將拆分的Spring配置文件合并。
合并方式一:使用`ClassPathXmlApplicationContext(String... configLocations)`將多個配置文件合并。
```java
@org.junit.Test
public void test() {
ApplicationContext context = new ClassPathXmlApplicationContext("ApplicationContext.xml"
,"ApplicationContext-dao.xml", "ApplicationContext-service.xml");
StudentService studentService = (StudentService) context.getBean("studentService");
}
```
合并方式二:`<import resource="xxx.xml"/>`在一個配置文件中導入其它配置。
*`ApplicationContext.xml`*
```xml
<import resource="ApplicationContext-dao.xml"/>
<import resource="ApplicationContext-service.xml"/>
```
- Mybatis
- mybatis是什么
- mybatis優缺點
- 環境搭建
- 使用步驟
- 傳參方式
- 無需傳參
- 一個參數
- 多個參數
- 增/刪/改
- 查詢
- 單表查詢
- 一對一查詢
- 一對多查詢
- 動態SQL
- 注解操作
- Spring
- Spring什么
- Spring優點
- Spring組成
- 第一個Spring程序
- 兩大核心技術
- IoC控制反轉
- IoC思想
- IoC容器使用步驟
- 屬性注入
- IoC注入方式
- 模擬IoC實現
- AOP
- AOP概念
- AOP原理
- AOP關鍵術語
- AOP編程過程
- 切入點規則
- 5種增強方式
- Spring注解開發
- 注解開發的優勢
- Bean注解開發
- AOP注解開發
- 完全注解開發
- 模擬Spring注解開發
- 自動裝配
- 配置文件拆分
- SpringBean
- Bean常用屬性
- Bean的作用域
- Bean的生命周期
- Spring整合MyBatis
- 整合步驟
- SqlSessionTemplate
- 業務層添加事務
- 事務的作用
- 配置文件事務
- 注解事務
- 事務參數
- SpringMVC
- SpringMVC是什么
- 環境搭建
- 請求流程
- 核心組件
- 前后端交互
- 簡單交互演示
- 常用注解
- 后端數據傳遞至前端
- ServletAPI
- 訪問靜態資源
- 異常處理
- HandlerExceptionResolver
- 局部異常
- 全局異常
- 轉發與重定向
- 轉發演示
- 重定向演示
- 轉發與重定向的區別
- 獲取表單數據
- 表單標簽
- REST風格的URL
- 異步處理
- 異步請求
- JSON數據處理
- 中文亂碼處理
- 日期處理
- 上傳文件
- 攔截器
- 視圖解析器
- 視圖類型
- 多視圖解析器
- 自定義pdf視圖
- JSR303數據驗證
- JSR303是什么
- 常用約束
- 使用步驟
- SpringMVC整合Mybatis
- 整合步驟
- Mybatis分頁插件
- SpringBoot
- SpringBoot是什么
- 環境搭建
- SpringBoot啟動分析
- SpringBoot啟動類
- 啟動過程
- SpringBoot配置文件
- 配置文件類型
- 更改配置文件
- 讀取配置文件
- 占位符
- 配置優先級
- 自定義IoC容器
- 定義方式
- 引入Spring配置文件
- @Configuration
- SpringBoot自動配置
- 自動配置原理
- 條件注解
- 自動配置報告
- 自定義自動配置
- 關閉自動配置
- 接管自動配置
- 多環境配置
- CommandLineRunner
- SpringBoot與Web開發
- 引入模板引擎
- Thymeleaf模板
- Freemarker模板
- 靜態資源訪問
- webjars
- 靜態資源位置
- ico圖標
- 指定首頁
- 更換Web服務器
- 國際化
- 攔截器
- 錯誤處理機制
- 錯誤處理機制原理
- 定制錯誤頁面
- 定制錯誤數據
- 上傳文件
- 注冊servlet三大組件
- 注冊Servlet
- 注冊過濾器
- 注冊監聽器
- 外部Tomcat與jsp模板
- 前后端交互
- 傳遞json字符串
- 傳遞js對象
- 傳遞表單
- 下載功能
- Swagger2文檔
- SpringBoot整合JDBC
- 整合步驟
- 核心API
- JdbcTemplate
- 增刪改
- 查詢
- NamedParameterJdbcTemplate
- 增刪改
- 查詢
- SpringBoot整合Mybatis
- 整合步驟
- 切換為Druid數據源
- 添加事務
- Mybatis分頁插件
- 場景啟動器
- 場景啟動器是什么
- 自定義場景啟動器
- SpringBoot與日志
- 日志框架
- slf4j日志
- slf4j日志實現
- 統一切換為slf4j
- 日志配置
- 日志文件
- 切換日志框架
- 切換日志場景啟動器
- SpringBoot與緩存
- JSR107緩存技術
- Spring緩存抽象
- 緩存注解
- SpEL表達式
- 使用緩存
- 自定義key生成器
- 緩存工作原理與流程
- SpringBoot整合Redis
- 整合步驟
- 初步使用
- 序列化機制
- 緩存管理器
- SpringBoot與任務
- 異步任務
- 實現異步任務
- 注意事項與原理
- 自定義線程池
- 定時任務
- cron表達式
- 創建定時任務
- @Scheduled參數
- 動態時間
- 郵件任務
- Quartz定時任務
- Quartz是什么
- 創建定時任務
- 觸發器與任務
- 任務的CURD
- 兩種觸發器
- 并發問題
- 持久化
- 任務持久化
- Quartz集群
- misfire策略
- 打包插件
- appassembler-maven-plugin
- appassembler與assembly配合