
案例代碼:https://gitee.com/flymini/codes01/tree/master/springboot_/com-learn-boot12
****
后端生成文檔給前端程序員參考,方便前端程序員開發。我們可以借助 Swagger2 工具來生成文檔。
<br/>
使用步驟如下:
**1. 引入swagger2依賴**
```xml
<dependencies>
<dependency>
<groupId>org.springframework.boot</groupId>
<artifactId>spring-boot-starter-web</artifactId>
</dependency>
<dependency>
<groupId>org.springframework.boot</groupId>
<artifactId>spring-boot-starter-test</artifactId>
</dependency>
<dependency>
<groupId>io.springfox</groupId>
<artifactId>springfox-swagger2</artifactId>
<version>2.9.2</version>
</dependency>
<dependency>
<groupId>io.springfox</groupId>
<artifactId>springfox-swagger-ui</artifactId>
<version>2.9.2</version>
</dependency>
</dependencies>
```
**2. 注冊Swagger2到IoC容器**
```java
@Configuration
@EnableSwagger2
public class Swagger2Config {
@Bean
public Docket docket() {
return new Docket(DocumentationType.SWAGGER_2)
.apiInfo(apiInfo())
.select()
//只能對controller層生成文檔
.apis(RequestHandlerSelectors.basePackage("com.learn.boot12.controller"))
.paths(PathSelectors.any()).build();
}
private ApiInfo apiInfo() {
return new ApiInfoBuilder()
//文檔標題
.title("com-learn-boot12項目文檔")
//作者, 地址, 郵箱
.contact(new Contact("Zhangsan", "www.baidu.com", "123@163.com"))
.version("1.0")
.description("com-learn-boot12項目文檔").build();
}
}
```
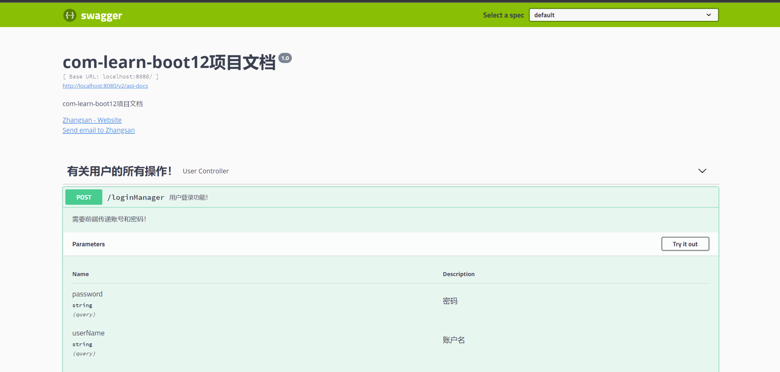
**3. 在controller層調用Swagger2相關注解說明**
```java
@Controller
@Api(tags = "有關用戶的所有操作!") //UserController類的文檔說明
public class UserController {
@ApiOperation(value = "用戶登錄功能!", notes = "需要前端傳遞賬號和密碼!") //該方法的文檔說明
@ApiImplicitParams({ //該方法的參數說明
@ApiImplicitParam(name = "userName", value = "賬戶名", dataType = "String", example = "zhangsan"),
@ApiImplicitParam(name = "password", value = "密碼", dataType = "String", example = "123456")
})
@RequestMapping(value = "/loginManager", method = RequestMethod.POST)
public String login(@RequestParam("userName") String userName
, @RequestParam("password") String password
, HttpServletRequest request) {
return "/main";
}
}
```
**4. 啟動SpringBoot項目**
訪問 http://localhost:8080/swagger-ui.html 即可看到文檔。
- Mybatis
- mybatis是什么
- mybatis優缺點
- 環境搭建
- 使用步驟
- 傳參方式
- 無需傳參
- 一個參數
- 多個參數
- 增/刪/改
- 查詢
- 單表查詢
- 一對一查詢
- 一對多查詢
- 動態SQL
- 注解操作
- Spring
- Spring什么
- Spring優點
- Spring組成
- 第一個Spring程序
- 兩大核心技術
- IoC控制反轉
- IoC思想
- IoC容器使用步驟
- 屬性注入
- IoC注入方式
- 模擬IoC實現
- AOP
- AOP概念
- AOP原理
- AOP關鍵術語
- AOP編程過程
- 切入點規則
- 5種增強方式
- Spring注解開發
- 注解開發的優勢
- Bean注解開發
- AOP注解開發
- 完全注解開發
- 模擬Spring注解開發
- 自動裝配
- 配置文件拆分
- SpringBean
- Bean常用屬性
- Bean的作用域
- Bean的生命周期
- Spring整合MyBatis
- 整合步驟
- SqlSessionTemplate
- 業務層添加事務
- 事務的作用
- 配置文件事務
- 注解事務
- 事務參數
- SpringMVC
- SpringMVC是什么
- 環境搭建
- 請求流程
- 核心組件
- 前后端交互
- 簡單交互演示
- 常用注解
- 后端數據傳遞至前端
- ServletAPI
- 訪問靜態資源
- 異常處理
- HandlerExceptionResolver
- 局部異常
- 全局異常
- 轉發與重定向
- 轉發演示
- 重定向演示
- 轉發與重定向的區別
- 獲取表單數據
- 表單標簽
- REST風格的URL
- 異步處理
- 異步請求
- JSON數據處理
- 中文亂碼處理
- 日期處理
- 上傳文件
- 攔截器
- 視圖解析器
- 視圖類型
- 多視圖解析器
- 自定義pdf視圖
- JSR303數據驗證
- JSR303是什么
- 常用約束
- 使用步驟
- SpringMVC整合Mybatis
- 整合步驟
- Mybatis分頁插件
- SpringBoot
- SpringBoot是什么
- 環境搭建
- SpringBoot啟動分析
- SpringBoot啟動類
- 啟動過程
- SpringBoot配置文件
- 配置文件類型
- 更改配置文件
- 讀取配置文件
- 占位符
- 配置優先級
- 自定義IoC容器
- 定義方式
- 引入Spring配置文件
- @Configuration
- SpringBoot自動配置
- 自動配置原理
- 條件注解
- 自動配置報告
- 自定義自動配置
- 關閉自動配置
- 接管自動配置
- 多環境配置
- CommandLineRunner
- SpringBoot與Web開發
- 引入模板引擎
- Thymeleaf模板
- Freemarker模板
- 靜態資源訪問
- webjars
- 靜態資源位置
- ico圖標
- 指定首頁
- 更換Web服務器
- 國際化
- 攔截器
- 錯誤處理機制
- 錯誤處理機制原理
- 定制錯誤頁面
- 定制錯誤數據
- 上傳文件
- 注冊servlet三大組件
- 注冊Servlet
- 注冊過濾器
- 注冊監聽器
- 外部Tomcat與jsp模板
- 前后端交互
- 傳遞json字符串
- 傳遞js對象
- 傳遞表單
- 下載功能
- Swagger2文檔
- SpringBoot整合JDBC
- 整合步驟
- 核心API
- JdbcTemplate
- 增刪改
- 查詢
- NamedParameterJdbcTemplate
- 增刪改
- 查詢
- SpringBoot整合Mybatis
- 整合步驟
- 切換為Druid數據源
- 添加事務
- Mybatis分頁插件
- 場景啟動器
- 場景啟動器是什么
- 自定義場景啟動器
- SpringBoot與日志
- 日志框架
- slf4j日志
- slf4j日志實現
- 統一切換為slf4j
- 日志配置
- 日志文件
- 切換日志框架
- 切換日志場景啟動器
- SpringBoot與緩存
- JSR107緩存技術
- Spring緩存抽象
- 緩存注解
- SpEL表達式
- 使用緩存
- 自定義key生成器
- 緩存工作原理與流程
- SpringBoot整合Redis
- 整合步驟
- 初步使用
- 序列化機制
- 緩存管理器
- SpringBoot與任務
- 異步任務
- 實現異步任務
- 注意事項與原理
- 自定義線程池
- 定時任務
- cron表達式
- 創建定時任務
- @Scheduled參數
- 動態時間
- 郵件任務
- Quartz定時任務
- Quartz是什么
- 創建定時任務
- 觸發器與任務
- 任務的CURD
- 兩種觸發器
- 并發問題
- 持久化
- 任務持久化
- Quartz集群
- misfire策略
- 打包插件
- appassembler-maven-plugin
- appassembler與assembly配合