
## 生產者 - 消費者模式
生產者消費者模式是一個經典的多線程設計模式。
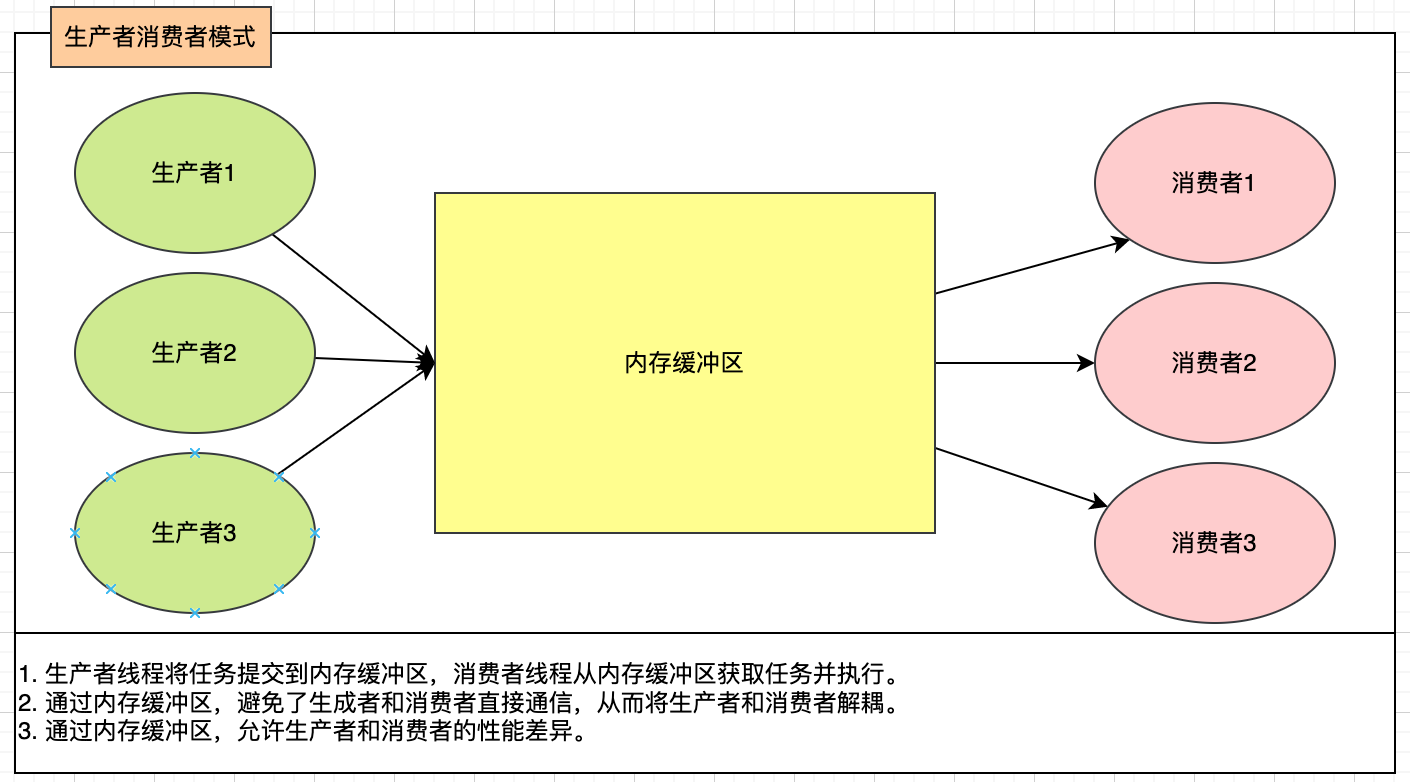
總結:
1. 生產者線程將任務提交到內存緩沖區,消費者線程從內存緩沖區獲取任務并執行。
2. 通過內存緩沖區,避免了生成者和消費者直接通信,從而將生產者和消費者解耦。
3. 通過內存緩沖區,允許生產者和消費者的性能差異。
在`JDK`中提供的線程池(`ThreadPoolExecutor`)就是典型的生產者消費者模式(其中任務是線程),其中內存緩沖區的實現使用的是`BlockingQueue`阻塞隊列。
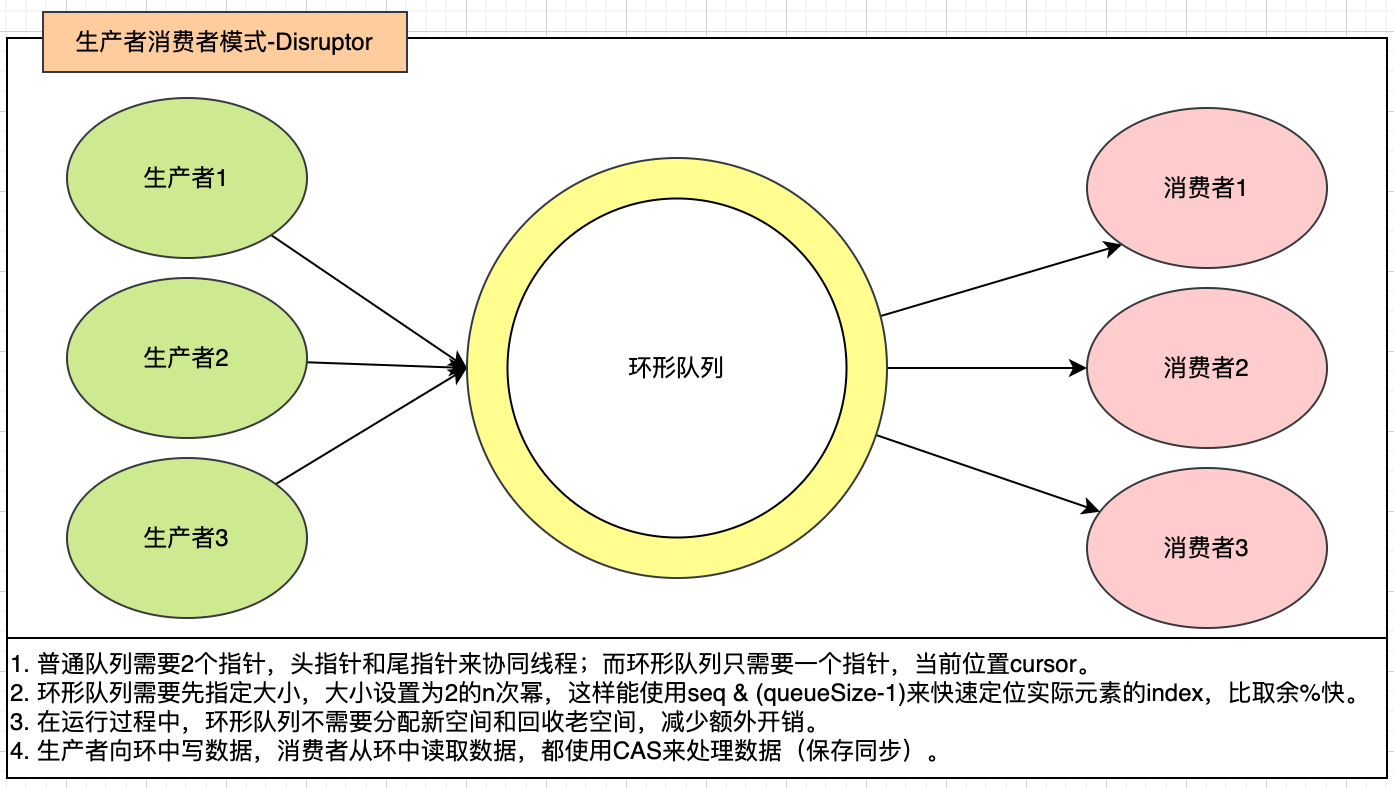
## 生產者 - 消費者模式(無鎖實現)
在`ThreadPoolExecutor`中使用了`BlockingQueue`阻塞隊列來做內存緩沖區,但是由于使用了鎖和阻塞等待來實現線程間的同步,所以新能不高。
而LMAX公司開發了一套無鎖實現的高性能生產者消費者模式的框架,叫做`Disruptor`。
例子:(生產者生成數據,消費者計算數據平方)
引入依賴:
~~~
<dependency>
<groupId>com.lmax</groupId>
<artifactId>disruptor</artifactId>
<version>3.4.4</version>
</dependency>
~~~
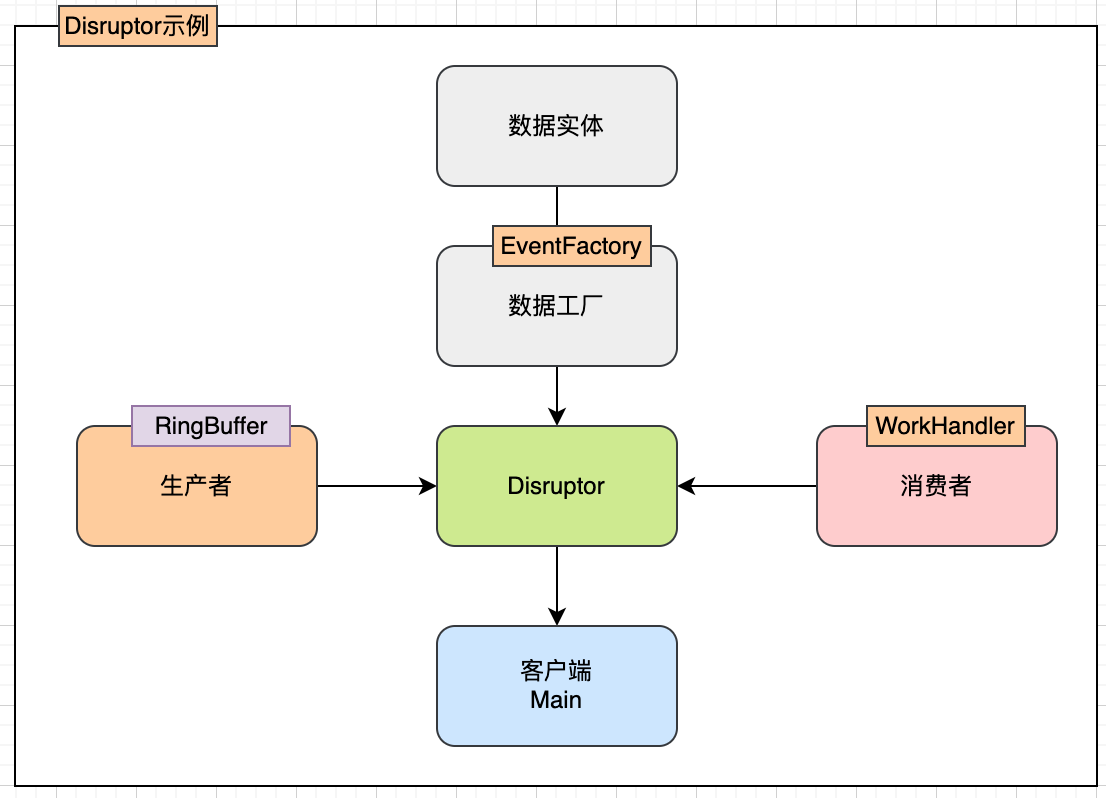
數據實體:
~~~
public class PCData {
private long value;
public long getValue() {
return value;
}
public void setValue(long value) {
this.value = value;
}
}
~~~
數據工廠:
~~~
public class PCDataFactory implements EventFactory<PCData> {
@Override
public PCData newInstance() {
return new PCData();
}
}
~~~
生產者:
~~~
import com.lmax.disruptor.RingBuffer;
import java.nio.ByteBuffer;
public class Producer {
private final RingBuffer<PCData> ringBuffer;
public Producer(RingBuffer<PCData> ringBuffer){
this.ringBuffer = ringBuffer;
}
public void pushData(ByteBuffer bb){
// 獲取環上的下一個序列
long sequence = ringBuffer.next();
PCData data = ringBuffer.get(sequence);
// 設置數據
data.setValue(bb.getLong(0));
// 發布序列
ringBuffer.publish(sequence);
}
}
~~~
消費者:
~~~
import com.lmax.disruptor.WorkHandler;
public class Consumer implements WorkHandler<PCData> {
@Override
public void onEvent(PCData pcData) throws Exception {
// 打印平方值
System.out.println(Thread.currentThread().getName() +
" -- value="+pcData.getValue() +
" -- 平方="+Math.pow(pcData.getValue(),2));
}
}
~~~
客戶端:
~~~
public class Main {
public static void main(String[] args) throws InterruptedException {
// 大小需要是2的冪
int bufferSize = 1024;
Disruptor<PCData> disruptor = new Disruptor<>(
new PCDataFactory(),
bufferSize,
Executors.defaultThreadFactory(),
ProducerType.MULTI,
// 選擇合適的策略,提高消費者的響應時間
new BlockingWaitStrategy() // 阻塞等待策略
// new SleepingWaitStrategy() // 休眠等待策略
// new YieldingWaitStrategy() // 謙讓等待策略
// new BusySpinWaitStrategy() // 忙自旋等待策略,死循環
);
// 4個消費者
disruptor.handleEventsWithWorkerPool(
new Consumer(),
new Consumer(),
new Consumer(),
new Consumer()
);
disruptor.start();
// 生成數據
RingBuffer<PCData> ringBuffer = disruptor.getRingBuffer();
long size = 1000L;
// 2個生產者
new Thread(()->{
Producer producer = new Producer(ringBuffer);
ByteBuffer bb = ByteBuffer.allocate(8);
for(long i = 0L;i<size;i++){
bb.putLong(0,i);
producer.pushData(bb);
System.out.println(Thread.currentThread().getName() + " - 產生數據:"+i);
}
}).start();
new Thread(()->{
Producer producer = new Producer(ringBuffer);
ByteBuffer bb = ByteBuffer.allocate(8);
for(long i = size;i<2*size;i++){
bb.putLong(0,i);
producer.pushData(bb);
System.out.println(Thread.currentThread().getName() + " - 產生數據:"+i);
}
}).start();
}
}
~~~
總結:
1. 選擇合適的策略,提高消費者的響應時間
```
new BlockingWaitStrategy() // 阻塞等待策略,省CPU
new SleepingWaitStrategy() // 休眠等待策略,中等延遲,自旋等待失敗后休眠,不占用太多CPU
new YieldingWaitStrategy() // 謙讓等待策略,低延遲,CPU物理核大于線程數
new BusySpinWaitStrategy() // 忙自旋等待策略,死循環,吃掉所有CPU資源
```
2. `Disruptor`對`Sequence`使用對齊填充的方式解決CPU緩存偽共享問題。
## CPU緩存偽共享
看下圖,能知道`CPU緩存偽共享`的問題
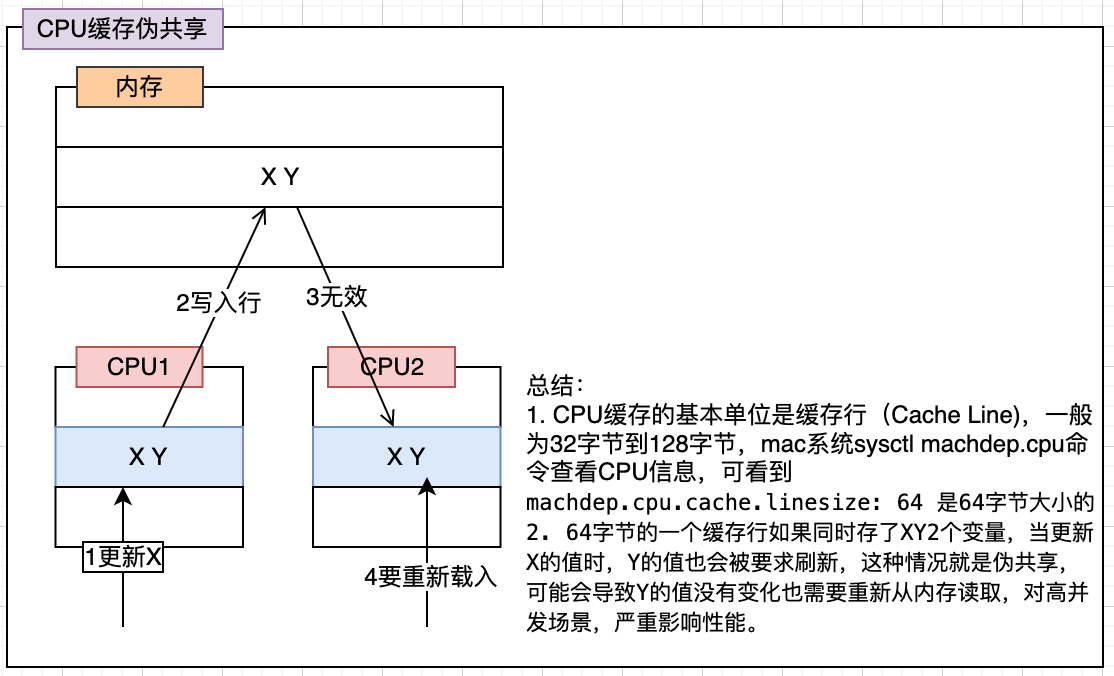
可以通過將存儲的數據使用填充對齊到緩存行(64字節)大小,使得每個緩存行只存一個數據。

如下代碼片段是`Disruptor`中`Sequence`繼承的`RhsPadding`類,里面填充了7個`long`類型的值(一個`long`類型64位即8字節,補7個加上自己的一個工8個,合計64字節,剛好占一個緩存行大小)
~~~
class RhsPadding extends Value {
protected long p9;
protected long p10;
protected long p11;
protected long p12;
protected long p13;
protected long p14;
protected long p15;
RhsPadding() {
}
}
~~~
## 參考資料
* 書籍 葛一鳴 * 《Java高并發程序設計》
- 面試突擊
- Java虛擬機
- 認識字節碼
- 000Java發展歷史
- 000Macos10.15.7上編譯OpenJDK8u
- 001熟悉Java內存區域
- 002熟悉HotSpot中的對象
- 003Java如何計算對象大小
- 004垃圾判定算法與4大引用
- 005回收堆和方法區中對象
- 006垃圾收集算法
- 007HotSpot虛擬機垃圾算法實現篇1
- 007HotSpot虛擬機垃圾算法實現篇2
- 007HotSpot虛擬機垃圾算法實現篇3
- 008垃圾收集器
- 009內存分配與回收策略
- 010Java虛擬機相關工具
- 011調優案例分析
- 012一次IDEA的啟動速度調優
- 013類文件Class的結構
- 014熟悉字節碼指令
- 015類加載機制(過程)
- 016類加載器
- IDEA的JVM參數
- Java基礎
- Java自動裝箱與拆箱
- Java基礎數據類型
- Java方法的參數傳遞
- Java并發
- 001走入并行的世界
- 002并行程序基礎
- 003熟悉Java內存模型JMM
- 004Java并發之volatile關鍵字
- 005線程池入門到精通
- 006Java多線程間的同步控制方法
- 007Java維基準測試框架JMH
- 008Java并發容器
- 009Java的線程實現
- 010Java關鍵字synchronized
- 011一些并行模式的熟悉
- 單例模式和不變模式
- 生產者消費者模式
- Future模式
- 012一些并行算法的熟悉
- 面試總結
- 長亮一面