
原文出處——>[淺談Android系統進程間通信(IPC)機制Binder中的Server和Client獲得Service Manager接口之路](http://blog.csdn.net/luoshengyang/article/details/6627260)
在前面一篇文章淺談Service Manager成為Android進程間通信(IPC)機制Binder守護進程之路中,介紹了Service Manager是如何成為Binder機制的守護進程的。既然作為守護進程,Service Manager的職責當然就是為Server和Client服務了。那么,Server和Client如何獲得Service Manager接口,進而享受它提供的服務呢?本文將簡要分析Server和Client獲得Service Manager的過程。
在閱讀本文之前,希望讀者先閱讀Android進程間通信(IPC)機制Binder簡要介紹和學習計劃一文提到的參考資料Android深入淺出之Binder機制,這樣可以加深對本文的理解。
我們知道,Service Manager在Binder機制中既充當守護進程的角色,同時它也充當著Server角色,然而它又與一般的Server不一樣。對于普通的Server來說,Client如果想要獲得Server的遠程接口,那么必須通過Service Manager遠程接口提供的getService接口來獲得,這本身就是一個使用Binder機制來進行進程間通信的過程。而對于Service Manager這個Server來說,Client如果想要獲得Service Manager遠程接口,卻不必通過進程間通信機制來獲得,因為Service Manager遠程接口是一個特殊的Binder引用,它的引用句柄一定是0。
獲取Service Manager遠程接口的函數是defaultServiceManager,這個函數聲明在frameworks/base/include/binder/IServiceManager.h文件中:
~~~
sp<IServiceManager> defaultServiceManager();
~~~
實現在frameworks/base/libs/binder/IServiceManager.cpp文件中:
~~~
sp<IServiceManager> defaultServiceManager()
{
if (gDefaultServiceManager != NULL) return gDefaultServiceManager;
{
AutoMutex _l(gDefaultServiceManagerLock);
if (gDefaultServiceManager == NULL) {
gDefaultServiceManager = interface_cast<IServiceManager>(
ProcessState::self()->getContextObject(NULL));
}
}
return gDefaultServiceManager;
}
~~~
gDefaultServiceManagerLock和gDefaultServiceManager是全局變量,定義在frameworks/base/libs/binder/Static.cpp文件中:
~~~
Mutex gDefaultServiceManagerLock;
sp<IServiceManager> gDefaultServiceManager;
~~~
從這個函數可以看出,gDefaultServiceManager是單例模式,調用defaultServiceManager函數時,如果gDefaultServiceManager已經創建,則直接返回,否則通過`interface_cast<IServiceManager>(ProcessState::self()->getContextObject(NULL))`來創建一個,并保存在gDefaultServiceManager全局變量中。
在繼續介紹`interface_cast<IServiceManager>(ProcessState::self()->getContextObject(NULL))`的實現之前,先來看一個類圖,這能夠幫助我們了解Service Manager遠程接口的創建過程。
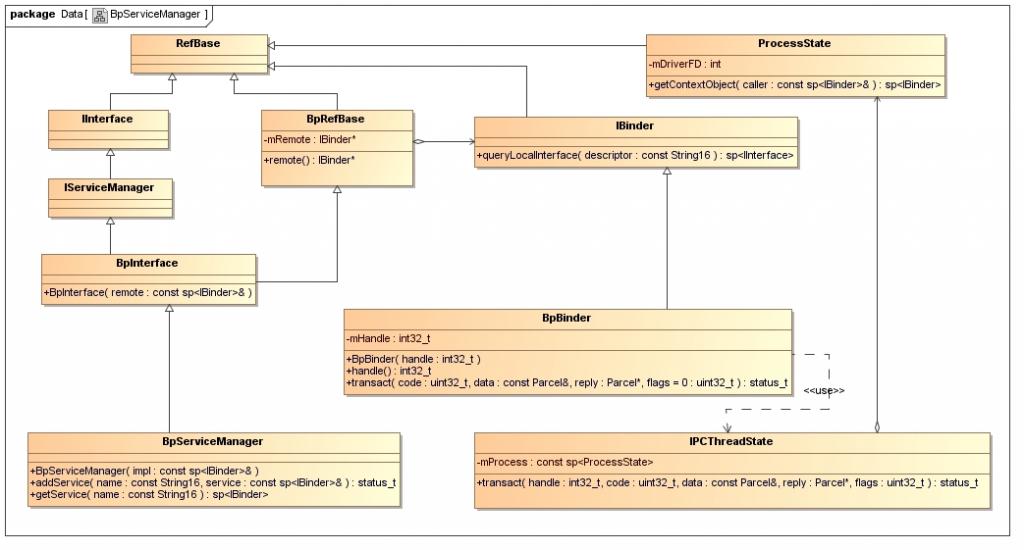
參考資料Android深入淺出之Binder機制一文的讀者,應該會比較容易理解這個圖。這個圖表明了,BpServiceManager類繼承了`BpInterface<IServiceManager>`類,BpInterface是一個模板類,它定義在**frameworks/base/include/binder/IInterface.h**文件中:
~~~
template<typename INTERFACE>
class BpInterface : public INTERFACE, public BpRefBase
{
public:
BpInterface(const sp<IBinder>& remote);
protected:
virtual IBinder* onAsBinder();
};
~~~
IServiceManager類繼承了IInterface類,而IInterface類和BpRefBase類又分別繼承了RefBase類。在BpRefBase類中,有一個成員變量mRemote,它的類型是IBinder*,實現類為BpBinder,它表示一個Binder引用,引用句柄值保存在BpBinder類的mHandle成員變量中。BpBinder類通過IPCThreadState類來和Binder驅動程序并互,而IPCThreadState又通過它的成員變量mProcess來打開/dev/binder設備文件,mProcess成員變量的類型為ProcessState。ProcessState類打開設備/dev/binder之后,將打開文件描述符保存在mDriverFD成員變量中,以供后續使用。
理解了這些概念之后,就可以繼續分析創建Service Manager遠程接口的過程了,最終目的是要創建一個BpServiceManager實例,并且返回它的IServiceManager接口。創建Service Manager遠程接口主要是下面語句:
~~~
gDefaultServiceManager = interface_cast<IServiceManager>(
ProcessState::self()->getContextObject(NULL));
~~~
看起來簡短,卻暗藏玄機,具體可閱讀Android深入淺出之Binder機制這篇參考資料,這里作簡要描述。
首先是調用ProcessState::self函數,self函數是ProcessState的靜態成員函數,它的作用是返回一個全局唯一的ProcessState實例變量,就是單例模式了,這個變量名為gProcess。如果gProcess尚未創建,就會執行創建操作,在ProcessState的構造函數中,會通過open文件操作函數打開設備文件/dev/binder,并且返回來的設備文件描述符保存在成員變量mDriverFD中。
接著調用gProcess->getContextObject函數來獲得一個句柄值為0的Binder引用,即BpBinder了,于是創建Service Manager遠程接口的語句可以簡化為:
~~~
gDefaultServiceManager = interface_cast<IServiceManager>(new BpBinder(0));
~~~
再來看函數`interface_cast<IServiceManager>`的實現,它是一個模板函數,定義在**framework/base/include/binder/IInterface.h**文件中:
~~~
template<typename INTERFACE>
inline sp<INTERFACE> interface_cast(const sp<IBinder>& obj)
{
return INTERFACE::asInterface(obj);
}
~~~
這里的INTERFACE是IServiceManager,于是調用了IServiceManager::asInterface函數。IServiceManager::asInterface是通過DECLARE_META_INTERFACE(ServiceManager)宏在IServiceManager類中聲明的,它位于framework/base/include/binder/IServiceManager.h文件中:
~~~
DECLARE_META_INTERFACE(ServiceManager);
~~~
展開即為:
~~~
#define DECLARE_META_INTERFACE(ServiceManager) \
static const android::String16 descriptor; \
static android::sp<IServiceManager> asInterface( \
const android::sp<android::IBinder>& obj); \
virtual const android::String16& getInterfaceDescriptor() const; \
IServiceManager(); \
virtual ~IServiceManager();
~~~
IServiceManager::asInterface的實現是通過IMPLEMENT_META_INTERFACE(ServiceManager, "android.os.IServiceManager")宏定義的,它位于framework/base/libs/binder/IServiceManager.cpp文件中:
~~~
IMPLEMENT_META_INTERFACE(ServiceManager, "android.os.IServiceManager");
~~~
展開即為:
~~~
#define IMPLEMENT_META_INTERFACE(ServiceManager, "android.os.IServiceManager") \
const android::String16 IServiceManager::descriptor("android.os.IServiceManager"); \
const android::String16& \
IServiceManager::getInterfaceDescriptor() const { \
return IServiceManager::descriptor; \
} \
android::sp<IServiceManager> IServiceManager::asInterface( \
const android::sp<android::IBinder>& obj) \
{ \
android::sp<IServiceManager> intr; \
if (obj != NULL) { \
intr = static_cast<IServiceManager*>( \
obj->queryLocalInterface( \
IServiceManager::descriptor).get()); \
if (intr == NULL) { \
intr = new BpServiceManager(obj); \
} \
} \
return intr; \
} \
IServiceManager::IServiceManager() { } \
IServiceManager::~IServiceManager() { }
~~~
估計寫這段代碼的員工是從Microsoft跳槽到Google的。這里我們關注IServiceManager::asInterface的實現:
~~~
android::sp<IServiceManager> IServiceManager::asInterface(const android::sp<android::IBinder>& obj)
{
android::sp<IServiceManager> intr;
if (obj != NULL) {
intr = static_cast<IServiceManager*>(
obj->queryLocalInterface(IServiceManager::descriptor).get());
if (intr == NULL) {
intr = new BpServiceManager(obj);
}
}
return intr;
}
~~~
這里傳進來的參數obj就則剛才創建的new BpBinder(0)了,BpBinder類中的成員函數queryLocalInterface繼承自基類IBinder,IBinder::queryLocalInterface函數位于framework/base/libs/binder/Binder.cpp文件中:
~~~
sp<IInterface> IBinder::queryLocalInterface(const String16& descriptor)
{
return NULL;
}
~~~
由此可見,在IServiceManager::asInterface函數中,最終會調用下面語句:
~~~
intr = new BpServiceManager(obj);
~~~
即為:
~~~
intr = new BpServiceManager(new BpBinder(0));
~~~
回到defaultServiceManager函數中,最終結果為:
~~~
gDefaultServiceManager = new BpServiceManager(new BpBinder(0));
~~~
這樣,Service Manager遠程接口就創建完成了,它本質上是一個BpServiceManager,包含了一個句柄值為0的Binder引用。
在Android系統的Binder機制中,Server和Client拿到這個Service Manager遠程接口之后怎么用呢?
對Server來說,就是調用IServiceManager::addService這個接口來和Binder驅動程序交互了,即調用BpServiceManager::addService 。而BpServiceManager::addService又會調用通過其基類BpRefBase的成員函數remote獲得原先創建的BpBinder實例,接著調用BpBinder::transact成員函數。在BpBinder::transact函數中,又會調用IPCThreadState::transact成員函數,這里就是最終與Binder驅動程序交互的地方了。回憶一下前面的類圖,IPCThreadState有一個PorcessState類型的成中變量mProcess,而mProcess有一個成員變量mDriverFD,它是設備文件/dev/binder的打開文件描述符,因此,IPCThreadState就相當于間接在擁有了設備文件/dev/binder的打開文件描述符,于是,便可以與Binder驅動程序交互了。
對Client來說,就是調用IServiceManager::getService這個接口來和Binder驅動程序交互了。具體過程上述Server使用Service Manager的方法是一樣的,這里就不再累述了。
IServiceManager::addService和IServiceManager::getService這兩個函數的具體實現,在下面兩篇文章中,會深入到Binder驅動程序這一層,進行詳細的源代碼分析,以便更好地理解Binder進程間通信機制,敬請關注。
- 前言
- Android組件設計思想
- Android源代碼開發和調試環境搭建
- Android源代碼下載和編譯
- Android源代碼情景分析法
- Android源代碼調試分析法
- 手把手教你為手機編譯ROM
- 在Ubuntu上下載、編譯和安裝Android最新源代碼
- 在Ubuntu上下載、編譯和安裝Android最新內核源代碼(Linux Kernel)
- 如何單獨編譯Android源代碼中的模塊
- 在Ubuntu上為Android系統編寫Linux內核驅動程序
- 在Ubuntu上為Android系統內置C可執行程序測試Linux內核驅動程序
- 在Ubuntu上為Android增加硬件抽象層(HAL)模塊訪問Linux內核驅動程序
- 在Ubuntu為Android硬件抽象層(HAL)模塊編寫JNI方法提供Java訪問硬件服務接口
- 在Ubuntu上為Android系統的Application Frameworks層增加硬件訪問服務
- 在Ubuntu上為Android系統內置Java應用程序測試Application Frameworks層的硬件服務
- Android源代碼倉庫及其管理工具Repo分析
- Android編譯系統簡要介紹和學習計劃
- Android編譯系統環境初始化過程分析
- Android源代碼編譯命令m/mm/mmm/make分析
- Android系統鏡像文件的打包過程分析
- 從CM刷機過程和原理分析Android系統結構
- Android系統架構概述
- Android系統整體架構
- android專用驅動
- Android硬件抽象層HAL
- Android應用程序組件
- Android應用程序框架
- Android用戶界面架構
- Android虛擬機之Dalvik虛擬機
- Android硬件抽象層
- Android硬件抽象層(HAL)概要介紹和學習計劃
- Android專用驅動
- Android Logger驅動系統
- Android日志系統驅動程序Logger源代碼分析
- Android應用程序框架層和系統運行庫層日志系統源代碼分析
- Android日志系統Logcat源代碼簡要分析
- Android Binder驅動系統
- Android進程間通信(IPC)機制Binder簡要介紹和學習計劃
- 淺談Service Manager成為Android進程間通信(IPC)機制Binder守護進程之路
- 淺談Android系統進程間通信(IPC)機制Binder中的Server和Client獲得Service Manager接口之路
- Android系統進程間通信(IPC)機制Binder中的Server啟動過程源代碼分析
- Android系統進程間通信(IPC)機制Binder中的Client獲得Server遠程接口過程源代碼分析
- Android系統進程間通信Binder機制在應用程序框架層的Java接口源代碼分析
- Android Ashmem驅動系統
- Android系統匿名共享內存Ashmem(Anonymous Shared Memory)簡要介紹和學習計劃
- Android系統匿名共享內存Ashmem(Anonymous Shared Memory)驅動程序源代碼分析
- Android系統匿名共享內存Ashmem(Anonymous Shared Memory)在進程間共享的原理分析
- Android系統匿名共享內存(Anonymous Shared Memory)C++調用接口分析
- Android應用程序進程管理
- Android應用程序進程啟動過程的源代碼分析
- Android系統進程Zygote啟動過程的源代碼分析
- Android系統默認Home應用程序(Launcher)的啟動過程源代碼分析
- Android應用程序消息機制
- Android應用程序消息處理機制(Looper、Handler)分析
- Android應用程序線程消息循環模型分析
- Android應用程序輸入事件分發和處理機制
- Android應用程序鍵盤(Keyboard)消息處理機制分析
- Android應用程序UI架構
- Android系統的開機畫面顯示過程分析
- Android幀緩沖區(Frame Buffer)硬件抽象層(HAL)模塊Gralloc的實現原理分析
- SurfaceFlinger
- Android系統Surface機制的SurfaceFlinger服務
- SurfaceFlinger服務簡要介紹和學習計劃
- 啟動過程分析
- 對幀緩沖區(Frame Buffer)的管理分析
- 線程模型分析
- 渲染應用程序UI的過程分析
- Android應用程序與SurfaceFlinger服務的關系
- 概述和學習計劃
- 連接過程分析
- 共享UI元數據(SharedClient)的創建過程分析
- 創建Surface的過程分析
- 渲染Surface的過程分析
- Android應用程序窗口(Activity)
- 實現框架簡要介紹和學習計劃
- 運行上下文環境(Context)的創建過程分析
- 窗口對象(Window)的創建過程分析
- 視圖對象(View)的創建過程分析
- 與WindowManagerService服務的連接過程分析
- 繪圖表面(Surface)的創建過程分析
- 測量(Measure)、布局(Layout)和繪制(Draw)過程分析
- WindowManagerService
- WindowManagerService的簡要介紹和學習計劃
- 計算Activity窗口大小的過程分析
- 對窗口的組織方式分析
- 對輸入法窗口(Input Method Window)的管理分析
- 對壁紙窗口(Wallpaper Window)的管理分析
- 計算窗口Z軸位置的過程分析
- 顯示Activity組件的啟動窗口(Starting Window)的過程分析
- 切換Activity窗口(App Transition)的過程分析
- 顯示窗口動畫的原理分析
- Android控件TextView的實現原理分析
- Android視圖SurfaceView的實現原理分析
- Android應用程序UI硬件加速渲染
- 簡要介紹和學習計劃
- 環境初始化過程分析
- 預加載資源地圖集服務(Asset Atlas Service)分析
- Display List構建過程分析
- Display List渲染過程分析
- 動畫執行過程分析
- Android應用程序資源管理框架
- Android資源管理框架(Asset Manager)
- Asset Manager 簡要介紹和學習計劃
- 編譯和打包過程分析
- Asset Manager的創建過程分析
- 查找過程分析
- Dalvik虛擬機和ART虛擬機
- Dalvik虛擬機
- Dalvik虛擬機簡要介紹和學習計劃
- Dalvik虛擬機的啟動過程分析
- Dalvik虛擬機的運行過程分析
- Dalvik虛擬機JNI方法的注冊過程分析
- Dalvik虛擬機進程和線程的創建過程分析
- Dalvik虛擬機垃圾收集機制簡要介紹和學習計劃
- Dalvik虛擬機Java堆創建過程分析
- Dalvik虛擬機為新創建對象分配內存的過程分析
- Dalvik虛擬機垃圾收集(GC)過程分析
- ART虛擬機
- Android ART運行時無縫替換Dalvik虛擬機的過程分析
- Android運行時ART簡要介紹和學習計劃
- Android運行時ART加載OAT文件的過程分析
- Android運行時ART加載類和方法的過程分析
- Android運行時ART執行類方法的過程分析
- ART運行時垃圾收集機制簡要介紹和學習計劃
- ART運行時Java堆創建過程分析
- ART運行時為新創建對象分配內存的過程分析
- ART運行時垃圾收集(GC)過程分析
- ART運行時Compacting GC簡要介紹和學習計劃
- ART運行時Compacting GC堆創建過程分析
- ART運行時Compacting GC為新創建對象分配內存的過程分析
- ART運行時Semi-Space(SS)和Generational Semi-Space(GSS)GC執行過程分析
- ART運行時Mark-Compact( MC)GC執行過程分析
- ART運行時Foreground GC和Background GC切換過程分析
- Android安全機制
- SEAndroid安全機制簡要介紹和學習計劃
- SEAndroid安全機制框架分析
- SEAndroid安全機制中的文件安全上下文關聯分析
- SEAndroid安全機制中的進程安全上下文關聯分析
- SEAndroid安全機制對Android屬性訪問的保護分析
- SEAndroid安全機制對Binder IPC的保護分析
- 從NDK在非Root手機上的調試原理探討Android的安全機制
- APK防反編譯
- Android視頻硬解穩定性問題探討和處理
- Android系統的智能指針(輕量級指針、強指針和弱指針)的實現原理分析
- Android應用程序安裝過程源代碼分析
- Android應用程序啟動過程源代碼分析
- 四大組件源代碼分析
- Activity
- Android應用程序的Activity啟動過程簡要介紹和學習計劃
- Android應用程序內部啟動Activity過程(startActivity)的源代碼分析
- 解開Android應用程序組件Activity的"singleTask"之謎
- Android應用程序在新的進程中啟動新的Activity的方法和過程分析
- Service
- Android應用程序綁定服務(bindService)的過程源代碼分析
- ContentProvider
- Android應用程序組件Content Provider簡要介紹和學習計劃
- Android應用程序組件Content Provider應用實例
- Android應用程序組件Content Provider的啟動過程源代碼分析
- Android應用程序組件Content Provider在應用程序之間共享數據的原理分析
- Android應用程序組件Content Provider的共享數據更新通知機制分析
- BroadcastReceiver
- Android系統中的廣播(Broadcast)機制簡要介紹和學習計劃
- Android應用程序注冊廣播接收器(registerReceiver)的過程分析
- Android應用程序發送廣播(sendBroadcast)的過程分析