
原文出處——>[Android系統匿名共享內存Ashmem(Anonymous Shared Memory)簡要介紹和學習計劃](http://blog.csdn.net/luoshengyang/article/details/6651971)
在Android系統中,提供了獨特的匿名共享內存子系統Ashmem(Anonymous Shared Memory),它以驅動程序的形式實現在內核空間中。它有兩個特點,一是能夠輔助內存管理系統來有效地管理不再使用的內存塊,二是它通過Binder進程間通信機制來實現進程間的內存共享。本文中,我們將通過實例來簡要介紹Android系統的匿名共享內存的使用方法,使得我們對Android系統的匿名共享內存機制有一個感性的認識,為進一步學習它的源代碼實現打下基礎。
Android系統的匿名共享內存子系統的主體是以驅動程序的形式實現在內核空間的,同時,在系統運行時庫層和應用程序框架層提供了訪問接口,其中,在系統運行時庫層提供了C/C++調用接口,而在應用程序框架層提供了Java調用接口。這里,我們將直接通過應用程序框架層提供的Java調用接口來說明匿名共享內存子系統Ashmem的使用方法,畢竟我們在Android開發應用程序時,是基于Java語言的,而實際上,應用程序框架層的Java調用接口是通過JNI方法來調用系統運行時庫層的C/C++調用接口,最后進入到內核空間的Ashmem驅動程序去的。
我們在這里舉的例子是一個名為Ashmem的應用程序,它包含了一個Server端和一個Client端實現,其中,Server端是以Service的形式實現的,在這里Service里面,創建一個匿名共享內存文件,而Client是一個Activity,這個Activity通過Binder進程間通信機制獲得前面這個Service創建的匿名共享內存文件的句柄,從而實現共享。在Android應用程序框架層,提供了一個MemoryFile接口來封裝了匿名共享內存文件的創建和使用,它實現在frameworks/base/core/java/android/os/MemoryFile.java文件中。下面,我們就來看看Server端是如何通過MemoryFile類來創建匿名共享內存文件的以及Client是如何獲得這個匿名共享內存文件的句柄的。
在MemoryFile類中,提供了兩種創建匿名共享內存的方法,我們通過MemoryFile類的構造函數來看看這兩種使用方法:
~~~
public class MemoryFile
{
......
/**
* Allocates a new ashmem region. The region is initially not purgable.
*
* @param name optional name for the file (can be null).
* @param length of the memory file in bytes.
* @throws IOException if the memory file could not be created.
*/
public MemoryFile(String name, int length) throws IOException {
mLength = length;
mFD = native_open(name, length);
mAddress = native_mmap(mFD, length, PROT_READ | PROT_WRITE);
mOwnsRegion = true;
}
/**
* Creates a reference to an existing memory file. Changes to the original file
* will be available through this reference.
* Calls to {@link #allowPurging(boolean)} on the returned MemoryFile will fail.
*
* @param fd File descriptor for an existing memory file, as returned by
* {@link #getFileDescriptor()}. This file descriptor will be closed
* by {@link #close()}.
* @param length Length of the memory file in bytes.
* @param mode File mode. Currently only "r" for read-only access is supported.
* @throws NullPointerException if <code>fd</code> is null.
* @throws IOException If <code>fd</code> does not refer to an existing memory file,
* or if the file mode of the existing memory file is more restrictive
* than <code>mode</code>.
*
* @hide
*/
public MemoryFile(FileDescriptor fd, int length, String mode) throws IOException {
if (fd == null) {
throw new NullPointerException("File descriptor is null.");
}
if (!isMemoryFile(fd)) {
throw new IllegalArgumentException("Not a memory file.");
}
mLength = length;
mFD = fd;
mAddress = native_mmap(mFD, length, modeToProt(mode));
mOwnsRegion = false;
}
......
}
~~~
從注釋中,我們可以看出這兩個構造函數的使用方法,這里就不再詳述了。兩個構造函數的主要區別是第一個參數,第一種構造方法是以指定的字符串調用JNI方法native_open來創建一個匿名共享內存文件,從而得到一個文件描述符,接著就以這個文件描述符為參數調用JNI方法natvie_mmap把這個匿名共享內存文件映射在進程空間中,然后就可以通過這個映射后得到的地址空間來直接訪問內存數據了;第二種構造方法是以指定的文件描述符來直接調用JNI方法natvie_mmap把這個匿名共享內存文件映射在進程空間中,然后進行訪問,而這個文件描述符就必須要是一個匿名共享內存文件的文件描述符,這是通過一個內部函數isMemoryFile來驗證的,而這個內部函數isMemoryFile也是通過JNI方法調用來進一步驗證的。前面所提到的這些JNI方法調用,最終都是通過系統運行時庫層進入到內核空間的Ashmem驅動程序中去,不過這里我們不關心這些JNI方法、系統運行庫層調用以及Ashmem驅動程序的具體實現,在接下來的兩篇文章中,我們將會著重介紹,這里我們只關注MemoryFile這個類的使用方法。
前面我們說到,我們在這里舉的例子包含了一個Server端和一個Client端實現,其中, Server端就是通過前面一個構造函數來創建一個匿名共享內存文件,接著,Client端過Binder進程間通信機制來向Server請求這個匿名共享內存的文件描述符,有了這個文件描述符之后,就可以通過后面一個構造函數來共享這個內存文件了。
因為涉及到Binder進程間通信,我們首先定義好Binder進程間通信接口。Binder進程間通信機制的相關介紹,請參考前面一篇文章Android進程間通信(IPC)機制Binder簡要介紹和學習計劃,這里就不詳細介紹了,直接進入主題。
首先在源代碼工程的packages/experimental目錄下創建一個應用程序工程目錄Ashmem。關于如何獲得Android源代碼工程,請參考在Ubuntu上下載、編譯和安裝Android最新源代碼一文;關于如何在Android源代碼工程中創建應用程序工程,請參考在Ubuntu上為Android系統內置Java應用程序測試Application Frameworks層的硬件服務一文。這里,工程名稱就是Ashmem了,它定義了一個路徑為shy.luo.ashmem的package,這個例子的源代碼主要就是實現在這里了。下面,將會逐一介紹這個package里面的文件。
這里要用到的Binder進程間通信接口定義在src/shy/luo/ashmem/IMemoryService.java文件中:
~~~
package shy.luo.ashmem;
import android.util.Log;
import android.os.IInterface;
import android.os.Binder;
import android.os.IBinder;
import android.os.Parcel;
import android.os.ParcelFileDescriptor;
import android.os.RemoteException;
public interface IMemoryService extends IInterface {
public static abstract class Stub extends Binder implements IMemoryService {
private static final String DESCRIPTOR = "shy.luo.ashmem.IMemoryService";
public Stub() {
attachInterface(this, DESCRIPTOR);
}
public static IMemoryService asInterface(IBinder obj) {
if (obj == null) {
return null;
}
IInterface iin = (IInterface)obj.queryLocalInterface(DESCRIPTOR);
if (iin != null && iin instanceof IMemoryService) {
return (IMemoryService)iin;
}
return new IMemoryService.Stub.Proxy(obj);
}
public IBinder asBinder() {
return this;
}
@Override
public boolean onTransact(int code, Parcel data, Parcel reply, int flags) throws android.os.RemoteException {
switch (code) {
case INTERFACE_TRANSACTION: {
reply.writeString(DESCRIPTOR);
return true;
}
case TRANSACTION_getFileDescriptor: {
data.enforceInterface(DESCRIPTOR);
ParcelFileDescriptor result = this.getFileDescriptor();
reply.writeNoException();
if (result != null) {
reply.writeInt(1);
result.writeToParcel(reply, 0);
} else {
reply.writeInt(0);
}
return true;
}
case TRANSACTION_setValue: {
data.enforceInterface(DESCRIPTOR);
int val = data.readInt();
setValue(val);
reply.writeNoException();
return true;
}
}
return super.onTransact(code, data, reply, flags);
}
private static class Proxy implements IMemoryService {
private IBinder mRemote;
Proxy(IBinder remote) {
mRemote = remote;
}
public IBinder asBinder() {
return mRemote;
}
public String getInterfaceDescriptor() {
return DESCRIPTOR;
}
public ParcelFileDescriptor getFileDescriptor() throws RemoteException {
Parcel data = Parcel.obtain();
Parcel reply = Parcel.obtain();
ParcelFileDescriptor result;
try {
data.writeInterfaceToken(DESCRIPTOR);
mRemote.transact(Stub.TRANSACTION_getFileDescriptor, data, reply, 0);
reply.readException();
if (0 != reply.readInt()) {
result = ParcelFileDescriptor.CREATOR.createFromParcel(reply);
} else {
result = null;
}
} finally {
reply.recycle();
data.recycle();
}
return result;
}
public void setValue(int val) throws RemoteException {
Parcel data = Parcel.obtain();
Parcel reply = Parcel.obtain();
try {
data.writeInterfaceToken(DESCRIPTOR);
data.writeInt(val);
mRemote.transact(Stub.TRANSACTION_setValue, data, reply, 0);
reply.readException();
} finally {
reply.recycle();
data.recycle();
}
}
}
static final int TRANSACTION_getFileDescriptor = IBinder.FIRST_CALL_TRANSACTION + 0;
static final int TRANSACTION_setValue = IBinder.FIRST_CALL_TRANSACTION + 1;
}
public ParcelFileDescriptor getFileDescriptor() throws RemoteException;
public void setValue(int val) throws RemoteException;
}
~~~
這里主要是定義了IMemoryService接口,它里面有兩個調用接口:
~~~
public ParcelFileDescriptor getFileDescriptor() throws RemoteException;
public void setValue(int val) throws RemoteException;
~~~
同時,還分別定義了用于Server端實現的IMemoryService.Stub基類和用于Client端使用的代理IMemoryService.Stub.Proxy類。關于Binder進程間通信機制在應用程序框架層的Java接口定義,請參考前面Android系統進程間通信Binder機制在應用程序框架層的Java接口源代碼分析一文。
有了Binder進程間通信接口之后,接下來就是要在Server端實現一個本地服務了。這里,Server端實現的本地服務名為MemoryService,實現在src/shy/luo/ashmem/MemoryService.java文件中:
~~~
package shy.luo.ashmem;
import java.io.FileDescriptor;
import java.io.IOException;
import android.os.Parcel;
import android.os.MemoryFile;
import android.os.ParcelFileDescriptor;
import android.util.Log;
public class MemoryService extends IMemoryService.Stub {
private final static String LOG_TAG = "shy.luo.ashmem.MemoryService";
private MemoryFile file = null;
public MemoryService() {
try {
file = new MemoryFile("Ashmem", 4);
setValue(0);
}
catch(IOException ex) {
Log.i(LOG_TAG, "Failed to create memory file.");
ex.printStackTrace();
}
}
public ParcelFileDescriptor getFileDescriptor() {
Log.i(LOG_TAG, "Get File Descriptor.");
ParcelFileDescriptor pfd = null;
try {
pfd = file.getParcelFileDescriptor();
} catch(IOException ex) {
Log.i(LOG_TAG, "Failed to get file descriptor.");
ex.printStackTrace();
}
return pfd;
}
public void setValue(int val) {
if(file == null) {
return;
}
byte[] buffer = new byte[4];
buffer[0] = (byte)((val >>> 24) & 0xFF);
buffer[1] = (byte)((val >>> 16) & 0xFF);
buffer[2] = (byte)((val >>> 8) & 0xFF);
buffer[3] = (byte)(val & 0xFF);
try {
file.writeBytes(buffer, 0, 0, 4);
Log.i(LOG_TAG, "Set value " + val + " to memory file. ");
}
catch(IOException ex) {
Log.i(LOG_TAG, "Failed to write bytes to memory file.");
ex.printStackTrace();
}
}
}
~~~
注意,這里的MemoryService類實現了IMemoryService.Stub類,表示這是一個Binder服務的本地實現。在構造函數中,通過指定文件名和文件大小來創建了一個匿名共享內存文件,即創建MemoryFile的一個實例,并保存在類成員變量file中。這個匿名共享內存文件名為"Ashmem",大小為4個節字,剛好容納一個整數,我們這里舉的例子就是要說明如果創建一個匿名共享內存來在兩個進程間實現共享一個整數了。當然,在實際應用中,可以根據需要創建合適大小的共享內存來共享有意義的數據。
這里還實現了IMemoryService.Stub的兩個接口getFileDescriptor和setVal,一個用來獲取匿名共享內存文件的文件描述符,一個來往匿名共享內存文件中寫入一個整數,其中,接口getFileDescriptor的返回值是一個ParcelFileDescriptor。在Java中,是用FileDescriptor類來表示一個文件描述符的,而ParcelFileDescriptor是用來序列化FileDescriptor的,以便在進程間調用時傳輸。
定義好本地服務好,就要定義一個Server來啟動這個服務了。這里定義的Server實現在src/shy/luo/ashmem/Server.java文件中:
~~~
package shy.luo.ashmem;
import android.app.Service;
import android.content.Intent;
import android.os.IBinder;
import android.util.Log;
import android.os.ServiceManager;
public class Server extends Service {
private final static String LOG_TAG = "shy.luo.ashmem.Server";
private MemoryService memoryService = null;
@Override
public IBinder onBind(Intent intent) {
return null;
}
@Override
public void onCreate() {
Log.i(LOG_TAG, "Create Memory Service...");
memoryService = new MemoryService();
try {
ServiceManager.addService("AnonymousSharedMemory", memoryService);
Log.i(LOG_TAG, "Succeed to add memory service.");
} catch (RuntimeException ex) {
Log.i(LOG_TAG, "Failed to add Memory Service.");
ex.printStackTrace();
}
}
@Override
public void onStart(Intent intent, int startId) {
Log.i(LOG_TAG, "Start Memory Service.");
}
@Override
public void onDestroy() {
Log.i(LOG_TAG, "Destroy Memory Service.");
}
}
~~~
這個Server繼承了Android系統應用程序框架層提供的Service類,當它被啟動時,運行在一個獨立的進程中。當這個Server被啟動時,它的onCreate函數就會被調用,然后它就通過ServiceManager的addService接口來添加MemoryService了:
~~~
memoryService = new MemoryService();
try {
ServiceManager.addService("AnonymousSharedMemory", memoryService);
Log.i(LOG_TAG, "Succeed to add memory service.");
} catch (RuntimeException ex) {
Log.i(LOG_TAG, "Failed to add Memory Service.");
ex.printStackTrace();
}
~~~
這樣,當這個Server成功啟動了,Client就可以通過ServiceManager的getService接口來獲取這個MemoryService了。
接著,我們就來看Client端的實現。Client端是一個Activity,實現在src/shy/luo/ashmem/Client.java文件中:
~~~
package shy.luo.ashmem;
import java.io.FileDescriptor;
import java.io.IOException;
import shy.luo.ashmem.R;
import android.app.Activity;
import android.content.Intent;
import android.os.Bundle;
import android.os.MemoryFile;
import android.os.ParcelFileDescriptor;
import android.os.ServiceManager;
import android.os.RemoteException;
import android.util.Log;
import android.view.View;
import android.view.View.OnClickListener;
import android.widget.Button;
import android.widget.EditText;
public class Client extends Activity implements OnClickListener {
private final static String LOG_TAG = "shy.luo.ashmem.Client";
IMemoryService memoryService = null;
MemoryFile memoryFile = null;
private EditText valueText = null;
private Button readButton = null;
private Button writeButton = null;
private Button clearButton = null;
@Override
public void onCreate(Bundle savedInstanceState) {
super.onCreate(savedInstanceState);
setContentView(R.layout.main);
IMemoryService ms = getMemoryService();
if(ms == null) {
startService(new Intent("shy.luo.ashmem.server"));
} else {
Log.i(LOG_TAG, "Memory Service has started.");
}
valueText = (EditText)findViewById(R.id.edit_value);
readButton = (Button)findViewById(R.id.button_read);
writeButton = (Button)findViewById(R.id.button_write);
clearButton = (Button)findViewById(R.id.button_clear);
readButton.setOnClickListener(this);
writeButton.setOnClickListener(this);
clearButton.setOnClickListener(this);
Log.i(LOG_TAG, "Client Activity Created.");
}
@Override
public void onResume() {
super.onResume();
Log.i(LOG_TAG, "Client Activity Resumed.");
}
@Override
public void onPause() {
super.onPause();
Log.i(LOG_TAG, "Client Activity Paused.");
}
@Override
public void onClick(View v) {
if(v.equals(readButton)) {
int val = 0;
MemoryFile mf = getMemoryFile();
if(mf != null) {
try {
byte[] buffer = new byte[4];
mf.readBytes(buffer, 0, 0, 4);
val = (buffer[0] << 24) | ((buffer[1] & 0xFF) << 16) | ((buffer[2] & 0xFF) << 8) | (buffer[3] & 0xFF);
} catch(IOException ex) {
Log.i(LOG_TAG, "Failed to read bytes from memory file.");
ex.printStackTrace();
}
}
String text = String.valueOf(val);
valueText.setText(text);
} else if(v.equals(writeButton)) {
String text = valueText.getText().toString();
int val = Integer.parseInt(text);
IMemoryService ms = getMemoryService();
if(ms != null) {
try {
ms.setValue(val);
} catch(RemoteException ex) {
Log.i(LOG_TAG, "Failed to set value to memory service.");
ex.printStackTrace();
}
}
} else if(v.equals(clearButton)) {
String text = "";
valueText.setText(text);
}
}
private IMemoryService getMemoryService() {
if(memoryService != null) {
return memoryService;
}
memoryService = IMemoryService.Stub.asInterface(
ServiceManager.getService("AnonymousSharedMemory"));
Log.i(LOG_TAG, memoryService != null ? "Succeed to get memeory service." : "Failed to get memory service.");
return memoryService;
}
private MemoryFile getMemoryFile() {
if(memoryFile != null) {
return memoryFile;
}
IMemoryService ms = getMemoryService();
if(ms != null) {
try {
ParcelFileDescriptor pfd = ms.getFileDescriptor();
if(pfd == null) {
Log.i(LOG_TAG, "Failed to get memory file descriptor.");
return null;
}
try {
FileDescriptor fd = pfd.getFileDescriptor();
if(fd == null) {
Log.i(LOG_TAG, "Failed to get memeory file descriptor.");
return null;
}
memoryFile = new MemoryFile(fd, 4, "r");
} catch(IOException ex) {
Log.i(LOG_TAG, "Failed to create memory file.");
ex.printStackTrace();
}
} catch(RemoteException ex) {
Log.i(LOG_TAG, "Failed to get file descriptor from memory service.");
ex.printStackTrace();
}
}
return memoryFile;
}
}
~~~
Client端的界面主要包含了三個按鈕Read、Write和Clear,以及一個用于顯示內容的文本框。
這個Activity在onCreate時,會通過startService接口來啟動我們前面定義的Server進程。調用startService時,需要指定要啟動的服務的名稱,這里就是"shy.luo.ashmem.server"了,后面我們會在程序的描述文件AndroidManifest.xml看到前面的Server類是如何和名稱"shy.luo.ashmem.server"關聯起來的。關于調用startService函數來啟動自定義服務的過程,可以參考Android系統在新進程中啟動自定義服務過程(startService)的原理分析一文。
內部函數getMemoryService用來獲取IMemoryService。如果是第一次調用該函數,則會通過ServiceManager的getService接口來獲得這個IMemoryService接口,然后保存在類成員變量memoryService中,以后再調用這個函數時,就可以直接返回memoryService了。
內部函數getMemoryFile用來從MemoryService中獲得匿名共享內存文件的描述符。同樣,如果是第一次調用該函數,則會通過IMemoryService的getFileDescriptor接口來獲得MemoryService中的匿名共享內存文件的描述符,然后用這個文件描述符來創建一個MemoryFile實例,并保存在類成員變量memoryFile中,以后再調用這個函數時,就可以直接返回memoryFile了。
有了memoryService和memoryFile后,我們就可以在Client端訪問Server端創建的匿名共享內存了。點擊Read按鈕時,就通過memoryFile的readBytes接口把共享內存中的整數讀出來,并顯示在文本框中;點擊Write按鈕時,就通過memoryService這個代理類的setVal接口來調用MemoryService的本地實現類的setVal服務,從而把文本框中的數值寫到Server端創建的匿名共享內存中去;點擊Clear按鈕時,就會清空文本框的內容。這樣,我們就可以通過Read和Write按鈕來驗證我們是否在Client和Server兩個進程中實現內存共享了。
現在,我們再來看看Client界面的配置文件,它定義在res/layout/main.xml文件中:
~~~
<?xml version="1.0" encoding="utf-8"?>
<LinearLayout xmlns:android="http://schemas.android.com/apk/res/android"
android:orientation="vertical"
android:layout_width="fill_parent"
android:layout_height="fill_parent"
>
<LinearLayout
android:layout_width="fill_parent"
android:layout_height="wrap_content"
android:orientation="vertical"
android:gravity="center">
<TextView
android:layout_width="wrap_content"
android:layout_height="wrap_content"
android:text="@string/value">
</TextView>
<EditText
android:layout_width="fill_parent"
android:layout_height="wrap_content"
android:id="@+id/edit_value"
android:hint="@string/hint">
</EditText>
</LinearLayout>
<LinearLayout
android:layout_width="fill_parent"
android:layout_height="wrap_content"
android:orientation="horizontal"
android:gravity="center">
<Button
android:id="@+id/button_read"
android:layout_width="wrap_content"
android:layout_height="wrap_content"
android:text="@string/read">
</Button>
<Button
android:id="@+id/button_write"
android:layout_width="wrap_content"
android:layout_height="wrap_content"
android:text="@string/write">
</Button>
<Button
android:id="@+id/button_clear"
android:layout_width="wrap_content"
android:layout_height="wrap_content"
android:text="@string/clear">
</Button>
</LinearLayout>
</LinearLayout>
~~~
相關的字符串定義在res/values/strings.xml文件中:
~~~
<?xml version="1.0" encoding="utf-8"?>
<resources>
<string name="app_name">Ashmem</string>
<string name="value">Value</string>
<string name="hint">Please input a value...</string>
<string name="read">Read</string>
<string name="write">Write</string>
<string name="clear">Clear</string>
</resources>
~~~
這樣,界面的相關配置文件就介紹完了。
我們還要再來看程序描述文件AndroidManifest.xml的相關配置,它位于Ashmem目錄下:
~~~
<?xml version="1.0" encoding="utf-8"?>
<manifest xmlns:android="http://schemas.android.com/apk/res/android"
package="shy.luo.ashmem"
android:sharedUserId="android.uid.system"
android:versionCode="1"
android:versionName="1.0">
<application android:icon="@drawable/icon" android:label="@string/app_name">
<activity android:name=".Client"
android:label="@string/app_name">
<intent-filter>
<action android:name="android.intent.action.MAIN" />
<category android:name="android.intent.category.LAUNCHER" />
</intent-filter>
</activity>
<service
android:enabled="true"
android:name=".Server"
android:process=".Server" >
<intent-filter>
<action android:name="shy.luo.ashmem.server"/>
<category android:name="android.intent.category.DEFAULT"/>
</intent-filter>
</service>
</application>
</manifest>
~~~
這里我們可以看到,下面的配置項把服務名稱"shy.luo.ashmem.server"和本地服務類Server關聯了起來:
~~~
<service
android:enabled="true"
android:name=".Server"
android:process=".Server" >
<intent-filter>
<action android:name="shy.luo.ashmem.server"/>
<category android:name="android.intent.category.DEFAULT"/>
</intent-filter>
</service>
~~~
這樣,我們就可以通過startService(new Intent("shy.luo.ashmem.server"))來啟動這個Server了。不過,在Android中,啟動服務是需要權限的,所以,下面這一行配置獲取了啟動服務需要的相應權限:
~~~
android:sharedUserId="android.uid.system"
~~~
最后,我們來看工程的編譯腳本文件Android.mk,它位于Ashmem目錄下:
~~~
LOCAL_PATH:= $(call my-dir)
include $(CLEAR_VARS)
LOCAL_MODULE_TAGS := optional
LOCAL_SRC_FILES += $(call all-subdir-java-files)
LOCAL_PACKAGE_NAME := Ashmem
LOCAL_CERTIFICATE := platform
include $(BUILD_PACKAGE)
~~~
這里又有一個關鍵的地方:
~~~
LOCAL_CERTIFICATE := platform
~~~
因為我們需要在程序中啟動Service,所以要配置這一行,并且要把源代碼工程放在Android源代碼平臺中進行編譯。
這樣,整個例子的源代碼實現就介紹完了,接下來就要編譯了。有關如何單獨編譯Android源代碼工程的模塊,以及如何打包system.img,請參考如何單獨編譯Android源代碼中的模塊一文。
執行以下命令進行編譯和打包:
~~~
USER-NAME@MACHINE-NAME:~/Android$ mmm packages/experimental/Ashmem
USER-NAME@MACHINE-NAME:~/Android$ make snod
~~~
這樣,打包好的Android系統鏡像文件system.img就包含我們前面創建的Ashmem應用程序了。
再接下來,就是運行模擬器來運行我們的例子了。關于如何在Android源代碼工程中運行模擬器,請參考在Ubuntu上下載、編譯和安裝Android最新源代碼一文。
執行以下命令啟動模擬器:
~~~
USER-NAME@MACHINE-NAME:~/Android$ emulator
~~~
模擬器啟動起,就可以在Home Screen上看到Ashmem應用程序圖標了:
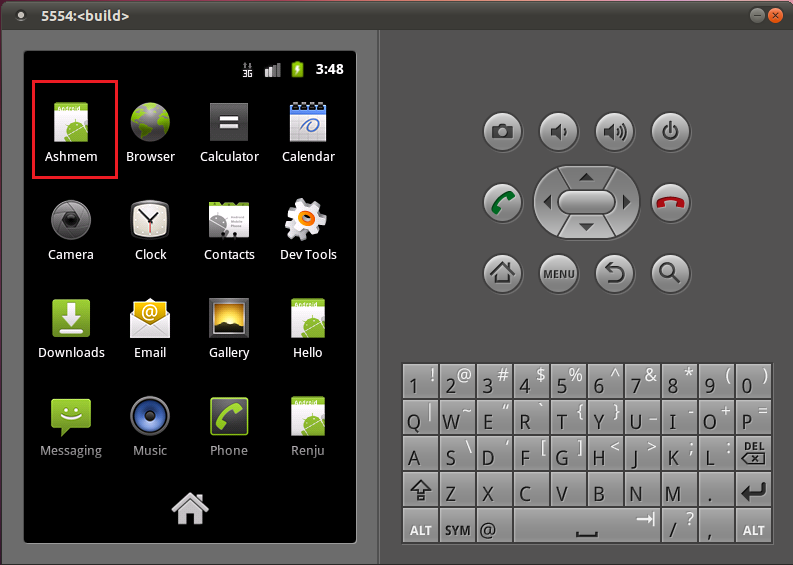
點擊Ashmem圖標,啟動Ashmem應用程序,界面如下:
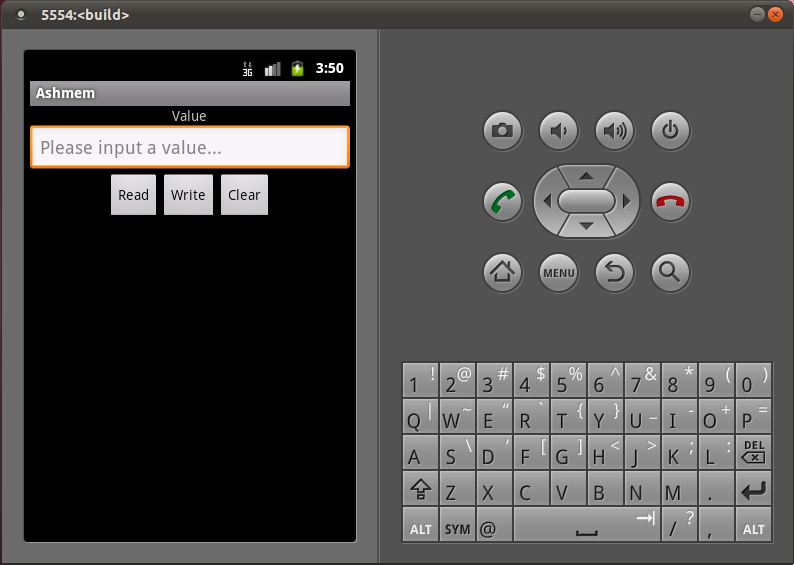
這樣,我們就可以驗證程序的功能了,看看是否實現了在兩個進程中通過使用Android系統的匿名共享內存機制來共享內存數據的功能。
通過這個例子的學習,相信讀者對Android系統匿名共享內存子系統Ashmem有了一個大概的認識,但是,這種認識還是停留在表面上。我們在文章開始時就提到,Android系統匿名共享內存子系統Ashmem兩個特點,一是能夠輔助內存管理系統來有效地管理不再使用的內存塊,二是它通過Binder進程間通信機制來實現進程間的內存共享。第二個特點我們在上面這個例子中看到了,但是似乎還不夠深入,我們知道,在Linux系統中,文件描述符其實就是一個整數,它是用來索引進程保存在內核空間的打開文件數據結構的,而且,這個文件描述符只是在進程內有效,也就是說,在不同的進程中,相同的文件描述符的值,代表的可能是不同的打開文件,既然是這樣,把Server進程中的文件描述符傳給Client進程,似乎就沒有用了,但是不用擔心,在傳輸過程中,Binder驅動程序會幫我們處理好一切,保證Client進程拿到的文件描述符是在本進程中有效的,并且它指向就是Server進程創建的匿名共享內存文件。至于第一個特點,我們也準備在后續學習Android系統匿名共享內存子系統Ashmem時,再詳細介紹。
因此,為了深入了解Android系統匿名共享內存子系統Ashmem,在接下來的兩篇文章中,圍繞上面提到的兩個特點,分別學習:
1. Android系統匿名共享內存子系統Ashmem是如何夠輔助內存管理系統來有效地管理不再使用的內存塊的?
2. Android系統匿名共享內存子系統Ashmem是如何通過Binder進程間通信機制來實現進程間的內存共享的?
學習完這兩篇文章后,相信大家對 Android系統匿名共享內存子系統Ashmem就會有一個更深刻的認識了,敬請關注。
- 前言
- Android組件設計思想
- Android源代碼開發和調試環境搭建
- Android源代碼下載和編譯
- Android源代碼情景分析法
- Android源代碼調試分析法
- 手把手教你為手機編譯ROM
- 在Ubuntu上下載、編譯和安裝Android最新源代碼
- 在Ubuntu上下載、編譯和安裝Android最新內核源代碼(Linux Kernel)
- 如何單獨編譯Android源代碼中的模塊
- 在Ubuntu上為Android系統編寫Linux內核驅動程序
- 在Ubuntu上為Android系統內置C可執行程序測試Linux內核驅動程序
- 在Ubuntu上為Android增加硬件抽象層(HAL)模塊訪問Linux內核驅動程序
- 在Ubuntu為Android硬件抽象層(HAL)模塊編寫JNI方法提供Java訪問硬件服務接口
- 在Ubuntu上為Android系統的Application Frameworks層增加硬件訪問服務
- 在Ubuntu上為Android系統內置Java應用程序測試Application Frameworks層的硬件服務
- Android源代碼倉庫及其管理工具Repo分析
- Android編譯系統簡要介紹和學習計劃
- Android編譯系統環境初始化過程分析
- Android源代碼編譯命令m/mm/mmm/make分析
- Android系統鏡像文件的打包過程分析
- 從CM刷機過程和原理分析Android系統結構
- Android系統架構概述
- Android系統整體架構
- android專用驅動
- Android硬件抽象層HAL
- Android應用程序組件
- Android應用程序框架
- Android用戶界面架構
- Android虛擬機之Dalvik虛擬機
- Android硬件抽象層
- Android硬件抽象層(HAL)概要介紹和學習計劃
- Android專用驅動
- Android Logger驅動系統
- Android日志系統驅動程序Logger源代碼分析
- Android應用程序框架層和系統運行庫層日志系統源代碼分析
- Android日志系統Logcat源代碼簡要分析
- Android Binder驅動系統
- Android進程間通信(IPC)機制Binder簡要介紹和學習計劃
- 淺談Service Manager成為Android進程間通信(IPC)機制Binder守護進程之路
- 淺談Android系統進程間通信(IPC)機制Binder中的Server和Client獲得Service Manager接口之路
- Android系統進程間通信(IPC)機制Binder中的Server啟動過程源代碼分析
- Android系統進程間通信(IPC)機制Binder中的Client獲得Server遠程接口過程源代碼分析
- Android系統進程間通信Binder機制在應用程序框架層的Java接口源代碼分析
- Android Ashmem驅動系統
- Android系統匿名共享內存Ashmem(Anonymous Shared Memory)簡要介紹和學習計劃
- Android系統匿名共享內存Ashmem(Anonymous Shared Memory)驅動程序源代碼分析
- Android系統匿名共享內存Ashmem(Anonymous Shared Memory)在進程間共享的原理分析
- Android系統匿名共享內存(Anonymous Shared Memory)C++調用接口分析
- Android應用程序進程管理
- Android應用程序進程啟動過程的源代碼分析
- Android系統進程Zygote啟動過程的源代碼分析
- Android系統默認Home應用程序(Launcher)的啟動過程源代碼分析
- Android應用程序消息機制
- Android應用程序消息處理機制(Looper、Handler)分析
- Android應用程序線程消息循環模型分析
- Android應用程序輸入事件分發和處理機制
- Android應用程序鍵盤(Keyboard)消息處理機制分析
- Android應用程序UI架構
- Android系統的開機畫面顯示過程分析
- Android幀緩沖區(Frame Buffer)硬件抽象層(HAL)模塊Gralloc的實現原理分析
- SurfaceFlinger
- Android系統Surface機制的SurfaceFlinger服務
- SurfaceFlinger服務簡要介紹和學習計劃
- 啟動過程分析
- 對幀緩沖區(Frame Buffer)的管理分析
- 線程模型分析
- 渲染應用程序UI的過程分析
- Android應用程序與SurfaceFlinger服務的關系
- 概述和學習計劃
- 連接過程分析
- 共享UI元數據(SharedClient)的創建過程分析
- 創建Surface的過程分析
- 渲染Surface的過程分析
- Android應用程序窗口(Activity)
- 實現框架簡要介紹和學習計劃
- 運行上下文環境(Context)的創建過程分析
- 窗口對象(Window)的創建過程分析
- 視圖對象(View)的創建過程分析
- 與WindowManagerService服務的連接過程分析
- 繪圖表面(Surface)的創建過程分析
- 測量(Measure)、布局(Layout)和繪制(Draw)過程分析
- WindowManagerService
- WindowManagerService的簡要介紹和學習計劃
- 計算Activity窗口大小的過程分析
- 對窗口的組織方式分析
- 對輸入法窗口(Input Method Window)的管理分析
- 對壁紙窗口(Wallpaper Window)的管理分析
- 計算窗口Z軸位置的過程分析
- 顯示Activity組件的啟動窗口(Starting Window)的過程分析
- 切換Activity窗口(App Transition)的過程分析
- 顯示窗口動畫的原理分析
- Android控件TextView的實現原理分析
- Android視圖SurfaceView的實現原理分析
- Android應用程序UI硬件加速渲染
- 簡要介紹和學習計劃
- 環境初始化過程分析
- 預加載資源地圖集服務(Asset Atlas Service)分析
- Display List構建過程分析
- Display List渲染過程分析
- 動畫執行過程分析
- Android應用程序資源管理框架
- Android資源管理框架(Asset Manager)
- Asset Manager 簡要介紹和學習計劃
- 編譯和打包過程分析
- Asset Manager的創建過程分析
- 查找過程分析
- Dalvik虛擬機和ART虛擬機
- Dalvik虛擬機
- Dalvik虛擬機簡要介紹和學習計劃
- Dalvik虛擬機的啟動過程分析
- Dalvik虛擬機的運行過程分析
- Dalvik虛擬機JNI方法的注冊過程分析
- Dalvik虛擬機進程和線程的創建過程分析
- Dalvik虛擬機垃圾收集機制簡要介紹和學習計劃
- Dalvik虛擬機Java堆創建過程分析
- Dalvik虛擬機為新創建對象分配內存的過程分析
- Dalvik虛擬機垃圾收集(GC)過程分析
- ART虛擬機
- Android ART運行時無縫替換Dalvik虛擬機的過程分析
- Android運行時ART簡要介紹和學習計劃
- Android運行時ART加載OAT文件的過程分析
- Android運行時ART加載類和方法的過程分析
- Android運行時ART執行類方法的過程分析
- ART運行時垃圾收集機制簡要介紹和學習計劃
- ART運行時Java堆創建過程分析
- ART運行時為新創建對象分配內存的過程分析
- ART運行時垃圾收集(GC)過程分析
- ART運行時Compacting GC簡要介紹和學習計劃
- ART運行時Compacting GC堆創建過程分析
- ART運行時Compacting GC為新創建對象分配內存的過程分析
- ART運行時Semi-Space(SS)和Generational Semi-Space(GSS)GC執行過程分析
- ART運行時Mark-Compact( MC)GC執行過程分析
- ART運行時Foreground GC和Background GC切換過程分析
- Android安全機制
- SEAndroid安全機制簡要介紹和學習計劃
- SEAndroid安全機制框架分析
- SEAndroid安全機制中的文件安全上下文關聯分析
- SEAndroid安全機制中的進程安全上下文關聯分析
- SEAndroid安全機制對Android屬性訪問的保護分析
- SEAndroid安全機制對Binder IPC的保護分析
- 從NDK在非Root手機上的調試原理探討Android的安全機制
- APK防反編譯
- Android視頻硬解穩定性問題探討和處理
- Android系統的智能指針(輕量級指針、強指針和弱指針)的實現原理分析
- Android應用程序安裝過程源代碼分析
- Android應用程序啟動過程源代碼分析
- 四大組件源代碼分析
- Activity
- Android應用程序的Activity啟動過程簡要介紹和學習計劃
- Android應用程序內部啟動Activity過程(startActivity)的源代碼分析
- 解開Android應用程序組件Activity的"singleTask"之謎
- Android應用程序在新的進程中啟動新的Activity的方法和過程分析
- Service
- Android應用程序綁定服務(bindService)的過程源代碼分析
- ContentProvider
- Android應用程序組件Content Provider簡要介紹和學習計劃
- Android應用程序組件Content Provider應用實例
- Android應用程序組件Content Provider的啟動過程源代碼分析
- Android應用程序組件Content Provider在應用程序之間共享數據的原理分析
- Android應用程序組件Content Provider的共享數據更新通知機制分析
- BroadcastReceiver
- Android系統中的廣播(Broadcast)機制簡要介紹和學習計劃
- Android應用程序注冊廣播接收器(registerReceiver)的過程分析
- Android應用程序發送廣播(sendBroadcast)的過程分析