[TOC]
不知不覺,Android主流三方庫源碼分析系列已經要接近尾聲了。這一次,筆者將會對Android中的事件總線框架EventBus源碼進行詳細地解析,一起來和大家揭開它背后的面紗。
### 一、簡單示例
#### 1、首先,定義要傳遞的事件實體
~~~
public class CollectEvent { ... }
~~~
#### 2、準備訂閱者:聲明并注解你的訂閱方法
~~~
@Subscribe(threadMode = ThreadMode.MAIN)
public void onMessageEvent(CollectEvent event) {
LogHelper.d("OK");
}
~~~
#### 3、在2中,也就是訂閱中所在的類中,注冊和解注冊你的訂閱者
~~~
@Override
public void onStart() {
super.onStart();
EventBus.getDefault().register(this);
}
@Override
public void onStop() {
super.onStop();
EventBus.getDefault().unregister(this);
}
~~~
#### 4、發送事件
~~~
EventBus.getDefault().post(new CollectEvent());
~~~
在正式講解之前,筆者覺得需要對一些基礎性的概念進行詳細的講解。眾所周知,EventBus沒出現之前,那時候的開發者一般是使用Android四大組件中的廣播進行組件間的消息傳遞,那么我們**為什么要使用事件總線機制來替代廣播呢**?主要是因為:
* 廣播:耗時、容易被捕獲(不安全)。
* 事件總線:更節省資源、更高效,能將信息傳遞給原生以外的各種對象。
那么,話又說回來了,**事件總線又是什么呢?**
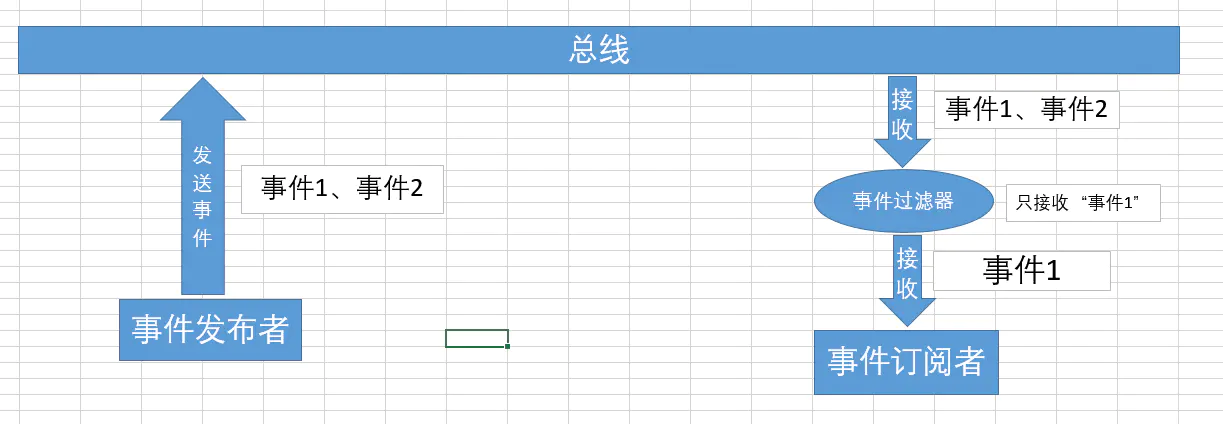
如下圖所示,事件總線機制通過記錄對象、使用觀察者模式來通知對象各種事件。(當然,你也可以發送基本數據類型如 int,String 等作為一個事件)
對于**事件總線EventBus**而言,它的**優缺點**又是如何?這里簡單總結下:
* 優點:開銷小,代碼更優雅、簡潔,解耦發送者和接收者,可動態設置事件處理線程和優先級。
* 缺點:每個事件必須自定義一個事件類,增加了維護成本。
EventBus是基于觀察者模式擴展而來的,我們先了解一下觀察者模式是什么?
觀察者模式又可稱為**發布 - 訂閱模式**,它定義了對象間的一種1對多的依賴關系,每當這個對象的狀態改變時,其它的對象都會接收到通知并被自動更新。
觀察者模式有以下角色:
* 抽象被觀察者:將所有已注冊的觀察者對象保存在一個集合中。
* 具體被觀察者:當內部狀態發生變化時,將會通知所有已注冊的觀察者。
* 抽象觀察者:定義了一個更新接口,當被觀察者狀態改變時更新自己。
* 具體觀察者:實現抽象觀察者的更新接口。
這里筆者給出一個簡單的示例來讓大家更深一步理解觀察者模式的思想:
1、首先,創建抽象觀察者
~~~
public interface observer {
public void update(String message);
}
~~~
2、接著,創建具體觀察者
~~~
public class WeXinUser implements observer {
private String name;
public WeXinUser(String name) {
this.name = name;
}
@Override
public void update(String message) {
...
}
}
~~~
3、然后,創建抽象被觀察者
~~~
public interface observable {
public void addWeXinUser(WeXinUser weXinUser);
public void removeWeXinUser(WeXinUser weXinUser);
public void notify(String message);
}
~~~
4、最后,創建具體被觀察者
~~~
public class Subscription implements observable {
private List<WeXinUser> mUserList = new ArrayList();
@Override
public void addWeXinUser(WeXinUser weXinUser) {
mUserList.add(weXinUser);
}
@Override
public void removeWeXinUser(WeXinUser weXinUser) {
mUserList.remove(weXinUser);
}
@Override
public void notify(String message) {
for(WeXinUser weXinUser : mUserList) {
weXinUser.update(message);
}
}
}
~~~
在具體使用時,我們便可以這樣使用,如下所示:
~~~
Subscription subscription = new Subscription();
WeXinUser hongYang = new WeXinUser("HongYang");
WeXinUser rengYuGang = new WeXinUser("RengYuGang");
WeXinUser liuWangShu = new WeXinUser("LiuWangShu");
subscription.addWeiXinUser(hongYang);
subscription.addWeiXinUser(rengYuGang);
subscription.addWeiXinUser(liuWangShu);
subscription.notify("New article coming");
~~~
在這里,hongYang、rengYuGang、liuWangShu等大神都訂閱了我的微信公眾號,每當我的公眾號發表文章時(subscription.notify()),他們就會接收到最新的文章信息(weXinUser.update())。(ps:當然,這一切都是YY,事實是,我并沒有微信公眾號-0v0-)
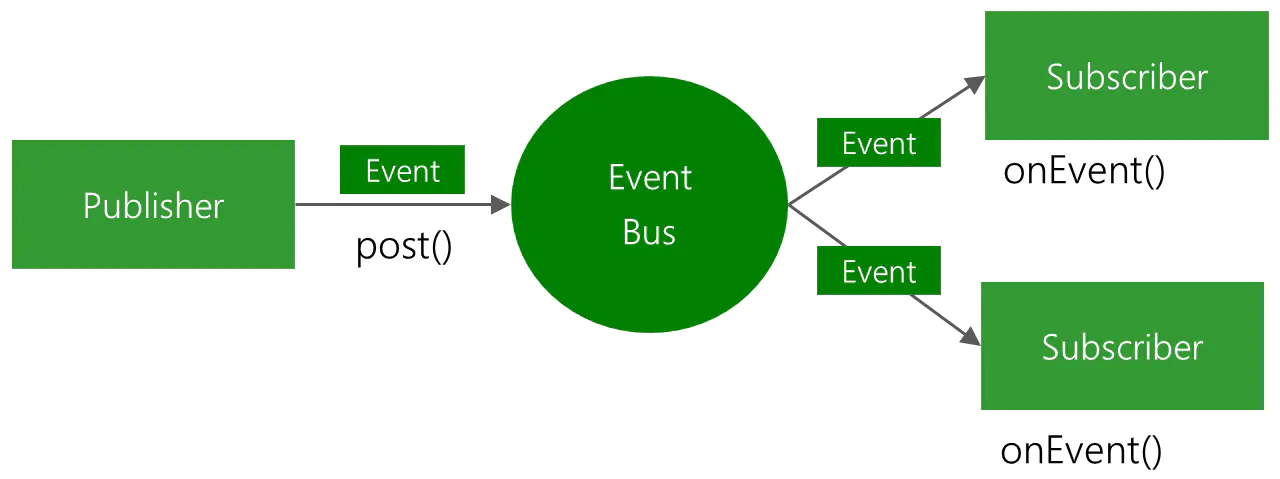
當然,EventBus的觀察者模式和一般的觀察者模式不同,它使用了**擴展的觀察者模式對事件進行訂閱和分發,其實這里的擴展就是指的使用了EventBus來作為中介者,抽離了許多職責**,如下是它的官方原理圖:
在得知了EventBus的原理之后,我們注意到,每次我們在register之后,都必須進行一次unregister,這是為什么呢?
**因為register是強引用,它會讓對象無法得到內存回收,導致內存泄露。所以必須在unregister方法中釋放對象所占的內存**。
有些同學可能之前使用的是EventBus2.x的版本,那么它又與EventBus3.x的版本有哪些區別呢?
* 1、EventBus2.x使用的是**運行時注解,它采用了反射的方式對整個注冊的類的所有方法進行掃描來完成注冊,因而會對性能有一定影響**。
* 2、EventBus3.x使用的是**編譯時注解,Java文件會編譯成.class文件,再對class文件進行打包等一系列處理。在編譯成.class文件時,EventBus會使用EventBusAnnotationProcessor注解處理器讀取@Subscribe()注解并解析、處理其中的信息,然后生成Java類來保存所有訂閱者的訂閱信息。這樣就創建出了對文件或類的索引關系,并將其編入到apk中**。
* 3、從EventBus3.0開始**使用了對象池緩存減少了創建對象的開銷**。
除了EventBus,其實現在比較流行的事件總線還有RxBus,那么,它與EventBus相比又如何呢?
* 1、**RxJava的Observable有onError、onComplete等狀態回調**。
* 2、**Rxjava使用組合而非嵌套的方式,避免了回調地獄**。
* 3、**Rxjava的線程調度設計的更加優秀,更簡單易用**。
* 4、**Rxjava可使用多種操作符來進行鏈式調用來實現復雜的邏輯**。
* 5、**Rxjava的信息效率高于EventBus2.x,低于EventBus3.x**。
在了解了EventBus和RxBus的區別之后,那么,對待新項目的事件總線選型時,我們該如何考量?
很簡單,**如果項目中使用了RxJava,則使用RxBus,否則使用EventBus3.x**。
接下來將按以下順序來進行EventBus的源碼分析:
* 1、訂閱者:EventBus.getDefault().register(this);
* 2、發布者:EventBus.getDefault().post(new CollectEvent());
* 3、訂閱者:EventBus.getDefault().unregister(this)。
下面,我們正式開始EventBus的探索之旅~
### 二、EventBus.getDefault().register(this)
首先,我們從獲取EventBus實例的方法getDefault()開始分析:
~~~
public static EventBus getDefault() {
if (defaultInstance == null) {
synchronized (EventBus.class) {
if (defaultInstance == null) {
defaultInstance = new EventBus();
}
}
}
return defaultInstance;
}
~~~
在getDefault()中使用了雙重校驗并加鎖的單例模式來創建EventBus實例。
接著,我們看到EventBus的默認構造方法中做了什么:
~~~
private static final EventBusBuilder DEFAULT_BUILDER = new EventBusBuilder();
public EventBus() {
this(DEFAULT_BUILDER);
}
~~~
在EventBus的默認構造方法中又調用了它的另一個有參構造方法,將一個類型為EventBusBuilder的DEFAULT\_BUILDER對象傳遞進去了。這里的EventBusBuilder很明顯是一個EventBus的建造器,以便于EventBus能夠添加自定義的參數和安裝一個自定義的默認EventBus實例。
我們再看一下EventBusBuilder的構造方法:
~~~
public class EventBusBuilder {
...
EventBusBuilder() {
}
...
}
~~~
EventBusBuilder的構造方法中什么也沒有做,那我么繼續查看EventBus的這個有參構造方法:
~~~
private final Map<Class<?>, CopyOnWriteArrayList<Subscription>> subscriptionsByEventType;
private final Map<Object, List<Class<?>>> typesBySubscriber;
private final Map<Class<?>, Object> stickyEvents;
EventBus(EventBusBuilder builder) {
...
// 1
subscriptionsByEventType = new HashMap<>();
// 2
typesBySubscriber = new HashMap<>();
// 3
stickyEvents = new ConcurrentHashMap<>();
// 4
mainThreadSupport = builder.getMainThreadSupport();
mainThreadPoster = mainThreadSupport != null ? mainThreadSupport.createPoster(this) : null;
backgroundPoster = new BackgroundPoster(this);
asyncPoster = new AsyncPoster(this);
...
// 5
subscriberMethodFinder = new SubscriberMethodFinder(builder.subscriberInfoIndexes,
builder.strictMethodVerification, builder.ignoreGeneratedIndex);
// 從builder取中一些列訂閱相關信息進行賦值
...
// 6
executorService = builder.executorService;
}
~~~
在注釋1處,創建了一個subscriptionsByEventType對象,可以看到它是一個類型為HashMap的subscriptionsByEventType對象,并且其key為 Event 類型,value為 Subscription鏈表。這里的Subscription是一個訂閱信息對象,它里面保存了兩個重要的字段,一個是類型為 Object 的 subscriber,該字段即為注冊的對象(在 Android 中時通常是 Activity對象);另一個是 類型為SubscriberMethod 的 subscriberMethod,它就是被@Subscribe注解的那個訂閱方法,里面保存了一個重要的字段eventType,它是 Class 類型的,代表了 Event 的類型。在注釋2處,新建了一個類型為 Map 的typesBySubscriber對象,它的key為subscriber對象,value為subscriber對象中所有的 Event 類型鏈表,日常使用中僅用于判斷某個對象是否注冊過。在注釋3處新建了一個類型為ConcurrentHashMap的stickyEvents對象,它是專用于粘性事件處理的一個字段,key為事件的Class對象,value為當前的事件。可能有的同學不了解sticky event,這里解釋下:
* 我們都知道**普通事件是先注冊,然后發送事件才能收到;而粘性事件,在發送事件之后再訂閱該事件也能收到。并且,粘性事件會保存在內存中,每次進入都會去內存中查找獲取最新的粘性事件,除非你手動解除注冊**。
在注釋4處,新建了三個不同類型的事件發送器,這里總結下:
* mainThreadPoster:主線程事件發送器,通過它的mainThreadPoster.enqueue(subscription, event)方法可以將訂閱信息和對應的事件進行入隊,然后通過 handler 去發送一個消息,在 handler 的 handleMessage 中去執行方法。
* backgroundPoster:后臺事件發送器,通過它的enqueue() 將方法加入到后臺的一個隊列,最后通過線程池去執行,注意,它在 Executor的execute()方法 上添加了 synchronized關鍵字 并設立 了控制標記flag,保證任一時間只且僅能有一個任務會被線程池執行。
* asyncPoster:實現邏輯類似于backgroundPoster,不同于backgroundPoster的保證任一時間只且僅能有一個任務會被線程池執行的特性,asyncPoster則是異步運行的,可以同時接收多個任務。
我們再回到注釋5這行代碼,這里新建了一個subscriberMethodFinder對象,這是從EventBus中抽離出的訂閱方法查詢的一個對象,在優秀的源碼中,我們經常能看到**組合優于繼承**的這種實現思想。在注釋6處,從builder中取出了一個默認的線程池對象,它由**Executors的newCachedThreadPool()**方法創建,它是一個**有則用、無則創建、無數量上限**的線程池。
分析完這些核心的字段之后,后面的講解就比較輕松了,接著我們查看EventBus的regist()方法:
~~~
public void register(Object subscriber) {
Class<?> subscriberClass = subscriber.getClass();
// 1
List<SubscriberMethod> subscriberMethods = subscriberMethodFinder.findSubscriberMethods(subscriberClass);
synchronized (this) {
for (SubscriberMethod subscriberMethod : subscriberMethods) {
// 2
subscribe(subscriber, subscriberMethod);
}
}
}
~~~
在注釋1處,根據當前注冊類獲取 subscriberMethods這個訂閱方法列表 。在注釋2處,使用了增強for循環令subsciber對象 對 subscriberMethods 中每個 SubscriberMethod 進行訂閱。
接著我們查看SubscriberMethodFinder的findSubscriberMethods()方法:
~~~
List<SubscriberMethod> findSubscriberMethods(Class<?> subscriberClass) {
// 1
List<SubscriberMethod> subscriberMethods = METHOD_CACHE.get(subscriberClass);
if (subscriberMethods != null) {
return subscriberMethods;
}
// 2
if (ignoreGeneratedIndex) {
subscriberMethods = findUsingReflection(subscriberClass);
} else {
subscriberMethods = findUsingInfo(subscriberClass);
}
if (subscriberMethods.isEmpty()) {
throw new EventBusException("Subscriber " + subscriberClass
+ " and its super classes have no public methods with the @Subscribe annotation");
} else {
METHOD_CACHE.put(subscriberClass, subscriberMethods);
return subscriberMethods;
}
}
~~~
在注釋1處,如果緩存中有subscriberClass對象對應 的訂閱方法列表,則直接返回。注釋2處,先詳細說說這個**ignoreGeneratedIndex**字段, 它用來**判斷是否使用生成的 APT 代碼去優化尋找接收事件的過程,如果開啟了的話,那么將會通過 subscriberInfoIndexes 來快速得到接收事件方法的相關信息**。如果我們沒有在項目中接入 EventBus 的 APT,那么可以將 ignoreGeneratedIndex 字段設為 false 以提高性能。這里ignoreGeneratedIndex 默認為false,所以會執行findUsingInfo()方法,后面生成 subscriberMethods 成功的話會加入到緩存中,失敗的話會 拋出異常。
接著我們查看SubscriberMethodFinder的findUsingInfo()方法:
~~~
private List<SubscriberMethod> findUsingInfo(Class<?> subscriberClass) {
// 1
FindState findState = prepareFindState();
findState.initForSubscriber(subscriberClass);
// 2
while (findState.clazz != null) {
findState.subscriberInfo = getSubscriberInfo(findState);
if (findState.subscriberInfo != null) {
SubscriberMethod[] array = findState.subscriberInfo.getSubscriberMethods();
for (SubscriberMethod subscriberMethod: array) {
if (findState.checkAdd(subscriberMethod.method, subscriberMethod.eventType)) {
findState.subscriberMethods.add(subscriberMethod);
}
}
} else {
// 3
findUsingReflectionInSingleClass(findState);
}
findState.moveToSuperclass();
}
// 4
return getMethodsAndRelease(findState);
}
~~~
在注釋1處,調用了SubscriberMethodFinder的prepareFindState()方法創建了一個新的 FindState 類,我們來看看這個方法:
~~~
private static final FindState[] FIND_STATE_POOL = new FindState[POOL_SIZE];
private FindState prepareFindState() {
// 1
synchronized(FIND_STATE_POOL) {
for (int i = 0; i < POOL_SIZE; i++) {
FindState state = FIND_STATE_POOL[i];
if (state != null) {
FIND_STATE_POOL[i] = null;
return state;
}
}
}
// 2
return new FindState();
}
~~~
在注釋1處,會先從 FIND\_STATE\_POOL 即 FindState 池中取出可用的 FindState(這里的POOL\_SIZE為4),如果沒有的話,則通過注釋2處的代碼直接新建 一個新的 FindState 對象。
接著我們來分析下FindState這個類:
~~~
static class FindState {
....
void initForSubscriber(Class<?> subscriberClass) {
this.subscriberClass = clazz = subscriberClass;
skipSuperClasses = false;
subscriberInfo = null;
}
...
}
~~~
它是 SubscriberMethodFinder 的內部類,這個方法主要做一個初始化、回收對象等工作。
我們接著回到SubscriberMethodFinder的注釋2處的SubscriberMethodFinder()方法:
~~~
private SubscriberInfo getSubscriberInfo(FindState findState) {
if (findState.subscriberInfo != null && findState.subscriberInfo.getSuperSubscriberInfo() != null) {
SubscriberInfo superclassInfo = findState.subscriberInfo.getSuperSubscriberInfo();
if (findState.clazz == superclassInfo.getSubscriberClass()) {
return superclassInfo;
}
}
if (subscriberInfoIndexes != null) {
for (SubscriberInfoIndex index: subscriberInfoIndexes) {
SubscriberInfo info = index.getSubscriberInfo(findState.clazz);
if (info != null) {
return info;
}
}
}
return null;
}
~~~
在前面初始化的時候,findState的subscriberInfo和subscriberInfoIndexes 這兩個字段為空,所以這里直接返回 null。
接著我們查看注釋3處的findUsingReflectionInSingleClass()方法:
~~~
private void findUsingReflectionInSingleClass(FindState findState) {
Method[] methods;
try {
// This is faster than getMethods, especially when subscribers are fat classes like Activities
methods = findState.clazz.getDeclaredMethods();
} catch (Throwable th) {
methods = findState.clazz.getMethods();
findState.skipSuperClasses = true;
}
for (Method method: methods) {
int modifiers = method.getModifiers();
if ((modifiers & Modifier.PUBLIC) != 0 && (modifiers & MODIFIERS_IGNORE) == 0) {
Class<?> [] parameterTypes = method.getParameterTypes();
if (parameterTypes.length == 1) {
Subscribe subscribeAnnotation = method.getAnnotation(Subscribe.class);
if (subscribeAnnotation != null) {
// 重點
Class<?> eventType = parameterTypes[0];
if (findState.checkAdd(method, eventType)) {
ThreadMode threadMode = subscribeAnnotation.threadMode();
findState.subscriberMethods.add(new SubscriberMethod(method, eventType, threadMode, subscribeAnnotation.priority(), subscribeAnnotation.sticky()));
}
}
} else if (strictMethodVerification && method.isAnnotationPresent(Subscribe.class)) {
String methodName = method.getDeclaringClass().getName() + "." + method.getName();
throw new EventBusException("@Subscribe method " + methodName + "must have exactly 1 parameter but has " + parameterTypes.length);
}
} else if (strictMethodVerification && method.isAnnotationPresent(Subscribe.class)) {
String methodName = method.getDeclaringClass().getName() + "." + method.getName();
throw new EventBusException(methodName + " is a illegal @Subscribe method: must be public, non-static, and non-abstract");
}
}
}
~~~
這個方法很長,大概做的事情是:
* 1、**通過反射的方式獲取訂閱者類中的所有聲明方法,然后在這些方法里面尋找以 @Subscribe作為注解的方法進行處理**。
* 2、**在經過經過一輪檢查,看看 findState.subscriberMethods是否存在,如果沒有,將方法名,threadMode,優先級,是否為 sticky 方法等信息封裝到 SubscriberMethod 對象中,最后添加到 subscriberMethods 列表中**。
最后,我們繼續查看注釋4處的getMethodsAndRelease()方法:
~~~
private List<SubscriberMethod> getMethodsAndRelease(FindState findState) {
// 1
List<SubscriberMethod> subscriberMethods = new ArrayList<>(findState.subscriberMethods);
// 2
findState.recycle();
// 3
synchronized(FIND_STATE_POOL) {
for (int i = 0; i < POOL_SIZE; i++) {
if (FIND_STATE_POOL[i] == null) {
FIND_STATE_POOL[i] = findState;
break;
}
}
}
// 4
return subscriberMethods;
}
~~~
在這里,首先在注釋1處,從findState中取出了保存的subscriberMethods。在注釋2處,將findState里的保存的所有對象進行回收。在注釋3處,把findState存儲在 FindState 池中方便下一次使用,以提高性能。最后,在注釋4處,返回subscriberMethods。接著,**在EventBus的 register() 方法的最后會調用 subscribe 方法**:
~~~
public void register(Object subscriber) {
Class<?> subscriberClass = subscriber.getClass();
List<SubscriberMethod> subscriberMethods = subscriberMethodFinder.findSubscriberMethods(subscriberClass);
synchronized (this) {
for (SubscriberMethod subscriberMethod : subscriberMethods) {
subscribe(subscriber, subscriberMethod);
}
}
}
~~~
我們繼續看看這個subscribe()方法做的事情:
~~~
private void subscribe(Object subscriber, SubscriberMethod subscriberMethod) {
Class<?> eventType = subscriberMethod.eventType;
Subscription newSubscription = new Subscription(subscriber, subscriberMethod);
// 1
CopyOnWriteArrayList<Subscription> subscriptions = subscriptionsByEventType.get(eventType);
if (subscriptions == null) {
subscriptions = new CopyOnWriteArrayList <> ();
subscriptionsByEventType.put(eventType, subscriptions);
} else {
if (subscriptions.contains(newSubscription)) {
throw new EventBusException("Subscriber " + subscriber.getClass() + " already registered to event " + eventType);
}
}
int size = subscriptions.size();
// 2
for (int i = 0; i <= size; i++) {
if (i == size || subscriberMethod.priority > subscriptions.get(i).subscriberMethod.priority) {
subscriptions.add(i, newSubscription);
break;
}
}
// 3
List<Class<?>> subscribedEvents = typesBySubscriber.get(subscriber);
if (subscribedEvents == null) {
subscribedEvents = new ArrayList<>();
typesBySubscriber.put(subscriber, subscribedEvents);
}
subscribedEvents.add(eventType);
// 4
if (subscriberMethod.sticky) {
if (eventInheritance) {
Set<Map.Entry<Class<?>, Object>> entries = stickyEvents.entrySet();
for (Map.Entry<Class<?>, Object> entry : entries) {
Class<?> candidateEventType = entry.getKey();
if(eventType.isAssignableFrom(candidateEventType)) {
Object stickyEvent = entry.getValue();
checkPostStickyEventToSubscription(newSubscription, stickyEvent);
}
}
} else {
Object stickyEvent = stickyEvents.get(eventType);
checkPostStickyEventToSubscription(newSubscription, stickyEvent);
}
}
}
~~~
首先,在注釋1處,會根據 subscriberMethod的eventType,在 subscriptionsByEventType 去查找一個 CopyOnWriteArrayList ,如果沒有則創建一個新的 CopyOnWriteArrayList,然后將這個 CopyOnWriteArrayList 放入 subscriptionsByEventType 中。在注釋2處,**添加 newSubscription對象,它是一個 Subscription 類,里面包含著 subscriber 和 subscriberMethod 等信息,并且這里有一個優先級的判斷,說明它是按照優先級添加的。優先級越高,會插到在當前 List 靠前面的位置**。在注釋3處,對typesBySubscriber 進行添加,這主要是在EventBus的isRegister()方法中去使用的,目的是用來判斷這個 Subscriber對象 是否已被注冊過。最后,在注釋4處,會判斷是否是 sticky事件。如果是sticky事件的話,會調用 checkPostStickyEventToSubscription() 方法。
我們接著查看這個checkPostStickyEventToSubscription()方法:
~~~
private void checkPostStickyEventToSubscription(Subscription newSubscription, Object stickyEvent) {
if (stickyEvent != null) {
postToSubscription(newSubscription, stickyEvent, isMainThread());
}
}
~~~
可以看到最終是**調用了postToSubscription()這個方法來進行粘性事件的發送**,對于粘性事件的處理,我們最后再分析,接下來我們看看事件是如何post的。
### 三、EventBus.getDefault().post(new CollectEvent())
~~~
public void post(Object event) {
// 1
PostingThreadState postingState = currentPostingThreadState.get();
List <Object> eventQueue = postingState.eventQueue;
eventQueue.add(event);
// 2
if (!postingState.isPosting) {
postingState.isMainThread = isMainThread();
postingState.isPosting = true;
if (postingState.canceled) {
throw new EventBusException("Internal error. Abort state was not reset");
}
try {
while (!eventQueue.isEmpty()) {
postSingleEvent(eventQueue.remove(0), postingState);
}
} finally {
postingState.isPosting = false;
postingState.isMainThread = false;
}
}
}
~~~
注釋1處,這里的currentPostingThreadState 是一個 ThreadLocal 類型的對象,里面存儲了 PostingThreadState,而 PostingThreadState 中包含了一個 eventQueue 和其他一些標志位,相關的源碼如下:
~~~
private final ThreadLocal <PostingThreadState> currentPostingThreadState = new ThreadLocal <PostingThreadState> () {
@Override
protected PostingThreadState initialValue() {
return new PostingThreadState();
}
};
final static class PostingThreadState {
final List <Object> eventQueue = new ArrayList<>();
boolean isPosting;
boolean isMainThread;
Subscription subscription;
Object event;
boolean canceled;
}
~~~
接著把傳入的 event,保存到了當前線程中的一個變量 PostingThreadState 的 eventQueue 中。在注釋2處,最后調用了 postSingleEvent() 方法,我們繼續查看這個方法:
~~~
private void postSingleEvent(Object event, PostingThreadState postingState) throws Error {
Class<?> eventClass = event.getClass();
boolean subscriptionFound = false;
// 1
if (eventInheritance) {
// 2
List<Class<?>> eventTypes = lookupAllEventTypes(eventClass);
int countTypes = eventTypes.size();
for (int h = 0; h < countTypes; h++) {
Class<?> clazz = eventTypes.get(h);
subscriptionFound |=
// 3
postSingleEventForEventType(event, postingState, clazz);
}
} else {
subscriptionFound = postSingleEventForEventType(event, postingState, eventClass);
}
if (!subscriptionFound) {
...
}
}
~~~
首先,在注釋1處,首先取出 Event 的 class 類型,接著**會對 eventInheritance 標志位 判斷,它默認為true,如果設為 true 的話,它會在發射事件的時候判斷是否需要發射父類事件,設為 false,能夠提高一些性能**。接著,在注釋2處,會調用lookupAllEventTypes() 方法,它的作用就是取出 Event 及其父類和接口的 class 列表,當然重復取的話會影響性能,所以它也做了一個 eventTypesCache 的緩存,這樣就不用重復調用 getSuperclass() 方法。最后,在注釋3處會調用postSingleEventForEventType()方法,我們看下這個方法:
~~~
private boolean postSingleEventForEventType(Object event, PostingThreadState postingState, Class <?> eventClass) {
CopyOnWriteArrayList <Subscription> subscriptions;
synchronized(this) {
subscriptions = subscriptionsByEventType.get(eventClass);
}
if (subscriptions != null && !subscriptions.isEmpty()) {
for (Subscription subscription: subscriptions) {
postingState.event = event;
postingState.subscription = subscription;
boolean aborted = false;
try {
postToSubscription(subscription, event, postingState.isMainThread);
aborted = postingState.canceled;
} finally {
postingState.event = null;
postingState.subscription = null;
postingState.canceled = false;
}
if (aborted) {
break;
}
}
return true;
}
return false;
}
~~~
可以看到,這里直接根據 Event 類型從 subscriptionsByEventType 中取出對應的 subscriptions對象,最后調用了 postToSubscription() 方法。
這個時候我們再看看這個postToSubscription()方法:
~~~
private void postToSubscription(Subscription subscription, Object event, boolean isMainThread) {
switch (subscription.subscriberMethod.threadMode) {
case POSTING:
invokeSubscriber(subscription, event);
break;
case MAIN:
if (isMainThread) {
invokeSubscriber(subscription, event);
} else {
mainThreadPoster.enqueue(subscription, event);
}
break;
case MAIN_ORDERED:
if (mainThreadPoster != null) {
mainThreadPoster.enqueue(subscription, event);
} else {
invokeSubscriber(subscription, event);
}
break;
case BACKGROUND:
if (isMainThread) {
backgroundPoster.enqueue(subscription, event);
} else {
invokeSubscriber(subscription, event);
}
break;
case ASYNC:
asyncPoster.enqueue(subscription, event);
break;
default:
throw new IllegalStateException("Unknow thread mode: " + subscription.subscriberMethod.threadMode);
}
}
~~~
從上面可以看出,這里通過threadMode 來判斷在哪個線程中去執行方法:
* 1、POSTING:執行 invokeSubscriber() 方法,內部**直接采用反射調用**。
* 2、MAIN:**首先去判斷當前是否在 UI 線程,如果是的話則直接反射調用,否則調用mainThreadPoster的enqueue()方法,即把當前的方法加入到隊列之中,然后通過 handler 去發送一個消息,在 handler 的 handleMessage 中去執行方法**。
* 3、MAIN\_ORDERED:**與MAIN類似,不過是確保是順序執行的**。
* 4、BACKGROUND:**判斷當前是否在 UI 線程,如果不是的話則直接反射調用,是的話通過backgroundPoster的enqueue()方法 將方法加入到后臺的一個隊列,最后通過線程池去執行。注意,backgroundPoster在 Executor的execute()方法 上添加了 synchronized關鍵字 并設立 了控制標記flag,保證任一時間只且僅能有一個任務會被線程池執行**。
* 5、ASYNC:**邏輯實現類似于BACKGROUND,將任務加入到后臺的一個隊列,最終由Eventbus 中的一個線程池去調用,這里的線程池與 BACKGROUND 邏輯中的線程池用的是同一個,即使用Executors的newCachedThreadPool()方法創建的線程池,它是一個有則用、無則創建、無數量上限的線程池。不同于backgroundPoster的保證任一時間只且僅能有一個任務會被線程池執行的特性,這里asyncPoster則是異步運行的,可以同時接收多個任務**。
分析完EventBus的post()方法值,我們接著看看它的unregister()。
### 四、EventBus.getDefault().unregister(this)
它的核心源碼如下所示:
~~~
public synchronized void unregister(Object subscriber) {
List<Class<?>> subscribedTypes = typesBySubscriber.get(subscriber);
if (subscribedTypes != null) {
for (Class<?> eventType : subscribedTypes) {
//1
unsubscribeByEventType(subscriber, eventType);
}
// 2
typesBySubscriber.remove(subscriber);
}
}
~~~
首先,在注釋1處,**unsubscribeByEventType() 方法中對 subscriptionsByEventType 移除了該 subscriber 的所有訂閱信息**。最后,在注釋2處,**移除了注冊對象和其對應的所有 Event 事件鏈表**。
最后,我們在來分析下EventBus中對粘性事件的處理。
### 五、EventBus.getDefault.postSticky(new CollectEvent())
如果想要發射 sticky 事件需要通過 EventBus的postSticky() 方法,內部源碼如下所示:
~~~
public void postSticky(Object event) {
synchronized (stickyEvents) {
// 1
stickyEvents.put(event.getClass(), event);
}
// 2
post(event);
}
~~~
在注釋1處,先將該事件放入 stickyEvents 中,接著在注釋2處使用post()發送事件。前面我們在分析register()方法的最后部分時,其中有關粘性事件的源碼如下:
~~~
if (subscriberMethod.sticky) {
Object stickyEvent = stickyEvents.get(eventType);
if (stickyEvent != null) {
postToSubscription(newSubscription, stickyEvent, isMainThread());
}
}
~~~
可以看到,在這里**會判斷當前事件是否是 sticky 事件,如果 是,則從 stickyEvents 中拿出該事件并執行 postToSubscription() 方法**。
至此,EventBus源碼分析完畢。
### 六、總結
EventBus 的源碼在Android主流三方庫源碼分析系列中可以說是除了ButterKnife之外,算是比較簡單的了。但是,它其中的一些思想和設計是值得借鑒的。比如**它使用 FindState 復用池來復用 FindState 對象,在各處使用了 synchronized 關鍵字進行代碼塊同步的一些優化操作**。其中上面分析了這么多,**EventBus最核心的邏輯就是利用了 subscriptionsByEventType 這個重要的列表,將訂閱對象,即接收事件的方法存儲在這個列表,發布事件的時候在列表中查詢出相對應的方法并執行**。至此,Android主流三方庫源碼分析系列到此完結~
~~~
想象一個來自未來的自己,他非常自信,非常成功,
擁有你現在所希望的一切,他會對現在的你說些什么?
他怎么說,你就怎么去做,10年之后,你就變成了他。
~~~
##### 參考鏈接:
* * *
1、EventBus V3.1.1 源碼
2、Android進階之光
4、Android組件化架構
5、[EventBus設計之禪](https://mp.weixin.qq.com/s?__biz=MzA5MzI3NjE2MA==&mid=2650243033&idx=1&sn=28709941e6f8821c6f5dd3fa047b1393&chksm=88638eb6bf1407a034ba2184cac9e31c24f43e3ac395b1b23b18243f64220c244f2edc7dc22a&scene=38#wechat_redirect)
6、[從源碼入手來學習EventBus 3事件總線機制](https://mp.weixin.qq.com/s?__biz=MzA5MzI3NjE2MA==&mid=2650242621&idx=1&sn=cc9c31aba5ff33b20fb9fecc3b0404b2&chksm=88638f52bf14064453fc09e6e53798ac5a1299d84df490b15764f9a85292732879eb4a1c0665&scene=38#wechat_redirect)
作者:jsonchao
鏈接:https://juejin.im/post/5e61b253e51d45270e212eb4
