[TOC]
### 文章鏈接:
[Android OkHttp源碼解析入門教程:同步和異步(一)](https://juejin.im/post/5c46822c6fb9a049ea394510)
[Android OkHttp源碼解析入門教程:攔截器和責任鏈(二)](https://juejin.im/post/5c4682d2f265da6130752a1d)
### **工欲善其事,必先利其器**
Android API23(6.0)版本以后,[Google正式移除Apache-HttpClient](https://developer.android.com/about/versions/marshmallow/android-6.0-changes#behavior-apache-http-client)。[OkHttp](https://github.com/square/okhttp)作為一個現代,快速,高效的HttpClient,其功能之強大也是顯而易見的
> * 支持[SPDY](https://zh.wikipedia.org/wiki/SPDY)可以合并多個請求到同一個主機的請求、連接池、[GZIP](https://baike.baidu.com/item/gzip/4487553)和HTTP緩存
> * 支持HTTP/2協議,通過HTTP/2 可以讓客戶端中到服務器的所有請求共用同一個Socket連接
> * 非HTTP/2 請求時,[OkHttp](https://github.com/square/okhttp)內部會維護一個線程池,通過線程池可以對HTTP/1.x的連接進行復用,減少延遲
> * 支持post,get請求,基于http的文件上傳和下載
> * 默認情況下,[OkHttp](https://github.com/square/okhttp)會自動處理常見的網絡問題,像二次連接、SSL的握手問題
當然[OkHttp](https://github.com/square/okhttp)的功能遠不止這些,這里只是說明平時經常用到的。既然[OkHttp](https://github.com/square/okhttp)已經作為官方庫使用,相比我們在做項目的時候也會用,但對于其底層的實現原理還是一知半解,那我們就從這篇文章開始解釋其底層實現原理。開車前先來一波介紹:
Ecplise引用:下載最新的[Jar](https://search.maven.org/search?q=g:com.squareup.okhttp3)包
Android studio引用:`implementation 'com.squareup.okhttp3:okhttp:3.11.0' //最新版本號請關注okhttp官網`
Maven引用:
~~~
<dependency>
<groupId>com.squareup.okhttp3</groupId>
<artifactId>okhttp</artifactId>
<version>3.11.0</version> //最新版本號請關注okhttp官網
</dependency>
~~~
>[info]注意:這里并沒有以OKHttp最新版本來講解,是因為最新版本是專為kotlin而寫的
### **一、基本使用方法**
流程如下
~~~
// 啟動客戶端類,主要有兩種方法進行創建,new對象和Builder內部類實現實例化
OkHttpClient client = new OkHttpClient.Builder().connectTimeout(5, TimeUnit.SECONDS).build();
// get請求
// 通過Builder模式創建一個Request對象(即請求報文)
// 這里可以設置請求基本參數:url地址,get請求,POST請求,請求頭,cookie參數等
Request request = new Request.Builder()
.url("http://www.baidu.com")
.header("User-Agent", "xxx.java")
.addHeader("token", "xxx")
.get()
.build();
// POST請求
// 表單形式上傳
RequestBody body = new FormBody.Builder().add("xxx","xxx").build();
// JSON參數形式,File對象上傳
RequestBody body = RequestBody.create(MediaType.parse("application/json; charset=utf-8"), json);
RequestBody body = RequestBody.create(MediaType.parse("File/*"), file);
Request request = new Request.Builder()
.post(body)
.url(url)
.header("User-Agent", "xxx.java")
.addHeader("token", "xxx")
.build();
// 創建Call對象(Http請求) ,即連接Request和Response的橋梁
// newCall方法將request封裝成Call對象
Call call = client.newCall(request);
try{
// Response即響應報文信息,包含返回狀態碼,響應頭,響應體等
Response response = call.execute();
// 這里深入一點,Call其實是一個接口,調用Call的execute()發送同步請求其實是調用了Realcall實現類的方法,Realcall從源碼可以看出示一個Runable
System.out.println(response.body().string());
}catch(IOException e){
e.printStackTrace();
}
~~~
看完代碼你可能覺得OkHttp基本流程很繁瑣,但是去掉一些擴展參數,你會發現OkHttp的使用其實很簡單,無非就是
> * 創建一個OkHttpClient并實例化,可設置相關參數連接時長connectTimeout等
> * 創建一個Request對象并實例化,可設置網絡地址url,請求方式get,post,攜帶參數等;
> * 創建一個[Call](https://github.com/square/okhttp/wiki/Calls)對象,通過okhttpClient的newCall()方法將Request封裝成Call對象
> * 創建一個Response響應,用于接收服務器返回的相關信息; 即OkHttpClient客戶端通過newCall()方法接受你的Request請求并生成Response響應
### **二、同步和異步請求**
看到這里你可能會問,為什么不繼續講些關于文件上傳,文件下載,Interceptors攔截器這些內容?其實同步和異步請求的實現可以說是源碼中非常重要的一環,涉及到`線程池`,`Dispatch調度`,`反向代理`等,掌握核心科技,剩下的都是開胃小菜。
1)基本使用方法
**同步請求方法**
~~~
OkhttpClient client = new OkHttpClient.Builder().connectTimeout(5, TimeUnit.SECONDS).build();
Request request = new Request.Builder()
.url("http://www.baidu.com")
.get()
.build();
Call call = client.newCall(request);
try{
Response response = call.execute();//調用同步請求
System.out.println(response.body().string());
}catch(IOException e){
e.printStackTrace();
}
~~~
通過上面代碼可以看出同步請求的基本流程: 1.創建OkHttpClient和Request對象 2.將Request封裝成Call對象 3.調用Call的excute()發起同步請求
`*特別注意*:`當前線程發送同步請求后,就會進入`阻塞狀態`,直到數據有響應才會停止(`和異步最大的不同點`)
**異步請求方法**
~~~
OkhttpClient client = new OkHttpClient.Builder().connectTimeout(5, TimeUnit.SECONDS).build();
Request request = new Request.Builder()
.url("http://www.baidu.com")
.get()
.build();
Call call = client.newCall(request);
call.enqueue(new Callback() { //調用異步請求,CallBack用于請求結束以后來進行接口回調
@Override
public void onFailure(Call call, IOException e) { System.out.println("Failure");}
@Override
public void onResponse(Call call, Response response) throw s IOException {
System.out.println(response.body().string());
}
});
~~~
通過上面代碼可以看出異步請求的基本流程: 1.創建OkHttpClient和Request對象 2.將Request封裝成Call對象 3.調用Call的enqueue發起異步請求
`*特別注意*:`onFailure和onResponse都是執行在`子線程`中
不難看出,其實異步和同步請求的`不同點`在于
> * `發起請求方法調用`
> * `是否阻塞線程`
到此,我們已經熟悉了OkHttp的同步,異步請求方法的基本使用;不管同步還是異步的調用都需要先初始化OkHttpClient,創建Request ,調用OkHttpClient.newcall()封裝Call對象,但其內部又是如何實現的呢?
**同步請求執行流程**
第一步:初始化OkHttpClient(Builder builder)
~~~
public Builder() {
dispatcher = new Dispatcher(); // 調度分發器(核心之一)
protocols = DEFAULT_PROTOCOLS; // 協議
connectionSpecs = DEFAULT_CONNECTION_SPECS; // 傳輸層版本和連接協議
eventListenerFactory = EventListener.factory(EventListener.NONE); // 監聽器
proxySelector = ProxySelector.getDefault(); // 代理選擇器
cookieJar = CookieJar.NO_COOKIES; // cookie
socketFactory = SocketFactory.getDefault(); // socket 工廠
hostnameVerifier = OkHostnameVerifier.INSTANCE; // 主機名字
certificatePinner = CertificatePinner.DEFAULT; // 證書鏈
proxyAuthenticator = Authenticator.NONE; // 代理身份驗證
authenticator = Authenticator.NONE; // 本地省份驗證
connectionPool = new ConnectionPool(); // 連接池(核心之一)
dns = Dns.SYSTEM;// 基礎域名
followSslRedirects = true;// 安全套接層重定向
followRedirects = true;// 本地重定向
retryOnConnectionFailure = true; // 連接失敗重試
connectTimeout = 10_000; // 連接超時時間
readTimeout = 10_000; // 讀取超時時間
writeTimeout = 10_000; // 寫入超時時間
pingInterval = 0; // 命令間隔
}
~~~
從這里看到,其實OkHttpClient的初始化已經幫我們配置了基本參數,我們也可以根據自身業務需求進行相應的參數設置(失敗重連,添加攔截器,cookie等等),一般遇到創建對象需要大量參數時,推薦使用[Builider模式](https://blog.csdn.net/justloveyou_/article/details/78298420)鏈式調用完成參數初始化,具體使用可以去Android源碼中的AlertDialog、Notification中詳細了解; 這里我們重點注意兩個核心,[Dispatcher](https://blog.csdn.net/sk719887916/article/details/78534583)和[ConnectionPool](https://www.jianshu.com/p/e6fccf55ca01),這兩點會在后面做詳細講解
`Dispatcher`:OkHttp請求的調度分發器,由它決定異步請求在線程池中是直接處理還是緩存等待,當然對于同步請求,只是將相應的同步請求放到請求隊列當中執行
`ConnectionPool`: 統一管理客戶端和服務器之間連接的每一個Connection,作用在于
> * 當你的Connection請求的URL相同時,可以選擇是否復用;
> * 控制Connection保持打開狀態還是復用
第二步:創建 (Builder builder)
~~~
public static class Builder {
HttpUrl url;
String method;
Headers.Builder headers;
RequestBody body; //請求體
Object tag; //標簽
public Builder() {
this.method = "GET";
this.headers = new Headers.Builder(); //Headers內部類
}
~~~
這個構造方法很簡單,在Request.Builder模式下默認指定請求方式為GET請求,創建了Headers內部類來保存頭部信息,我們再來看build方法
~~~
public Request build() {
if (url == null) throw new IllegalStateException("url == null");
return new Request(this);
}
Request(Builder builder) {
this.url = builder.url;
this.method = builder.method;
this.headers = builder.headers.build();
this.body = builder.body;
this.tag = builder.tag != null ? builder.tag : this;
}
~~~
Request的構造方法就是為其初始化指定需求的請求方式,請求URL,請求頭部信息,這樣就完成同步請求的前兩步
第三步:調用OkHttpClient.newcall()封裝Call對象
~~~
/**
* Prepares the {@code request} to be executed at some point in the future.
* 準備在將來某個時候執行{@code請求}
*/
@Override public Call newCall(Request request) {
return RealCall.newRealCall(this, request, false /* for web socket */);
}
~~~
上面我們也提到過,Call是一個接口,所以它的實際操作是在RealCall類中實現的
~~~
final class RealCall implements Call {
final OkHttpClient client;
final RetryAndFollowUpInterceptor retryAndFollowUpInterceptor; //重定向攔截器
/**
* There is a cycle between the {@link Call} and {@link EventListener} that makes this awkward.
* This will be set after we create the call instance then create the event listener instance.
*/
private EventListener eventListener;
/** The application's original request unadulterated by redirects or auth headers. */
final Request originalRequest;
final boolean forWebSocket;
// Guarded by this.
private boolean executed;
//實際構造方法
private RealCall(OkHttpClient client, Request originalRequest, boolean forWebSocket) {
this.client = client;
this.originalRequest = originalRequest;
this.forWebSocket = forWebSocket;
this.retryAndFollowUpInterceptor = new RetryAndFollowUpInterceptor(client, forWebSocket);
}
static RealCall newRealCall(OkHttpClient client, Request originalRequest, boolean forWebSocket) {
// Safely publish the Call instance to the EventListener.
RealCall call = new RealCall(client, originalRequest, forWebSocket);
call.eventListener = client.eventListenerFactory().create(call);
return call;
}
}
~~~
從這里就可以看到,RealCall其實是持有之前初始化好的OkHttpClient和Request對象,同時賦值了RetryAndFollowUpInterceptor重定向攔截器,關于攔截器的內容,我們會后面具體講解OKhttp內部的5大攔截器;
第四步,調用call.exucte方法實現同步請求
~~~
@Override public Response execute() throws IOException {
synchronized (this) {
if (executed) throw new IllegalStateException("Already Executed");
executed = true;
}
captureCallStackTrace(); // 捕捉異常堆棧信息
eventListener.callStart(this); // 調用監聽方法
try {
client.dispatcher().executed(this); // 調度器將call請求 加入到了同步執行隊列中
Response result = getResponseWithInterceptorChain(); // 獲取返回數據
if (result == null) throw new IOException("Canceled");
return result;
} catch (IOException e) {
eventListener.callFailed(this, e);
throw e;
} finally {
client.dispatcher().finished(this);
}
}
~~~
首先, 加入了[synchronized](https://blog.csdn.net/javazejian/article/details/72828483)同步鎖,判斷executed標識位是否為true,確保每個call只能被執行一次不能重復執行,然后開啟了eventListener監聽事件,接收相應的事件回調,通過dispatcher將Call請求添加到同步隊列中
~~~
public Dispatcher dispatcher() {
return dispatcher;
}
/** Used by {@code Call#execute} to signal it is in-flight. */
synchronized void executed(RealCall call) {
runningSyncCalls.add(call);
}
/** Running synchronous calls. Includes canceled calls that haven't finished yet. */
// 同步請求隊列
private final Deque<RealCall> runningSyncCalls = new ArrayDeque<>();
~~~
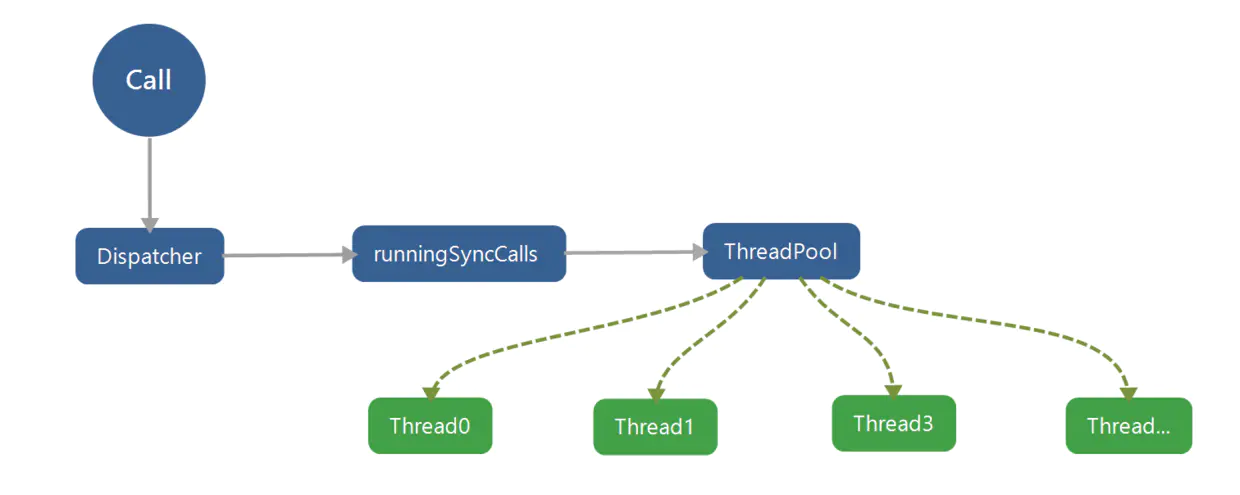
每當調用executed同步方法時,dispather就會幫我們把同步請求添加到同步請求隊列中去,由此可以看出Dispather調度器的作用就是`維持Call請求發送狀態`和`維護線程池`并把`Call請求添加到相應的執行隊列`當中,由它決定當前Call請求是緩存等待還是直接執行,流程如下
getResponseWithInterceptorChain()是一個攔截器鏈,依次調用攔截器對返回的response進行相應的操作,我們在講解到責任鏈模式時會詳細介紹,如圖

另外要特別注意下`client.dispatcher().finished(this);`
~~~
/** Used by {@code Call#execute} to signal completion. */
void finished(RealCall call) {
finished(runningSyncCalls, call, false); // 注意參數傳遞的值
}
private <T> void finished(Deque<T> calls, T call, boolean promoteCalls) {
int runningCallsCount;
Runnable idleCallback; // 閑置接口
synchronized (this) {
if (!calls.remove(call)) throw new AssertionError("Call wasn't in-flight!");
if (promoteCalls) promoteCalls(); // 將等待隊列的請求加入運行隊列并開始執行,只會在異 步方法中調用
runningCallsCount = runningCallsCount();
idleCallback = this.idleCallback;
}
if (runningCallsCount == 0 && idleCallback != null) {
idleCallback.run();
}
}
/***********************************************************************************************************************/
public synchronized int runningCallsCount() {
return runningAsyncCalls.size() + runningSyncCalls.size();
}
~~~
當同步請求完成后會調用finished()方法將隊列中的請求清除掉,runningCallsCount()計算返回正在執行同步請求和正在執行異步請求的數量總和,最后判斷如果runningCallsCount 為0的時候,表示整個Dispatcher分發器中沒有可運行的請求,同時在滿足idleCallback不為空的情況下,就調用Run方法開啟閑置接口;這里可以看出,在同步請求的方法中,dispatcher的作用只是調用 executed將Call請求添加到同步隊列中,執行完畢后調用 finished清除隊列中的請求,可見dispatcher更多的是為異步服務
**異步請求執行流程**
關于OkHttpClient和Request初始化流程上文已經講解,不清楚的可以返回去看看,所以直奔主題
第四步,調用call.enqueue方法實現異步請求
~~~
//RealCall實現類
@Override public void enqueue(Callback responseCallback) {
synchronized (this) {
if (executed) throw new IllegalStateException("Already Executed");
executed = true; // executed用于表示Call請求是否執行過
}
captureCallStackTrace();// 捕捉異常堆棧信息
eventListener.callStart(this);// 開啟監聽事件
client.dispatcher().enqueue(new AsyncCall(responseCallback));
}
~~~
有沒有發現和同步的excute方法很類似,都是先使用synchronized 防止請求重復執行,然后開啟監聽事件,最后在執行相應的方法,但奇怪的是同步在執行完excute方法后是直接通過getResponseWithInterceptorChain()返回數據,異步又是如何返回數據的呢?AsyncCall又是干什么的?
~~~
final class AsyncCall extends NamedRunnable {
private final Callback responseCallback;
AsyncCall(Callback responseCallback) {
super("OkHttp %s", redactedUrl());
this.responseCallback = responseCallback;
}
@Override protected void execute() {
boolean signalledCallback = false;
try {
// 返回數據
Response response = getResponseWithInterceptorChain();
if (retryAndFollowUpInterceptor.isCanceled()) {
signalledCallback = true;
responseCallback.onFailure(RealCall.this, new IOException("Canceled"));
} else {
signalledCallback = true;
responseCallback.onResponse(RealCall.this, response);
}
} catch (IOException e) {
if (signalledCallback) {
// Do not signal the callback twice!
Platform.get().log(INFO, "Callback failure for " + toLoggableString(), e);
} else {
eventListener.callFailed(RealCall.this, e);
responseCallback.onFailure(RealCall.this, e);
}
} finally {
client.dispatcher().finished(this);
}
}
}
~~~
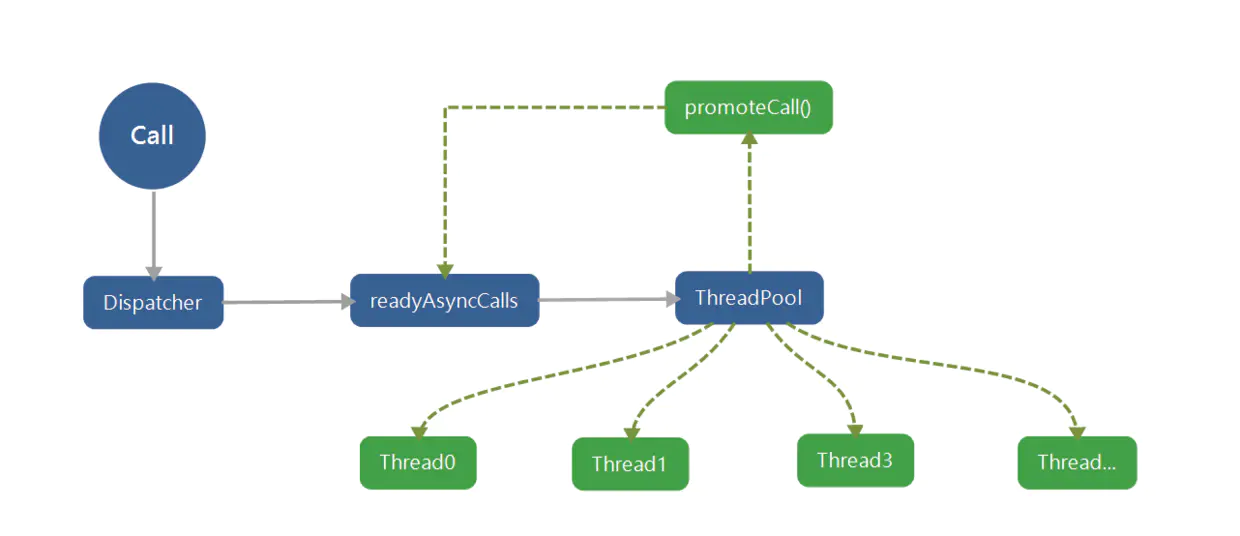
這里的 AsyncCall 是 RealCall 的一個內部類,它繼承于NamedRunnable抽象類,NamedRunnable抽象類又實現了 Runnable,所以可以被提交到[ExecutorService](https://www.cnblogs.com/zhaoyan001/p/7049627.html)上執行,在execute方法里,我們看到了熟悉的流程,上文也說到getResponseWithInterceptorChain是一個攔截器鏈,會依次執行相應的攔截器后返回數據,所以當返回數據后,通過retryAndFollowUpInterceptor重定向攔截器判斷請求是否正常執行,并且通過Callback接口返回相應數據信息,最后調用finished方法清除隊列 這里有個疑問,Dispatcher是通過什么把異步就緒隊列的請求`調度分發`到異步執行隊列中的?
還記得我們講client.dispatcher().finished(this)的時候,說到過promoteCalls方法,只是同步傳參的是false沒有調用,但異步傳參是true,所以promoteCalls方法才真正在異步中調用
~~~
//Disaptcher
/** Ready async calls in the order they'll be run. */
// 異步就緒隊列
private final Deque<AsyncCall> readyAsyncCalls = new ArrayDeque<>();
/** Running asynchronous calls. Includes canceled calls that haven't finished yet. */
// 異步執行隊列
private final Deque<AsyncCall> runningAsyncCalls = new ArrayDeque<>();
private void promoteCalls() {
// maxRequests最大請求數量64
if (runningAsyncCalls.size() >= maxRequests) return; // Already running max capacity.
if (readyAsyncCalls.isEmpty()) return; // No ready calls to promote.
for (Iterator<AsyncCall> i = readyAsyncCalls.iterator(); i.hasNext(); ) {
AsyncCall call = i.next();
if (runningCallsForHost(call) < maxRequestsPerHost) {
i.remove();
runningAsyncCalls.add(call);
executorService().execute(call);
}
if (runningAsyncCalls.size() >= maxRequests) return; // Reached max capacity.
}
}
~~~
源碼是不是很清楚明了,原來異步隊列就是在這里進行調度的,在for循環中,Disaptcher首先對異步就緒隊列進行遍歷,如果滿足runningCallsForHost(當前調用請求主機數)小于maxRequestsPerHost( 最大請求主機數5個)并且異步并發數量沒有超過最大請求數量64的前提下,就把異步就緒隊列中最后一個元素移除加入到異步執行隊列中
我們接著看enqueue方法具體做了哪些操作
~~~
//Disaptcher
synchronized void enqueue(AsyncCall call) {
// 異步并發請求數量不能超過最大請求數量64
// 當前網絡請求的host是否小于5個請求的host
if (runningAsyncCalls.size() < maxRequests && runningCallsForHost(call) < maxRequestsPerHost) {
// 加入執行隊列 并交給線程池執行
runningAsyncCalls.add(call);
executorService().execute(call);
} else {
// 加入就緒隊列等待
readyAsyncCalls.add(call);
}
}
***************************************************************************************************************
public synchronized ExecutorService executorService() {
// 核心線程 最大線程 非核心線程閑置60秒回收 任務隊列
if (executorService == null) {
executorService = new ThreadPoolExecutor(0, Integer.MAX_VALUE, 60, TimeUnit.SECONDS,
new SynchronousQueue<Runnable>(), Util.threadFactory("OkHttp Dispatcher", false));
}
return executorService;
}
~~~
Disaptcher的enqueue方法只是做了一個異步請求的邏輯判斷,即判斷當前異步并發執行隊列的數量是否超過最大承載運行數量64和相同host主機最多允許5條線程同時執行請求,滿足以上條件,則將傳進來的AsyncCall添加到異步執行隊列,同時啟動線程池執行,反之則添加到異步就緒隊列中等待,[executorService](https://www.cnblogs.com/zhaoyan001/p/7049627.html)調用的就是AsyncCall的execute方法

同步和異步請求的源碼就講到這里,對過程還有不理解的可以在下方評論中提出問題
