# Thread的join方法
關于join官方的解釋是 Waits for this thread to die. 也就是等待一個線程結束。
我們來先來一段代碼來引入join的使用場景(這里使用了java8的IntStream)
```java
/**
* @program: ThreadDemo
* @description: 正常兩個線程交替執行
* @author: hs96.cn@Gmail.com
* @create: 2020-09-03
*/
public class ThreadJoin {
public static void main(String[] args) throws InterruptedException {
Thread t1 = new Thread(() -> {
IntStream.range(1, 1_000).forEach(i ->
System.out.println(Thread.currentThread().getName() + "->" + i)
);
}, "t1");
t1.start();
IntStream.range(1, 1_000).forEach(i ->
System.out.println(Thread.currentThread().getName() + "->" + i)
);
}
}
```
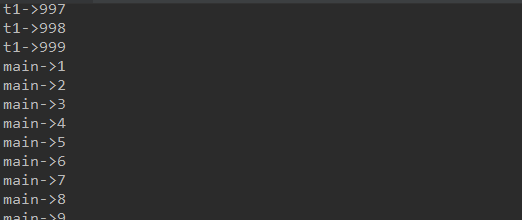
運行結果如下 :

可以看到正常兩個線程是交替執行的。如果我們想線程t1執行完再執行main線程呢,這里就需要使用join了:
```java
/**
* @program: ThreadDemo
* @description: 使用join方法線程t1結束后才會執行線程main
* @author: hs96.cn@Gmail.com
* @create: 2020-09-03
*/
public class ThreadJoin {
public static void main(String[] args) throws InterruptedException {
Thread t1 = new Thread(() -> {
//java8 IntStream
IntStream.range(1, 1_000).forEach(i ->
System.out.println(Thread.currentThread().getName() + "->" + i)
);
}, "t1");
t1.start();
t1.join();
IntStream.range(1, 1_000).forEach(i ->
System.out.println(Thread.currentThread().getName() + "->" + i)
);
}
}
```
運行結果如下:

再增加一個子線程,join一下試試:
```java
/**
* @program: ThreadDemo
* @description: 使用join方法線程t1結束后才會執行線程main
* @author: hs96.cn@Gmail.com
* @create: 2020-09-03
*/
public class ThreadJoin {
public static void main(String[] args) throws InterruptedException {
Thread t1 = new Thread(() -> {
//java8 IntStream
IntStream.range(1, 1_000).forEach(i ->
System.out.println(Thread.currentThread().getName() + "->" + i)
);
}, "t1");
Thread t2 = new Thread(() -> {
IntStream.range(1, 1_000).forEach(i ->
System.out.println(Thread.currentThread().getName() + "->" + i)
);
}, "t2");
t1.start();
t2.start();
t1.join();
t2.join();
IntStream.range(1, 1_000).forEach(i ->
System.out.println(Thread.currentThread().getName() + "->" + i)
);
}
}
```


結果和我們的預期一樣,兩個子線程執行完之后才執行main線程。
join方法還支持幾個參數:

一個毫秒級別,一個微妙級別,就是最多等待這個線程執行多久。
代碼來測試一下:
```java
/**
* @program: ThreadDemo
* @description: join(long millis), join(long millis, int nanos)
* @author: hs96.cn@Gmail.com
* @create: 2020-09-03
*/
public class ThreadJoin2 {
public static void main(String[] args) throws InterruptedException {
Thread t1 = new Thread(() -> {
try {
System.out.println("t1 is running...");
Thread.sleep(5_000);
System.out.println("t1 is done.");
} catch (InterruptedException e) {
e.printStackTrace();
}
});
t1.start();
//只等待t1線程3秒
t1.join(3_000);
System.out.println("main thread is running...");
}
}
```
運行效果如下:

流程如下:程序開始進入t1線程,開始執行t1線程run方法,t1線程run方法打印t1 is running...,然后開始sleep5秒,這時候程序執行到t1.join(3_000);也就是只等待t1線程3秒,等待結束后main線程打印main thread is running...,再過大約2秒,t1sleep結束,打印t1 is done。后面的我們就不測試了,現在引出一個新的問題:
一些嵌入式的HTTP Server,比如jetty,為什么把任務啟動,一會之后會自動掛掉?其實原因很簡單就是在主線程退出之后會把http server掛掉(守護線程),避免占用端口、浪費資源。解決辦法是使用Thread.currentThread().join();。讓當前線程執行,直到當前線程死掉。
測試代碼如下:
```java
/**
* @program: ThreadDemo
* @description: join(long millis), join(long millis, int nanos)
* @author: hs96.cn@Gmail.com
* @create: 2020-09-03
*/
public class ThreadJoin2 {
public static void main(String[] args) throws InterruptedException {
Thread.currentThread().join();
}
}
```
運行效果如下:

可以看到currentThread一直在等待,thread done....永遠不會輸出出來。
接下來結合一個案例感受一下join在多線程中的使用場景:比如我們啟動多個線程來采集服務器節點的信息,那么我們該如何保證唯一的采集結束時間呢?
```java
/**
* @program: ThreadDemo
* @description: 采集服務器節點的信息的例子。問題:多個線程如何得到唯一的采集結束時間?
* @author: hs96.cn@Gmail.com
* @create: 2020-09-03
*/
public class ThreadJoin3 {
public static void main(String[] args) throws InterruptedException {
long startTimestamp = System.currentTimeMillis();
// 假設有三臺機器,開啟三個線程。
Thread m1 = new Thread(new CaptureRunnable("M1", 1_000L));
Thread m2 = new Thread(new CaptureRunnable("M2", 2_000L));
Thread m3 = new Thread(new CaptureRunnable("M3", 3_000L));
m1.start();
m2.start();
m3.start();
long endTimestamp = System.currentTimeMillis();
System.out.printf("Save data begin timestamp is %s, end timestamp is %s\n", startTimestamp, endTimestamp);
System.out.printf("Spend time is %s", endTimestamp - startTimestamp);
}
}
/**
* 采集服務器節點的任務。
*/
class CaptureRunnable implements Runnable {
// 機器節點的名稱
private String machineName;
// 采集花費時間
private long spendTime;
public CaptureRunnable(String machineName, long spendTime) {
this.machineName = machineName;
this.spendTime = spendTime;
}
@Override
public void run() {
// do the really capture data.
try {
Thread.sleep(spendTime);
System.out.printf(machineName + " completed data capture at timestamp [%s] and successful.\n", System.currentTimeMillis());
} catch (InterruptedException e) {
e.printStackTrace();
}
}
public String getResult() {
return machineName + " finish.";
}
}
```
運行效果如下:

可以看到三個線程還沒走完,就提前把時間打印出來了,這個不是我我們想要的效果,那么我們讓三個線程join一下試試:
```java
// 假設有三臺機器,開啟三個線程。
Thread m1 = new Thread(new CaptureRunnable("M1", 1_000L));
Thread m2 = new Thread(new CaptureRunnable("M2", 2_000L));
Thread m3 = new Thread(new CaptureRunnable("M3", 3_000L));
m1.start();
m2.start();
m3.start();
m1.join();
m2.join();
m3.join();
```
運行效果如下:

這樣就達到我們想要的效果了。
- 微服務
- 服務器相關
- 操作系統
- 極客時間操作系統實戰筆記
- 01 程序的運行過程:從代碼到機器運行
- 02 幾行匯編幾行C:實現一個最簡單的內核
- 03 黑盒之中有什么:內核結構與設計
- Rust
- 入門:Rust開發一個簡單的web服務器
- Rust的引用和租借
- 函數與函數指針
- Rust中如何面向對象編程
- 構建單線程web服務器
- 在服務器中增加線程池提高吞吐
- Java
- 并發編程
- 并發基礎
- 1.創建并啟動線程
- 2.java線程生命周期以及start源碼剖析
- 3.采用多線程模擬銀行排隊叫號
- 4.Runnable接口存在的必要性
- 5.策略模式在Thread和Runnable中的應用分析
- 6.Daemon線程的創建以及使用場景分析
- 7.線程ID,優先級
- 8.Thread的join方法
- 9.Thread中斷Interrupt方法學習&采用優雅的方式結束線程生命周期
- 10.編寫ThreadService實現暴力結束線程
- 11.線程同步問題以及synchronized的引入
- 12.同步代碼塊以及同步方法之間的區別和關系
- 13.通過實驗分析This鎖和Class鎖的存在
- 14.多線程死鎖分析以及案例介紹
- 15.線程間通信快速入門,使用wait和notify進行線程間的數據通信
- 16.多Product多Consumer之間的通訊導致出現程序假死的原因分析
- 17.使用notifyAll完善多線程下的生產者消費者模型
- 18.wait和sleep的本質區別
- 19.完善數據采集程序
- 20.如何實現一個自己的顯式鎖Lock
- 21.addShutdownHook給你的程序注入鉤子
- 22.如何捕獲線程運行期間的異常
- 23.ThreadGroup API介紹
- 24.線程池原理與自定義線程池一
- 25.給線程池增加拒絕策略以及停止方法
- 26.給線程池增加自動擴充,閑時自動回收線程的功能
- JVM
- C&C++
- GDB調試工具筆記
- C&C++基礎
- 一個例子理解C語言數據類型的本質
- 字節順序-大小端模式
- Php
- Php源碼閱讀筆記
- Swoole相關
- Swoole基礎
- php的五種運行模式
- FPM模式的生命周期
- OSI網絡七層圖片速查
- IP/TCP/UPD/HTTP
- swoole源代碼編譯安裝
- 安全相關
- MySql
- Mysql基礎
- 1.事務與鎖
- 2.事務隔離級別與IO的關系
- 3.mysql鎖機制與結構
- 4.mysql結構與sql執行
- 5.mysql物理文件
- 6.mysql性能問題
- Docker&K8s
- Docker安裝java8
- Redis
- 分布式部署相關
- Redis的主從復制
- Redis的哨兵
- redis-Cluster分區方案&應用場景
- redis-Cluster哈希虛擬槽&簡單搭建
- redis-Cluster redis-trib.rb 搭建&原理
- redis-Cluster集群的伸縮調優
- 源碼閱讀筆記
- Mq
- ELK
- ElasticSearch
- Logstash
- Kibana
- 一些好玩的東西
- 一次折騰了幾天的大華攝像頭調試經歷
- 搬磚實用代碼
- python讀取excel拼接sql
- mysql大批量插入數據四種方法
- composer好用的鏡像源
- ab
- 環境搭建與配置
- face_recognition本地調試筆記
- 虛擬機配置靜態ip
- Centos7 Init Shell
- 發布自己的Composer包
- git推送一直失敗怎么辦
- Beyond Compare過期解決辦法
- 我的Navicat for Mysql
- 小錯誤解決辦法
- CLoin報錯CreateProcess error=216
- mysql error You must reset your password using ALTER USER statement before executing this statement.
- VM無法連接到虛擬機
- Jetbrains相關
- IntelliJ IDEA 筆記
- CLoin的配置與使用
- PhpStormDocker環境下配置Xdebug
- PhpStorm advanced metadata
- PhpStorm PHP_CodeSniffer
