演示案例:由 cloud-comsumer-order80 消費端調用 cloud-provider-payment8001 服務端,然后由 Sleuth + Zipkin 監控其調用的情況。
<br/>
步驟如下:
[TOC]
# 1. 啟動Zipkin
:-: 
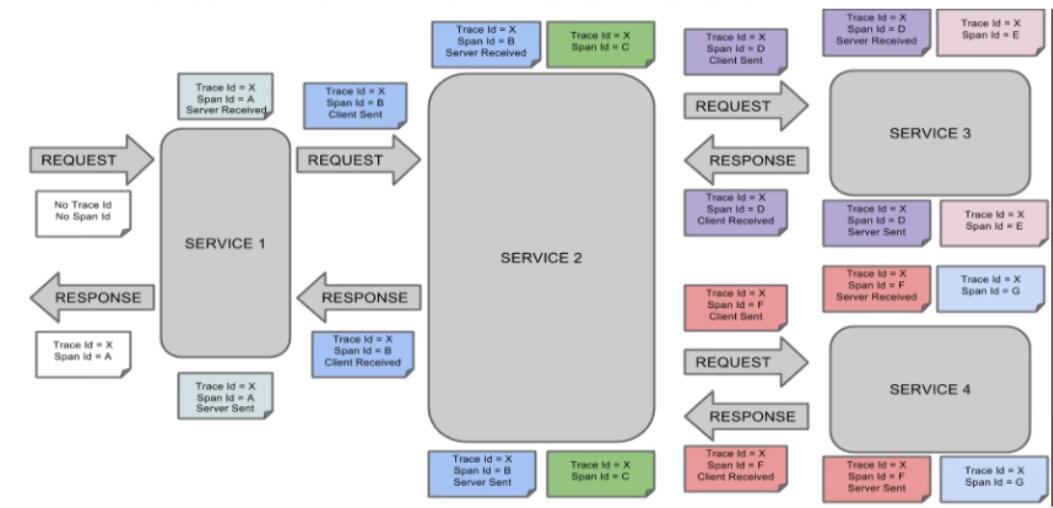
官網原圖:Zipkin完整的調用鏈路

簡化官網圖:Zipkin完整的調用鏈路

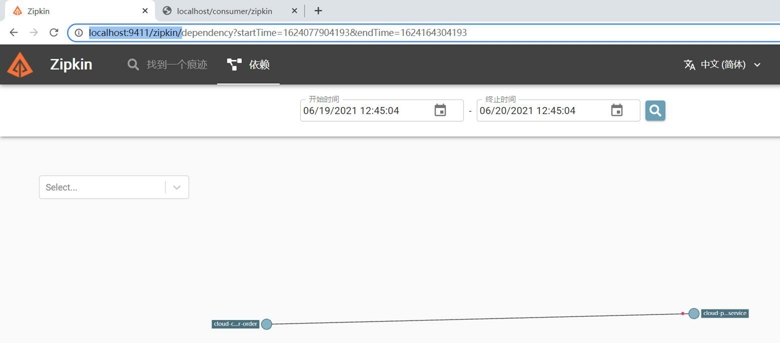
整個鏈路的依賴關系
如上面的圖所示:表示一請求鏈路,一條鏈路通過Trace ld唯一標識,Span標識發起的請求信息,各 span 通過 parent id 關聯起來。
```
Trace:類似于樹結構的Span集合,表示一條調用鏈路,存在唯一標識
span:表示調用鏈路來源,通俗的理解span就是一次請求信息
```
<br/>
SpringCloud從F版起已不需要自己構建Zipkin Server了,只需調用jar包即可,當前使用 SpringCloud版本為H版本(F -> H)。
****
zipkin下載地址 github:https://github.com/openzipkin/zipkin
<br/>
**1. 運行 zipin server jar 包**
如果沒有現成的 zipkin-server-2.23.3-*exec.jar 包,則需要自己編譯,按照如下命令編譯。
```shell
$ git clone https://github.com/openzipkin/zipkin
$ cd zipkin
$ mvn -DskipTests --also-make -pl zipkin-server clean install
# 運行 zipkin-server jar包
$ java -jar ./zipkin-server/target/zipkin-server-*exec.jar
```
**2. 訪問Zipkin Server http://localhost:9411/zipkin/**

<br/>
# 2. cloud-provider-payment8001 服務端配置
**1. 在 payment8001 模塊的`pom.xml`添加 zipkin 依賴**
```xml
<dependencies>
<!--包含了Sleuth-->
<dependency>
<groupId>org.springframework.cloud</groupId>
<artifactId>spring-cloud-starter-zipkin</artifactId>
</dependency>
<dependency>
<groupId>org.springframework.cloud</groupId>
<artifactId>spring-cloud-starter-netflix-eureka-client</artifactId>
</dependency>
<dependency>
<groupId>org.springframework.boot</groupId>
<artifactId>spring-boot-starter-web</artifactId>
</dependency>
<dependency>
<groupId>org.springframework.boot</groupId>
<artifactId>spring-boot-starter-actuator</artifactId>
</dependency>
<dependency>
<groupId>org.springframework.boot</groupId>
<artifactId>spring-boot-starter-test</artifactId>
<scope>test</scope>
</dependency>
...
</dependencies>
```
**2. 在 payment8001 模塊的`application.yml`中添加 Zipkin 相關配置**
```yml
spring:
application:
name: cloud-payment-service
zipkin:
base-url: http://localhost:9411 #Zipkin的訪問地址
sleuth:
sampler:
#采樣率值介于0到1之間,1則表示全部采集,一般取0.5即可
probability: 1
```
**3. 在 controller 添加一個用于測試的方法**
```java
@RestController
@RequestMapping("/payment")
public class PaymentController {
@GetMapping("/zipkin")
public String paymentZipkin() {
return "hi,i`am paymentzipkin server fall back.welcome to atguigu";
}
}
```
<br/>
# 3. cloud-comsumer-order80 消費端配置
**1. 在 order80 消費端的`pom.xml`中添加 zipkin 依賴**
```xml
<dependencies>
<!--包含了Sleuth-->
<dependency>
<groupId>org.springframework.cloud</groupId>
<artifactId>spring-cloud-starter-zipkin</artifactId>
</dependency>
<dependency>
<groupId>org.springframework.cloud</groupId>
<artifactId>spring-cloud-starter-netflix-eureka-client</artifactId>
</dependency>
<dependency>
<groupId>org.springframework.boot</groupId>
<artifactId>spring-boot-starter-web</artifactId>
</dependency>
<dependency>
<groupId>org.springframework.boot</groupId>
<artifactId>spring-boot-starter-actuator</artifactId>
</dependency>
<dependency>
<groupId>org.springframework.boot</groupId>
<artifactId>spring-boot-starter-test</artifactId>
<scope>test</scope>
</dependency>
...
</dependencies>
```
**2. 在 order80 消費端的`application.yml`中添加 zipkin 相關配置**
```yml
spring:
application:
name: cloud-comsumer-order
zipkin:
base-url: http://localhost:9411 #Zipkin的訪問地址
sleuth:
sampler:
#采樣率值介于0到1之間,1則表示全部采集,一般取0.5即可
probability: 1
```
**3. 在 order80 消費端的controller層添加一個測試方法**
```java
@RestController
@RequestMapping("/order")
public class OrderController {
@Resource
private RestTemplate restTemplate;
@GetMapping("/zipkin")
public String paymentZipkin() {
String result = restTemplate.getForObject("http://localhost:8001/payment/zipkin", String.class);
return result;
}
}
```
<br/>
# 4. 測試
(1)已經運行了 zipkin server jar 包。
(2)啟動 payment8001 服務端,再啟動 order80 消費端。
訪問 order80 消費端 http://localhost/consumer/zipkin 并多刷新幾次頁面。
(3)訪問Zipkin http://localhost:9411/zipkin/ ,查看Zipkin上監控的信息。
:-: 
圖1:可以看到兩個服務之間的依賴關系

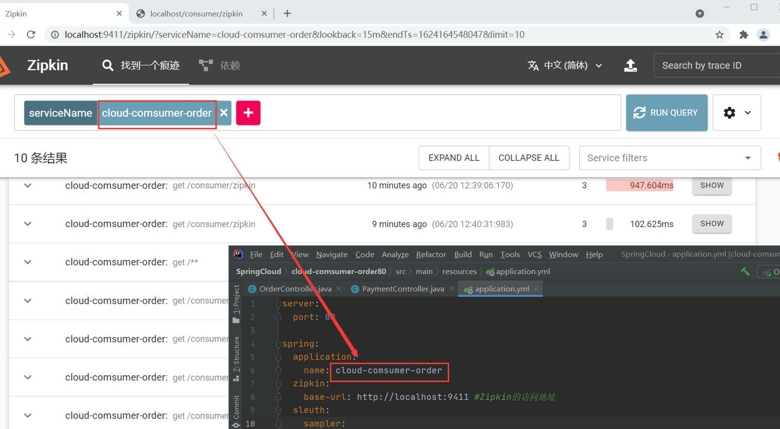
圖2:可以查看兩個服務就的請求情況
- 微服務
- 微服務是什么?
- 微服務架構
- 微服務優缺點
- 微服務技術棧
- 微服務框架對比
- SpringCloud
- SpringCloud是什么
- SpringCloud與SpringBoot對比
- SpringCloud與Dubbo對比
- Rest微服務案例
- 總體介紹
- 父工程構建步驟
- 公共模塊構建步驟
- 服務端模塊構建步驟
- 消費端模塊構建步驟
- Eureka服務注冊與發現
- Eureka是什么
- Eureka原理
- Eureka注冊服務中心構建
- 向Eureka注冊已有微服務
- Eureka的自我保護機制
- Eureka服務發現
- Eureka集群配置
- Eureka與Zookeeper對比
- Ribbon負載均衡
- Ribbon是什么
- Ribbon負載均衡演示
- 構建服務端模塊
- 構建消費端模塊
- Ribbon核心組件IRule
- 自定義負載均衡策略
- Ribbon均衡策略優先級
- 輪詢策略算法
- OpenFeign負載均衡
- OpenFeign是什么
- 負載均衡演示
- 日志打印功能
- 導出功能
- Hystrix斷路器
- Hystrix是什么
- 服務熔斷
- Hystrix服務端構建
- 服務熔斷演示
- 服務熔斷類型
- HystrixProperty配置匯總
- 服務降級
- Hystrix客戶端構建
- 服務降級演示
- fallbackFactory
- 熔斷與降級
- 服務監控
- 網關服務Zuul
- Zuul是什么
- Zuul路由服務構建
- 設置訪問映射規則
- Config分布式配置中心
- Config分布式配置中心是什么
- Config服務端與Git通信
- Config客戶端獲取配置
- Config客戶端動態刷新
- Bus消息總線
- Bus消息總線是什么
- Bus消息總線原理
- 廣播通知設計思想
- 廣播通知演示
- 定點通知演示
- Stream消息驅動
- 為什么要引入Stream
- Stream消息驅動是什么
- Stream設計思想
- Stream流程和注解
- Stream案例演示
- 重復消費問題
- 消息持久化
- Sleuth分布式鏈路跟蹤
- Sleuth是什么
- 搭建鏈路監控
- SpringCloud Alibaba
- Nacos注冊與配置中心
- Nacos是什么
- 安裝并運行Nacos
- Nacos注冊中心
- 服務端入住Nacos
- 消費端入住Nacos
- Nacos負載均衡演示
- 服務注冊中心對比
- Nacos的AP和CP轉化
- Nacos配置中心
- 基礎配置演示
- Nacos分類配置
- Nacos集群搭建
- Sentinel實現熔斷與限流
- Sentinel是什么
- Sentinel環境搭建
- Sentinel監控微服務演示
- Sentinel流控規則
- 流量監控的作用
- 設置流控規則
- Sentinel降級規則
- 熔斷降級作用
- 設置降級規則
- Sentinel熱點限流
- 什么是熱點
- 設置熱點限流
- Sentinel系統限流
- @SentinelResource
- @SentinelResource屬性
- @SentinelResource限流演示
- @SentinelResource熔斷演示
- 規則持久化
- 熔斷框架比較
- Seata分布式事務
- 分布式事務問題
- Seata是什么
- Seata分布式事務過程
- Seata環境搭建
- 演示示例
- 業務說明
- 數據庫環境準備
- 微服務環境準備
- 測試
- Consul服務注冊與發現
- Consul是什么
- Consul能做什么
- 環境搭建
- Windows平臺
- 服務端入住Consul
- 消費端入住Consul
- 注冊中心對比
- Zookeeper服務注冊與發現
- Zookeeper是什么
- 環境搭建
- 服務端入住Zookeeper
- 消費端入住Zookeeper
- 網關服務Gateway
- Gateway是什么
- Gateway能做什么
- Gateway對比Zuul
- 三大核心概念
- Gateway工作流
- 環境搭建
- 網關路由配置方式
- 配置文件配置
- 代碼中配置
- 動態路由
- Predicate斷言
- 斷言是什么
- 常用斷言
- Filter過濾器
- 過濾器是什么
- 過濾器種類
- 自定義過濾器
