
[https://www.jb51.net/article/179295.htm](https://www.jb51.net/article/179295.htm)
這篇文章主要介紹了Laravel + Elasticsearch 實現中文搜索的方法,文中通過示例代碼介紹的非常詳細,對大家的學習或者工作具有一定的參考學習價值,需要的朋友們下面隨著小編來一起學習學習吧
[](https://files.jb51.net/file_images/article/202002/202002020903021.jpg)
**Elasticsearch**
Elasticsearch 是一個基于 Apache Lucene(TM) 的開源搜索引擎,無論在開源還是專有領域,Lucene可 以被認為是迄今為止最先進、性能最好的、功能最全的搜索引擎庫。
但是,Lucene 只是一個庫。想要發揮其強大的作用,你需使用 Java 并要將其集成到你的應用中。Lucene 非常復雜,你需要深入的了解檢索相關知識來理解它是如何工作的。
Elasticsearch 也是使用 Java 編寫并使用 Lucene 來建立索引并實現搜索功能,但是它的目的是通過簡單連貫的 RESTful API 讓全文搜索變得簡單并隱藏 Lucene 的復雜性。
不過,Elasticsearch 不僅僅是 Lucene 和全文搜索引擎,它還提供:
* 分布式的實時文件存儲,每個字段都被索引并可被搜索
* 實時分析的分布式搜索引擎
* 可以擴展到上百臺服務器,處理PB級結構化或非結構化數據
而且,所有的這些功能被集成到一臺服務器,你的應用可以通過簡單的 RESTful API、各種語言的客戶端甚至命令行與之交互。上手 Elasticsearch 非常簡單,它提供了許多合理的缺省值,并對初學者隱藏了復雜的搜索引擎理論。它開箱即用(安裝即可使用),只需很少的學習既可在生產環境中使用。
Elasticsearch 在 Apache 2 license 下許可使用,可以免費下載、使用和修改。
**ElasticSearch 安裝**
在 Laradock 中已經集成了 ElasticSearch。我們可以直接使用:
1docker-compose up -d elasticsearch
如果需要安裝插件,執行命令:
1234docker-compose exec elasticsearch /usr/share/elasticsearch/bin/elasticsearch-plugin install {plugin-name} // 重啟容器docker-compose restart elasticsearch
*注:*
> The vm.max\_map\_count kernel setting must be set to at least 262144 for production use.
>
> 由于我是 centos 7 環境,直接設置在系統設置:
> `sysctl -w vm.max_map_count=262144`
>
> 默認用戶名和密碼:「elastic」、「changeme」,端口號:9200
[](https://files.jb51.net/file_images/article/202002/202002020903032.jpg)
**ElasticHQ**
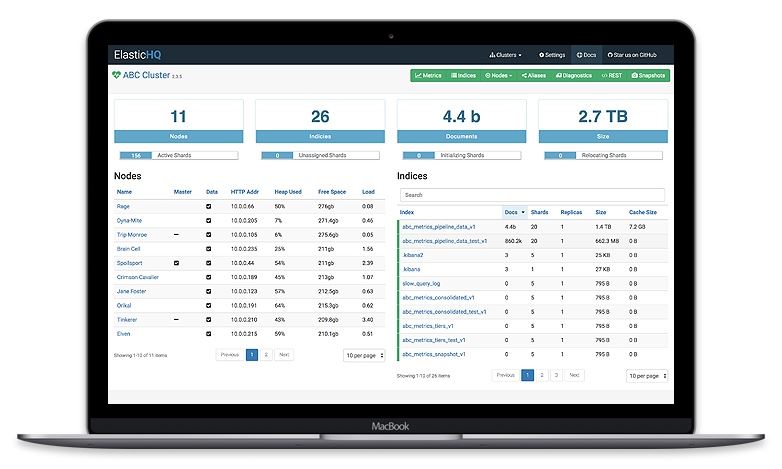
> ElasticHQ is an open source application that offers a simplified interface for managing and monitoring Elasticsearch clusters.
>
> Management and Monitoring for Elasticsearch.
>
> http://www.elastichq.org/
* Real-Time Monitoring
* Full Cluster Management
* Full Cluster Monitoring
* Elasticsearch Version Agnostic
* Easy Install - Always On
* Works with X-Pack
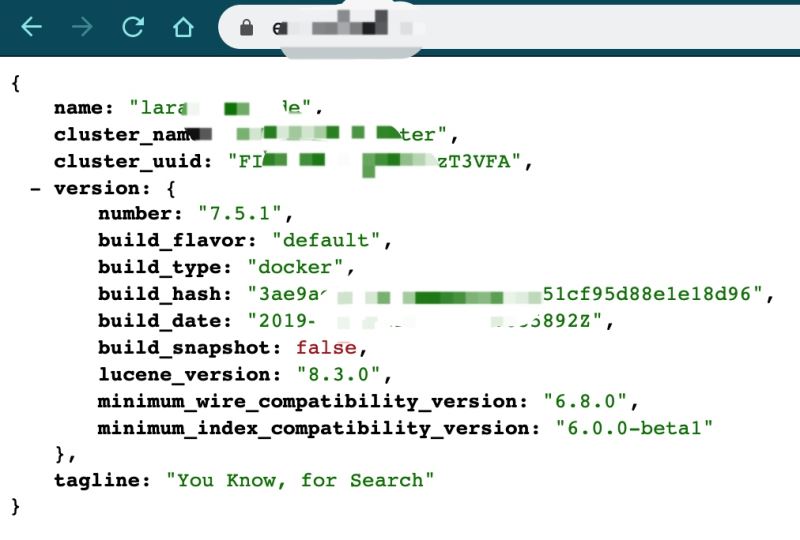
[](https://files.jb51.net/file_images/article/202002/202002020903034.jpg)
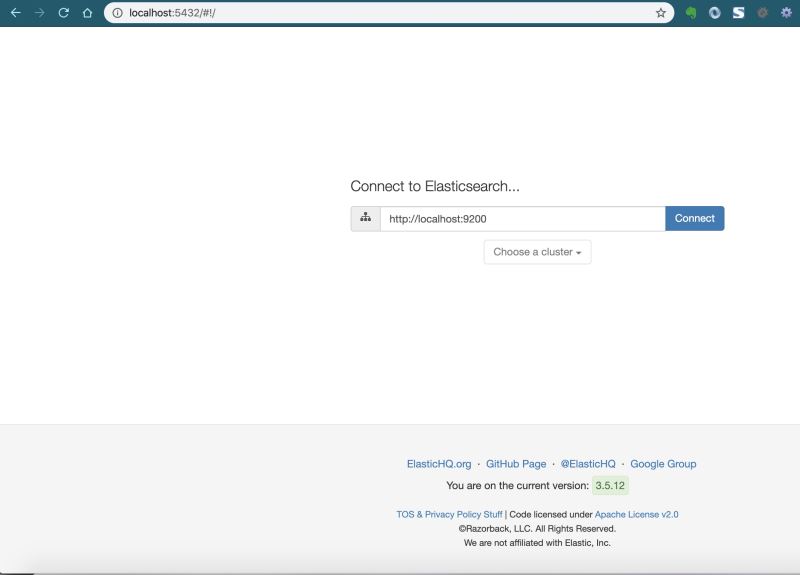
輸入我們的 Elasticsearch Host,即可進入后臺。
[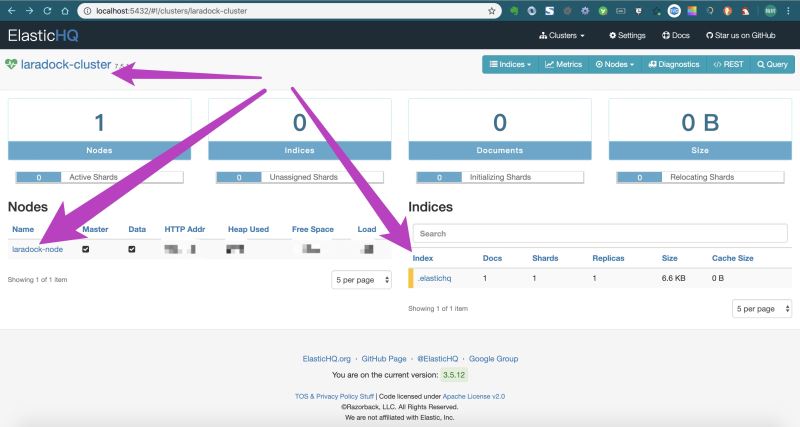](https://files.jb51.net/file_images/article/202002/202002020903035.jpg)
默認的創建了:
> 一個集群 cluster:laradock-cluster
> 一個節點 node:laradock-node
> 一個索引 index:.elastichq
**IK 分詞器安裝**
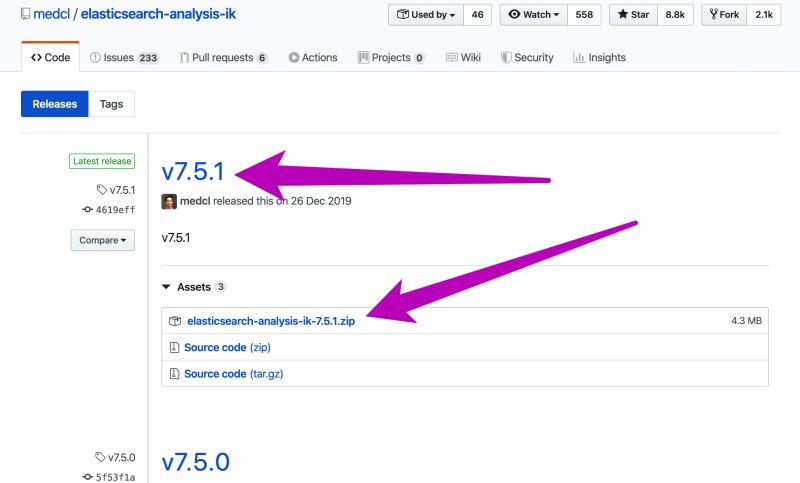
ElasticSearch 主要是用于自己 blog 或者公眾號文章的搜索使用,所以需要選擇一個中文分詞器配合使用,這里剛開始推薦使用 IK 分詞器,下面開始安裝對應 ElasticSearch版本 (7.5.1) 一致的插件:
[https://github.com/medcl/elasticsearch-analysis-ik/releases](https://github.com/medcl/elasticsearch-analysis-ik/releases)
[](https://files.jb51.net/file_images/article/202002/202002020903046.jpg)
12// 安裝插件docker-compose exec elasticsearch /usr/share/elasticsearch/bin/elasticsearch-plugin install https://github.com/medcl/elasticsearch-analysis-ik/releases/download/v7.5.1/elasticsearch-analysis-ik-7.5.1.zip
[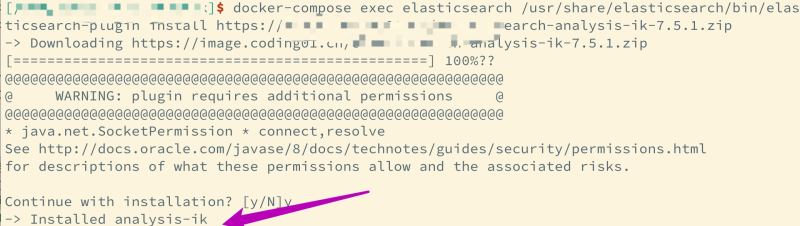](https://files.jb51.net/file_images/article/202002/202002020903047.jpg)
> 注:可以將 zip 文件先下載回來,然后再安裝,速度會快些。
**檢驗分詞效果**
根據 Elasticsearch API 測試,分詞的效果達到了:
12345678910111213141516171819202122232425262728293031323334353637383940414243444546~ curl -X POST "http://your_host/_analyze?pretty" -H 'Content-Type: application/json' -d'{ "analyzer": "ik_max_word", "text": "我是中國人"}' { "tokens" : [ { "token" : "我", "start_offset" : 0, "end_offset" : 1, "type" : "CN_CHAR", "position" : 0 }, { "token" : "是", "start_offset" : 1, "end_offset" : 2, "type" : "CN_CHAR", "position" : 1 }, { "token" : "中國人", "start_offset" : 2, "end_offset" : 5, "type" : "CN_WORD", "position" : 2 }, { "token" : "中國", "start_offset" : 2, "end_offset" : 4, "type" : "CN_WORD", "position" : 3 }, { "token" : "國人", "start_offset" : 3, "end_offset" : 5, "type" : "CN_WORD", "position" : 4 } ]}
**結合 Laravel**
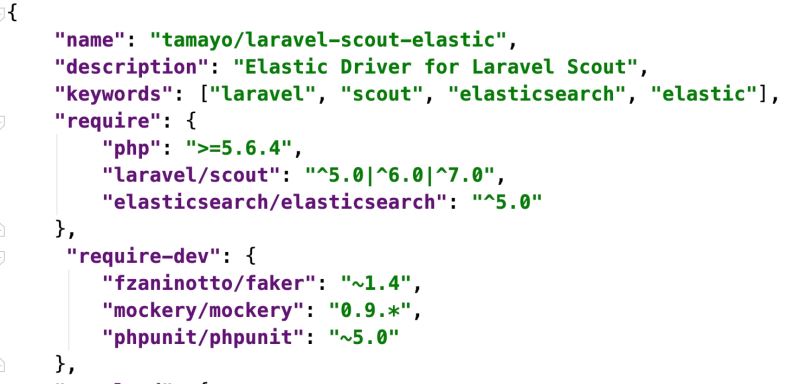
雖然 Elasticsearch 官方提供了對應的 PHP 版本的插件,但我們還是希望和 Laravel 結合的更緊密些,所以這里選擇和 Scout 結合使用,具體用到了`tamayo/laravel-scout-elastic`插件。
12345composer require tamayo/laravel-scout-elastic composer require laravel/scout php artisan vendor:publish
選擇:`Laravel\Scout\ScoutServiceProvider`
[](https://files.jb51.net/file_images/article/202002/202002020903048.jpg)
修改驅動為`elasticsearch`:
1'driver' => env('SCOUT_DRIVER', 'elasticsearch'),
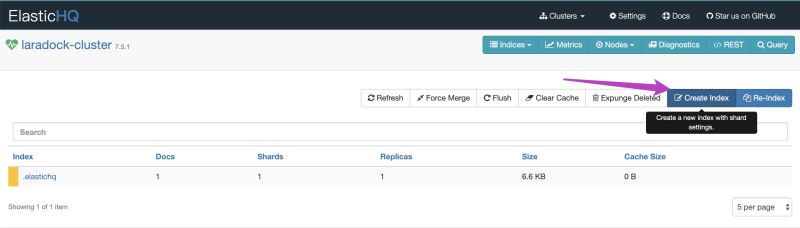
**創建索引**
創建索引有幾種方法,其中可以使用 Ela 可視化工具 ElasticHQ 直接創建。
[](https://files.jb51.net/file_images/article/202002/202002020903059.jpg)
[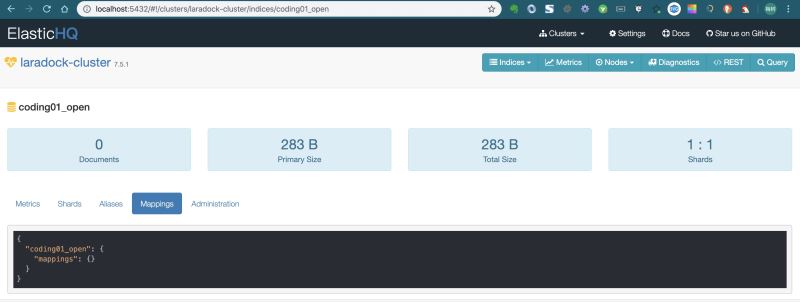](https://files.jb51.net/file_images/article/202002/2020020209030510.jpg)
接下來我們需要更新這個索引,補充 Mappings 這部分,可以用 Postman。
另一種方法是用 Laravel 自帶的 Artisan 命令行功能。
> 這里我們推薦使用 Artisan 命令行。
1php artisan make:command ESOpenCommand
根據官網提示,我們可以在`ESOpenCommand`上向 Elasticsearch 服務器發送 PUT 請求,這里借助 Elasticsearch 提供的 PHP 插件,在我們使用`tamayo/laravel-scout-elastic`插件時,已經安裝了 Elasticsearch PHP 插件:
[](https://files.jb51.net/file_images/article/202002/2020020209030612.jpg)
下面就可以借助插件,創建我們的 Index,直接看代碼:
123456789101112131415161718192021222324252627282930313233343536373839404142434445464748public function handle() { $host = config('scout.elasticsearch.hosts'); $index = config('scout.elasticsearch.index'); $client = ClientBuilder::create()->setHosts($host)->build(); if ($client->indices()->exists(['index' => $index])) { $this->warn("Index {$index} exists, deleting..."); $client->indices()->delete(['index' => $index]); } $this->info("Creating index: {$index}"); return $client->indices()->create([ 'index' => $index, 'body' => [ 'settings' => [ 'number_of_shards' => 1, 'number_of_replicas' => 0 ], 'mappings' => [ '_source' => [ 'enabled' => true ], 'properties' => [ 'id' => [ 'type' => 'long' ], 'title' => [ 'type' => 'text', 'analyzer' => 'ik_max_word', 'search_analyzer' => 'ik_smart' ], 'subtitle' => [ 'type' => 'text', 'analyzer' => 'ik_max_word', 'search_analyzer' => 'ik_smart' ], 'content' => [ 'type' => 'text', 'analyzer' => 'ik_max_word', 'search_analyzer' => 'ik_smart' ] ], ] ] ]);}
[](https://files.jb51.net/file_images/article/202002/2020020209030613.jpg)
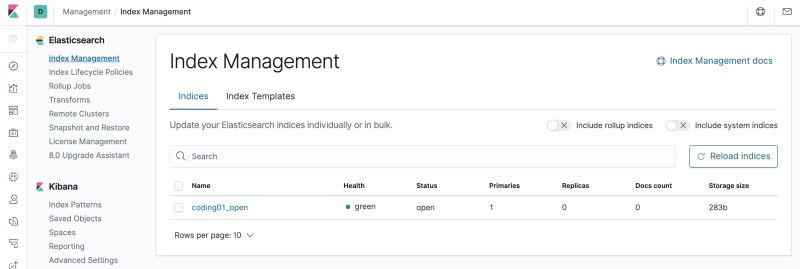
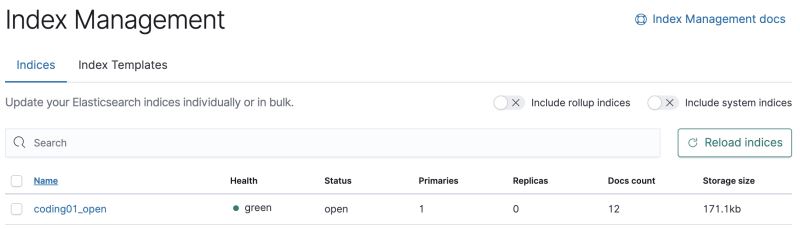
好了,我們執行 Kibana 看到我們已經創建好了 Index:
[](https://files.jb51.net/file_images/article/202002/2020020209030614.jpg)
> 注 Kibana 本地 Docker 安裝:
>
> 后續會重點說明 Kibana 如何使用
1docker run -d --name kibana -e ELASTICSEARCH_HOSTS=http://elasticsearch_host -p 5601:5601 -e SERVER_NAME=ki.test kibana:7.5.2
為了驗證 Index 是否可用,可以插入一條數據看看:
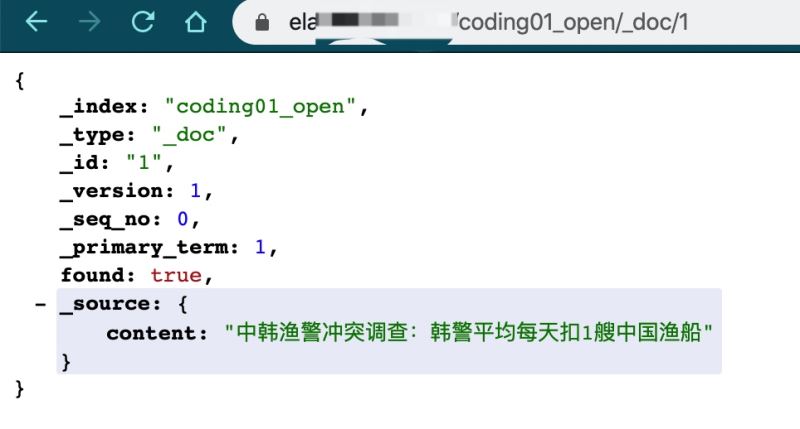
12curl -XPOST your_host/coding01_open/_create/1 -H 'Content-Type:application/json' -d'{"content":"中韓漁警沖突調查:韓警平均每天扣1艘中國漁船"}
[](https://files.jb51.net/file_images/article/202002/2020020209030615.jpg)
可以通過瀏覽器看看對應的數據:
[](https://files.jb51.net/file_images/article/202002/2020020209030716.jpg)
有了 Index,下一步我們就可以結合 Laravel,導入、更新、查詢等操作了。
**Laravel Model 使用**
Laravel 框架已經為我們推薦使用 Scout 全文搜索,我們只需要在 Article Model 加上官方所說的內容即可,很簡單,推薦大家看 Scout 使用文檔:[https://learnku.com/docs/laravel/6.x/scout/5191](https://learnku.com/docs/laravel/6.x/scout/5191),下面直接上代碼:
1234567891011121314151617181920212223242526272829303132333435363738394041424344454647484950515253545556575859606162636465666768697071727374757677787980818283848586<?php namespace App; use App\Tools\Markdowner;use Illuminate\Database\Eloquent\Model;use Illuminate\Database\Eloquent\SoftDeletes;use Laravel\Scout\Searchable; class Article extends Model{ use Searchable; protected $connection = 'blog'; protected $table = 'articles'; use SoftDeletes; /** * The attributes that should be mutated to dates. * * @var array */ protected $dates = ['published_at', 'created_at', 'deleted_at']; /** * The attributes that are mass assignable. * * @var array */ protected $fillable = [ 'user_id', 'last_user_id', 'category_id', 'title', 'subtitle', 'slug', 'page_image', 'content', 'meta_description', 'is_draft', 'is_original', 'published_at', 'wechat_url', ]; protected $casts = [ 'content' => 'array' ]; /** * Set the content attribute. * * @param $value */ public function setContentAttribute($value) { $data = [ 'raw' => $value, 'html' => (new Markdowner)->convertMarkdownToHtml($value) ]; $this->attributes['content'] = json_encode($data); } /** * 獲取模型的可搜索數據 * * @return array */ public function toSearchableArray() { $data = [ 'id' => $this->id, 'title' => $this->title, 'subtitle' => $this->subtitle, 'content' => $this->content['html'] ]; return $data; } public function searchableAs() { return '_doc'; }}
Scout 提供了 Artisan 命令 import 用來導入所有已存在的記錄到搜索索引中。
1php artisan scout:import "App\Article"
[](https://files.jb51.net/file_images/article/202002/2020020209030717.jpg)
看看 Kibana,已存入 12 條數據,和數據庫條數吻合。
[](https://files.jb51.net/file_images/article/202002/2020020209030718.jpg)
有了數據,我們可以測試看看能不能查詢到數據。
還是一樣的,創建一個命令:
12345678910111213141516171819202122232425262728293031323334353637class ElasearchCommand extends Command{ /** * The name and signature of the console command. * * @var string */ protected $signature = 'command:search {query}'; /** * The console command description. * * @var string */ protected $description = 'Command description'; /** * Create a new command instance. * * @return void */ public function __construct() { parent::__construct(); } /** * Execute the console command. * * @return mixed */ public function handle() { $article = Article::search($this->argument('query'))->first(); $this->info($article->title); }}
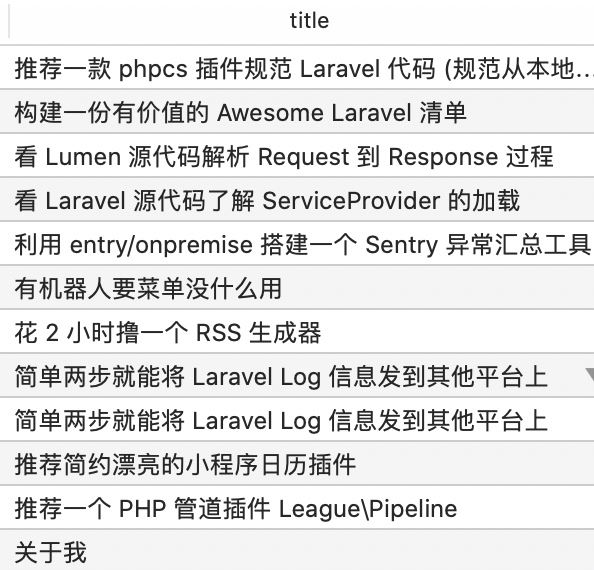
這是我的 titles,我隨便輸入一個關鍵字:「清單」,看是否能搜到。
[](https://files.jb51.net/file_images/article/202002/2020020209030820.jpg)
**總結**
整體完成了:
* Elasticsearch 安裝;
* Elasticsearch IK 分詞器插件安裝;
* Elasticsearch 可視化工具 ElasticHQ 和 Kibana 的安裝和簡單使用;
* Scout 的使用;
* Elasticsearch 和 Scout 結合使用。
接下來就要將更多的內容存入 Elasticsearch 中,為自己的 blog、公眾號、自動化搜索等場景提供全文搜索。
**參考**
推薦一個命令行應用開發工具——[Laravel Zero](https://mp.weixin.qq.com/s/RKEuz5gd8mOoCWfT2A3xzQ)
Artisan 命令行[https://learnku.com/docs/laravel/6.x/artisan/5158](https://learnku.com/docs/laravel/6.x/artisan/5158)
Scout 全文搜索[https://learnku.com/docs/laravel/6.x/scout/5191](https://learnku.com/docs/laravel/6.x/scout/5191)
How to integrate Elasticsearch in your Laravel App – 2019 edition[https://madewithlove.be/how-to-integrate-elasticsearch-in-your-laravel-app-2019-edition/](https://madewithlove.be/how-to-integrate-elasticsearch-in-your-laravel-app-2019-edition/)
Kibana Guide[https://www.elastic.co/guide/en/kibana/index.html](https://www.elastic.co/guide/en/kibana/index.html)
elasticsearch php-api \[[https://www.elastic.co/guide/en/elasticsearch/client/php-api/current/index.html\](https://www.elastic.co/guide/en/elasticsearch/client/php-api/current/index.html](https://www.elastic.co/guide/en/elasticsearch/client/php-api/current/index.html](https://www.elastic.co/guide/en/elasticsearch/client/php-api/current/index.html))
以上就是本文的全部內容,希望對大家的學習有所幫助,也希望大家多多支持腳本之家。
- 常見功能
- 第三方授權登錄
- 郵件發送
- 簡易聊天室
- 獲取各國匯率
- PHP獲取服務器硬件指標
- 數據上報之
- web開發
- 開發規范
- 前端
- 踩坑
- 將footer固定在底部
- bootstrap
- Metronic
- 用到的jquery插件
- bootstrap-hover-dropdown
- jquery.slimscroll
- jquery.blockui
- bootstrap-switch
- js.cookie
- moment
- bootstrap-daterangepicker
- morris
- raphael
- jquery.waypoints
- jquery.counterup
- select2
- 取值和設置默認值
- vue
- axios
- 瀏覽器
- 谷歌瀏覽器
- 谷歌插件
- layui
- layui-表格
- layui-表單
- layui-彈窗
- layui-分頁
- 后端
- 操作系統
- linux
- 用戶管理
- 文件管理
- 目錄管理
- 壓縮和解壓縮
- 進程查看
- 端口查看
- 開機自啟動服務
- 定時任務
- shell腳本
- 殺掉運行超過指定時長指定服務的進程
- 獲取服務器使用狀態
- bash-shell連接socket
- 自定義快捷命令
- centos-踩坑
- 防火墻
- 軟件
- yum
- vim
- screen
- window
- 語言
- PHP
- 配置優化
- 框架
- thinkphp5.1+
- think命令行
- laravel6.+
- 維護模式
- 根據環境讀取不同配置
- laravel6.+采坑
- laravel坑位
- 數據庫事務
- 任務調度
- 文件權限問題
- 增強框架
- larvel:elastic-search
- 圖形驗證碼
- laravel獲取ip
- 函數
- strtotime
- 正則匹配
- 類
- 接口類與抽象類
- 類相關的關鍵字 - abstract
- 類相關的關鍵字 - interface
- PHP有關類的調用方式"->"與"::"的區別
- 擴展
- 問題歸納
- json_encode和json_decode
- 字符串的運算
- curl
- 優化php效率
- 數組相加合并與array_merge
- 時區轉換
- 不常用特性
- php反射
- 包管理器-composer
- GuzzleHttp
- Python
- Go
- 數據庫
- Redis
- 安裝
- 本地化-數據備份
- php-redis操作
- Mysql
- mysql-命令集合
- 設置終端可訪問
- 數據庫設計
- 用戶基礎信息表
- 踩坑集合
- mysql-2002
- mysql-2054
- 優化策略
- mysql-密碼驗證插件
- 一些牛逼的sql查詢
- topN
- 無限級分類
- Memcache
- MongoDb
- 安裝mongo-server
- 安裝php-mongodb擴展
- 在laravel中使用mongoDB
- 客戶端軟件
- Hbase
- Elasticsearch
- elastic-search
- restfulApi操作es
- web服務器
- 1.nginx
- 配置語法規則
- 配置詳解
- rewrite規則
- request_filename
- 2.apache
- 功能設計
- 加密解密
- Base64
- 對亞馬遜SKU加密
- 兼職項目中的加解密
- 騰訊外包時的加密
- 接口設計
- 接口限流設計
- 分庫分表
- 遍歷展示文件目錄結構
- 時區換算
- 文件切割
- 解析xml字符串
- 項目
- 博客后臺管理
- 亞馬遜廣告API
- 官方指引文檔
- 開發人員中心
- 應用商店
- 第三方庫
- 申請API郵件記錄
- 亞馬遜MWS
- 付款報告
- 亂碼
- 亞馬遜管理庫存報告
- 報告
- 商品
- 入庫
- 履行
- 出庫
- 財務
- 訂單
- 異步任務處理
- 集群如何同步代碼
- 基本開發流程
- 文檔管理
- showdoc
- 運行環境
- 開發環境
- vagrant
- windows上配置安裝
- vagrant安裝插件緩慢
- 更換ssh默認端口映射
- 設置x-shell密碼登錄
- 使用市場的box-homestead
- homestead-7: Box 'lc/homestead'
- 常見問題
- 虛擬環境reboot
- 突然無法使用
- phpStudy
- wamp
- 壓測性能
- VPN
- vultr
- 凌空圖床
- 寶塔
- 自動化部署
- 版本管理軟件鉤子
- 線上環境-LNMP
- centos7
- nginx
- mysql
- mysql開機自啟
- mysql-更換默認端口
- datetime字段類型默認值
- php
- php擴展安裝
- redis
- swoole
- gd
- BCMath
- igbinary
- zstd
- 包管理器:composer
- 優化性能
- nodejs
- 更新gcc版本
- 版本控制
- git
- 常用命令
- gitlab
- 版本管理規范
- 使用阿里云創建遠程倉庫
- git自動化部署
- svn
- 忽略指定文件
- 拉取代碼
- 自動化運維
- jekins
- 容器
- 集群
- 架構設計
- 設計原則
- 閱讀參考
- 代碼規劃
- 架構實戰
- 服務治理
- 權限控制設計
- 具體設計
- 計劃
- 疑問知識點
- 讀書筆記
- 高性能Mysql
- TCP-IP詳解-卷一:協議
- 思考
- php如何實現并發執行
- 對接調用設計
- 如何在瀏覽器上實現插件
- 如何設計一個app結合業務告警
- mysql的where查詢沒有用到索引
- 為啥in查詢比循環嵌套sql的查詢還要慢
- 使用git來創建屬于自己的composer包
- 翻頁獲取數據的時候又新增了數據
- 安全思路
- 月報
- PHP ?? 和 ?: 的區別
- PHP異步執行
- redis集群的目標是什么
- 大文件數據處理
- 性能瓶頸分析
- 命令行里輸出帶顏色的字體
- 面試問題合集
- 基礎
- 安全
- 算法
- 冒泡排序
- 快速排序
- 二分法查詢數組指定成員
- 字符查找匹配
- 令牌桶
- 漏桶
- 計數器
- 代理
- 協議
- http
- 狀態碼
- tcp
- udp
- Oauth2.0
- 設計模式
- 單例模式
- 適配器模式
- 工廠模式
- 觀察者模式
- 流程化
- 地址欄輸入網址到返回網頁的流程
- 題目收集
- 工具
- rabbitMq
- rabbitMQ用戶管理
- 生產者
- 消費者
- 支持TP5.*的think-queue
- 消息丟失
- 消費者報錯
- rabbitMQ配置優化
- 磁盤滿載導致服務掛掉
- PHP類庫
- rabbitMQ踩坑
- navicat
- vscode
- phpstorm
- 激活碼
- markdown
- PHP自定義類庫
- 工具類
- 領導力
- 任務分配
- 代碼組織
- 不要重復
- 避免污染
- 接口定義規范
- 小業務需求
- 獲取充值面額組成
- 監控服務器CPU和內存
- shell腳本版本