
# 2.2 高級Numpy
**作者**: Pauli Virtanen
Numpy是Python科學工具棧的基礎。它的目的很簡單:在一個內存塊上實現針對多個物品的高效操作。了解它的工作細節有助于有效的使用它的靈活性,使用有用的快捷鍵,基于它構建新的工作。
這個指南的目的包括:
* 剖析Numpy數組,以及它的重要性。提示與技巧。
* 通用函數:什么是、為什么以及如果你需要一個全新的該做什么。
* 與其他工具整合:Numpy提供了一些方式將任意數據封裝為ndarray,而不需要不必要的復制。
* 新近增加的功能,對我來說他們包含什么:PEP 3118 buffers、廣義ufuncs, ...
**先決條件**
* Numpy (>= 1.2; 越新越好...)
* Cython (>= 0.12, 對于Ufunc例子)
* PIL (在一些例子中使用)
在這個部分,numpy將被如下引入:
In?[2]:
```
import numpy as np
```
章節內容
* ndarry的一生
* 它是...
* 內存塊
* 數據類型
* 索引體系:strides
* 剖析中的發現
* 通用函數
* 他們是什么?
* 練習:從零開始構建一個ufunc
* 答案:從零開始構建一個ufunc
* 廣義ufuncs
* 協同工作功能
* 共享多維度,類型數據
* 舊的buffer協議
* 舊的buffer協議
* 數組接口協議
* 數組切片:`chararray`、`maskedarray`、`matrix`
* `chararray`:向量化字符操作
* `masked_array` 缺失值
* recarray:純便利
* `matrix`:便利?
* 總結
* 為Numpy/Scipy做貢獻
* 為什么
* 報告bugs
* 貢獻文檔
* 貢獻功能
* 如何幫忙,總的來說
## 2.2.1 ndarray的一生
### 2.2.1.1 它是...
**ndarray** =
```
內存塊 + 索引體系 + 數據類型描述符
```
* 原始數據
* 如何定義一個元素
* 如何解釋一個元素 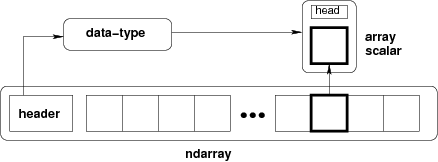
In?[?]:
```
typedef struct PyArrayObject {
PyObject_HEAD
/* Block of memory */
char *data;
/* Data type descriptor */
PyArray_Descr *descr;
/* Indexing scheme */
int nd;
npy_intp *dimensions;
npy_intp *strides;
/* Other stuff */
PyObject *base;
int flags;
PyObject *weakreflist;
} PyArrayObject;
```
### 2.2.1.2 內存塊
In?[5]:
```
x = np.array([1, 2, 3, 4], dtype=np.int32)
x.data
```
Out[5]:
```
<read-write buffer for 0x105ee2850, size 16, offset 0 at 0x105f880f0>
```
In?[6]:
```
str(x.data)
```
Out[6]:
```
'\x01\x00\x00\x00\x02\x00\x00\x00\x03\x00\x00\x00\x04\x00\x00\x00'
```
數據的內存地址:
In?[7]:
```
x.__array_interface__['data'][0]
```
Out[7]:
```
4352517296
```
完整的`__array_interface__`:
In?[8]:
```
x.__array_interface__
```
Out[8]:
```
{'data': (4352517296, False),
'descr': [('', '<i4')],
'shape': (4,),
'strides': None,
'typestr': '<i4',
'version': 3}
```
提醒:兩個`ndarrays`可以共享相同的內存:
In?[9]:
```
x = np.array([1, 2, 3, 4])
y = x[:-1]
x[0] = 9
y
```
Out[9]:
```
array([9, 2, 3])
```
內存不必為一個`ndarray`擁有:
In?[10]:
```
x = '1234'
y = np.frombuffer(x, dtype=np.int8)
y.data
```
Out[10]:
```
<read-only buffer for 0x105ee2e40, size 4, offset 0 at 0x105f883b0>
```
In?[11]:
```
y.base is x
```
Out[11]:
```
True
```
In?[12]:
```
y.flags
```
Out[12]:
```
C_CONTIGUOUS : True
F_CONTIGUOUS : True
OWNDATA : False
WRITEABLE : False
ALIGNED : True
UPDATEIFCOPY : False
```
`owndata`和`writeable`標記表明了內存塊的狀態。
也可以看一下:[array接口](http://docs.scipy.org/doc/numpy/reference/arrays.interface.html)
### 2.2.1.3 數據類型
#### 2.2.1.3.1 描述符
`dtype`描述了數組里的一個項目:
| | |
| --- | --- |
| type | 數據的**標量類型**,int8、int16、float64等之一(固定大小),str、unicode、void(可變大小) |
| itemsize | 數據塊的**大小** |
| byteorder | **字節序**: big-endian `>` / little-endian `<` / 不可用 |
| fields | 子-dtypes,如果是一個**結構化的數據類型** |
| shape | 數組的形狀,如果是一個**子數組** |
In?[13]:
```
np.dtype(int).type
```
Out[13]:
```
numpy.int64
```
In?[14]:
```
np.dtype(int).itemsize
```
Out[14]:
```
8
```
In?[15]:
```
np.dtype(int).byteorder
```
Out[15]:
```
'='
```
#### 2.2.1.3.2 例子:讀取.wav文件
The`.wav` file header:
| | |
| --- | --- |
| chunk_id | "RIFF" |
| chunk_size | 4字節無符號little-endian整型 |
| format | "WAVE" |
| fmt_id | "fmt " |
| fmt_size | 4字節無符號little-endian整型 |
| audio_fmt | 2字節無符號little-endian整型 |
| num_channels | 2字節無符號little-endian整型 |
| sample_rate | 4字節無符號little-endian整型 |
| byte_rate | 4字節無符號little-endian整型 |
| block_align | 2字節無符號little-endian整型 |
| bits_per_sample | 2字節無符號little-endian整型 |
| data_id | "data" |
| data_size | 4字節無符號little-endian整型 |
* 44字節塊的原始數據(在文件的開頭)
* ...接下來是`data_size` 實際聲音數據的字節。
`.wav`文件頭是Numpy結構化數據類型:
In?[6]:
```
wav_header_dtype = np.dtype([
("chunk_id", (str, 4)), # flexible-sized scalar type, item size 4
("chunk_size", "<u4"), # little-endian unsigned 32-bit integer
("format", "S4"), # 4-byte string
("fmt_id", "S4"),
("fmt_size", "<u4"),
("audio_fmt", "<u2"), #
("num_channels", "<u2"), # .. more of the same ...
("sample_rate", "<u4"), #
("byte_rate", "<u4"),
("block_align", "<u2"),
("bits_per_sample", "<u2"),
("data_id", ("S1", (2, 2))), # sub-array, just for fun!
("data_size", "u4"),
#
# the sound data itself cannot be represented here:
# it does not have a fixed size
])
```
也可以看一下`wavreader.py`
In?[5]:
```
wav_header_dtype['format']
```
Out[5]:
```
dtype('S4')
```
In?[6]:
```
wav_header_dtype.fields
```
Out[6]:
```
<dictproxy {'audio_fmt': (dtype('uint16'), 20),
'bits_per_sample': (dtype('uint16'), 34),
'block_align': (dtype('uint16'), 32),
'byte_rate': (dtype('uint32'), 28),
'chunk_id': (dtype('S4'), 0),
'chunk_size': (dtype('uint32'), 4),
'data_id': (dtype(('S1', (2, 2))), 36),
'data_size': (dtype('uint32'), 40),
'fmt_id': (dtype('S4'), 12),
'fmt_size': (dtype('uint32'), 16),
'format': (dtype('S4'), 8),
'num_channels': (dtype('uint16'), 22),
'sample_rate': (dtype('uint32'), 24)}>
```
In?[7]:
```
wav_header_dtype.fields['format']
```
Out[7]:
```
(dtype('S4'), 8)
```
* 第一個元素是結構化數據中對應于名稱`format`的子類型
* 第二個是它的從項目開始的偏移(以字節計算)
**練習**
小練習,通過使用偏移來創造一個“稀釋”的dtype,只使用一些字段:
In?[?]:
```
wav_header_dtype = np.dtype(dict(
names=['format', 'sample_rate', 'data_id'],
offsets=[offset_1, offset_2, offset_3], # counted from start of structure in bytes
formats=list of dtypes for each of the fields,
))
```
并且用它來讀取sample rate和`data_id`(就像子數組)。
In?[7]:
```
f = open('data/test.wav', 'r')
wav_header = np.fromfile(f, dtype=wav_header_dtype, count=1)
f.close()
print(wav_header)
```
```
[ ('RIFF', 17402L, 'WAVE', 'fmt ', 16L, 1, 1, 16000L, 32000L, 2, 16, [['d', 'a'], ['t', 'a']], 17366L)]
```
In?[8]:
```
wav_header['sample_rate']
```
Out[8]:
```
array([16000], dtype=uint32)
```
讓我們訪問子數組:
In?[9]:
```
wav_header['data_id']
```
Out[9]:
```
array([[['d', 'a'],
['t', 'a']]],
dtype='|S1')
```
In?[10]:
```
wav_header.shape
```
Out[10]:
```
(1,)
```
In?[11]:
```
wav_header['data_id'].shape
```
Out[11]:
```
(1, 2, 2)
```
當訪問子數組時,維度被添加到末尾!
**注意:**有許多模塊可以用于加載聲音數據,比如`wavfile`、`audiolab`等...
#### 2.2.1.3.3 投射和再解釋/視圖
**投射**
* 賦值
* 數組構建
* 算術
* 等等
* 手動:`.astype(dtype)`
**data re-interpretation**
* 手動:`.view(dtype)`
##### 2.2.1.3.3.1 投射
* 算術投射,簡而言之:
* 只有類型(不是值!)操作符最重要
* 最大的“安全”模式能代表選出的兩者
* 在一些情況下,數組中的量值可能“丟失”
* 在通用復制數據中的投射:
In?[4]:
```
x = np.array([1, 2, 3, 4], dtype=np.float)
x
```
Out[4]:
```
array([ 1., 2., 3., 4.])
```
In?[5]:
```
y = x.astype(np.int8)
y
```
Out[5]:
```
array([1, 2, 3, 4], dtype=int8)
```
In?[6]:
```
y + 1
```
Out[6]:
```
array([2, 3, 4, 5], dtype=int8)
```
In?[7]:
```
y + 256
```
Out[7]:
```
array([257, 258, 259, 260], dtype=int16)
```
In?[8]:
```
y + 256.0
```
Out[8]:
```
array([ 257., 258., 259., 260.])
```
In?[9]:
```
y + np.array([256], dtype=np.int32)
```
Out[9]:
```
array([257, 258, 259, 260], dtype=int32)
```
* 集合項目上的投射:數組的dtype在項目賦值過程中不會改變:
In?[10]:
```
y[:] = y + 1.5
y
```
Out[10]:
```
array([2, 3, 4, 5], dtype=int8)
```
**注意** 具體規則:見文檔:[http://docs.scipy.org/doc/numpy/reference/ufuncs.html#casting-rules](http://docs.scipy.org/doc/numpy/reference/ufuncs.html#casting-rules)
##### 2.2.1.3.3.2 再解釋/視圖
* 內存中的數據塊(4字節)
0x01 || 0x02 || 0x03 || 0x04
```
- 4 of uint8, OR,
- 4 of int8, OR,
- 2 of int16, OR,
- 1 of int32, OR,
- 1 of float32, OR,
- ...
```
如何從一個切換另一個?
* 切換dtype:
In?[11]:
```
x = np.array([1, 2, 3, 4], dtype=np.uint8)
x.dtype = "<i2"
x
```
Out[11]:
```
array([ 513, 1027], dtype=int16)
```
In?[12]:
```
0x0201, 0x0403
```
Out[12]:
```
(513, 1027)
```
0x01 0x02 || 0x03 0x04
**注意** little-endian:越不重要的字節在內存的左側
* 創建新視圖:
In?[14]:
```
y = x.view("<i4")
y
```
Out[14]:
```
array([67305985], dtype=int32)
```
In?[15]:
```
0x04030201
```
Out[15]:
```
67305985
```
0x01 0x02 0x03 0x04
**注意:**
* **`.view()`創建視圖,并不復制(或改變)內存塊**
* **只改變dtype(調整數組形狀):**
In?[16]:
```
x[1] = 5
```
In?[17]:
```
y
```
Out[17]:
```
array([328193], dtype=int32)
```
In?[18]:
```
y.base is x
```
Out[18]:
```
True
```
**小練習:數據再解釋**
**也可以看一下:** `view-colors.py`
數組中的RGBA數據:
In?[19]:
```
x = np.zeros((10, 10, 4), dtype=np.int8)
x[:, :, 0] = 1
x[:, :, 1] = 2
x[:, :, 2] = 3
x[:, :, 3] = 4
```
后三個維度是R、B和G,以及alpha渠道。
如何用字段名‘r’, ‘g’, ‘b’, ‘a’創建一個(10,10)結構化數組而不用復制數據?
In?[?]:
```
y = ...
assert (y['r'] == 1).all()
assert (y['g'] == 2).all()
assert (y['b'] == 3).all()
assert (y['a'] == 4).all()
```
答案
...
**警告:**另一個占有四個字節內存的數組:
In?[21]:
```
y = np.array([[1, 3], [2, 4]], dtype=np.uint8).transpose()
x = y.copy()
x
```
Out[21]:
```
array([[1, 2],
[3, 4]], dtype=uint8)
```
In?[22]:
```
y
```
Out[22]:
```
array([[1, 2],
[3, 4]], dtype=uint8)
```
In?[23]:
```
x.view(np.int16)
```
Out[23]:
```
array([[ 513],
[1027]], dtype=int16)
```
In?[24]:
```
0x0201, 0x0403
```
Out[24]:
```
(513, 1027)
```
In?[25]:
```
y.view(np.int16)
```
Out[25]:
```
array([[ 769, 1026]], dtype=int16)
```
* 發生了什么?
* ... 我們需要實際看一下x[0,1]里面是什么
In?[26]:
```
0x0301, 0x0402
```
Out[26]:
```
(769, 1026)
```
### 2.2.1.4 索引體系:步幅
#### 2.2.1.4.1 主要觀點
**問題**
In?[28]:
```
x = np.array([[1, 2, 3],
[4, 5, 6],
[7, 8, 9]], dtype=np.int8)
str(x.data)
```
Out[28]:
```
'\x01\x02\x03\x04\x05\x06\x07\x08\t'
```
item x[1,2]開始在`x.data`中的哪個字節?
**答案**(在Numpy)
* **步幅**:尋找一下個元素跳躍的字節數
* 每個維度一個步幅
In?[29]:
```
x.strides
```
Out[29]:
```
(3, 1)
```
In?[31]:
```
byte_offset = 3*1 + 1*2 # 查找x[1,2]
x.data[byte_offset]
```
Out[31]:
```
'\x06'
```
In?[32]:
```
x[1, 2]
```
Out[32]:
```
6
```
* 簡單、**靈活**
##### 2.2.1.4.1.1 C和Fortran順序
In?[34]:
```
x = np.array([[1, 2, 3],
[4, 5, 6],
[7, 8, 9]], dtype=np.int16, order='C')
x.strides
```
Out[34]:
```
(6, 2)
```
In?[35]:
```
str(x.data)
```
Out[35]:
```
'\x01\x00\x02\x00\x03\x00\x04\x00\x05\x00\x06\x00\x07\x00\x08\x00\t\x00'
```
* 需要跳躍6個字節尋找下一行
* 需要跳躍2個字節尋找下一列
In?[36]:
```
y = np.array(x, order='F')
y.strides
```
Out[36]:
```
(2, 6)
```
In?[37]:
```
str(y.data)
```
Out[37]:
```
'\x01\x00\x04\x00\x07\x00\x02\x00\x05\x00\x08\x00\x03\x00\x06\x00\t\x00'
```
* 需要跳躍2個字節尋找下一行
* 需要跳躍6個字節尋找下一列
更高維度也類似:
```
- C:最后的維度變化最快(=最小的步幅)
- F:最早的維度變化最快
```

**注意**:現在我們可以理解`.view()`的行為:
In?[38]:
```
y = np.array([[1, 3], [2, 4]], dtype=np.uint8).transpose()
x = y.copy()
```
變換順序不影響數據的內部布局,只是步幅
In?[39]:
```
x.strides
```
Out[39]:
```
(2, 1)
```
In?[40]:
```
y.strides
```
Out[40]:
```
(1, 2)
```
In?[41]:
```
str(x.data)
```
Out[41]:
```
'\x01\x02\x03\x04'
```
In?[42]:
```
str(y.data)
```
Out[42]:
```
'\x01\x03\x02\x04'
```
* 當解釋為int16時結果會不同
* `.copy()`以C順序(默認)創建新的數組
##### 2.2.1.4.1.2 用整數切片
* 通過僅改變形狀、步幅和可能調整數據指針可以代表任何東西!
* 不用制造數據的副本
In?[43]:
```
x = np.array([1, 2, 3, 4, 5, 6], dtype=np.int32)
y = x[::-1]
y
```
Out[43]:
```
array([6, 5, 4, 3, 2, 1], dtype=int32)
```
In?[44]:
```
y.strides
```
Out[44]:
```
(-4,)
```
In?[45]:
```
y = x[2:]
y.__array_interface__['data'][0] - x.__array_interface__['data'][0]
```
Out[45]:
```
8
```
In?[46]:
```
x = np.zeros((10, 10, 10), dtype=np.float)
x.strides
```
Out[46]:
```
(800, 80, 8)
```
In?[47]:
```
x[::2,::3,::4].strides
```
Out[47]:
```
(1600, 240, 32)
```
* 類似的,變換順序絕不會創建副本(只是交換的步幅)
In?[48]:
```
x = np.zeros((10, 10, 10), dtype=np.float)
x.strides
```
Out[48]:
```
(800, 80, 8)
```
In?[49]:
```
x.T.strides
```
Out[49]:
```
(8, 80, 800)
```
但是:并不是所有的重排操作都可以通過操縱步幅來完成。
In?[3]:
```
a = np.arange(6, dtype=np.int8).reshape(3, 2)
b = a.T
b.strides
```
Out[3]:
```
(1, 2)
```
到目前為止,都很不錯,但是:
In?[4]:
```
str(a.data)
```
Out[4]:
```
'\x00\x01\x02\x03\x04\x05'
```
In?[5]:
```
b
```
Out[5]:
```
array([[0, 2, 4],
[1, 3, 5]], dtype=int8)
```
In?[6]:
```
c = b.reshape(3*2)
c
```
Out[6]:
```
array([0, 2, 4, 1, 3, 5], dtype=int8)
```
這里,沒辦法用一個給定的步長和`a`的內存塊來表示數組`c`。因此,重排操作在這里需要制作一個副本。
#### 2.2.1.4.2 例子:用步長偽造維度
**步長操作**
In?[2]:
```
from numpy.lib.stride_tricks import as_strided
help(as_strided)
```
```
Help on function as_strided in module numpy.lib.stride_tricks:
as_strided(x, shape=None, strides=None)
Make an ndarray from the given array with the given shape and strides.
```
**警告**:`as_strided`并不檢查你是否還待在內存塊邊界里..
In?[9]:
```
x = np.array([1, 2, 3, 4], dtype=np.int16)
as_strided(x, strides=(2*2, ), shape=(2, ))
```
Out[9]:
```
array([1, 3], dtype=int16)
```
In?[10]:
```
x[::2]
```
Out[10]:
```
array([1, 3], dtype=int16)
```
也可以看一下:stride-fakedims.py
**練習**
In?[?]:
```
array([1, 2, 3, 4], dtype=np.int8)
-> array([[1, 2, 3, 4],
[1, 2, 3, 4],
[1, 2, 3, 4]], dtype=np.int8)
```
僅使用`as_strided`.:
提示:byte_offset = stride[0]*index[0] + stride[1]*index[1] + ...
解密:
步長可以設置為0:
In?[11]:
```
x = np.array([1, 2, 3, 4], dtype=np.int8)
y = as_strided(x, strides=(0, 1), shape=(3, 4))
y
```
Out[11]:
```
array([[1, 2, 3, 4],
[1, 2, 3, 4],
[1, 2, 3, 4]], dtype=int8)
```
In?[12]:
```
y.base.base is x
```
Out[12]:
```
True
```
#### 2.2.1.4.3 廣播
* 用它來做一些有用的事情:[1, 2, 3, 4]和[5, 6, 7]的外積
In?[13]:
```
x = np.array([1, 2, 3, 4], dtype=np.int16)
x2 = as_strided(x, strides=(0, 1*2), shape=(3, 4))
x2
```
Out[13]:
```
array([[1, 2, 3, 4],
[1, 2, 3, 4],
[1, 2, 3, 4]], dtype=int16)
```
In?[14]:
```
y = np.array([5, 6, 7], dtype=np.int16)
y2 = as_strided(y, strides=(1*2, 0), shape=(3, 4))
y2
```
Out[14]:
```
array([[5, 5, 5, 5],
[6, 6, 6, 6],
[7, 7, 7, 7]], dtype=int16)
```
In?[15]:
```
x2 * y2
```
Out[15]:
```
array([[ 5, 10, 15, 20],
[ 6, 12, 18, 24],
[ 7, 14, 21, 28]], dtype=int16)
```
**...看起來有一些熟悉...**
In?[16]:
```
x = np.array([1, 2, 3, 4], dtype=np.int16)
y = np.array([5, 6, 7], dtype=np.int16)
x[np.newaxis,:] * y[:,np.newaxis]
```
Out[16]:
```
array([[ 5, 10, 15, 20],
[ 6, 12, 18, 24],
[ 7, 14, 21, 28]], dtype=int16)
```
* 在內部,數組**廣播**的確使用0步長來實現的。
#### 2.2.1.4.4 更多技巧:對角線
**也可以看一下** stride-diagonals.py
**挑戰**
* 提取矩陣對角線的起點:(假定是C內存順序):
In?[?]:
```
x = np.array([[1, 2, 3],
[4, 5, 6],
[7, 8, 9]], dtype=np.int32)
x_diag = as_strided(x, shape=(3,), strides=(???,))
```
* 提取第一個超級-對角線的起點[2,6]。
* 那么子對角線呢?
(后兩個問題的提示:切片首先移動步長起點的點。)
答案
...
提取對角線:
In?[6]:
```
x_diag = as_strided(x, shape=(3, ), strides=((3+1)*x.itemsize, ))
x_diag
```
Out[6]:
```
array([1, 5, 9], dtype=int32)
```
首先切片,調整數據指針:
In?[8]:
```
as_strided(x[0, 1:], shape=(2, ), strides=((3+1)*x.itemsize, ))
```
Out[8]:
```
array([2, 6], dtype=int32)
```
In?[9]:
```
as_strided(x[1:, 0], shape=(2, ), strides=((3+1)*x.itemsize, ))
```
Out[9]:
```
array([4, 8], dtype=int32)
```
**筆記**
In?[7]:
```
y = np.diag(x, k=1)
y
```
Out[7]:
```
array([2, 6], dtype=int32)
```
但是
In?[8]:
```
y.flags.owndata
```
Out[8]:
```
False
```
這是一個副本?!
**也可以看一下**stride-diagonals.py
**挑戰**
計算張量的跡:
In?[9]:
```
x = np.arange(5*5*5*5).reshape(5,5,5,5)
s = 0
for i in xrange(5):
for j in xrange(5):
s += x[j,i,j,i]
```
通過跨越并且在結果上使用`sum()`。
In?[?]:
```
y = as_strided(x, shape=(5, 5), strides=(TODO, TODO))
s2 = ...
assert s == s2
```
答案
...
In?[?]:
```
y = as_strided(x, shape=(5, 5), strides=((5*5*5 + 5)*x.itemsize,
(5*5 + 1)*x.itemsize))
s2 = y.sum()
```
#### 2.2.1.4.5 CPU緩存效果
內存布局可以影響性能:
In?[13]:
```
x = np.zeros((20000,))
y = np.zeros((20000*67,))[::67]
x.shape, y.shape
```
Out[13]:
```
((20000,), (20000,))
```
In?[14]:
```
%timeit x.sum()
```
```
The slowest run took 20.69 times longer than the fastest. This could mean that an intermediate result is being cached
10000 loops, best of 3: 15.4 μs per loop
```
In?[15]:
```
%timeit y.sum()
```
```
The slowest run took 114.83 times longer than the fastest. This could mean that an intermediate result is being cached
10000 loops, best of 3: 53 μs per loop
```
In?[16]:
```
x.strides, y.strides
```
Out[16]:
```
((8,), (536,))
```
**小步長更快?**
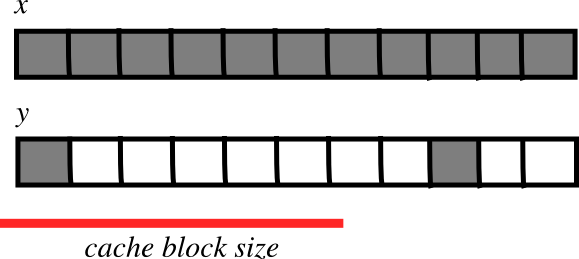
* CPU從主內存中拉取數據到緩存塊 pulls data from main memory to its cache in blocks
* 如果需要數據項連續操作適應于一個內存塊(小步長):
* 需要更少的遷移
* 更快
**也可以看一下**:`numexpr`設計用來減輕數組計算時的緩存效果。
#### 2.2.1.4.6 例子:原地操作(買者當心)
有時,
In?[?]:
```
a -= b
```
并不等同于
In?[?]:
```
a -= b.copy()
```
In?[21]:
```
x = np.array([[1, 2], [3, 4]])
x -= x.transpose()
x
```
Out[21]:
```
array([[ 0, -1],
[ 1, 0]])
```
In?[22]:
```
y = np.array([[1, 2], [3, 4]])
y -= y.T.copy()
y
```
Out[22]:
```
array([[ 0, -1],
[ 1, 0]])
```
* `x`和`x.transpose()`共享數據
* `x -= x.transpose()`逐個元素修改數據...
* 因為`x`和`x.transpose()`步長不同,修改后的數據重新出現在RHS
### 2.2.1.5 剖析上的發現

* _內存塊_:可以共享,`.base`、`.data`
* _數據類型描述符_:結構化數據、子數組、字節順序、投射、視圖、`.astype()`、`.view()`
* _步長索引_:跨越、C/F-order、w/ 整數切片、`as_strided`、廣播、跨越技巧、`diag`、CPU緩存一致性
## 2.2.2 通用函數
### 2.2.2.1 他們是什么?
* Ufunc在數組的所有元素上進行元素級操作。
例子:
`np.add`、`np.subtract`、`scipy.special`.*, ...
* 自動話支持:廣播、投射...
* ufunc的作者只提供了元素級操作,Numpy負責剩下的。
* 元素級操作需要在C中實現(或者比如Cython)
#### 2.2.2.1.1 Ufunc的部分
* 由用戶提供
In?[?]:
```
void ufunc_loop(void **args, int *dimensions, int *steps, void *data)
{
/*
* int8 output = elementwise_function(int8 input_1, int8 input_2)
*
* This function must compute the ufunc for many values at once,
* in the way shown below.
*/
char *input_1 = (char*)args[0];
char *input_2 = (char*)args[1];
char *output = (char*)args[2];
int i;
for (i = 0; i < dimensions[0]; ++i) {
*output = elementwise_function(*input_1, *input_2);
input_1 += steps[0];
input_2 += steps[1];
output += steps[2];
}
}
```
* Numpy部分,由下面的代碼創建
In?[?]:
```
char types[3]
types[0] = NPY_BYTE /* type of first input arg */
types[1] = NPY_BYTE /* type of second input arg */
types[2] = NPY_BYTE /* type of third input arg */
PyObject *python_ufunc = PyUFunc_FromFuncAndData(
ufunc_loop,
NULL,
types,
1, /* ntypes */
2, /* num_inputs */
1, /* num_outputs */
identity_element,
name,
docstring,
unused)
```
```
- ufunc也可以支持多種不同輸入輸出類型組合。
```
#### 2.2.2.1.2 簡化一下
`ufunc_loop`是非常通用的模式,Numpy提供了預制
| | |
| --- | --- |
| `PyUfunc_f_f` | `float elementwise_func(float input_1)` |
| `PyUfunc_ff_f` | `float elementwise_func(float input_1, float input_2)` |
| `PyUfunc_d_d` | `double elementwise_func(double input_1)` |
| `PyUfunc_dd_d` | `double elementwise_func(double input_1, double input_2)` |
| `PyUfunc_D_D` | `elementwise_func(npy_cdouble \*input, npy_cdouble\* output)` |
| `PyUfunc_DD_D` | `elementwise_func(npy_cdouble \*in1, npy_cdouble \*in2, npy_cdouble\* out)` |
```
- 只有需要提供`elementwise_func`
- ... 除非當你的元素級函數不是上面的形式中的任何一種
```
### 2.2.2.2 練習:從0開始構建一個ufunc
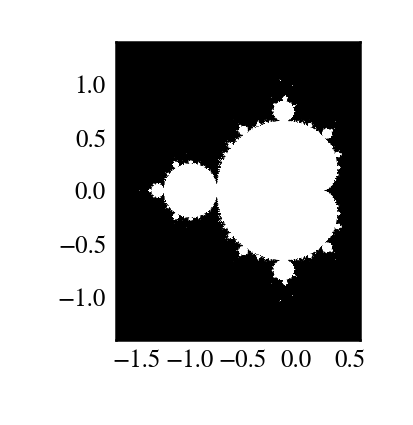
Mandelbrot分形由如下迭代定義:

`C=X+iy`是一個復數,只要Z仍然是有限的,無論迭代要跑多久,迭代都會重復。C屬于Mandelbrot集。
* ufunc調用`mandel(z0, c)`計算:
In?[?]:
```
z = z0
for k in range(iterations):
z = z*z + c
```
比如,一百次迭代或者直到`z.real**2 + z.imag**2 > 1000`。用它來決定哪個`C`是在Mandelbrot集中。
* 我們的函數是很簡單的,因此,請利用`PyUFunc_*`助手。
* 用Cython來完成
也可以看一下`mandel.pyx`,`mandelplot.py`
提醒:一些預設Ufunc循環:
| | |
| --- | --- |
| `PyUfunc_f_f` | `float elementwise_func(float input_1)` |
| `PyUfunc_ff_f` | `float elementwise_func(float input_1, float input_2)` |
| `PyUfunc_d_d` | `double elementwise_func(double input_1)` |
| `PyUfunc_dd_d` | `double elementwise_func(double input_1, double input_2)` |
| `PyUfunc_D_D` | `elementwise_func(complex_double *input, complex_double* output)` |
| `PyUfunc_DD_D` | `elementwise_func(complex_double *in1, complex_double *in2, complex_double* out)` |
打印代碼:
NPY_BOOL, NPY_BYTE, NPY_UBYTE, NPY_SHORT, NPY_USHORT, NPY_INT, NPY_UINT, NPY_LONG, NPY_ULONG, NPY_LONGLONG, NPY_ULONGLONG, NPY_FLOAT, NPY_DOUBLE, NPY_LONGDOUBLE, NPY_CFLOAT, NPY_CDOUBLE, NPY_CLONGDOUBLE, NPY_DATETIME, NPY_TIMEDELTA, NPY_OBJECT, NPY_STRING, NPY_UNICODE, NPY_VOID
#### 2.2.2.3 答案:從0開始創建一個ufunc
In?[?]:
```
# The elementwise function
# ------------------------
cdef void mandel_single_point(double complex *z_in,
double complex *c_in,
double complex *z_out) nogil:
#
# The Mandelbrot iteration
#
#
# Some points of note:
#
# - It's *NOT* allowed to call any Python functions here.
#
# The Ufunc loop runs with the Python Global Interpreter Lock released.
# Hence, the ``nogil``.
#
# - And so all local variables must be declared with ``cdef``
#
# - Note also that this function receives *pointers* to the data;
# the "traditional" solution to passing complex variables around
#
cdef double complex z = z_in[0]
cdef double complex c = c_in[0]
cdef int k # the integer we use in the for loop
# Straightforward iteration
for k in range(100):
z = z*z + c
if z.real**2 + z.imag**2 > 1000:
break
# Return the answer for this point
z_out[0] = z
# Boilerplate Cython definitions
#
# You don't really need to read this part, it just pulls in
# stuff from the Numpy C headers.
# ----------------------------------------------------------
cdef extern from "numpy/arrayobject.h":
void import_array()
ctypedef int npy_intp
cdef enum NPY_TYPES:
NPY_CDOUBLE
cdef extern from "numpy/ufuncobject.h":
void import_ufunc()
ctypedef void (*PyUFuncGenericFunction)(char**, npy_intp*, npy_intp*, void*)
object PyUFunc_FromFuncAndData(PyUFuncGenericFunction* func, void** data,
char* types, int ntypes, int nin, int nout,
int identity, char* name, char* doc, int c)
void PyUFunc_DD_D(char**, npy_intp*, npy_intp*, void*)
# Required module initialization
# ------------------------------
import_array()
import_ufunc()
# The actual ufunc declaration
# ----------------------------
cdef PyUFuncGenericFunction loop_func[1]
cdef char input_output_types[3]
cdef void *elementwise_funcs[1]
loop_func[0] = PyUFunc_DD_D
input_output_types[0] = NPY_CDOUBLE
input_output_types[1] = NPY_CDOUBLE
input_output_types[2] = NPY_CDOUBLE
elementwise_funcs[0] = <void*>mandel_single_point
mandel = PyUFunc_FromFuncAndData(
loop_func,
elementwise_funcs,
input_output_types,
1, # number of supported input types
2, # number of input args
1, # number of output args
0, # `identity` element, never mind this
"mandel", # function name
"mandel(z, c) -> computes iterated z*z + c", # docstring
0 # unused
)
```
In?[?]:
```
import numpy as np
import mandel
x = np.linspace(-1.7, 0.6, 1000)
y = np.linspace(-1.4, 1.4, 1000)
c = x[None,:] + 1j*y[:,None]
z = mandel.mandel(c, c)
import matplotlib.pyplot as plt
plt.imshow(abs(z)**2 < 1000, extent=[-1.7, 0.6, -1.4, 1.4])
plt.gray()
plt.show()
```
**筆記**:大多數模板可以由下列Cython模塊來自動完成: [http://wiki.cython.org/MarkLodato/CreatingUfuncs](http://wiki.cython.org/MarkLodato/CreatingUfuncs)
**一些可接受的輸入類型**
例如:支持小數點后一位及兩位兩個準確度版本
In?[?]:
```
cdef void mandel_single_point(double complex *z_in,
double complex *c_in,
double complex *z_out) nogil:
...
cdef void mandel_single_point_singleprec(float complex *z_in,
float complex *c_in,
float complex *z_out) nogil:
...
cdef PyUFuncGenericFunction loop_funcs[2]
cdef char input_output_types[3*2]
cdef void *elementwise_funcs[1*2]
loop_funcs[0] = PyUFunc_DD_D
input_output_types[0] = NPY_CDOUBLE
input_output_types[1] = NPY_CDOUBLE
input_output_types[2] = NPY_CDOUBLE
elementwise_funcs[0] = <void*>mandel_single_point
loop_funcs[1] = PyUFunc_FF_F
input_output_types[3] = NPY_CFLOAT
input_output_types[4] = NPY_CFLOAT
input_output_types[5] = NPY_CFLOAT
elementwise_funcs[1] = <void*>mandel_single_point_singleprec
mandel = PyUFunc_FromFuncAndData(
loop_func,
elementwise_funcs,
input_output_types,
2, # number of supported input types <----------------
2, # number of input args
1, # number of output args
0, # `identity` element, never mind this
"mandel", # function name
"mandel(z, c) -> computes iterated z*z + c", # docstring
0 # unused
)
```
### 2.2.2.4 廣義ufuncs
**ufunc**
`output = elementwise_function(input)`
`output`和`input`都可以只是一個數組元素。
**廣義ufunc**
`output`和`input`可以是有固定維度數的數組
例如,矩陣跡(對象線元素的sum):
In?[?]:
```
input shape = (n, n)
output shape = () i.e. scalar
(n, n) -> ()
```
矩陣乘積:
In?[?]:
```
input_1 shape = (m, n)
input_2 shape = (n, p)
output shape = (m, p)
(m, n), (n, p) -> (m, p)
```
* 這是廣義ufunc的”簽名“
* g-ufunc發揮作用的維度是“核心維度”
**Numpy中的狀態**
* g-ufuncs已經在Numpy中...
* 新的可以用`PyUFunc_FromFuncAndDataAndSignature`來創建
* ... 但是,除了測試外,我們不會配置公用的g-ufuncs,ATM
In?[4]:
```
import numpy.core.umath_tests as ut
ut.matrix_multiply.signature
```
Out[4]:
```
'(m,n),(n,p)->(m,p)'
```
In?[5]:
```
x = np.ones((10, 2, 4))
y = np.ones((10, 4, 5))
ut.matrix_multiply(x, y).shape
```
Out[5]:
```
(10, 2, 5)
```
* 后兩個維度成為了核心維度,并且根據每個_簽名_去修改
* 否則,g-ufunc“按元素級”運行
* 這種方式的矩陣乘法對一次在許多小矩陣是非常有用
**廣義ufunc循環**
矩陣相乘 `(m,n),(n,p) -> (m,p)`
In?[?]:
```
void gufunc_loop(void **args, int *dimensions, int *steps, void *data)
{
char *input_1 = (char*)args[0]; /* these are as previously */
char *input_2 = (char*)args[1];
char *output = (char*)args[2];
int input_1_stride_m = steps[3]; /* strides for the core dimensions */
int input_1_stride_n = steps[4]; /* are added after the non-core */
int input_2_strides_n = steps[5]; /* steps */
int input_2_strides_p = steps[6];
int output_strides_n = steps[7];
int output_strides_p = steps[8];
int m = dimension[1]; /* core dimensions are added after */
int n = dimension[2]; /* the main dimension; order as in */
int p = dimension[3]; /* signature */
int i;
for (i = 0; i < dimensions[0]; ++i) {
matmul_for_strided_matrices(input_1, input_2, output,
strides for each array...);
input_1 += steps[0];
input_2 += steps[1];
output += steps[2];
}
}
```
## 2.2.3 互操性功能
### 2.2.3.1 多維度類型數據貢獻
假設你
1. 寫一個庫處理(多維度)二進制數據,
2. 想要它可以用Numpy或者其他庫來簡單的操作數據,
3. ... 但是并不像依賴Numpy。
目前,三個解決方案:
* “舊的” buffer接口
* 數組接口
* “新的” buffer接口([PEP 3118](http://www.python.org/dev/peps/pep-3118))
### 2.2.3.2 舊的buffer協議
* 只有1-D buffers
* 沒有數據類型信息
* C-級接口;`PyBufferProcs` `tp_as_buffer`在類型對象中
* 但是它被整合在Python中(比如,字符支持這個協議)
使用PIL(Python Imaging Library)的小練習:
也可以看一下:pilbuffer.py
In?[?]:
```
import Image
data = np.zeros((200, 200, 4), dtype=np.int8)
data[:, :] = [255, 0, 0, 255] # Red
# In PIL, RGBA images consist of 32-bit integers whose bytes are [RR,GG,BB,AA]
data = data.view(np.int32).squeeze()
img = Image.frombuffer("RGBA", (200, 200), data)
img.save('test.png')
```
**Q**: 檢查一下如果`data`修改的話,再保存一下`img`看一下會發生什么。
### 2.2.3.3 舊的buffer協議
In?[9]:
```
import numpy as np
# import Image
from PIL import Image
# Let's make a sample image, RGBA format
x = np.zeros((200, 200, 4), dtype=np.int8)
x[:,:,0] = 254 # red
x[:,:,3] = 255 # opaque
data = x.view(np.int32) # Check that you understand why this is OK!
img = Image.frombuffer("RGBA", (200, 200), data)
img.save('test.png')
#
# Modify the original data, and save again.
#
# It turns out that PIL, which knows next to nothing about Numpy,
# happily shares the same data.
#
x[:,:,1] = 254
img.save('test2.png')
```
```
/Library/Frameworks/Python.framework/Versions/2.7/lib/python2.7/site-packages/IPython/kernel/__main__.py:14: RuntimeWarning: the frombuffer defaults may change in a future release; for portability, change the call to read:
frombuffer(mode, size, data, 'raw', mode, 0, 1)
```

### 2.2.3.4 數組接口協議
* 多維度buffers
* 存在數據類型信息
* Numpy-特定方法;慢慢的廢棄(不過不會消失)
* 然而,沒有整合在Python中
**也可以看一下**:文檔:[http://docs.scipy.org/doc/numpy/reference/arrays.interface.html](http://docs.scipy.org/doc/numpy/reference/arrays.interface.html)
In?[8]:
```
x = np.array([[1, 2], [3, 4]])
x.__array_interface__
```
Out[8]:
```
{'data': (4298825184, False),
'descr': [('', '<i8')],
'shape': (2, 2),
'strides': None,
'typestr': '<i8',
'version': 3}
```
In?[11]:
```
# import Image
from PIL import Image
img = Image.open('data/test.png')
img.__array_interface__
```
Out[11]:
```
{'data': '\xfe\x00\x00\xff\xfe\x00\x00...\xff\xfe\x00\x00\xff',
'shape': (200, 200, 4),
'typestr': '|u1'}
```
In?[12]:
```
x = np.asarray(img)
x.shape
```
Out[12]:
```
(200, 200, 4)
```
In?[13]:
```
x.dtype
```
Out[13]:
```
dtype('uint8')
```
**筆記**: 一個對C更友好的數組接口變體也被定義出來了。
## 2.2.4 數組的兄弟:chararray、maskedarray、matrix
### 2.2.4.1 chararray:: 向量化字符操作
In?[14]:
```
x = np.array(['a', ' bbb', ' ccc']).view(np.chararray)
x.lstrip(' ')
```
Out[14]:
```
chararray(['a', 'bbb', 'ccc'],
dtype='|S5')
```
In?[15]:
```
x.upper()
```
Out[15]:
```
chararray(['A', ' BBB', ' CCC'],
dtype='|S5')
```
**筆記**:`.view()`有另一個含義:它將一個ndarray變成專門的ndarray子類的一個實例
### 2.2.4.2 masked_array缺失數據
Masked arrays是有缺失或無效條目的數組。
例如,假如我們有一個第四個條目無效的數組:
In?[16]:
```
x = np.array([1, 2, 3, -99, 5])
```
描述這個數組的一個方式是創建masked array:
In?[17]:
```
mx = np.ma.masked_array(x, mask=[0, 0, 0, 1, 0])
mx
```
Out[17]:
```
masked_array(data = [1 2 3 -- 5],
mask = [False False False True False],
fill_value = 999999)
```
Masked平均數會忽略masked數據:
In?[18]:
```
mx.mean()
```
Out[18]:
```
2.75
```
In?[19]:
```
np.mean(mx)
```
Out[19]:
```
2.75
```
**警告**:不是所有的Numpy函數都接收mask,例如,`np.dot`,因此,請檢查返回的類型。
`masked_array`返回原始數組的一個視圖:
In?[20]:
```
mx[1] = 9
x
```
Out[20]:
```
array([ 1, 9, 3, -99, 5])
```
#### 2.2.4.2.1 mask
你可以通過賦值來修改mask:
In?[21]:
```
mx[1] = np.ma.masked
mx
```
Out[21]:
```
masked_array(data = [1 -- 3 -- 5],
mask = [False True False True False],
fill_value = 999999)
```
通過賦值可以清除mask:
In?[22]:
```
mx[1] = 9
mx
```
Out[22]:
```
masked_array(data = [1 9 3 -- 5],
mask = [False False False True False],
fill_value = 999999)
```
mask也可以直接訪問:
In?[23]:
```
mx.mask
```
Out[23]:
```
array([False, False, False, True, False], dtype=bool)
```
masked條目可以通過填入一個給定值來變回一般的數組:
In?[24]:
```
x2 = mx.filled(-1)
x2
```
Out[24]:
```
array([ 1, 9, 3, -1, 5])
```
mask也可以被清除:
In?[25]:
```
mx.mask = np.ma.nomask
mx
```
Out[25]:
```
masked_array(data = [1 9 3 -99 5],
mask = [False False False False False],
fill_value = 999999)
```
#### 2.2.4.2.2 領域相關的函數
masked數組包也包含一些領域相關的函數:
In?[26]:
```
np.ma.log(np.array([1, 2, -1, -2, 3, -5]))
```
Out[26]:
```
masked_array(data = [0.0 0.6931471805599453 -- -- 1.0986122886681098 --],
mask = [False False True True False True],
fill_value = 1e+20)
```
**筆記**:對于高效無縫處理數組中的缺失值的支持將在Numpy 1.7中出現。現在還在優化中!
**例子:Masked統計**
加拿大的護林員在計算1903-1918年野兔和猞猁的數量時有些心煩意亂,數字經常出錯。(盡管胡蘿卜農場主不斷的警告。)計算隨著時間推移的平均數,忽略無效數據。
In?[4]:
```
data = np.loadtxt('data/populations.txt')
populations = np.ma.masked_array(data[:,1:])
year = data[:, 0]
bad_years = (((year >= 1903) & (year <= 1910))
| ((year >= 1917) & (year <= 1918)))
# '&' means 'and' and '|' means 'or'
populations[bad_years, 0] = np.ma.masked
populations[bad_years, 1] = np.ma.masked
populations.mean(axis=0)
```
Out[4]:
```
masked_array(data = [40472.72727272727 18627.272727272728 42400.0],
mask = [False False False],
fill_value = 1e+20)
```
In?[5]:
```
populations.std(axis=0)
```
Out[5]:
```
masked_array(data = [21087.656489006717 15625.799814240254 3322.5062255844787],
mask = [False False False],
fill_value = 1e+20)
```
注意,Matplotlib了解masked數組:
In?[8]:
```
plt.plot(year, populations, 'o-')
```
Out[8]:
```
[<matplotlib.lines.Line2D at 0x10565f250>,
<matplotlib.lines.Line2D at 0x10565f490>,
<matplotlib.lines.Line2D at 0x10565f650>]
```

### 2.2.4.3 recarray:僅僅方便
In?[9]:
```
arr = np.array([('a', 1), ('b', 2)], dtype=[('x', 'S1'), ('y', int)])
arr2 = arr.view(np.recarray)
arr2.x
```
Out[9]:
```
chararray(['a', 'b'],
dtype='|S1')
```
In?[10]:
```
arr2.y
```
Out[10]:
```
array([1, 2])
```
### 2.2.4.4 矩陣:方便?
* 通常是2-D
* * 是矩陣的積,不是元素級的積
In?[11]:
```
np.matrix([[1, 0], [0, 1]]) * np.matrix([[1, 2], [3, 4]])
```
Out[11]:
```
matrix([[1, 2],
[3, 4]])
```
## 2.2.5 總結
* ndarray的剖析:data、dtype, 步長
* 通用函數:元素級操作,如何常見一個新的通用函數
* Ndarray子類
* 整合其他工具的多種buffer接口
* 最近的補充:PEP 3118,廣義ufuncs
## 2.2.6 為Numpy/Scipy做貢獻
看一下這篇教程:[http://www.euroscipy.org/talk/882](http://www.euroscipy.org/talk/882)
### 2.2.6.1 為什么
* “這有個bug?”
* “我不理解這個要做什么?”
* “我有這個神器的代碼。你要嗎?”
* “我需要幫助!我應該怎么辦?”
### 2.2.6.2 報告bugs
* Bug跟蹤(推薦這種方式)
* [http://projects.scipy.org/numpy](http://projects.scipy.org/numpy)
* [http://projects.scipy.org/scipy](http://projects.scipy.org/scipy)
* 點擊“注冊”鏈接獲得一個帳號
* 郵件列表 ( scipy.org/Mailing_Lists )
* 如果你不確定
* 在一周左右還沒有任何回復?去開一個bug ticket吧。
#### 2.2.6.2.1 好的bug報告
Title: numpy.random.permutations fails for non-integer arguments
I'm trying to generate random permutations, using numpy.random.permutations
When calling numpy.random.permutation with non-integer arguments it fails with a cryptic error message::
```
>>> np.random.permutation(12)
array([ 6, 11, 4, 10, 2, 8, 1, 7, 9, 3, 0, 5])
>>> np.random.permutation(12.)
Traceback (most recent call last):
File "<stdin>", line 1, in <module>
File "mtrand.pyx", line 3311, in mtrand.RandomState.permutation
File "mtrand.pyx", line 3254, in mtrand.RandomState.shuffle
TypeError: len() of unsized object
```
This also happens with long arguments, and so np.random.permutation(X.shape[0]) where X is an array fails on 64 bit windows (where shape is a tuple of longs).
It would be great if it could cast to integer or at least raise a proper error for non-integer types.
I'm using Numpy 1.4.1, built from the official tarball, on Windows 64 with Visual studio 2008, on Python.org 64-bit Python.
1. 你要做什么?
2. **重現bug的小代碼段**(如果可能的話)
* 實際上發生了什么
* 期望發生什么
3. 平臺(Windows / Linux / OSX, 32/64 bits, x86/PPC, ...)
4. Numpy/Scipy的版本
In?[2]:
```
print np.__version__
```
```
1.9.2
```
**檢查下面的文件是你所期望的**
In?[3]:
```
print np.__file__
```
```
/Library/Frameworks/Python.framework/Versions/2.7/lib/python2.7/site-packages/numpy/__init__.pyc
```
以免你想要舊/損壞的Numpy安裝在哪里
如果不確定,試著刪除現有的Numpy安裝文件,并且重新安裝...
### 2.2.6.3 為文檔做貢獻
1. 文檔編輯器
* [http://docs.scipy.org/numpy](http://docs.scipy.org/numpy)
* 注冊
* 注冊一個帳號
* 訂閱scipy-dev郵件列表(僅限訂閱者)
* 郵件列表有問題:你可以發郵件
* 但是:**你可以關閉郵件送達**
* 在[http://mail.scipy.org/mailman/listinfo/scipy-dev](http://mail.scipy.org/mailman/listinfo/scipy-dev) 底部“改變你的訂閱選項”
* 給@`scipy-dev`郵件列表發一封郵件;要求激活:
To: [[email?protected]](/cdn-cgi/l/email-protection)
Hi,
I'd like to edit Numpy/Scipy docstrings. My account is XXXXX
Cheers, N. N.
```
- 檢查一下風格指南:
- http://docs.scipy.org/numpy/
- 不要被嚇住;要修補一個小事情,就修補它
```
* 編輯
2. 編輯源碼發送補丁(和bug一樣)
3. 向郵件列表抱怨
### 2.2.6.4 貢獻功能
1. 在郵件列表上詢問,如果不確定應該它應該在哪里
2. 寫一個補丁,在bug跟蹤器上添加一個增強的ticket
3. 或者,創建一個實現了這個功能的Git分支 + 添加增強ticket。
* 特別是對于大的/擴散性的功能添加
* [http://projects.scipy.org/numpy/wiki/GitMirror](http://projects.scipy.org/numpy/wiki/GitMirror)
* [http://www.spheredev.org/wiki/Git_for_the_lazy](http://www.spheredev.org/wiki/Git_for_the_lazy)
In?[?]:
```
# 克隆numpy倉庫
git clone --origin svn http://projects.scipy.org/git/numpy.git numpy
cd numpy
# 創建功能分支
git checkout -b name-of-my-feature-branch svn/trunk
<edit stuff>
git commit -a
```
* 在[http://github.com](http://github.com) (或者其他地方)創建一個帳號
* @ Github創建一個新倉庫
* 將你的工作推送到github
In?[?]:
```
git remote add github git@github:YOURUSERNAME/YOURREPOSITORYNAME.git
git push github name-of-my-feature-branch
```
### 2.2.6.5 如何幫助,總體而言
* 永遠歡迎修補bug!
* 什么讓你最惱怒
* 瀏覽一下跟蹤器
* 文檔工作
* API文檔:改善文檔字符串
* 很好的了解了一些Scipy模塊
* 用戶指南
* 最終需要完成
* 想要想一下?看一下目錄 [http://scipy.org/Developer_Zone/UG_Toc](http://scipy.org/Developer_Zone/UG_Toc)
* 在溝通渠道上詢問:
* `numpy-discussion`列表
* `scipy-dev`列表
In?[1]:
```
%matplotlib inline
import numpy as np
```
- 介紹
- 1.1 科學計算工具及流程
- 1.2 Python語言
- 1.3 NumPy:創建和操作數值數據
- 1.4 Matplotlib:繪圖
- 1.5 Scipy:高級科學計算
- 1.6 獲取幫助及尋找文檔
- 2.1 Python高級功能(Constructs)
- 2.2 高級Numpy
- 2.3 代碼除錯
- 2.4 代碼優化
- 2.5 SciPy中稀疏矩陣
- 2.6 使用Numpy和Scipy進行圖像操作及處理
- 2.7 數學優化:找到函數的最優解
- 2.8 與C進行交互
- 3.1 Python中的統計學
- 3.2 Sympy:Python中的符號數學
- 3.3 Scikit-image:圖像處理
- 3.4 Traits:創建交互對話
- 3.5 使用Mayavi進行3D作圖
- 3.6 scikit-learn:Python中的機器學習