
# 第 3 章 Python 的數據結構、函數和文件
本章討論Python的內置功能,這些功能本書會用到很多。雖然擴展庫,比如pandas和Numpy,使處理大數據集很方便,但它們是和Python的內置數據處理工具一同使用的。
我們會從Python最基礎的數據結構開始:元組、列表、字典和集合。然后會討論創建你自己的、可重復使用的Python函數。最后,會學習Python的文件對象,以及如何與本地硬盤交互。
# 3.1 數據結構和序列
Python的數據結構簡單而強大。通曉它們才能成為熟練的Python程序員。
## 元組
元組是一個固定長度,不可改變的Python序列對象。創建元組的最簡單方式,是用逗號分隔一列值:
```python
In [1]: tup = 4, 5, 6
In [2]: tup
Out[2]: (4, 5, 6)
```
當用復雜的表達式定義元組,最好將值放到圓括號內,如下所示:
```python
In [3]: nested_tup = (4, 5, 6), (7, 8)
In [4]: nested_tup
Out[4]: ((4, 5, 6), (7, 8))
```
用``tuple``可以將任意序列或迭代器轉換成元組:
```python
In [5]: tuple([4, 0, 2])
Out[5]: (4, 0, 2)
In [6]: tup = tuple('string')
In [7]: tup
Out[7]: ('s', 't', 'r', 'i', 'n', 'g')
```
可以用方括號訪問元組中的元素。和C、C++、JAVA等語言一樣,序列是從0開始的:
```python
In [8]: tup[0]
Out[8]: 's'
```
元組中存儲的對象可能是可變對象。一旦創建了元組,元組中的對象就不能修改了:
```python
In [9]: tup = tuple(['foo', [1, 2], True])
In [10]: tup[2] = False
---------------------------------------------------------------------------
TypeError Traceback (most recent call last)
<ipython-input-10-c7308343b841> in <module>()
----> 1 tup[2] = False
TypeError: 'tuple' object does not support item assignment
```
如果元組中的某個對象是可變的,比如列表,可以在原位進行修改:
```python
In [11]: tup[1].append(3)
In [12]: tup
Out[12]: ('foo', [1, 2, 3], True)
```
可以用加號運算符將元組串聯起來:
```python
In [13]: (4, None, 'foo') + (6, 0) + ('bar',)
Out[13]: (4, None, 'foo', 6, 0, 'bar')
```
元組乘以一個整數,像列表一樣,會將幾個元組的復制串聯起來:
```python
In [14]: ('foo', 'bar') * 4
Out[14]: ('foo', 'bar', 'foo', 'bar', 'foo', 'bar', 'foo', 'bar')
```
對象本身并沒有被復制,只是引用了它。
## 拆分元組
如果你想將元組賦值給類似元組的變量,Python會試圖拆分等號右邊的值:
```python
In [15]: tup = (4, 5, 6)
In [16]: a, b, c = tup
In [17]: b
Out[17]: 5
```
即使含有元組的元組也會被拆分:
```python
In [18]: tup = 4, 5, (6, 7)
In [19]: a, b, (c, d) = tup
In [20]: d
Out[20]: 7
```
使用這個功能,你可以很容易地替換變量的名字,其它語言可能是這樣:
```python
tmp = a
a = b
b = tmp
```
但是在Python中,替換可以這樣做:
```python
In [21]: a, b = 1, 2
In [22]: a
Out[22]: 1
In [23]: b
Out[23]: 2
In [24]: b, a = a, b
In [25]: a
Out[25]: 2
In [26]: b
Out[26]: 1
```
變量拆分常用來迭代元組或列表序列:
```python
In [27]: seq = [(1, 2, 3), (4, 5, 6), (7, 8, 9)]
In [28]: for a, b, c in seq:
....: print('a={0}, b={1}, c={2}'.format(a, b, c))
a=1, b=2, c=3
a=4, b=5, c=6
a=7, b=8, c=9
```
另一個常見用法是從函數返回多個值。后面會詳解。
Python最近新增了更多高級的元組拆分功能,允許從元組的開頭“摘取”幾個元素。它使用了特殊的語法``*rest``,這也用在函數簽名中以抓取任意長度列表的位置參數:
```python
In [29]: values = 1, 2, 3, 4, 5
In [30]: a, b, *rest = values
In [31]: a, b
Out[31]: (1, 2)
In [32]: rest
Out[32]: [3, 4, 5]
```
``rest``的部分是想要舍棄的部分,rest的名字不重要。作為慣用寫法,許多Python程序員會將不需要的變量使用下劃線:
```python
In [33]: a, b, *_ = values
```
## tuple方法
因為元組的大小和內容不能修改,它的實例方法都很輕量。其中一個很有用的就是``count``(也適用于列表),它可以統計某個值得出現頻率:
```python
In [34]: a = (1, 2, 2, 2, 3, 4, 2)
In [35]: a.count(2)
Out[35]: 4
```
## 列表
與元組對比,列表的長度可變、內容可以被修改。你可以用方括號定義,或用``list``函數:
```python
In [36]: a_list = [2, 3, 7, None]
In [37]: tup = ('foo', 'bar', 'baz')
In [38]: b_list = list(tup)
In [39]: b_list
Out[39]: ['foo', 'bar', 'baz']
In [40]: b_list[1] = 'peekaboo'
In [41]: b_list
Out[41]: ['foo', 'peekaboo', 'baz']
```
列表和元組的語義接近,在許多函數中可以交叉使用。
``list``函數常用來在數據處理中實體化迭代器或生成器:
```python
In [42]: gen = range(10)
In [43]: gen
Out[43]: range(0, 10)
In [44]: list(gen)
Out[44]: [0, 1, 2, 3, 4, 5, 6, 7, 8, 9]
```
## 添加和刪除元素
可以用``append``在列表末尾添加元素:
```python
In [45]: b_list.append('dwarf')
In [46]: b_list
Out[46]: ['foo', 'peekaboo', 'baz', 'dwarf']
```
``insert``可以在特定的位置插入元素:
```python
In [47]: b_list.insert(1, 'red')
In [48]: b_list
Out[48]: ['foo', 'red', 'peekaboo', 'baz', 'dwarf']
```
插入的序號必須在0和列表長度之間。
>警告:與``append``相比,``insert``耗費的計算量大,因為對后續元素的引用必須在內部遷移,以便為新元素提供空間。如果要在序列的頭部和尾部插入元素,你可能需要使用``collections.deque``,一個雙尾部隊列。
insert的逆運算是pop,它移除并返回指定位置的元素:
```python
In [49]: b_list.pop(2)
Out[49]: 'peekaboo'
In [50]: b_list
Out[50]: ['foo', 'red', 'baz', 'dwarf']
```
可以用``remove``去除某個值,``remove``會先尋找第一個值并除去:
```python
In [51]: b_list.append('foo')
In [52]: b_list
Out[52]: ['foo', 'red', 'baz', 'dwarf', 'foo']
In [53]: b_list.remove('foo')
In [54]: b_list
Out[54]: ['red', 'baz', 'dwarf', 'foo']
```
如果不考慮性能,使用``append``和``remove``,可以把Python的列表當做完美的“多重集”數據結構。
用``in``可以檢查列表是否包含某個值:
```python
In [55]: 'dwarf' in b_list
Out[55]: True
```
否定``in``可以再加一個not:
```python
In [56]: 'dwarf' not in b_list
Out[56]: False
```
在列表中檢查是否存在某個值遠比字典和集合速度慢,因為Python是線性搜索列表中的值,但在字典和集合中,在同樣的時間內還可以檢查其它項(基于哈希表)。
## 串聯和組合列表
與元組類似,可以用加號將兩個列表串聯起來:
```python
In [57]: [4, None, 'foo'] + [7, 8, (2, 3)]
Out[57]: [4, None, 'foo', 7, 8, (2, 3)]
```
如果已經定義了一個列表,用``extend``方法可以追加多個元素:
```python
In [58]: x = [4, None, 'foo']
In [59]: x.extend([7, 8, (2, 3)])
In [60]: x
Out[60]: [4, None, 'foo', 7, 8, (2, 3)]
```
通過加法將列表串聯的計算量較大,因為要新建一個列表,并且要復制對象。用``extend``追加元素,尤其是到一個大列表中,更為可取。因此:
```python
everything = []
for chunk in list_of_lists:
everything.extend(chunk)
```
要比串聯方法快:
```python
everything = []
for chunk in list_of_lists:
everything = everything + chunk
```
## 排序
你可以用``sort``函數將一個列表原地排序(不創建新的對象):
```python
In [61]: a = [7, 2, 5, 1, 3]
In [62]: a.sort()
In [63]: a
Out[63]: [1, 2, 3, 5, 7]
```
``sort``有一些選項,有時會很好用。其中之一是二級排序key,可以用這個key進行排序。例如,我們可以按長度對字符串進行排序:
```python
In [64]: b = ['saw', 'small', 'He', 'foxes', 'six']
In [65]: b.sort(key=len)
In [66]: b
Out[66]: ['He', 'saw', 'six', 'small', 'foxes']
```
稍后,我們會學習``sorted``函數,它可以產生一個排好序的序列副本。
## 二分搜索和維護已排序的列表
``bisect``模塊支持二分查找,和向已排序的列表插入值。``bisect.bisect``可以找到插入值后仍保證排序的位置,``bisect.insort``是向這個位置插入值:
```python
In [67]: import bisect
In [68]: c = [1, 2, 2, 2, 3, 4, 7]
In [69]: bisect.bisect(c, 2)
Out[69]: 4
In [70]: bisect.bisect(c, 5)
Out[70]: 6
In [71]: bisect.insort(c, 6)
In [72]: c
Out[72]: [1, 2, 2, 2, 3, 4, 6, 7]
```
>注意:``bisect``模塊不會檢查列表是否已排好序,進行檢查的話會耗費大量計算。因此,對未排序的列表使用``bisect``不會產生錯誤,但結果不一定正確。
## 切片
用切邊可以選取大多數序列類型的一部分,切片的基本形式是在方括號中使用``start:stop``:
```python
In [73]: seq = [7, 2, 3, 7, 5, 6, 0, 1]
In [74]: seq[1:5]
Out[74]: [2, 3, 7, 5]
```
切片也可以被序列賦值:
```python
In [75]: seq[3:4] = [6, 3]
In [76]: seq
Out[76]: [7, 2, 3, 6, 3, 5, 6, 0, 1]
```
切片的起始元素是包括的,不包含結束元素。因此,結果中包含的元素個數是``stop - start``。
``start``或``stop``都可以被省略,省略之后,分別默認序列的開頭和結尾:
```python
In [77]: seq[:5]
Out[77]: [7, 2, 3, 6, 3]
In [78]: seq[3:]
Out[78]: [6, 3, 5, 6, 0, 1]
```
負數表明從后向前切片:
```python
In [79]: seq[-4:]
Out[79]: [5, 6, 0, 1]
In [80]: seq[-6:-2]
Out[80]: [6, 3, 5, 6]
```
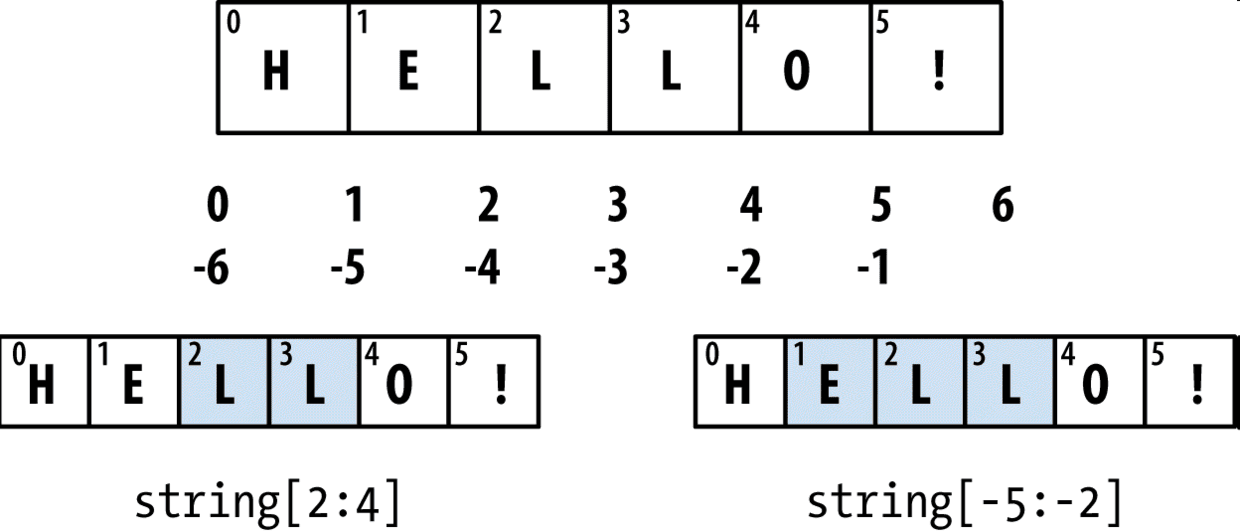
需要一段時間來熟悉使用切片,尤其是當你之前學的是R或MATLAB。圖3-1展示了正整數和負整數的切片。在圖中,指數標示在邊緣以表明切片是在哪里開始哪里結束的。
在第二個冒號后面使用``step``,可以隔一個取一個元素:
```python
In [81]: seq[::2]
Out[81]: [7, 3, 3, 6, 1]
```
一個聰明的方法是使用``-1``,它可以將列表或元組顛倒過來:
```python
In [82]: seq[::-1]
Out[82]: [1, 0, 6, 5, 3, 6, 3, 2, 7]
```
## 序列函數
Python有一些有用的序列函數。
## enumerate函數
迭代一個序列時,你可能想跟蹤當前項的序號。手動的方法可能是下面這樣:
```python
i = 0
for value in collection:
# do something with value
i += 1
```
因為這么做很常見,Python內建了一個``enumerate``函數,可以返回``(i, value)``元組序列:
```python
for i, value in enumerate(collection):
# do something with value
```
當你索引數據時,使用``enumerate``的一個好方法是計算序列(唯一的)``dict``映射到位置的值:
```python
In [83]: some_list = ['foo', 'bar', 'baz']
In [84]: mapping = {}
In [85]: for i, v in enumerate(some_list):
....: mapping[v] = i
In [86]: mapping
Out[86]: {'bar': 1, 'baz': 2, 'foo': 0}
```
## sorted函數
``sorted``函數可以從任意序列的元素返回一個新的排好序的列表:
```python
In [87]: sorted([7, 1, 2, 6, 0, 3, 2])
Out[87]: [0, 1, 2, 2, 3, 6, 7]
In [88]: sorted('horse race')
Out[88]: [' ', 'a', 'c', 'e', 'e', 'h', 'o', 'r', 'r', 's']
```
``sorted``函數可以接受和``sort``相同的參數。
## zip函數
``zip``可以將多個列表、元組或其它序列成對組合成一個元組列表:
```python
In [89]: seq1 = ['foo', 'bar', 'baz']
In [90]: seq2 = ['one', 'two', 'three']
In [91]: zipped = zip(seq1, seq2)
In [92]: list(zipped)
Out[92]: [('foo', 'one'), ('bar', 'two'), ('baz', 'three')]
```
``zip``可以處理任意多的序列,元素的個數取決于最短的序列:
```python
In [93]: seq3 = [False, True]
In [94]: list(zip(seq1, seq2, seq3))
Out[94]: [('foo', 'one', False), ('bar', 'two', True)]
```
``zip``的常見用法之一是同時迭代多個序列,可能結合``enumerate``使用:
```python
In [95]: for i, (a, b) in enumerate(zip(seq1, seq2)):
....: print('{0}: {1}, {2}'.format(i, a, b))
....:
0: foo, one
1: bar, two
2: baz, three
```
給出一個“被壓縮的”序列,``zip``可以被用來解壓序列。也可以當作把行的列表轉換為列的列表。這個方法看起來有點神奇:
```python
In [96]: pitchers = [('Nolan', 'Ryan'), ('Roger', 'Clemens'),
....: ('Schilling', 'Curt')]
In [97]: first_names, last_names = zip(*pitchers)
In [98]: first_names
Out[98]: ('Nolan', 'Roger', 'Schilling')
In [99]: last_names
Out[99]: ('Ryan', 'Clemens', 'Curt')
```
## reversed函數
``reversed``可以從后向前迭代一個序列:
```python
In [100]: list(reversed(range(10)))
Out[100]: [9, 8, 7, 6, 5, 4, 3, 2, 1, 0]
```
要記住``reversed``是一個生成器(后面詳細介紹),只有實體化(即列表或for循環)之后才能創建翻轉的序列。
## 字典
字典可能是Python最為重要的數據結構。它更為常見的名字是哈希映射或關聯數組。它是鍵值對的大小可變集合,鍵和值都是Python對象。創建字典的方法之一是使用尖括號,用冒號分隔鍵和值:
```python
In [101]: empty_dict = {}
In [102]: d1 = {'a' : 'some value', 'b' : [1, 2, 3, 4]}
In [103]: d1
Out[103]: {'a': 'some value', 'b': [1, 2, 3, 4]}
```
你可以像訪問列表或元組中的元素一樣,訪問、插入或設定字典中的元素:
```python
In [104]: d1[7] = 'an integer'
In [105]: d1
Out[105]: {'a': 'some value', 'b': [1, 2, 3, 4], 7: 'an integer'}
In [106]: d1['b']
Out[106]: [1, 2, 3, 4]
```
你可以用檢查列表和元組是否包含某個值的方法,檢查字典中是否包含某個鍵:
```python
In [107]: 'b' in d1
Out[107]: True
```
可以用``del``關鍵字或``pop``方法(返回值的同時刪除鍵)刪除值:
```python
In [108]: d1[5] = 'some value'
In [109]: d1
Out[109]:
{'a': 'some value',
'b': [1, 2, 3, 4],
7: 'an integer',
5: 'some value'}
In [110]: d1['dummy'] = 'another value'
In [111]: d1
Out[111]:
{'a': 'some value',
'b': [1, 2, 3, 4],
7: 'an integer',
5: 'some value',
'dummy': 'another value'}
In [112]: del d1[5]
In [113]: d1
Out[113]:
{'a': 'some value',
'b': [1, 2, 3, 4],
7: 'an integer',
'dummy': 'another value'}
In [114]: ret = d1.pop('dummy')
In [115]: ret
Out[115]: 'another value'
In [116]: d1
Out[116]: {'a': 'some value', 'b': [1, 2, 3, 4], 7: 'an integer'}
```
``keys``和``values``是字典的鍵和值的迭代器方法。雖然鍵值對沒有順序,這兩個方法可以用相同的順序輸出鍵和值:
```python
In [117]: list(d1.keys())
Out[117]: ['a', 'b', 7]
In [118]: list(d1.values())
Out[118]: ['some value', [1, 2, 3, 4], 'an integer']
```
用``update``方法可以將一個字典與另一個融合:
```python
In [119]: d1.update({'b' : 'foo', 'c' : 12})
In [120]: d1
Out[120]: {'a': 'some value', 'b': 'foo', 7: 'an integer', 'c': 12}
```
``update``方法是原地改變字典,因此任何傳遞給``update``的鍵的舊的值都會被舍棄。
## 用序列創建字典
常常,你可能想將兩個序列配對組合成字典。下面是一種寫法:
```python
mapping = {}
for key, value in zip(key_list, value_list):
mapping[key] = value
```
因為字典本質上是2元元組的集合,dict可以接受2元元組的列表:
```python
In [121]: mapping = dict(zip(range(5), reversed(range(5))))
In [122]: mapping
Out[122]: {0: 4, 1: 3, 2: 2, 3: 1, 4: 0}
```
后面會談到``dict comprehensions``,另一種構建字典的優雅方式。
## 默認值
下面的邏輯很常見:
```python
if key in some_dict:
value = some_dict[key]
else:
value = default_value
```
因此,dict的方法get和pop可以取默認值進行返回,上面的if-else語句可以簡寫成下面:
```python
value = some_dict.get(key, default_value)
```
get默認會返回None,如果不存在鍵,pop會拋出一個例外。關于設定值,常見的情況是在字典的值是屬于其它集合,如列表。例如,你可以通過首字母,將一個列表中的單詞分類:
```python
In [123]: words = ['apple', 'bat', 'bar', 'atom', 'book']
In [124]: by_letter = {}
In [125]: for word in words:
.....: letter = word[0]
.....: if letter not in by_letter:
.....: by_letter[letter] = [word]
.....: else:
.....: by_letter[letter].append(word)
.....:
In [126]: by_letter
Out[126]: {'a': ['apple', 'atom'], 'b': ['bat', 'bar', 'book']}
```
``setdefault``方法就正是干這個的。前面的for循環可以改寫為:
```python
for word in words:
letter = word[0]
by_letter.setdefault(letter, []).append(word)
```
``collections``模塊有一個很有用的類,``defaultdict``,它可以進一步簡化上面。傳遞類型或函數以生成每個位置的默認值:
```python
from collections import defaultdict
by_letter = defaultdict(list)
for word in words:
by_letter[word[0]].append(word)
```
## 有效的鍵類型
字典的值可以是任意Python對象,而鍵通常是不可變的標量類型(整數、浮點型、字符串)或元組(元組中的對象必須是不可變的)。這被稱為“可哈希性”。可以用``hash``函數檢測一個對象是否是可哈希的(可被用作字典的鍵):
```python
In [127]: hash('string')
Out[127]: 5023931463650008331
In [128]: hash((1, 2, (2, 3)))
Out[128]: 1097636502276347782
In [129]: hash((1, 2, [2, 3])) # fails because lists are mutable
---------------------------------------------------------------------------
TypeError Traceback (most recent call last)
<ipython-input-129-800cd14ba8be> in <module>()
----> 1 hash((1, 2, [2, 3])) # fails because lists are mutable
TypeError: unhashable type: 'list'
```
要用列表當做鍵,一種方法是將列表轉化為元組,只要內部元素可以被哈希,它也就可以被哈希:
```python
In [130]: d = {}
In [131]: d[tuple([1, 2, 3])] = 5
In [132]: d
Out[132]: {(1, 2, 3): 5}
```
## 集合
集合是無序的不可重復的元素的集合。你可以把它當做字典,但是只有鍵沒有值。可以用兩種方式創建集合:通過set函數或使用尖括號set語句:
```python
In [133]: set([2, 2, 2, 1, 3, 3])
Out[133]: {1, 2, 3}
In [134]: {2, 2, 2, 1, 3, 3}
Out[134]: {1, 2, 3}
```
集合支持合并、交集、差分和對稱差等數學集合運算。考慮兩個示例集合:
```python
In [135]: a = {1, 2, 3, 4, 5}
In [136]: b = {3, 4, 5, 6, 7, 8}
```
合并是取兩個集合中不重復的元素。可以用``union``方法,或者``|``運算符:
```python
In [137]: a.union(b)
Out[137]: {1, 2, 3, 4, 5, 6, 7, 8}
In [138]: a | b
Out[138]: {1, 2, 3, 4, 5, 6, 7, 8}
```
交集的元素包含在兩個集合中。可以用``intersection``或``&``運算符:
```python
In [139]: a.intersection(b)
Out[139]: {3, 4, 5}
In [140]: a & b
Out[140]: {3, 4, 5}
```
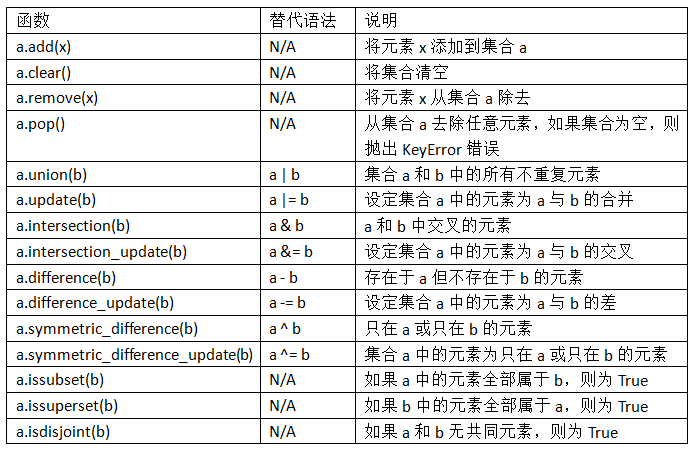
表3-1列出了常用的集合方法。
所有邏輯集合操作都有另外的原地實現方法,可以直接用結果替代集合的內容。對于大的集合,這么做效率更高:
```python
In [141]: c = a.copy()
In [142]: c |= b
In [143]: c
Out[143]: {1, 2, 3, 4, 5, 6, 7, 8}
In [144]: d = a.copy()
In [145]: d &= b
In [146]: d
Out[146]: {3, 4, 5}
```
與字典類似,集合元素通常都是不可變的。要獲得類似列表的元素,必須轉換成元組:
```python
In [147]: my_data = [1, 2, 3, 4]
In [148]: my_set = {tuple(my_data)}
In [149]: my_set
Out[149]: {(1, 2, 3, 4)}
```
你還可以檢測一個集合是否是另一個集合的子集或父集:
```python
In [150]: a_set = {1, 2, 3, 4, 5}
In [151]: {1, 2, 3}.issubset(a_set)
Out[151]: True
In [152]: a_set.issuperset({1, 2, 3})
Out[152]: True
```
集合的內容相同時,集合才對等:
```python
In [153]: {1, 2, 3} == {3, 2, 1}
Out[153]: True
```
## 列表、集合和字典推導式
列表推導式是Python最受喜愛的特性之一。它允許用戶方便的從一個集合過濾元素,形成列表,在傳遞參數的過程中還可以修改元素。形式如下:
```python
[expr for val in collection if condition]
```
它等同于下面的for循環;
```python
result = []
for val in collection:
if condition:
result.append(expr)
```
filter條件可以被忽略,只留下表達式就行。例如,給定一個字符串列表,我們可以過濾出長度在2及以下的字符串,并將其轉換成大寫:
```python
In [154]: strings = ['a', 'as', 'bat', 'car', 'dove', 'python']
In [155]: [x.upper() for x in strings if len(x) > 2]
Out[155]: ['BAT', 'CAR', 'DOVE', 'PYTHON']
```
用相似的方法,還可以推導集合和字典。字典的推導式如下所示:
```python
dict_comp = {key-expr : value-expr for value in collection if condition}
```
集合的推導式與列表很像,只不過用的是尖括號:
```python
set_comp = {expr for value in collection if condition}
```
與列表推導式類似,集合與字典的推導也很方便,而且使代碼的讀寫都很容易。來看前面的字符串列表。假如我們只想要字符串的長度,用集合推導式的方法非常方便:
```python
In [156]: unique_lengths = {len(x) for x in strings}
In [157]: unique_lengths
Out[157]: {1, 2, 3, 4, 6}
```
``map``函數可以進一步簡化:
```python
In [158]: set(map(len, strings))
Out[158]: {1, 2, 3, 4, 6}
```
作為一個字典推導式的例子,我們可以創建一個字符串的查找映射表以確定它在列表中的位置:
```python
In [159]: loc_mapping = {val : index for index, val in enumerate(strings)}
In [160]: loc_mapping
Out[160]: {'a': 0, 'as': 1, 'bat': 2, 'car': 3, 'dove': 4, 'python': 5}
```
## 嵌套列表推導式
假設我們有一個包含列表的列表,包含了一些英文名和西班牙名:
```python
In [161]: all_data = [['John', 'Emily', 'Michael', 'Mary', 'Steven'],
.....: ['Maria', 'Juan', 'Javier', 'Natalia', 'Pilar']]
```
你可能是從一些文件得到的這些名字,然后想按照語言進行分類。現在假設我們想用一個列表包含所有的名字,這些名字中包含兩個或更多的e。可以用for循環來做:
```python
names_of_interest = []
for names in all_data:
enough_es = [name for name in names if name.count('e') >= 2]
names_of_interest.extend(enough_es)
```
可以用嵌套列表推導式的方法,將這些寫在一起,如下所示:
```python
In [162]: result = [name for names in all_data for name in names
.....: if name.count('e') >= 2]
In [163]: result
Out[163]: ['Steven']
```
嵌套列表推導式看起來有些復雜。列表推導式的for部分是根據嵌套的順序,過濾條件還是放在最后。下面是另一個例子,我們將一個整數元組的列表扁平化成了一個整數列表:
```python
In [164]: some_tuples = [(1, 2, 3), (4, 5, 6), (7, 8, 9)]
In [165]: flattened = [x for tup in some_tuples for x in tup]
In [166]: flattened
Out[166]: [1, 2, 3, 4, 5, 6, 7, 8, 9]
```
記住,for表達式的順序是與嵌套for循環的順序一樣(而不是列表推導式的順序):
```python
flattened = []
for tup in some_tuples:
for x in tup:
flattened.append(x)
```
你可以有任意多級別的嵌套,但是如果你有兩三個以上的嵌套,你就應該考慮下代碼可讀性的問題了。分辨列表推導式的列表推導式中的語法也是很重要的:
```python
In [167]: [[x for x in tup] for tup in some_tuples]
Out[167]: [[1, 2, 3], [4, 5, 6], [7, 8, 9]]
```
這段代碼產生了一個列表的列表,而不是扁平化的只包含元素的列表。
# 3.2 函數
函數是Python中最主要也是最重要的代碼組織和復用手段。作為最重要的原則,如果你要重復使用相同或非常類似的代碼,就需要寫一個函數。通過給函數起一個名字,還可以提高代碼的可讀性。
函數使用``def``關鍵字聲明,用``return``關鍵字返回值:
```python
def my_function(x, y, z=1.5):
if z > 1:
return z * (x + y)
else:
return z / (x + y)
```
同時擁有多條return語句也是可以的。如果到達函數末尾時沒有遇到任何一條return語句,則返回None。
函數可以有一些位置參數(positional)和一些關鍵字參數(keyword)。關鍵字參數通常用于指定默認值或可選參數。在上面的函數中,x和y是位置參數,而z則是關鍵字參數。也就是說,該函數可以下面這兩種方式進行調用:
```python
my_function(5, 6, z=0.7)
my_function(3.14, 7, 3.5)
my_function(10, 20)
```
函數參數的主要限制在于:關鍵字參數必須位于位置參數(如果有的話)之后。你可以任何順序指定關鍵字參數。也就是說,你不用死記硬背函數參數的順序,只要記得它們的名字就可以了。
>筆記:也可以用關鍵字傳遞位置參數。前面的例子,也可以寫為:
>```python
>my_function(x=5, y=6, z=7)
>my_function(y=6, x=5, z=7)
>```
>這種寫法可以提高可讀性。
## 命名空間、作用域,和局部函數
函數可以訪問兩種不同作用域中的變量:全局(global)和局部(local)。Python有一種更科學的用于描述變量作用域的名稱,即命名空間(namespace)。任何在函數中賦值的變量默認都是被分配到局部命名空間(local namespace)中的。局部命名空間是在函數被調用時創建的,函數參數會立即填入該命名空間。在函數執行完畢之后,局部命名空間就會被銷毀(會有一些例外的情況,具體請參見后面介紹閉包的那一節)。看看下面這個函數:
```python
def func():
a = []
for i in range(5):
a.append(i)
```
調用func()之后,首先會創建出空列表a,然后添加5個元素,最后a會在該函數退出的時候被銷毀。假如我們像下面這樣定義a:
```python
a = []
def func():
for i in range(5):
a.append(i)
```
雖然可以在函數中對全局變量進行賦值操作,但是那些變量必須用global關鍵字聲明成全局的才行:
```python
In [168]: a = None
In [169]: def bind_a_variable():
.....: global a
.....: a = []
.....: bind_a_variable()
.....:
In [170]: print(a)
[]
```
>注意:我常常建議人們不要頻繁使用global關鍵字。因為全局變量一般是用于存放系統的某些狀態的。如果你發現自己用了很多,那可能就說明得要來點兒面向對象編程了(即使用類)。
## 返回多個值
在我第一次用Python編程時(之前已經習慣了Java和C++),最喜歡的一個功能是:函數可以返回多個值。下面是一個簡單的例子:
```python
def f():
a = 5
b = 6
c = 7
return a, b, c
a, b, c = f()
```
在數據分析和其他科學計算應用中,你會發現自己常常這么干。該函數其實只返回了一個對象,也就是一個元組,最后該元組會被拆包到各個結果變量中。在上面的例子中,我們還可以這樣寫:
```python
return_value?=?f()
```
這里的return_value將會是一個含有3個返回值的三元元組。此外,還有一種非常具有吸引力的多值返回方式——返回字典:
```python
def f():
a = 5
b = 6
c = 7
return {'a' : a, 'b' : b, 'c' : c}
```
取決于工作內容,第二種方法可能很有用。
## 函數也是對象
由于Python函數都是對象,因此,在其他語言中較難表達的一些設計思想在Python中就要簡單很多了。假設我們有下面這樣一個字符串數組,希望對其進行一些數據清理工作并執行一堆轉換:
```python
In [171]: states = [' Alabama ', 'Georgia!', 'Georgia', 'georgia', 'FlOrIda',
.....: 'south carolina##', 'West virginia?']
```
不管是誰,只要處理過由用戶提交的調查數據,就能明白這種亂七八糟的數據是怎么一回事。為了得到一組能用于分析工作的格式統一的字符串,需要做很多事情:去除空白符、刪除各種標點符號、正確的大寫格式等。做法之一是使用內建的字符串方法和正則表達式``re``模塊:
```python
import re
def clean_strings(strings):
result = []
for value in strings:
value = value.strip()
value = re.sub('[!#?]', '', value)
value = value.title()
result.append(value)
return result
```
結果如下所示:
```python
In [173]: clean_strings(states)
Out[173]:
['Alabama',
'Georgia',
'Georgia',
'Georgia',
'Florida',
'South Carolina',
'West Virginia']
```
其實還有另外一種不錯的辦法:將需要在一組給定字符串上執行的所有運算做成一個列表:
```python
def remove_punctuation(value):
return re.sub('[!#?]', '', value)
clean_ops = [str.strip, remove_punctuation, str.title]
def clean_strings(strings, ops):
result = []
for value in strings:
for function in ops:
value = function(value)
result.append(value)
return result
```
然后我們就有了:
```python
In [175]: clean_strings(states, clean_ops)
Out[175]:
['Alabama',
'Georgia',
'Georgia',
'Georgia',
'Florida',
'South Carolina',
'West Virginia']
```
這種多函數模式使你能在很高的層次上輕松修改字符串的轉換方式。此時的clean_strings也更具可復用性!
還可以將函數用作其他函數的參數,比如內置的map函數,它用于在一組數據上應用一個函數:
```python
In [176]: for x in map(remove_punctuation, states):
.....: print(x)
Alabama
Georgia
Georgia
georgia
FlOrIda
south carolina
West virginia
```
## 匿名(lambda)函數
Python支持一種被稱為匿名的、或lambda函數。它僅由單條語句組成,該語句的結果就是返回值。它是通過lambda關鍵字定義的,這個關鍵字沒有別的含義,僅僅是說“我們正在聲明的是一個匿名函數”。
```python
def short_function(x):
return x * 2
equiv_anon = lambda x: x * 2
```
本書其余部分一般將其稱為lambda函數。它們在數據分析工作中非常方便,因為你會發現很多數據轉換函數都以函數作為參數的。直接傳入lambda函數比編寫完整函數聲明要少輸入很多字(也更清晰),甚至比將lambda函數賦值給一個變量還要少輸入很多字。看看下面這個簡單得有些傻的例子:
```python
def apply_to_list(some_list, f):
return [f(x) for x in some_list]
ints = [4, 0, 1, 5, 6]
apply_to_list(ints, lambda x: x * 2)
```
雖然你可以直接編寫[x *2for x in ints],但是這里我們可以非常輕松地傳入一個自定義運算給apply_to_list函數。
再來看另外一個例子。假設有一組字符串,你想要根據各字符串不同字母的數量對其進行排序:
```python
In [177]: strings = ['foo', 'card', 'bar', 'aaaa', 'abab']
```
這里,我們可以傳入一個lambda函數到列表的sort方法:
```python
In [178]: strings.sort(key=lambda x: len(set(list(x))))
In [179]: strings
Out[179]: ['aaaa', 'foo', 'abab', 'bar', 'card']
```
>筆記:lambda函數之所以會被稱為匿名函數,與def聲明的函數不同,原因之一就是這種函數對象本身是沒有提供名稱__name__屬性。
## 柯里化:部分參數應用
柯里化(currying)是一個有趣的計算機科學術語,它指的是通過“部分參數應用”(partial argument application)從現有函數派生出新函數的技術。例如,假設我們有一個執行兩數相加的簡單函數:
```python
def add_numbers(x, y):
return x + y
```
通過這個函數,我們可以派生出一個新的只有一個參數的函數——add_five,它用于對其參數加5:
```python
add_five = lambda y: add_numbers(5, y)
```
add_numbers的第二個參數稱為“柯里化的”(curried)。這里沒什么特別花哨的東西,因為我們其實就只是定義了一個可以調用現有函數的新函數而已。內置的functools模塊可以用partial函數將此過程簡化:
```python
from functools import partial
add_five = partial(add_numbers, 5)
```
## 生成器
能以一種一致的方式對序列進行迭代(比如列表中的對象或文件中的行)是Python的一個重要特點。這是通過一種叫做迭代器協議(iterator protocol,它是一種使對象可迭代的通用方式)的方式實現的,一個原生的使對象可迭代的方法。比如說,對字典進行迭代可以得到其所有的鍵:
```python
In [180]: some_dict = {'a': 1, 'b': 2, 'c': 3}
In [181]: for key in some_dict:
.....: print(key)
a
b
c
```
當你編寫for key in some_dict時,Python解釋器首先會嘗試從some_dict創建一個迭代器:
```python
In [182]: dict_iterator = iter(some_dict)
In [183]: dict_iterator
Out[183]: <dict_keyiterator at 0x7fbbd5a9f908>
```
迭代器是一種特殊對象,它可以在諸如for循環之類的上下文中向Python解釋器輸送對象。大部分能接受列表之類的對象的方法也都可以接受任何可迭代對象。比如min、max、sum等內置方法以及list、tuple等類型構造器:
```python
In [184]: list(dict_iterator)
Out[184]: ['a', 'b', 'c']
```
生成器(generator)是構造新的可迭代對象的一種簡單方式。一般的函數執行之后只會返回單個值,而生成器則是以延遲的方式返回一個值序列,即每返回一個值之后暫停,直到下一個值被請求時再繼續。要創建一個生成器,只需將函數中的return替換為yeild即可:
```python
def squares(n=10):
print('Generating squares from 1 to {0}'.format(n ** 2))
for i in range(1, n + 1):
yield i ** 2
```
調用該生成器時,沒有任何代碼會被立即執行:
```python
In [186]: gen = squares()
In [187]: gen
Out[187]: <generator object squares at 0x7fbbd5ab4570>
```
直到你從該生成器中請求元素時,它才會開始執行其代碼:
```python
In [188]: for x in gen:
.....: print(x, end=' ')
Generating squares from 1 to 100
1 4 9 16 25 36 49 64 81 100
```
## 生成器表達式
另一種更簡潔的構造生成器的方法是使用生成器表達式(generator expression)。這是一種類似于列表、字典、集合推導式的生成器。其創建方式為,把列表推導式兩端的方括號改成圓括號:
```python
In [189]: gen = (x ** 2 for x in range(100))
In [190]: gen
Out[190]: <generator object <genexpr> at 0x7fbbd5ab29e8>
```
它跟下面這個冗長得多的生成器是完全等價的:
```python
def _make_gen():
for x in range(100):
yield x ** 2
gen = _make_gen()
```
生成器表達式也可以取代列表推導式,作為函數參數:
```python
In [191]: sum(x ** 2 for x in range(100))
Out[191]: 328350
In [192]: dict((i, i **2) for i in range(5))
Out[192]: {0: 0, 1: 1, 2: 4, 3: 9, 4: 16}
```
## itertools模塊
標準庫itertools模塊中有一組用于許多常見數據算法的生成器。例如,groupby可以接受任何序列和一個函數。它根據函數的返回值對序列中的連續元素進行分組。下面是一個例子:
```python
In [193]: import itertools
In [194]: first_letter = lambda x: x[0]
In [195]: names = ['Alan', 'Adam', 'Wes', 'Will', 'Albert', 'Steven']
In [196]: for letter, names in itertools.groupby(names, first_letter):
.....: print(letter, list(names)) # names is a generator
A ['Alan', 'Adam']
W ['Wes', 'Will']
A ['Albert']
S ['Steven']
```
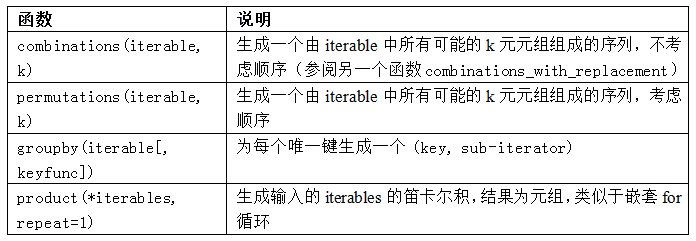
表3-2中列出了一些我經常用到的itertools函數。建議參閱Python官方文檔,進一步學習。
## 錯誤和異常處理
優雅地處理Python的錯誤和異常是構建健壯程序的重要部分。在數據分析中,許多函數函數只用于部分輸入。例如,Python的float函數可以將字符串轉換成浮點數,但輸入有誤時,有``ValueError``錯誤:
```python
In [197]: float('1.2345')
Out[197]: 1.2345
In [198]: float('something')
---------------------------------------------------------------------------
ValueError Traceback (most recent call last)
<ipython-input-198-439904410854> in <module>()
----> 1 float('something')
ValueError: could not convert string to float: 'something'
```
假如想優雅地處理float的錯誤,讓它返回輸入值。我們可以寫一個函數,在try/except中調用float:
```python
def attempt_float(x):
try:
return float(x)
except:
return x
```
當float(x)拋出異常時,才會執行except的部分:
```python
In [200]: attempt_float('1.2345')
Out[200]: 1.2345
In [201]: attempt_float('something')
Out[201]: 'something'
```
你可能注意到float拋出的異常不僅是ValueError:
```python
In [202]: float((1, 2))
---------------------------------------------------------------------------
TypeError Traceback (most recent call last)
<ipython-input-202-842079ebb635> in <module>()
----> 1 float((1, 2))
TypeError: float() argument must be a string or a number, not 'tuple'
```
你可能只想處理ValueError,TypeError錯誤(輸入不是字符串或數值)可能是合理的bug。可以寫一個異常類型:
```python
def attempt_float(x):
try:
return float(x)
except ValueError:
return x
```
然后有:
```python
In [204]: attempt_float((1, 2))
---------------------------------------------------------------------------
TypeError Traceback (most recent call last)
<ipython-input-204-9bdfd730cead> in <module>()
----> 1 attempt_float((1, 2))
<ipython-input-203-3e06b8379b6b> in attempt_float(x)
1 def attempt_float(x):
2 try:
----> 3 return float(x)
4 except ValueError:
5 return x
TypeError: float() argument must be a string or a number, not 'tuple'
```
可以用元組包含多個異常:
```python
def attempt_float(x):
try:
return float(x)
except (TypeError, ValueError):
return x
```
某些情況下,你可能不想抑制異常,你想無論try部分的代碼是否成功,都執行一段代碼。可以使用finally:
```python
f = open(path, 'w')
try:
write_to_file(f)
finally:
f.close()
```
這里,文件處理f總會被關閉。相似的,你可以用else讓只在try部分成功的情況下,才執行代碼:
```python
f = open(path, 'w')
try:
write_to_file(f)
except:
print('Failed')
else:
print('Succeeded')
finally:
f.close()
```
## IPython的異常
如果是在%run一個腳本或一條語句時拋出異常,IPython默認會打印完整的調用棧(traceback),在棧的每個點都會有幾行上下文:
```python
In [10]: %run examples/ipython_bug.py
---------------------------------------------------------------------------
AssertionError Traceback (most recent call last)
/home/wesm/code/pydata-book/examples/ipython_bug.py in <module>()
13 throws_an_exception()
14
---> 15 calling_things()
/home/wesm/code/pydata-book/examples/ipython_bug.py in calling_things()
11 def calling_things():
12 works_fine()
---> 13 throws_an_exception()
14
15 calling_things()
/home/wesm/code/pydata-book/examples/ipython_bug.py in throws_an_exception()
7 a = 5
8 b = 6
----> 9 assert(a + b == 10)
10
11 def calling_things():
AssertionError:
```
自身就帶有文本是相對于Python標準解釋器的極大優點。你可以用魔術命令``%xmode``,從Plain(與Python標準解釋器相同)到Verbose(帶有函數的參數值)控制文本顯示的數量。后面可以看到,發生錯誤之后,(用%debug或%pdb magics)可以進入stack進行事后調試。
# 3.3 文件和操作系統
本書的代碼示例大多使用諸如pandas.read_csv之類的高級工具將磁盤上的數據文件讀入Python數據結構。但我們還是需要了解一些有關Python文件處理方面的基礎知識。好在它本來就很簡單,這也是Python在文本和文件處理方面的如此流行的原因之一。
為了打開一個文件以便讀寫,可以使用內置的open函數以及一個相對或絕對的文件路徑:
```python
In [207]: path = 'examples/segismundo.txt'
In [208]: f = open(path)
```
默認情況下,文件是以只讀模式('r')打開的。然后,我們就可以像處理列表那樣來處理這個文件句柄f了,比如對行進行迭代:
```python
for line in f:
pass
```
從文件中取出的行都帶有完整的行結束符(EOL),因此你常常會看到下面這樣的代碼(得到一組沒有EOL的行):
```python
In [209]: lines = [x.rstrip() for x in open(path)]
In [210]: lines
Out[210]:
['Sue?a el rico en su riqueza,',
'que más cuidados le ofrece;',
'',
'sue?a el pobre que padece',
'su miseria y su pobreza;',
'',
'sue?a el que a medrar empieza,',
'sue?a el que afana y pretende,',
'sue?a el que agravia y ofende,',
'',
'y en el mundo, en conclusión,',
'todos sue?an lo que son,',
'aunque ninguno lo entiende.',
'']
```
如果使用open創建文件對象,一定要用close關閉它。關閉文件可以返回操作系統資源:
```python
In [211]: f.close()
```
用with語句可以可以更容易地清理打開的文件:
```python
In [212]: with open(path) as f:
.....: lines = [x.rstrip() for x in f]
```
這樣可以在退出代碼塊時,自動關閉文件。
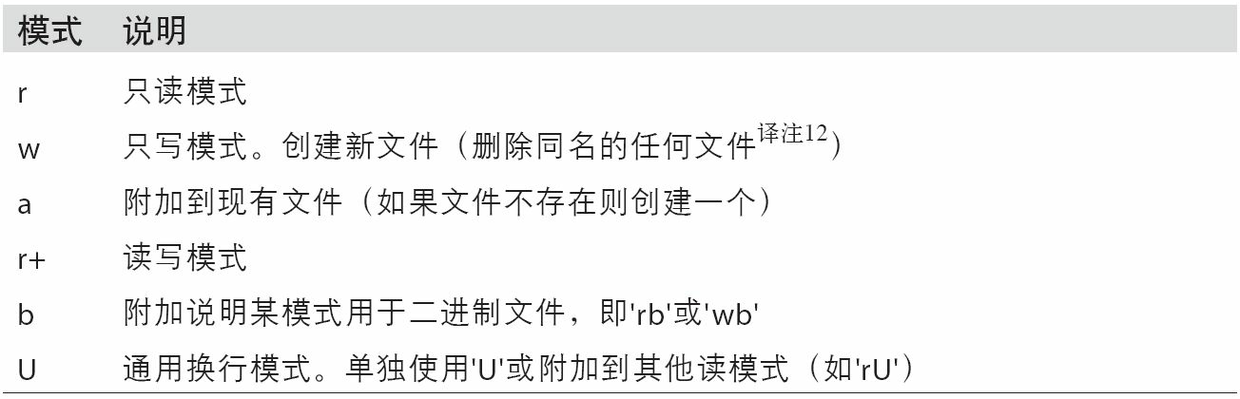
如果輸入f =open(path,'w'),就會有一個新文件被創建在examples/segismundo.txt,并覆蓋掉該位置原來的任何數據。另外有一個x文件模式,它可以創建可寫的文件,但是如果文件路徑存在,就無法創建。表3-3列出了所有的讀/寫模式。
對于可讀文件,一些常用的方法是read、seek和tell。read會從文件返回字符。字符的內容是由文件的編碼決定的(如UTF-8),如果是二進制模式打開的就是原始字節:
```python
In [213]: f = open(path)
In [214]: f.read(10)
Out[214]: 'Sue?a el r'
In [215]: f2 = open(path, 'rb') # Binary mode
In [216]: f2.read(10)
Out[216]: b'Sue\xc3\xb1a el '
```
read模式會將文件句柄的位置提前,提前的數量是讀取的字節數。tell可以給出當前的位置:
```python
In [217]: f.tell()
Out[217]: 11
In [218]: f2.tell()
Out[218]: 10
```
盡管我們從文件讀取了10個字符,位置卻是11,這是因為用默認的編碼用了這么多字節才解碼了這10個字符。你可以用sys模塊檢查默認的編碼:
```python
In [219]: import sys
In [220]: sys.getdefaultencoding()
Out[220]: 'utf-8'
```
seek將文件位置更改為文件中的指定字節:
```python
In [221]: f.seek(3)
Out[221]: 3
In [222]: f.read(1)
Out[222]: '?'
```
最后,關閉文件:
```python
In [223]: f.close()
In [224]: f2.close()
```
向文件寫入,可以使用文件的write或writelines方法。例如,我們可以創建一個無空行版的prof_mod.py:
```python
In [225]: with open('tmp.txt', 'w') as handle:
.....: handle.writelines(x for x in open(path) if len(x) > 1)
In [226]: with open('tmp.txt') as f:
.....: lines = f.readlines()
In [227]: lines
Out[227]:
['Sue?a el rico en su riqueza,\n',
'que más cuidados le ofrece;\n',
'sue?a el pobre que padece\n',
'su miseria y su pobreza;\n',
'sue?a el que a medrar empieza,\n',
'sue?a el que afana y pretende,\n',
'sue?a el que agravia y ofende,\n',
'y en el mundo, en conclusión,\n',
'todos sue?an lo que son,\n',
'aunque ninguno lo entiende.\n']
```
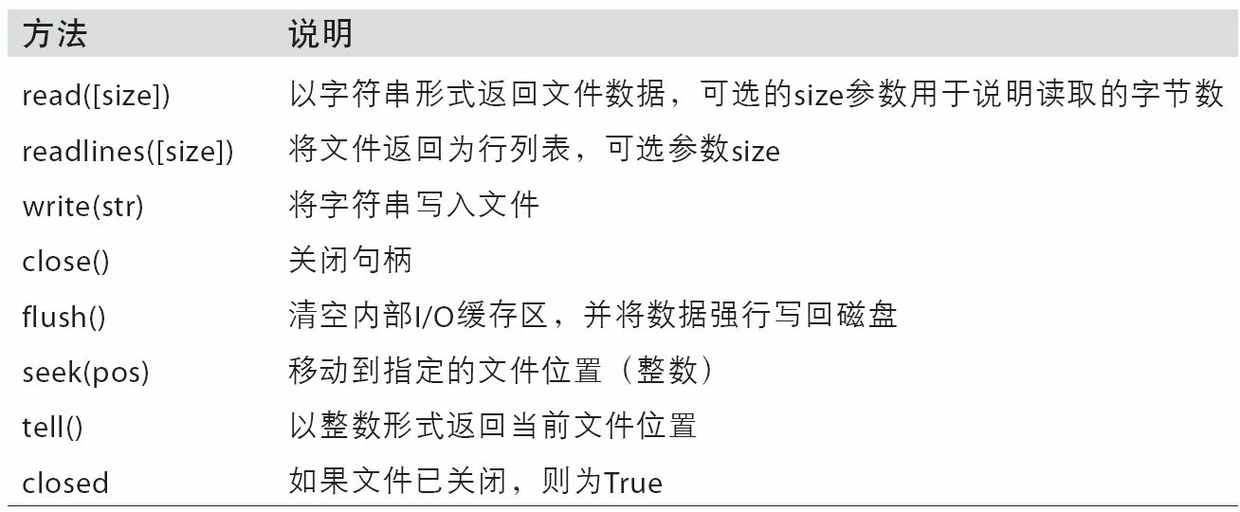
表3-4列出了一些最常用的文件方法。
## 文件的字節和Unicode
Python文件的默認操作是“文本模式”,也就是說,你需要處理Python的字符串(即Unicode)。它與“二進制模式”相對,文件模式加一個b。我們來看上一節的文件(UTF-8編碼、包含非ASCII字符):
```python
In [230]: with open(path) as f:
.....: chars = f.read(10)
In [231]: chars
Out[231]: 'Sue?a el r'
```
UTF-8是長度可變的Unicode編碼,所以當我從文件請求一定數量的字符時,Python會從文件讀取足夠多(可能少至10或多至40字節)的字節進行解碼。如果以“rb”模式打開文件,則讀取確切的請求字節數:
```python
In [232]: with open(path, 'rb') as f:
.....: data = f.read(10)
In [233]: data
Out[233]: b'Sue\xc3\xb1a el '
```
取決于文本的編碼,你可以將字節解碼為str對象,但只有當每個編碼的Unicode字符都完全成形時才能這么做:
```python
In [234]: data.decode('utf8')
Out[234]: 'Sue?a el '
In [235]: data[:4].decode('utf8')
---------------------------------------------------------------------------
UnicodeDecodeError Traceback (most recent call last)
<ipython-input-235-300e0af10bb7> in <module>()
----> 1 data[:4].decode('utf8')
UnicodeDecodeError: 'utf-8' codec can't decode byte 0xc3 in position 3: unexpecte
d end of data
```
文本模式結合了open的編碼選項,提供了一種更方便的方法將Unicode轉換為另一種編碼:
```python
In [236]: sink_path = 'sink.txt'
In [237]: with open(path) as source:
.....: with open(sink_path, 'xt', encoding='iso-8859-1') as sink:
.....: sink.write(source.read())
In [238]: with open(sink_path, encoding='iso-8859-1') as f:
.....: print(f.read(10))
Sue?a el r
```
注意,不要在二進制模式中使用seek。如果文件位置位于定義Unicode字符的字節的中間位置,讀取后面會產生錯誤:
```python
In [240]: f = open(path)
In [241]: f.read(5)
Out[241]: 'Sue?a'
In [242]: f.seek(4)
Out[242]: 4
In [243]: f.read(1)
---------------------------------------------------------------------------
UnicodeDecodeError Traceback (most recent call last)
<ipython-input-243-7841103e33f5> in <module>()
----> 1 f.read(1)
/miniconda/envs/book-env/lib/python3.6/codecs.py in decode(self, input, final)
319 # decode input (taking the buffer into account)
320 data = self.buffer + input
--> 321 (result, consumed) = self._buffer_decode(data, self.errors, final
)
322 # keep undecoded input until the next call
323 self.buffer = data[consumed:]
UnicodeDecodeError: 'utf-8' codec can't decode byte 0xb1 in position 0: invalid s
tart byte
In [244]: f.close()
```
如果你經常要對非ASCII字符文本進行數據分析,通曉Python的Unicode功能是非常重要的。更多內容,參閱Python官方文檔。
# 3.4 結論
我們已經學過了Python的基礎、環境和語法,接下來學習NumPy和Python的面向數組計算。
- 利用 Python 進行數據分析 · 第 2 版
- 第 1 章 準備工作
- 第 2 章 Python 語法基礎,IPython 和 Jupyter Notebooks
- 第 3 章 Python 的數據結構、函數和文件
- 第 4 章 NumPy 基礎:數組和矢量計算
- 第 5 章 pandas 入門
- 第 6 章 數據加載、存儲與文件格式
- 第 7 章 數據清洗和準備
- 第 8 章 數據規整:聚合、合并和重塑
- 第 9 章 繪圖和可視化
- 第 10 章 數據聚合與分組運算
- 第 11 章 時間序列
- 第 12 章 pandas 高級應用
- 第 13 章 Python 建模庫介紹
- 第 14 章 數據分析案例
- 附錄 A NumPy 高級應用
- 附錄 B 更多關于 IPython 的內容