
# OAuth
## 什么是OAuth?
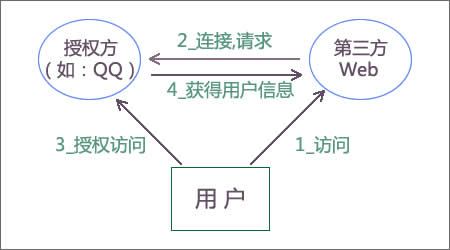
OAuth(開放授權)是一個開放標準,允許用戶讓第三方應用訪問該用戶在某一網站上存儲的私密的資源(如照片,視頻,聯系人列表),而無需將用戶名和密碼提供給第三方應用。
目前主流是2.0
OAuth 2.0是OAuth協議的下一版本,但不向后兼容OAuth 1.0。
OAuth 2.0關注客戶端開發者的簡易性,同時為Web應用,桌面應用和手機,和起居室設備提供專門的認證流程。2012年10月,OAuth 2.0協議正式發布為RFC 6749[1] 。
主要是api
* 微博api
* twitter
* facebook
* github
* qq、微信
## 原理
[http://www.ruanyifeng.com/blog/2014/05/oauth_2_0.html](http://www.ruanyifeng.com/blog/2014/05/oauth_2_0.html)

server
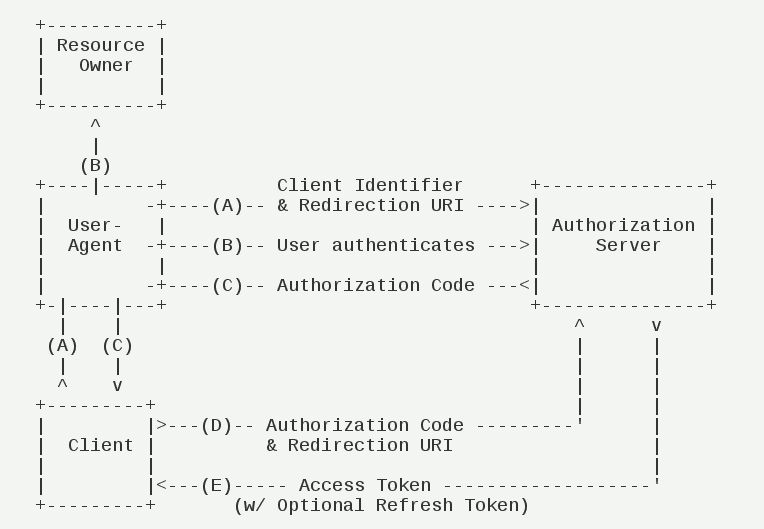
-(A)用戶打開客戶端以后,客戶端要求用戶給予授權。 -(B)用戶同意給予客戶端授權。 -(C)客戶端使用上一步獲得的授權,向認證服務器申請令牌。 -(D)認證服務器對客戶端進行認證以后,確認無誤,同意發放令牌。 -(E)客戶端使用令牌,向資源服務器申請獲取資源。 -(F)資源服務器確認令牌無誤,同意向客戶端開放資源。
## OAuth in nodejs
實現
* [https://github.com/thomseddon/node-oauth2-server](https://i5ting.github.io/wechat-dev-with-nodejs/wechat/Complete,%20compliant%20and%20well%20tested%20module%20for%20implementing%20an%20OAuth2%20Server/Provider%20with%20express%20in%20node.js)
* [Simple, unobtrusive authentication for Node.js.](https://github.com/jaredhanson/passport)
## 微信OAuth說明
如果用戶在微信客戶端中訪問第三方網頁,公眾號可以通過微信網頁授權機制,來獲取用戶基本信息,進而實現業務邏輯。
關于網頁授權回調域名的說明
1、在微信公眾號請求用戶網頁授權之前,開發者需要先到公眾平臺官網中的開發者中心頁配置授權回調域名。請注意,這里填寫的是域名(是一個字符串),而不是URL,因此請勿加[http://等協議頭;](http://xn--%3B-nv8a14pdn5bver/)?2、授權回調域名配置規范為全域名,比如需要網頁授權的域名為:www.qq.com,配置以后此域名下面的頁面[http://www.qq.com/music.html](http://www.qq.com/music.html)?、?[http://www.qq.com/login.html](http://www.qq.com/login.html)?都可以進行OAuth2.0鑒權。但[http://pay.qq.com](http://pay.qq.com/)?、?[http://music.qq.com](http://music.qq.com/)?、?[http://qq.com無法進行OAuth2.0鑒權](http://qq.xn--comoauth2-735sh62dwk9eysua.xn--0-k76bu98j/)?3、如果公眾號登錄授權給了第三方開發者來進行管理,則不必做任何設置,由第三方代替公眾號實現網頁授權即可
關于網頁授權的兩種scope的區別說明
1、以snsapi_base為scope發起的網頁授權,是用來獲取進入頁面的用戶的openid的,并且是靜默授權并自動跳轉到回調頁的。用戶感知的就是直接進入了回調頁(往往是業務頁面) 2、以snsapi_userinfo為scope發起的網頁授權,是用來獲取用戶的基本信息的。但這種授權需要用戶手動同意,并且由于用戶同意過,所以無須關注,就可在授權后獲取該用戶的基本信息。 3、用戶管理類接口中的“獲取用戶基本信息接口”,是在用戶和公眾號產生消息交互或關注后事件推送后,才能根據用戶OpenID來獲取用戶基本信息。這個接口,包括其他微信接口,都是需要該用戶(即openid)關注了公眾號后,才能調用成功的。
關于網頁授權access_token和普通access_token的區別
1、微信網頁授權是通過OAuth2.0機制實現的,在用戶授權給公眾號后,公眾號可以獲取到一個網頁授權特有的接口調用憑證(網頁授權access_token),通過網頁授權access_token可以進行授權后接口調用,如獲取用戶基本信息; 2、其他微信接口,需要通過基礎支持中的“獲取access_token”接口來獲取到的普通access_token調用。
關于UnionID機制
1、請注意,網頁授權獲取用戶基本信息也遵循UnionID機制。即如果開發者有在多個公眾號,或在公眾號、移動應用之間統一用戶帳號的需求,需要前往微信開放平臺(open.weixin.qq.com)綁定公眾號后,才可利用UnionID機制來滿足上述需求。 2、UnionID機制的作用說明:如果開發者擁有多個移動應用、網站應用和公眾帳號,可通過獲取用戶基本信息中的unionid來區分用戶的唯一性,因為同一用戶,對同一個微信開放平臺下的不同應用(移動應用、網站應用和公眾帳號),unionid是相同的。
關于特殊場景下的靜默授權
1、上面已經提到,對于以snsapi_base為scope的網頁授權,就靜默授權的,用戶無感知; 2、對于已關注公眾號的用戶,如果用戶從公眾號的會話或者自定義菜單進入本公眾號的網頁授權頁,即使是scope為snsapi_userinfo,也是靜默授權,用戶無感知。
具體而言,網頁授權流程分為四步:
1、引導用戶進入授權頁面同意授權,獲取code 2、通過code換取網頁授權access_token(與基礎支持中的access_token不同) 3、如果需要,開發者可以刷新網頁授權access_token,避免過期 4、通過網頁授權access_token和openid獲取用戶基本信息(支持UnionID機制)
## install
[https://github.com/node-webot/wechat-oauth](https://github.com/node-webot/wechat-oauth)
~~~
npm install wechat-oauth
~~~
## 創建routes/oauth.js
~~~
var express = require('express');
var router = express.Router();
var OAuth = require('wechat-oauth');
var client = new OAuth('wx1627638f56ff80a5', 'd9df5debf4e37def18cc5e37326b604e');
/* GET users listing. */
router.get('/', function (req, res, next) {
var domain = "https://topfio-3001-rsqevg.box.myide.io"
var auth_callback_url = domain + "/oauth/callback"
var url = client.getAuthorizeURL(auth_callback_url, '', 'snsapi_userinfo');
console.log(url);
// 重定向請求到微信服務器
res.redirect(url);
});
router.get('/callback', function (req, res, next) {
var code = req.query.code;
client.getAccessToken(code, function (err, result) {
console.log(result)
var accessToken = result.data.access_token;
var openid = result.data.openid;
client.getUser(openid, function (err, result) {
var userInfo = result;
// save or other opration
res.json(userInfo)
});
});
});
module.exports = router;
~~~
## callback之后
。。。
[https://cnodejs.org/topic/555fec114eb040084cfe5d15](https://cnodejs.org/topic/555fec114eb040084cfe5d15)
之前的版本
這是樸靈寫的一個模塊
[https://github.com/node-webot/wechat-oauth](https://github.com/node-webot/wechat-oauth)
#### 授權流程
網頁授權流程分為四步:
* 1、引導用戶進入授權頁面同意授權,獲取code
* 2、通過code換取網頁授權access_token(與基礎支持中的access_token不同)
* 3、如果需要,開發者可以刷新網頁授權access_token,避免過期
* 4、通過網頁授權access_token和openid獲取用戶基本信息(支持UnionID機制)
簡單點
* 1、根據app_id和app_secret和授權后回調url
* 2、在回調里處理業務邏輯,比如獲取用戶信息,保存或更新
#### 準備工作
~~~
var OAuth = require('wechat-oauth');
var client = new OAuth('your appid', 'your secret');
~~~
但是有一個問題,比如多臺機器集群或多進程時,token需要全局維護,以下為保存token的接口。
~~~
if (req.wx) {
req.wx_client = new OAuth(req.wx.app_id, req.wx.app_secret, function (openid, callback) {
// 傳入一個根據openid獲取對應的全局token的方法
// 在getUser時會通過該方法來獲取token
fs.readFile(openid +':access_token.txt', 'utf8', function (err, txt) {
if (err) {return callback(err);}
callback(null, JSON.parse(txt));
});
}, function (openid, token, callback) {
// 請將token存儲到全局,跨進程、跨機器級別的全局,比如寫到數據庫、redis等
// 這樣才能在cluster模式及多機情況下使用,以下為寫入到文件的示例
// 持久化時請注意,每個openid都對應一個唯一的token!
fs.writeFile(openid + ':access_token.txt', JSON.stringify(token), callback);
});
}
~~~
#### OAuth認證
簡單點說就是根據app_id和app_secret和授權后回調url,去微信的網關去認證
認證成功后就會跳到回調url
~~~
// 主頁,主要是負責OAuth認證
router.get('/oauth', c, wx_config, wx_option, function(req, res) {
console.log('req.query');
var qs = require('qs')
var query_json = qs.stringify(req.query);
console.log(query_json);
var auth_url = req.wx.domain + req.wx.callback.url + "/" + query_json
console.log('auth_url = ' + auth_url);
var url = req.wx_client.getAuthorizeURL(auth_url, '', 'snsapi_userinfo');
// 重定向請求到微信服務器
res.redirect(url);
});
~~~
核心方法就是getAuthorizeURL方法
參數
* 'redirectUrl'
* 'state'
* 'scope'
#### 獲取用戶信息getUser(openid)
#### 獲取用戶信息getUserByCode
## weixin.js
這樣說太抽象,還是看代碼吧
~~~
var express = require('express');
var router = express.Router();
var check_session = require('../middleware/check_session_is_expired');
var OAuth = require('wechat-oauth');
var signature = require('wx_jsapi_sign');
// 讀取配置項
var config = require('config');
var app_id = config.get('wx.app_id');
var app_secret = config.get('wx.app_secret');
var domain = config.get('domain');
// 微信授權和回調
var client = new OAuth(app_id, app_secret);
// 主頁,主要是負責OAuth認真
router.get('/', function(req, res) {
var url = client.getAuthorizeURL('http://' + domain + '/weixin/callback','','snsapi_userinfo');
// 重定向請求到微信服務器
res.redirect(url);
})
/**
* 認證授權后回調函數
*
* 根據openid判斷是否用戶已經存在
* - 如果是新用戶,注冊并綁定,然后跳轉到手機號驗證界面
* - 如果是老用戶,跳轉到主頁
*/
router.get('/callback', function(req, res) {
console.log('----weixin callback -----')
var code = req.query.code;
var User = req.model.UserModel;
client.getAccessToken(code, function (err, result) {
console.dir(err);
console.dir(result);
var accessToken = result.data.access_token;
var openid = result.data.openid;
var unionid = result.data.unionid;
console.log('token=' + accessToken);
console.log('openid=' + openid);
console.log('unionid=' + unionid);
User.find_by_unionid(unionid, function(err, user){
console.log('微信回調后,User.find_by_unionid(unionid) 返回的user = ' + user)
if(err || user == null){
console.log('經過unionid查詢無結果');
client.getUser(openid, function (err, get_by_openid) {
console.log(get_by_openid);
var oauth_user = get_by_openid;
var _user = new User(oauth_user);
_user.username = oauth_user.nickname;
_user.save(function(err, user_save) {
if (err) {
console.log('User save error ....' + err);
} else {
console.log('User save sucess ....' + err);
req.session.current_user = void 0;
res.redirect('/users/' + user_save._id + '/verify');
}
});
});
}else{
console.log('根據unionid查詢,用戶已經存在')
// if phone_number exist,go home page
if(user.is_valid == true){
req.session.current_user = user;
res.redirect('/mobile/')
}else{
//if phone_number exist,go to user detail page to fill it
req.session.current_user = void 0;
res.redirect('/users/' + user._id + '/verify');
}
}
});
});
});
router.post('/getsignature', function(req, res) {
var url = req.body.url;
var re = /\/$/;
if(!re.test(url)) {
url = url + '/'
}
console.log('\033[32m'+url+'\033[39m');
var config = {
cache_json_file: req.server_path,
appId: app_id,
appSecret: app_secret,
appToken: 'mengxiaoban.com'
};
signature.getSignature(config)(url, function(error, result) {
console.log(result);
if (error) {
res.json({
'error': error
});
} else {
res.json(result);
}
});
});
module.exports = router;
~~~
在關注者與公眾號產生消息交互后,公眾號可獲得關注者的OpenID(加密后的微信號,每個用戶對每個公眾號的OpenID是唯一的。對于不同公眾號,同一用戶的openid不同)。 摘自《微信公眾平臺開發者文檔》
## 流程
* 1)var client = new OAuth(app_id, app_secret);
* 2)如果授權成功,就會跳到callback url地址,即認證授權后回調函數
* 3)獲取code,即var code = req.query.code;
* 4)獲取微信用戶信息,client.getAccessToken(code,cb)
* 5)根據微信用戶信息里的openid或unionid查詢當前數據庫里是否有該用戶,即
~~~
User.find_by_unionid(unionid, function(err, user)
~~~
* 6)如果有,登錄成功,創建session,重定向主頁面
~~~
req.session.current_user = user;
res.redirect('/mobile/')
~~~
* 7)如果沒有,需要創建用戶,根據openid獲取用戶信息
~~~
client.getUser(openid, function (err, get_by_openid)
~~~
* 8)保存用戶
~~~
var _user = new User(oauth_user);
_user.username = oauth_user.nickname;
_user.save(function(err, user_save)
~~~
* 9)如果保存用戶成功,跳轉到6)
* 10)保存失敗,顯示錯誤頁面即可
## user.js model
~~~
var LOCK_TIME, MAX_LOGIN_ATTEMPTS, SALT_WORK_FACTOR, Schema, UserSchema, bcrypt, mongoose;
var mongoose = require('mongoose');
var Schema = mongoose.Schema;
var Promise = require('bluebird');
var autoIncrement = require('mongoose-auto-increment');
autoIncrement.initialize(mongoose.connection);
Schema = mongoose.Schema;
SALT_WORK_FACTOR = 10;
MAX_LOGIN_ATTEMPTS = 5;
LOCK_TIME = 2 * 60 * 60 * 1000;
UserSchema = new Schema({
username: {// 真實姓名
type: String
},
unionid : String,
openid: {// from weixin openid
type: String,
required: true,
index: {
unique: true
}
},
nickname : String,// from weixin 昵稱
sex : String,// from weixin 性別 0->女 1->男
language : String,// from weixin 語言
city : String,// from weixin 城市
province : String,// from weixin
country : String,// from weixin
headimgurl : String,// from weixin 頭像路徑
privilege : [], // from weixin
created_at : {
type: Date,
"default": Date.now
}
});
UserSchema.virtual('is_valid').get(function(){
console.log('phone_number = ' +this.phone_number)
if(this.phone_number == undefined | this.invite_code == undefined){
return false;
}
return this.invite_code.length >= 2 && this.phone_number > 0
});
// 檢查是否填寫過邀請信息
UserSchema.virtual('is_invited').get(function(){
if(typeof this.weixin_name == 'undefined'){
return false;
}
});
UserSchema.methods.is_exist = function(cb) {
var query;
query = {
username: this.username,
password: this.password
};
return this.model('UserModel').findOne(query, cb);
};
UserSchema.statics.findAll = function(cb) {
return this.find().sort({ created_at: 'asc'}).exec(cb);
};
UserSchema.methods.save_necessary = function(cb) {
var update = {
invite_code: this.invite_code,
phone_number: this.phone_number,
address:this.address
};
return this.model('UserModel').findByIdAndUpdate(this.id, update, cb);
};
UserSchema.statics.find_by_openid = function(openid, cb) {
return this.findOne({
openid: openid
}, cb);
};
UserSchema.statics.find_by_unionid = function(unionid, cb) {
return this.findOne({
unionid: unionid
}, cb);
};
UserSchema.statics.find_by_nickname = function(nickname, cb) {
return this.findOne({
nickname: nickname
}, cb);
};
UserSchema.plugin(autoIncrement.plugin, {
model: 'XbmId',
field: 'xbm_id',
startAt: 10000,
incrementBy: 1
});
var UserModel = mongoose.model('UserModel', UserSchema);
Promise.promisifyAll(UserModel);
Promise.promisifyAll(UserModel.prototype);
module.exports = UserModel;
~~~
此處按需設置即可
技巧點
* mongoose用法
* 索引
* virtual
* plugin
* statics
* methods
* promise/bluebird用法
- 前言
- 1 skill
- 1.1 Coding WebIDE
- 1.2 git
- 1.3 extra practice
- 1.4 預習
- 2 nodejs入門
- 2.1 入門
- 2.2 安裝
- 2.3 helloworld
- 2.4 commonJS規范
- 2.5 模塊導出
- 2.6 Nodejs代碼調試
- 2.7 編寫Nodejs模塊
- 2.8 最小化問題
- 2.9 隨堂練習
- 3 異步流程控制
- 3.1 什么時候會用到異步流程控制
- 3.2 簡單做法async模塊
- 3.3 Promise/a+規范
- 3.4 Node.js Promise/a+實現
- 3.5 生成器Generators/yield
- 3.6 Async函數/Await
- 3.7 神奇的co
- 3.8 5種 yieldable
- 3.9 學習重點
- 3.10 隨堂練習
- 4 express和微信開發入門
- 4.1 入門
- 4.2 connect
- 4.3 靜態Http服務器
- 4.4 那些預處理器
- 4.5 路由
- 4.6 視圖與模塊引擎
- 4.7 中間件
- 4.8 更多實踐
- 4.9 微信入門
- 4.10 隨堂練習:完成登錄、注冊功能
- 5 微信實例與H5實踐
- 5.1 微信基礎和sandbox
- 5.2 公眾號菜單和自動回復
- 5.3 微信OAuth用戶授權
- 5.4 微信分享
- 5.5 wechat-api
- 5.6 H5-上篇
- 5.7 H5-下篇
- 5.8 隨堂練習
- 6 weui實戰
- 6.1 使用bower
- 6.2 移動端抽象
- 6.3 優化滑動列表
- 6.4 weui
- 6.5 讓weui和iscroll結婚
- 6.6 優化事件
- 6.7 how-to-write-h5
- 6.8 優化無止境
- 6.9 隨堂練習
- 7 微信支付
- 7.1 吹個牛
- 7.2 支付概述
- 7.3 科普幾個概念
- 7.4 準備
- 7.5 調試
- 7.6 公眾號支付(JSAPI)
- 7.7 對賬單
- 7.8 數據處理
- 7.9 隨堂練習
- 8 項目實戰《付費課程系統MVP》
- 8.1 需求分析
- 8.2 ui/ue
- 8.3 技術棧
- 8.4 模型
- 8.5 靜態api
- 8.6 開發
- 8.7 部署
- 8.8 監控
- 8.9 數據統計
- 8.10 demo
- 9 高級篇
- 9.1 前后端分離實踐?
- 9.2 如何展望未來的大前端
- 9.3 容器和微服務
- 10 答疑問題收集