# 批量安裝系統-cobbler
[TOC]
## 1 環境準備
### 1.1 簡介
cobbler可以理解為是kickstart的升級版,將其封裝并了個web界面,可以附帶管理DHCP,DNS等,提供了API接口可供二次開發.
官網:https://cobbler.github.io
### 1.2 系統信息
```
cat /etc/redhat-release
CentOS Linux release 7.4.1708 (Core)
uname -r
3.10.0-693.el7.x86_64
hostname -I
10.0.0.201 172.16.1.201
```
### 1.3 防火墻、selinux
```
sed -i 's/SELINUX=enforcing/SELINUX=disabled/g' /etc/selinux/config
setenforce 0
systemctl stop firewalld.service
systemctl disable firewalld.service
```
## 2 安裝cobbler
### 2.1 安裝阿里云源
```
curl -o /etc/yum.repos.d/CentOS-Base.repo http://mirrors.aliyun.com/repo/Centos-7.repo
curl -o /etc/yum.repos.d/epel.repo http://mirrors.aliyun.com/repo/epel-7.repo
```
已配置過第三方源可忽略此步驟
### 2.2 安裝和啟動cobbler
```
yum -y install cobbler cobbler-web dhcp tftp-server pykickstart httpd python-django
systemctl start cobblerd.service
systemctl start httpd.service
```
### 2.3 配置cobbler
1) 校驗命令
```
cobbler check
```
檢查后會提示需要修改的地方,根據提示進行修改
2) 根據提示修改
```
sed -i '/^server/ s#127.0.0.1#172.16.1.201#g' /etc/cobbler/settings
sed -i '/^next_server/ s#127.0.0.1#172.16.1.201#g' /etc/cobbler/settings
sed -ri 's#(.*disable.*= )yes#\1no#g' /etc/xinetd.d/tftp
cobbler get-loaders
```
3) 讓cobbler管理dhcp
```
sed -i 's/manage_dhcp: 0/manage_dhcp: 1/' /etc/cobbler/settings
sed -i.ori 's#192.168.1#172.16.1#g;22d;23d' /etc/cobbler/dhcp.template
```
4) 防止誤重裝
```
sed -i 's/pxe_just_once: 0/pxe_just_once: 1/' /etc/cobbler/settings
```
5) 啟動關聯服務
```
systemctl start rsyncd.service
systemctl enable rsyncd.service
systemctl start tftp.socket
systemctl enable tftp.socket
```
6) 提交修改
```
cobbler sync
```
仍然有個別提示,其中包括更改密碼的要求,生成環境的話根據要求修改密碼
7) 重啟所有服務
```
systemctl restart cobblerd.service httpd.service rsyncd.service tftp.socket
systemctl is-active cobblerd.service httpd.service rsyncd.service tftp.socket
```
## 3 web端操作
### 3.1 基礎配置
1) 基礎信息
網址:https://10.0.0.201/cobbler_web
賬號密碼:cobbler cobbler
掛載光盤:mount /dev/cdrom /mnt
### 3.2 導入光盤
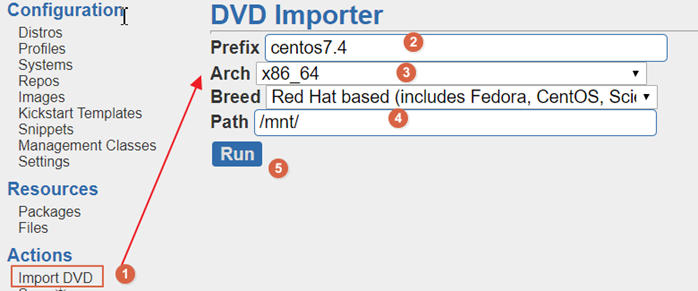
點擊actions-->import菜單導入光盤

### 3.3 創建配置文件

### 3.4 匹配配置文件

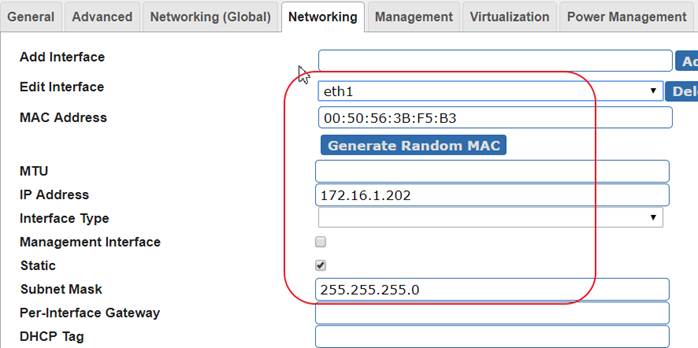
至此,新建虛擬機,開機后通過通過網絡已經可以獲得選擇菜單,選擇版本后即可自動安裝,如果還要做的開機后直接安裝,不選擇版本且按要求配置網絡參數的話,還需要接下來這一步
### 3.5 配置全自動安裝[非必須]


- shell編程
- 變量1-規范-環境變量-普通變量
- 變量2-位置-狀態-特殊變量
- 變量3-變量子串
- 變量4-變量賦值三種方法
- 變量5-數組相關
- 計算1-數值計算命令和案例
- 計算2-expr命令舉例
- 計算3-條件表達式和各種操作符
- 計算4-條件表達式和操作符案例
- 循環1-函數的概念與作用
- 循環2-if與case語法
- 循環3-while語法
- 循環4-for循環
- 其他1-判斷傳入的參數為0或整數的多種思路
- 其他2-while+read按行讀取文件
- 其他3-給輸出內容加顏色
- 其他4-shell腳本后臺運行知識
- 其他5-6種產生隨機數的方法
- 其他6-break,continue,exit,return區別
- if語法案例
- case語法案例
- 函數語法案例
- WEB服務軟件
- nginx相關
- 01-簡介與對比
- 02-日志說明
- 03-配置文件和虛擬主機
- 04-location模塊和訪問控制
- 05-status狀態模塊
- 06-rewrite重寫模塊
- 07-負載均衡和反向代理
- 08-反向代理監控虛擬IP地址
- nginx與https自簽發證書
- php-nginx-mysql聯動
- Nginx編譯安裝[1.12.2]
- 案例
- 不同客戶端顯示不同信息
- 上傳和訪問資源池分離
- 配置文件
- nginx轉發解決跨域問題
- 反向代理典型配置
- php相關
- C6編譯安裝php.5.5.32
- C7編譯php5
- C6/7yum安裝PHP指定版本
- tomcxat相關
- 01-jkd與tomcat部署
- 02-目錄-日志-配置文件介紹
- 03-tomcat配置文件詳解
- 04-tomcat多實例和集群
- 05-tomcat監控和調優
- 06-Tomcat安全管理規范
- show-busy-java-threads腳本
- LVS與keepalived
- keepalived
- keepalived介紹和部署
- keepalived腦裂控制
- keepalived與nginx聯動-監控
- keepalived與nginx聯動-雙主
- LVS負載均衡
- 01-LVS相關概念
- 02-LVS部署實踐-ipvsadm
- 03-LVS+keepalived部署實踐
- 04-LVS的一些問題和思路
- mysql數據庫
- 配置和腳本
- 5.6基礎my.cnf
- 5.7基礎my.cnf
- 多種安裝方式
- 詳細用法和命令
- 高可用和讀寫分離
- 優化和壓測
- docker與k8s
- docker容器技術
- 1-容器和docker基礎知識
- 2-docker軟件部署
- 3-docker基礎操作命令
- 4-數據的持久化和共享互連
- 5-docker鏡像構建
- 6-docker鏡像倉庫和標簽tag
- 7-docker容器的網絡通信
- 9-企業級私有倉庫harbor
- docker單機編排技術
- 1-docker-compose快速入門
- 2-compose命令和yaml模板
- 3-docker-compose命令
- 4-compose/stack/swarm集群
- 5-命令補全和資源限制
- k8s容器編排工具
- mvn的dockerfile打包插件
- openstack與KVM
- kvm虛擬化
- 1-KVM基礎與快速部署
- 2-KVM日常管理命令
- 3-磁盤格式-快照和克隆
- 4-橋接網絡-熱添加與熱遷移
- openstack云平臺
- 1-openstack基礎知識
- 2-搭建環境準備
- 3-keystone認證服務部署
- 4-glance鏡像服務部署
- 5-nova計算服務部署
- 6-neutron網絡服務部署
- 7-horizon儀表盤服務部署
- 8-啟動openstack實例
- 9-添加計算節點流程
- 10-遷移glance鏡像服務
- 11-cinder塊存儲服務部署
- 12-cinder服務支持NFS存儲
- 13-新增一個網絡類型
- 14-云主機冷遷移前提設置
- 15-VXALN網絡類型配置
- 未分類雜項
- 部署環境準備
- 監控
- https證書
- python3.6編譯安裝
- 編譯安裝curl[7.59.0]
- 修改Redhat7默認yum源為阿里云
- 升級glibc至2.17
- rabbitmq安裝和啟動
- rabbitmq多實例部署[命令方式]
- mysql5.6基礎my.cnf
- centos6[upstart]/7[systemd]創建守護進程
- Java啟動參數詳解
- 權限控制方案
- app發包倉庫
- 版本發布流程
- elk日志系統
- rsyslog日志統一收集系統
- ELK系統介紹及YUM源
- 快速安裝部署ELK
- Filebeat模塊講解
- logstash的in/output模塊
- logstash的filter模塊
- Elasticsearch相關操作
- ES6.X集群及head插件
- elk收集nginx日志(json格式)
- kibana說明-漢化-安全
- ES安裝IK分詞器
- zabbix監控
- zabbix自動注冊模板實現監控項自動注冊
- hadoop大數據集群
- hadoop部署
- https證書
- certbot網站
- jenkins與CI/CD
- 01-Jenkins部署和初始化
- 02-Jenkins三種插件安裝方式
- 03-Jenkins目錄說明和備份
- 04-git與gitlab項目準備
- 05-構建自由風格項目和相關知識
- 06-構建html靜態網頁項目
- 07-gitlab自動觸發項目構建
- 08-pipelinel流水線構建項目
- 09-用maven構建java項目
- iptables
- 01-知識概念
- 02-常規命令實戰
- 03-企業應用模板
- 04-企業應用模板[1鍵腳本]
- 05-企業案例-共享上網和端口映射
- SSH與VPN
- 常用VPN
- VPN概念和常用軟件
- VPN之PPTP部署[6.x][7.x]
- 使用docker部署softether vpn
- softEther-vpn靜態路由表推送
- SSH服務
- SSH介紹和部署
- SSH批量分發腳本
- 開啟sftp日志并限制sftp訪問目錄
- sftp賬號權限分離-開發平臺
- ssh配置文件最佳實踐
- git-github-gitlab
- git安裝部署
- git詳細用法
- github使用說明
- gitlab部署和使用
- 緩存數據庫
- zookeeper草稿
- mongodb數據庫系列
- mongodb基本使用
- mongodb常用命令
- MongoDB配置文件詳解
- mongodb用戶認證管理
- mongodb備份與恢復
- mongodb復制集群
- mongodb分片集群
- docker部署mongodb
- memcached
- memcached基本概念
- memcached部署[6.x][7.x]
- memcached參數和命令
- memcached狀態和監控
- 會話共享和集群-優化-持久化
- memcached客戶端-web端
- PHP測試代碼
- redis
- 1安裝和使用
- 2持久化-事務-鎖
- 3數據類型和發布訂閱
- 4主從復制和高可用
- 5redis集群
- 6工具-安全-pythonl連接
- redis配置文件詳解
- 磁盤管理和存儲
- Glusterfs分布式存儲
- GlusterFS 4.1 版本選擇和部署
- Glusterfs常用命令整理
- GlusterFS 4.1 深入使用
- NFS文件存儲
- NFS操作和部署
- NFS文件系統-掛載和優化
- sersync與inotify
- rsync同步服務
- rsyncd.conf
- rsync操作和部署文檔
- rsync常見錯誤處理
- inotify+sersync同步服務
- inotify安裝部署
- inotify最佳腳本
- sersync安裝部署
- 時間服務ntp和chrony
- 時間服務器部署
- 修改utc時間為cst時間
- 批量操作與自動化
- cobbler與kickstart
- KS+COBBLER文件
- cobbler部署[7.x]
- kickstart部署[7.x]
- kickstar-KS文件和語法解析
- kickstart-PXE配置文件解析
- 自動化之ansible
- ansible部署和實踐
- ansible劇本編寫規范
- 配置文件示例
- 內網DNS服務
- 壓力測試
- 壓測工具-qpefr測試帶寬和延時
