
[TOC]
Kubernetes 集群中, 在 Kube Proxy 里大量用到了 iptables, 在 Kubernetes 集群規模較大的情況下, 數以千/萬計的 iptables 規則會極大地拖慢 Kubernetes 網絡性能, 導致網絡請求響應緩慢.
# Kube Proxy 的用途
Kube Proxy 的負責以下幾個方面的流量路由:
1. ClusterIP: 集群內通過 ClusterIP 的訪問
2. NodePort: 集群內外通過 NodePort 的訪問
3. ExternalIP: 集群外通過 external IP 的訪問
4. LoadBalancer: 集群外通過 LoadBalancer 的訪問.
以上功能 cilium 均已實現,并且性能更加強悍。
# cilium與kubeProxy性能對比
Cilium 完全實現了 kube-proxy 功能, 并做到了性能上有所提升, 具體 [Cilium 官方測試結果](https://cilium.io/blog/2019/08/20/cilium-16/)
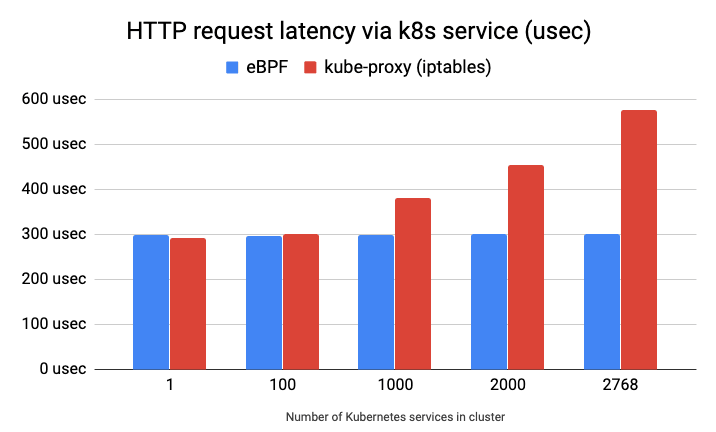
>[info] 下圖顯示了通過 Kubernetes 服務發送到遠程主機上運行的 nginx Pod 的每個 HTTP GET 請求的延遲(越低越好),使用 `ab` 發送 100,000 個連續請求來測量。 正如我們所看到的,eBPF 服務實現不依賴于集群中部署的服務數量,而使用 iptables 的 kube-proxy 實現卻依賴于集群中部署的服務數量。
在 [Google文檔](https://docs.google.com/presentation/d/1cZJ-pcwB9WG88wzhDm2jxQY4Sh8adYg0-N3qWQ8593I/edit?pli=1#slide=id.g708c5740c0_0_216) 找到提及多個轉發(iptables, ipvs, eBPF)方式對比結果。該文檔創建者也是撰寫 [cilium官網替換kube-proxy性能提升](https://cilium.io/blog/2019/08/20/cilium-16/) 的兩位測試之中的一員。數據估計是可靠的
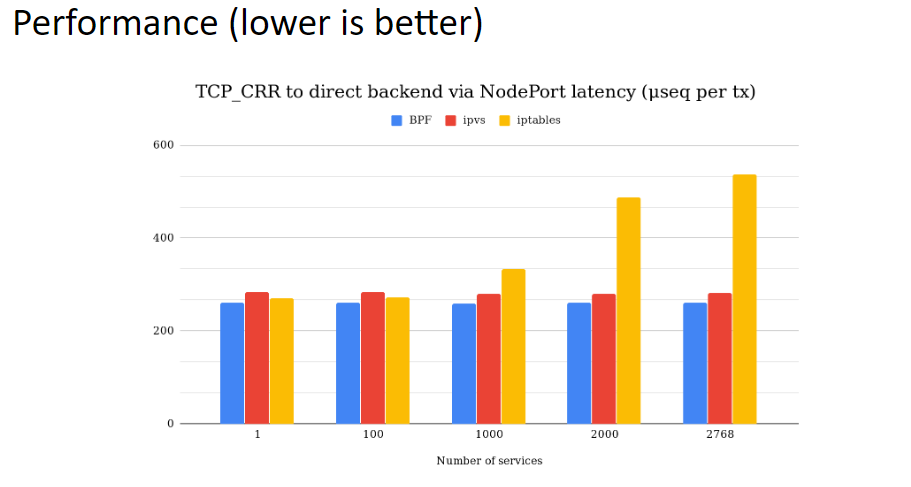
>[info] 從這個結果來看,kubeProxy中 ipvs 模式與 eBPF 相差不遠。兩者都不會跟隨 Service 增加而降低性能
# 實施 cilium 替換 kube-proxy
## 前提條件
- Cilium 的 kube-proxy 替換依賴于 socket-LB 功能,這需要 v4.19.57、v5.1.16、v5.2.0 或更高版本的 Linux 內核
## 逐步替換節點
1. kube-proxy 設置節點反親和性
```shell
$ kubectl -n kube-system patch daemonset kube-proxy --patch '{"spec": {"template": {"spec": {"affinity": {"nodeAffinity": {"requiredDuringSchedulingIgnoredDuringExecution": {"nodeSelectorTerms": [{"matchExpressions": [{"key": "io.cilium.migration/kube-proxy-replacement", "operator": "NotIn", "values": ["strict"]}]}]}}}}}}}'
```
2. 設置cilium節點配置
```shell
$ cat <<EOF | kubectl apply --server-side -f -
apiVersion: cilium.io/v2alpha1
kind: CiliumNodeConfig
metadata:
namespace: kube-system
name: kube-proxy-replacement-strict
spec:
nodeSelector:
matchLabels:
io.cilium.migration/kube-proxy-replacement: strict
defaults:
kube-proxy-replacement: strict
kube-proxy-replacement-healthz-bind-address: "0.0.0.0:10256"
EOF
ciliumnodeconfig.cilium.io/kube-proxy-replacement-strict serverside-applied
```
3. 節點禁止調度
```shell
$ export NODE=192.168.32.127
$ kubectl cordon $NODE
```
4. 節點設置label
```shell
$ export NODE=192.168.32.127
$ kubectl label node $NODE --overwrite 'io.cilium.migration/kube-proxy-replacement=strict'
```
5. 重啟cilium
```shell
$ export NODE=192.168.32.127
$ kubectl -n kube-system delete pod -l k8s-app=cilium --field-selector spec.nodeName=$NODE
```
6. 確認cilium啟動參數
```shell
$ export NODE=192.168.32.127
$ kubectl -n kube-system exec $(kubectl -n kube-system get pod -l k8s-app=cilium --field-selector spec.nodeName=$NODE -o name) -c cilium-agent -- cilium config get kube-proxy-replacement
$ kubectl -n kube-system exec $(kubectl -n kube-system get pod -l k8s-app=cilium --field-selector spec.nodeName=$NODE -o name) -c cilium-agent -- cilium status --verbose
...
KubeProxyReplacement Details:
Status: Strict
Socket LB: Enabled
Socket LB Tracing: Enabled
Socket LB Coverage: Full
Devices: ens33 192.168.32.127
Mode: SNAT
Backend Selection: Random
Session Affinity: Enabled
Graceful Termination: Enabled
NAT46/64 Support: Disabled
XDP Acceleration: Disabled
Services:
- ClusterIP: Enabled
- NodePort: Enabled (Range: 30000-32767)
- LoadBalancer: Enabled
- externalIPs: Enabled
- HostPort: Enabled
...
```
7. 節點運行調度
```shell
$ export NODE=192.168.32.127
$ kubectl uncordon $NODE
```
8. 逐步替換其他節點
替換其他節點,只需從第 `3-7` 步執行。將 NODE 變量改成需要替換的k8s節點名稱
9. 修改cilium配置文件
>[info] 集群中所有節點都替換完成后才執行此步驟
```shell
# 獲取當前版本號
cilium_version=$(helm -n kube-system ls | awk '/cilium/ {print $NF}')
echo $cilium_version
# 備份上一次安裝的參數
helm -n kube-system get values cilium > cilium_custom.yaml
sed -i '1d' cilium_custom.yaml
# 添加參數
cat <<EOF | tee -a cilium_custom.yaml >> /dev/null
# 在 Cilium BPF 數據路徑中配置 kube-proxy 替換
kubeProxyReplacement: "strict"
# 用于 kube-proxy 替換的 healthz 服務器綁定地址
kubeProxyReplacementHealthzBindAddr: "0.0.0.0:10256"
EOF
# 修改參數
helm -n kube-system upgrade cilium cilium/cilium --version $cilium_version -f cilium_custom.yaml
```
10. 刪除cilium節點配置
```shell
$ kubectl -n kube-system delete ciliumnodeconfig kube-proxy-replacement-strict
```
11. 卸載kube-proxy服務
```shell
$ kubectl -n kube-system delete ds kube-proxy
$ kubectl -n kube-system delete cm kube-proxy
$ iptables-save | grep -v KUBE | iptables-restore
```
12. 取消節點 label 標簽
```shell
$ kubectl label node --all --overwrite 'io.cilium.migration/kube-proxy-replacement-'
```
- 前言
- 架構
- 部署
- kubeadm部署
- kubeadm擴容節點
- 二進制安裝基礎組件
- 添加master節點
- 添加工作節點
- 選裝插件安裝
- Kubernetes使用
- k8s與dockerfile啟動參數
- hostPort與hostNetwork異同
- 應用上下線最佳實踐
- 進入容器命名空間
- 主機與pod之間拷貝
- events排序問題
- k8s會話保持
- 容器root特權
- CNI插件
- calico
- calicoctl安裝
- calico網絡通信
- calico更改pod地址范圍
- 新增節點網卡名不一致
- 修改calico模式
- calico數據存儲遷移
- 啟用 kubectl 來管理 Calico
- calico卸載
- cilium
- cilium架構
- cilium/hubble安裝
- cilium網絡路由
- IP地址管理(IPAM)
- Cilium替換KubeProxy
- NodePort運行DSR模式
- IP地址偽裝
- ingress使用
- nginx-ingress
- ingress安裝
- ingress高可用
- helm方式安裝
- 基本使用
- Rewrite配置
- tls安全路由
- ingress發布管理
- 代理k8s集群外的web應用
- ingress自定義日志
- ingress記錄真實IP地址
- 自定義參數
- traefik-ingress
- traefik名詞概念
- traefik安裝
- traefik初次使用
- traefik路由(IngressRoute)
- traefik中間件(middlewares)
- traefik記錄真實IP地址
- cert-manager
- 安裝教程
- 頒布者CA
- 創建證書
- 外部存儲
- 對接NFS
- 對接ceph-rbd
- 對接cephfs
- 監控平臺
- Prometheus
- Prometheus安裝
- grafana安裝
- Prometheus配置文件
- node_exporter安裝
- kube-state-metrics安裝
- Prometheus黑盒監控
- Prometheus告警
- grafana儀表盤設置
- 常用監控配置文件
- thanos
- Prometheus
- Sidecar組件
- Store Gateway組件
- Querier組件
- Compactor組件
- Prometheus監控項
- grafana
- Querier對接grafana
- alertmanager
- Prometheus對接alertmanager
- 日志中心
- filebeat安裝
- kafka安裝
- logstash安裝
- elasticsearch安裝
- elasticsearch索引生命周期管理
- kibana安裝
- event事件收集
- 資源預留
- 節點資源預留
- imagefs與nodefs驗證
- 資源預留 vs 驅逐 vs OOM
- scheduler調度原理
- Helm
- Helm安裝
- Helm基本使用
- 安全
- apiserver審計日志
- RBAC鑒權
- namespace資源限制
- 加密Secret數據
- 服務網格
- 備份恢復
- Velero安裝
- 備份與恢復
- 常用維護操作
- container runtime
- 拉取私有倉庫鏡像配置
- 拉取公網鏡像加速配置
- runtime網絡代理
- overlay2目錄占用過大
- 更改Docker的數據目錄
- Harbor
- 重置Harbor密碼
- 問題處理
- 關閉或開啟Harbor的認證
- 固定harbor的IP地址范圍
- ETCD
- ETCD擴縮容
- ETCD常用命令
- ETCD數據空間壓縮清理
- ingress
- ingress-nginx header配置
- kubernetes
- 驗證yaml合法性
- 切換KubeProxy模式
- 容器解析域名
- 刪除節點
- 修改鏡像倉庫
- 修改node名稱
- 升級k8s集群
- 切換容器運行時
- apiserver接口
- 其他
- 升級內核
- k8s組件性能分析
- ETCD
- calico
- calico健康檢查失敗
- Harbor
- harbor同步失敗
- Kubernetes
- 資源Terminating狀態
- 啟動容器報錯