# 組件生命周期(了解)
組件生命周期和Vue實例生命周期很類似。也有`template`選項。不過組件沒有`el`選項。這個例子中我們用父子組件,且子組件是否顯示,取決于父組件的一個數據。
```
<div id="app"></div>
<script>
var MyKids = {
template:`<span>這是孩子組件</span>`,
}
var MyParent = {
data(){
return {
show:true
}
},
template:`<div>
這是父親組件
<my-kids v-if="show"></my-kids>
<button @click="toggle">切換</button>
</div>`,
methods:{
toggle(){
this.show= !this.show;
}
},
components:{
MyKids
},
}
var vm = new Vue(MyParent).$mount('#app')
</script>
```
## 添加生命周期
我們對這兩個組件分別添加生命周期函數。代碼改為下面效果
```
var MyKids = {
template:`<span>這是孩子組件</span>`,
beforeCreate() {
console.log('MyKids beforeCreate')
},
created() {
console.log('MyKids created')
},
beforeMount() {
console.log('MyKids beforeMount')
},
mounted(){
console.log('MyKids mounted')
},
beforeUpdate() {
console.log('MyKids beforeUpdate')
},
updated() {
console.log('MyKids updated')
},
beforeDestroy() {
console.log('MyKids beforeDestroy')
},
destroyed(){
console.log('MyKids destroyed')
}
}
var MyParent = {
data(){
return {
show:true
}
},
template:`<div>
這是父親組件
<my-kids v-if="show"></my-kids>
<button @click="toggle">切換</button>
</div>`,
methods:{
toggle(){
this.show= !this.show;
}
},
components:{
MyKids
},
beforeCreate() {
console.log('MyParent beforeCreate')
},
created() {
console.log('MyParent created')
},
beforeMount() {
console.log('MyParent beforeMount')
},
mounted(){
console.log('MyParent mounted')
},
beforeUpdate() {
console.log('MyParent beforeUpdate')
},
updated() {
console.log('MyParent updated')
},
beforeDestroy() {
console.log('MyParent beforeDestroy')
},
destroyed(){
console.log('MyParent destroyed')
}
}
var vm = new Vue(MyParent).$mount('#app')
```
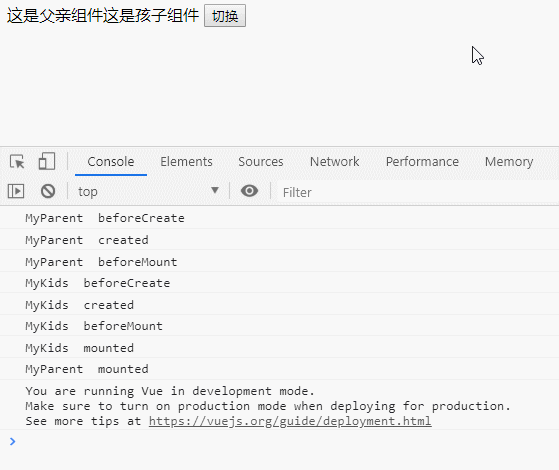
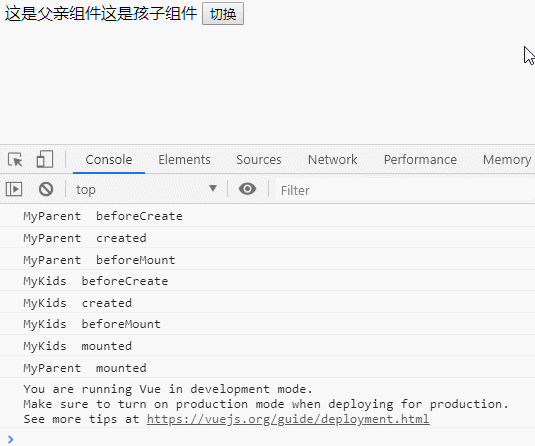
## 效果如下

## 單擊切換
單擊切換其實就是將show的值取反,而組件`<my-kids></my-kids>` 是通過`v-if`來進行**創建**和**銷毀**的。注意這里并非是通過`v-show` 。`v-show` 僅僅只是讓數據顯示和隱藏,更新dom。我們這里是為了能夠體驗到組件的**銷毀和創建。**
********
# 總結
嵌套組件在進行渲染時,是**深度渲染**,即在組件中是到嵌套其它的組件,那么先渲染嵌套的組件待渲染完畢后,再結束當前組件的渲染。最終呈現到頁面中。
# 思考題
## 如果換成v-show效果又是怎么樣的?