
[代碼地址鏈接](https://github.com/fujiazhang/vuex/tree/master/my-project)
看了vuex源碼后,覺得vuex很簡單,但是又比redux復雜一點,想動手寫寫,這篇文章會記錄寫一個簡易版的vuex,能在項目中直接替換用我們手寫的vuex替代真實的vuex,目前沒有Map語法糖的輔助函數,后面有時間的話會加上。
首先在main.js中導入,我們自己的vuex.js,同時定義一些Store的 options 供測試,這里的 new Vuex.Store和里面的state、action、mutations等等使用都和官方的使用無差異,不必過多糾結。
```
import Vuex from '../vuex/index'
Vue.use(Vuex)
let store = new Vuex.Store({
state: {
count: 520
},
getters: {
getStateCount(state) {
return state.count
}
},
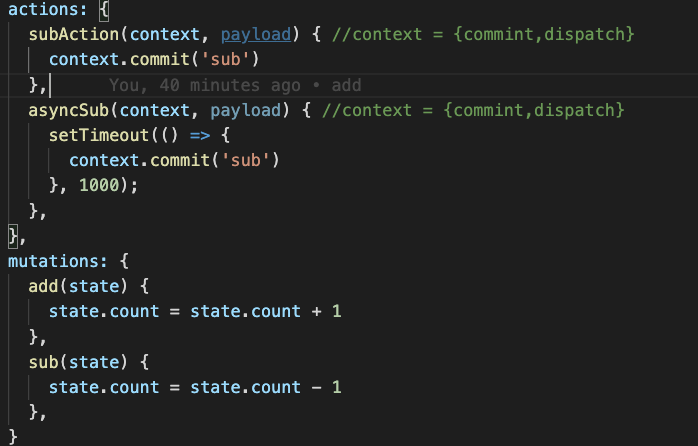
actions: {
subAction(context, payload) { //context = {commint,dispatch}
context.commit('sub')
},
asyncSub(context, payload) { //context = {commint,dispatch}
setTimeout(() = >{
context.commit('sub')
},
1000);
},
},
mutations: {
add(state) {
state.count = state.count + 1
},
sub(state) {
state.count = state.count - 1
},
}
},
Vue)
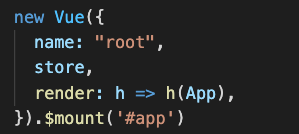
new Vue({
name: "root",
store,
render: h = >h(App),
}).$mount('#app')
```
這里 Vue.use是vue提供給第三方插件的預留接口,源碼中,Vue.use接收一個第三方的插件作為參數,同時回去調用install方法,所以我們要在插件中寫好install方法,共外面注冊插件的use方法的時候使用。
在我們自己的vuex/index.js中,導出一個class store 和install方法(供Vus.use自動調用)
```
class Store {
}
// 插件的作用 需要在所有的組件中添加 $store對象
// 讓所有的組件中可以使用訪問到 this.$store對象
const install = (v) = >{
Vue = v
Vue.mixin({
beforeCreate() {
console.log(this.$options.name)
if (this.$options && this.$options.store) { //root
this.$store = this.$options.store
} else {
this.$store = this.$parent && this.$parent.$store
}
}
})
}
```
這里install方法的是一個箭頭函數,參數接收一個 vue作為參數,同時,把這個vue參數,保存一下,存到外面(供后面實現響應式數據時用),調用Vue.mixin,在每一個組件生成前調用,判斷一下當前組件是否有this.$options.store這個這個玩意兒(根組件是有的,在初始化的時候傳了)
其他組件都沒有,所以判斷一下,如果this.$options.store存在那么就是根組件 直接將this.$store = this.$options.store,如果沒有,就去父組件里面找,因為我們父組件都是一層一層的渲染下去,所以可以保證子組件一定能找到store。
總結一下 這個install方法 就一個作用:給所有組件中 添加$store 對象。
在 class Store 中,代碼如下:
```
constructor(options) {
this.vm = new Vue({ //將options.state放到vue的data里 以便監聽數據
data: {
state: options.state
}
})
// getters
let getters = options.getters
this.getters = {}
Object.keys(getters).forEach(getterName = >{
Object.defineProperty(this.getters, getterName, {
get: () = >{
return getters[getterName](this.state)
}
})
})
// actions
let actions = options.actions this.actions = {}
Object.keys(actions).forEach(actionName = >{
this.actions[actionName] = (payload) = >{
actions[actionName](this, payload)
}
})
// mutations
let mutations = options.mutations this.mutations = {}
Object.keys(mutations).forEach(mutationName = >{
this.mutations[mutationName] = (payload) = >{
mutations[mutationName](this.state, payload)
}
})
}
dispatch(type, payload) {
this.actions[type](payload)
}
commit(type, payload) {
this.mutations[type](payload)
}
get state() {
return this.vm.state
}
}
```
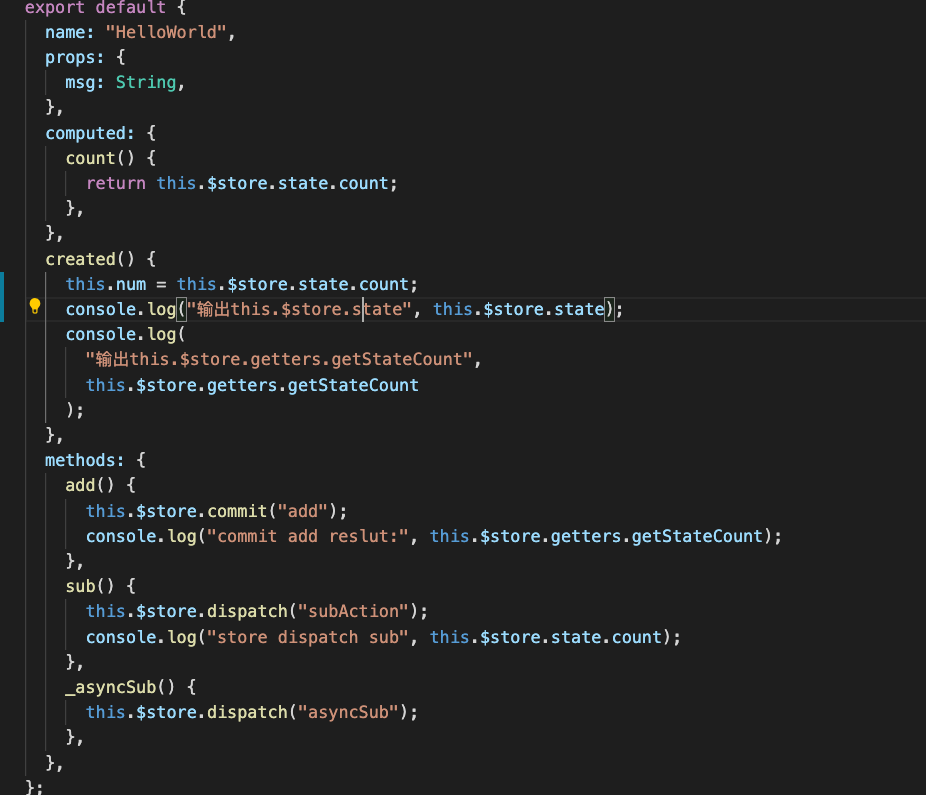
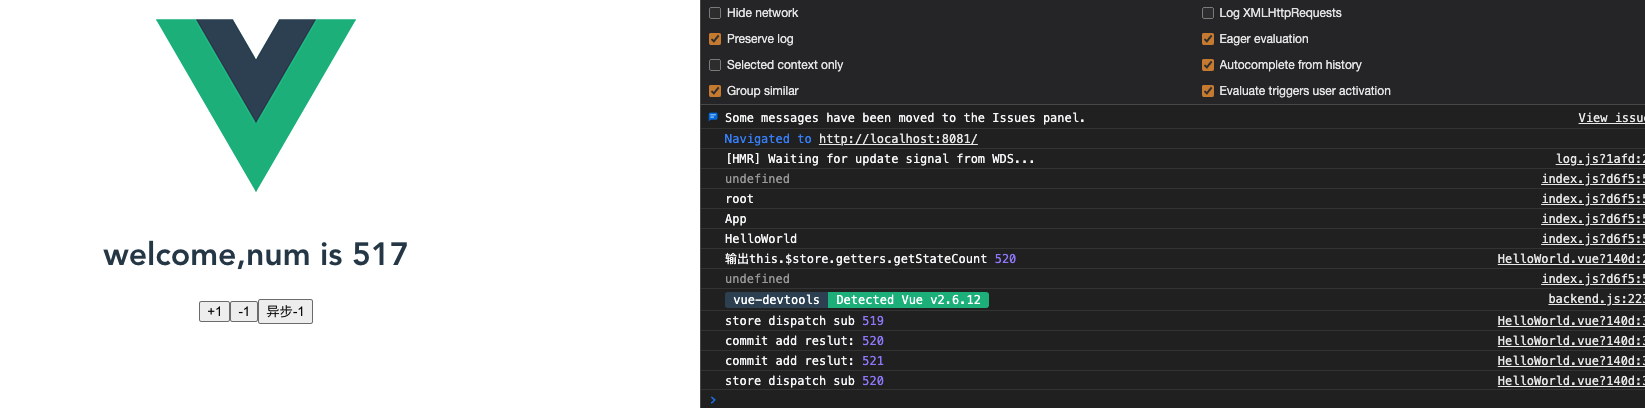
此時的界面代碼:
說一下 class Store 中代碼的實現:
```
this.vm = new Vue({
data: {
state: options.state
}
})
```
這里是將接收到初始化參數options.state放到vue的data里 以便監聽數據與響應。
下面是實現getters,其實就是,將傳進來的參數options.getters 復制一份到我們得this.getters,然后獲取返回到我們store中的的值。
```
// getters
let getters = options.getters
this.getters = {}
Object.keys(getters).forEach(getterName = >{
Object.defineProperty(this.getters, getterName, {
get: () = >{
return getters[getterName](this.state)
}
})
})
```
下面的actIons和mutations的實現其實方法都差不多類似
```
// actions
let actions = options.actions
this.actions = {}
Object.keys(actions).forEach(actionName = >{
this.actions[actionName] = (payload) = >{
actions[actionName](this, payload)
}
})
// mutations
let mutations = options.mutations
this.mutations = {}
Object.keys(mutations).forEach(mutationName = >{
this.mutations[mutationName] = (payload) = >{
mutations[mutationName](this.state, payload)
}
})
```
主要需要 dispatch和commit函數
```
dispatch(type, payload) {
this.actions[type](payload)
}
commit(type, payload) {
this.mutations[type](payload)
}
```
需要注意一點的是,mutations接受的參數是state ,而actions接受的參數是 ({commint,dispatch},payload)。如下:
所以要定義好 dispatch和commit函數。
嘻嘻,是不是很簡單,和官方相比,也就差一個Module和Map語法糖,但是基本的都有了哦。
**總結:Vuex的雙向綁定通過調用 new Vue實現,然后通過 Vue.mixin 注入到Vue組件的生命周期中,再通過劫持state.get將數據放入組件中**
參考資料:
>[vuex 源碼:如何實現一個簡單的 vuex](https://juejin.im/post/5a7a935851882524713dcd05)
>[從0開始寫一個自己的Vuex](https://segmentfault.com/a/1190000010888395)
>[Vue 源碼(三) —— Vuex](https://zhuanlan.zhihu.com/p/48516116)
>[淺談Vue.use](https://segmentfault.com/a/1190000012296163)
>[Vuex官方文檔](https://vuex.vuejs.org/zh/guide/)
>[vuex Github倉庫](https://github.com/vuejs/vuex)
- 前言
- 工作中的一些記錄
- 破解快手直播間的webSocket的連接
- 快手「反」反爬蟲的研究記錄
- HTML AND CSS
- 遇到的一些還行的css筆試題
- css常見面試題
- JavaScript 深度剖析
- ES6到ESNext新特性
- 關于http與緩存
- 關于頁面性能
- 關于瀏覽器的重排(reflow、layout)與重繪
- 手寫函數節流
- 手寫promise
- 手寫函數防抖
- 手寫圖片懶加載
- 手寫jsonp
- 手寫深拷貝
- 手寫new
- 數據結構和算法
- 前言
- 時間復雜度
- 棧
- 隊列
- 集合
- 字典
- 鏈表
- 樹
- 圖
- 堆
- 排序
- 搜索
- Webpack
- Webpack原理與實踐
- Vue
- Vuejs的Virtual Dom的源碼實現
- minVue
- Vuex實現原理
- 一道關于diff算法的面試題
- Vue2源碼筆記:源碼目錄設計
- vue-router源碼分析(v4.x)
- React及周邊
- 深入理解redux(一步步實現一個 redux)
- React常見面試題匯總
- Taro、小程序等
- TypeScript
- CI/CD
- docker踩坑筆記
- jenkins
- 最后