
使用克隆可以為我們快速地構建出一個已有對象的副本,它屬于 Java 基礎的一部分,也是面試中常被問到的知識點之一。
我們本課時的面試題是,什么是淺克隆和深克隆?如何實現克隆?
#### 典型回答
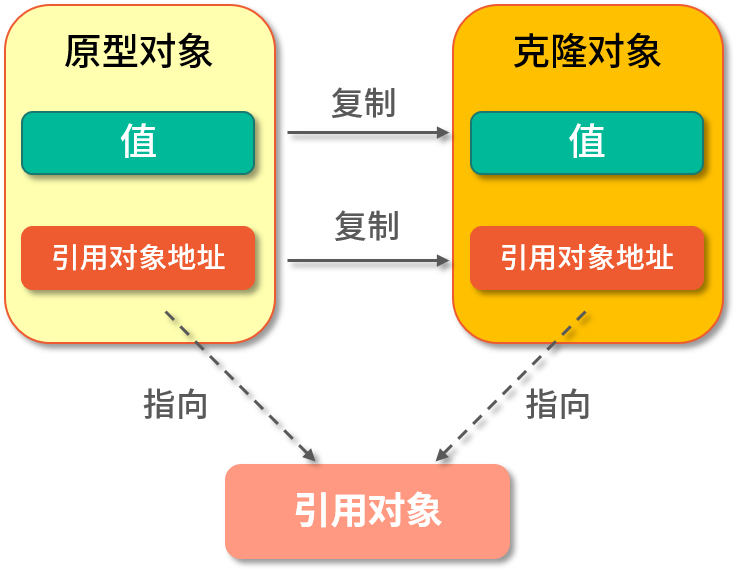
淺克隆(Shadow Clone)是把原型對象中成員變量為值類型的屬性都復制給克隆對象,把原型對象中成員變量為引用類型的引用地址也復制給克隆對象,也就是原型對象中如果有成員變量為引用對象,則此引用對象的地址是共享給原型對象和克隆對象的。
簡單來說就是淺克隆只會復制原型對象,但不會復制它所引用的對象,如下圖所示:
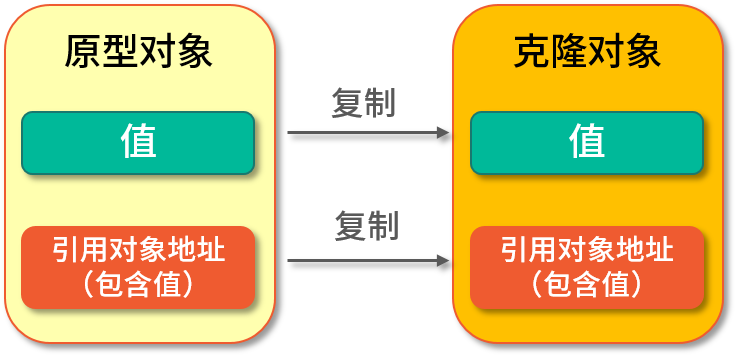
深克隆(Deep Clone)是將原型對象中的所有類型,無論是值類型還是引用類型,都復制一份給克隆對象,也就是說深克隆會把原型對象和原型對象所引用的對象,都復制一份給克隆對象,如下圖所示:
在 Java 語言中要實現克隆則需要實現 Cloneable 接口,并重寫 Object 類中的 clone() 方法,實現代碼如下:
```
public class CloneExample {
public static void main(String[] args) throws CloneNotSupportedException {
// 創建被賦值對象
People p1 = new People();
p1.setId(1);
p1.setName("Java");
// 克隆 p1 對象
People p2 = (People) p1.clone();
// 打印名稱
System.out.println("p2:" + p2.getName());
}
static class People implements Cloneable {
// 屬性
private Integer id;
private String name;
/**
* 重寫 clone 方法
* @throws CloneNotSupportedException
*/
@Override
protected Object clone() throws CloneNotSupportedException {
return super.clone();
}
public Integer getId() {
return id;
}
public void setId(Integer id) {
this.id = id;
}
public String getName() {
return name;
}
public void setName(String name) {
this.name = name;
}
}
}
```
以上程序執行的結果為:
```
p2:Java
```
#### 考點分析
克隆相關的面試題不算太難,但因為使用頻率不高,因此很容易被人忽略,面試官通常會在一面或者二面的時候問到此知識點,和它相關的面試題還有以下這些:
1. 在 java.lang.Object 中對 clone() 方法的約定有哪些?
2. Arrays.copyOf() 是深克隆還是淺克隆?
3.
深克隆的實現方式有幾種?
4.
Java 中的克隆為什么要設計成,既要實現空接口 Cloneable,還要重寫 Object 的 clone() 方法?
#### 知識擴展
* [ ] clone() 源碼分析
要想真正的了解克隆,首先要從它的源碼入手,代碼如下:
```
/**
* Creates and returns a copy of this object. The precise meaning
* of "copy" may depend on the class of the object. The general
* intent is that, for any object {@code x}, the expression:
* <blockquote>
* <pre>
* x.clone() != x</pre></blockquote>
* will be true, and that the expression:
* <blockquote>
* <pre>
* x.clone().getClass() == x.getClass()</pre></blockquote>
* will be {@code true}, but these are not absolute requirements.
* While it is typically the case that:
* <blockquote>
* <pre>
* x.clone().equals(x)</pre></blockquote>
* will be {@code true}, this is not an absolute requirement.
* <p>
* By convention, the returned object should be obtained by calling
* {@code super.clone}. If a class and all of its superclasses (except
* {@code Object}) obey this convention, it will be the case that
* {@code x.clone().getClass() == x.getClass()}.
* <p>
* By convention, the object returned by this method should be independent
* of this object (which is being cloned). To achieve this independence,
* it may be necessary to modify one or more fields of the object returned
* by {@code super.clone} before returning it. Typically, this means
* copying any mutable objects that comprise the internal "deep structure"
* of the object being cloned and replacing the references to these
* objects with references to the copies. If a class contains only
* primitive fields or references to immutable objects, then it is usually
* the case that no fields in the object returned by {@code super.clone}
* need to be modified.
* <p>
* ......
*/
protected native Object clone() throws CloneNotSupportedException;
```
從以上源碼的注釋信息中我們可以看出,Object 對 clone() 方法的約定有三條:
* 對于所有對象來說,x.clone() !=x 應當返回 true,因為克隆對象與原對象不是同一個對象;
*
對于所有對象來說,x.clone().getClass() == x.getClass() 應當返回 true,因為克隆對象與原對象的類型是一樣的;
*
對于所有對象來說,x.clone().equals(x) 應當返回 true,因為使用 equals 比較時,它們的值都是相同的。
除了注釋信息外,我們看 clone() 的實現方法,發現 clone() 是使用 native 修飾的本地方法,因此執行的性能會很高,并且它返回的類型為 Object,因此在調用克隆之后要把對象強轉為目標類型才行。
* [ ] Arrays.copyOf()
如果是數組類型,我們可以直接使用 Arrays.copyOf() 來實現克隆,實現代碼如下:
```
People[] o1 = {new People(1, "Java")};
People[] o2 = Arrays.copyOf(o1, o1.length);
// 修改原型對象的第一個元素的值
o1[0].setName("Jdk");
System.out.println("o1:" + o1[0].getName());
System.out.println("o2:" + o2[0].getName());
```
以上程序的執行結果為:
```
o1:Jdk
o2:Jdk
```
從結果可以看出,我們在修改克隆對象的第一個元素之后,原型對象的第一個元素也跟著被修改了,這說明 Arrays.copyOf() 其實是一個淺克隆。
因為數組比較特殊數組本身就是引用類型,因此在使用 Arrays.copyOf() 其實只是把引用地址復制了一份給克隆對象,如果修改了它的引用對象,那么指向它的(引用地址)所有對象都會發生改變,因此看到的結果是,修改了克隆對象的第一個元素,原型對象也跟著被修改了。
深克隆實現方式匯總
深克隆的實現方式有很多種,大體可以分為以下幾類:
* 所有對象都實現克隆方法;
* 通過構造方法實現深克隆;
* 使用 JDK 自帶的字節流實現深克隆;
* 使用第三方工具實現深克隆,比如 Apache Commons Lang;
* 使用 JSON 工具類實現深克隆,比如 Gson、FastJSON 等。
接下來我們分別來實現以上這些方式,在開始之前先定義一個公共的用戶類,代碼如下:
```
/**
* 用戶類
*/
public class People {
private Integer id;
private String name;
private Address address; // 包含 Address 引用對象
// 忽略構造方法、set、get 方法
}
/**
* 地址類
*/
public class Address {
private Integer id;
private String city;
// 忽略構造方法、set、get 方法
}
```
可以看出在 People 對象中包含了一個引用對象 Address。
* [ ] 1.所有對象都實現克隆
這種方式我們需要修改 People 和 Address 類,讓它們都實現 Cloneable 的接口,讓所有的引用對象都實現克隆,從而實現 People 類的深克隆,代碼如下:
```
public class CloneExample {
public static void main(String[] args) throws CloneNotSupportedException {
// 創建被賦值對象
Address address = new Address(110, "北京");
People p1 = new People(1, "Java", address);
// 克隆 p1 對象
People p2 = p1.clone();
// 修改原型對象
p1.getAddress().setCity("西安");
// 輸出 p1 和 p2 地址信息
System.out.println("p1:" + p1.getAddress().getCity() +
" p2:" + p2.getAddress().getCity());
}
/**
* 用戶類
*/
static class People implements Cloneable {
private Integer id;
private String name;
private Address address;
/**
* 重寫 clone 方法
* @throws CloneNotSupportedException
*/
@Override
protected People clone() throws CloneNotSupportedException {
People people = (People) super.clone();
people.setAddress(this.address.clone()); // 引用類型克隆賦值
return people;
}
// 忽略構造方法、set、get 方法
}
/**
* 地址類
*/
static class Address implements Cloneable {
private Integer id;
private String city;
/**
* 重寫 clone 方法
* @throws CloneNotSupportedException
*/
@Override
protected Address clone() throws CloneNotSupportedException {
return (Address) super.clone();
}
// 忽略構造方法、set、get 方法
}
}
```
以上程序的執行結果為:
```
p1:西安 p2:北京
```
從結果可以看出,當我們修改了原型對象的引用屬性之后,并沒有影響克隆對象,這說明此對象已經實現了深克隆。
* [ ] 2.通過構造方法實現深克隆
《Effective Java》 中推薦使用構造器(Copy Constructor)來實現深克隆,如果構造器的參數為基本數據類型或字符串類型則直接賦值,如果是對象類型,則需要重新 new 一個對象,實現代碼如下:
```
public class SecondExample {
public static void main(String[] args) throws CloneNotSupportedException {
// 創建對象
Address address = new Address(110, "北京");
People p1 = new People(1, "Java", address);
// 調用構造函數克隆對象
People p2 = new People(p1.getId(), p1.getName(),
new Address(p1.getAddress().getId(), p1.getAddress().getCity()));
// 修改原型對象
p1.getAddress().setCity("西安");
// 輸出 p1 和 p2 地址信息
System.out.println("p1:" + p1.getAddress().getCity() +
" p2:" + p2.getAddress().getCity());
}
/**
* 用戶類
*/
static class People {
private Integer id;
private String name;
private Address address;
// 忽略構造方法、set、get 方法
}
/**
* 地址類
*/
static class Address {
private Integer id;
private String city;
// 忽略構造方法、set、get 方法
}
}
```
以上程序的執行結果為:
```
p1:西安 p2:北京
```
從結果可以看出,當我們修改了原型對象的引用屬性之后,并沒有影響克隆對象,這說明此對象已經實現了深克隆。
* [ ] 3.通過字節流實現深克隆
通過 JDK 自帶的字節流實現深克隆的方式,是先將要原型對象寫入到內存中的字節流,然后再從這個字節流中讀出剛剛存儲的信息,來作為一個新的對象返回,那么這個新對象和原型對象就不存在任何地址上的共享,這樣就實現了深克隆,代碼如下:
```
import java.io.*;
public class ThirdExample {
public static void main(String[] args) throws CloneNotSupportedException {
// 創建對象
Address address = new Address(110, "北京");
People p1 = new People(1, "Java", address);
// 通過字節流實現克隆
People p2 = (People) StreamClone.clone(p1);
// 修改原型對象
p1.getAddress().setCity("西安");
// 輸出 p1 和 p2 地址信息
System.out.println("p1:" + p1.getAddress().getCity() +
" p2:" + p2.getAddress().getCity());
}
/**
* 通過字節流實現克隆
*/
static class StreamClone {
public static <T extends Serializable> T clone(People obj) {
T cloneObj = null;
try {
// 寫入字節流
ByteArrayOutputStream bo = new ByteArrayOutputStream();
ObjectOutputStream oos = new ObjectOutputStream(bo);
oos.writeObject(obj);
oos.close();
// 分配內存,寫入原始對象,生成新對象
ByteArrayInputStream bi = new ByteArrayInputStream(bo.toByteArray());//獲取上面的輸出字節流
ObjectInputStream oi = new ObjectInputStream(bi);
// 返回生成的新對象
cloneObj = (T) oi.readObject();
oi.close();
} catch (Exception e) {
e.printStackTrace();
}
return cloneObj;
}
}
/**
* 用戶類
*/
static class People implements Serializable {
private Integer id;
private String name;
private Address address;
// 忽略構造方法、set、get 方法
}
/**
* 地址類
*/
static class Address implements Serializable {
private Integer id;
private String city;
// 忽略構造方法、set、get 方法
}
}
```
以上程序的執行結果為:
```
p1:西安 p2:北京
```
此方式需要注意的是,由于是通過字節流序列化實現的深克隆,因此每個對象必須能被序列化,必須實現 Serializable 接口,標識自己可以被序列化,否則會拋出異常 (java.io.NotSerializableException)。
* [ ] 4.通過第三方工具實現深克隆
本課時使用 Apache Commons Lang 來實現深克隆,實現代碼如下:
```
import org.apache.commons.lang3.SerializationUtils;
import java.io.Serializable;
/**
* 深克隆實現方式四:通過 apache.commons.lang 實現
*/
public class FourthExample {
public static void main(String[] args) throws CloneNotSupportedException {
// 創建對象
Address address = new Address(110, "北京");
People p1 = new People(1, "Java", address);
// 調用 apache.commons.lang 克隆對象
People p2 = (People) SerializationUtils.clone(p1);
// 修改原型對象
p1.getAddress().setCity("西安");
// 輸出 p1 和 p2 地址信息
System.out.println("p1:" + p1.getAddress().getCity() +
" p2:" + p2.getAddress().getCity());
}
/**
* 用戶類
*/
static class People implements Serializable {
private Integer id;
private String name;
private Address address;
// 忽略構造方法、set、get 方法
}
/**
* 地址類
*/
static class Address implements Serializable {
private Integer id;
private String city;
// 忽略構造方法、set、get 方法
}
}
```
以上程序的執行結果為:
```
p1:西安 p2:北京
```
可以看出此方法和第三種實現方式類似,都需要實現 Serializable 接口,都是通過字節流的方式實現的,只不過這種實現方式是第三方提供了現成的方法,讓我們可以直接調用。
* [ ] 5.通過 JSON 工具類實現深克隆
本課時我們使用 Google 提供的 JSON 轉化工具 Gson 來實現,其他 JSON 轉化工具類也是類似的,實現代碼如下:
```
import com.google.gson.Gson;
/**
* 深克隆實現方式五:通過 JSON 工具實現
*/
public class FifthExample {
public static void main(String[] args) throws CloneNotSupportedException {
// 創建對象
Address address = new Address(110, "北京");
People p1 = new People(1, "Java", address);
// 調用 Gson 克隆對象
Gson gson = new Gson();
People p2 = gson.fromJson(gson.toJson(p1), People.class);
// 修改原型對象
p1.getAddress().setCity("西安");
// 輸出 p1 和 p2 地址信息
System.out.println("p1:" + p1.getAddress().getCity() +
" p2:" + p2.getAddress().getCity());
}
/**
* 用戶類
*/
static class People {
private Integer id;
private String name;
private Address address;
// 忽略構造方法、set、get 方法
}
/**
* 地址類
*/
static class Address {
private Integer id;
private String city;
// 忽略構造方法、set、get 方法
}
}
```
以上程序的執行結果為:
```
p1:西安 p2:北京
```
使用 JSON 工具類會先把對象轉化成字符串,再從字符串轉化成新的對象,因為新對象是從字符串轉化而來的,因此不會和原型對象有任何的關聯,這樣就實現了深克隆,其他類似的 JSON 工具類實現方式也是一樣的。
克隆設計理念猜想
對于克隆為什么要這樣設計,官方沒有直接給出答案,我們只能憑借一些經驗和源碼文檔來試著回答一下這個問題。Java 中實現克隆需要兩個主要的步驟,一是 實現 Cloneable 空接口,二是重寫 Object 的 clone() 方法再調用父類的克隆方法 (super.clone()),那為什么要這么做?
從源碼中可以看出 Cloneable 接口誕生的比較早,JDK 1.0 就已經存在了,因此從那個時候就已經有克隆方法了,那我們怎么來標識一個類級別對象擁有克隆方法呢?克隆雖然重要,但我們不能給每個類都默認加上克隆,這顯然是不合適的,那我們能使用的手段就只有這幾個了:
* 在類上新增標識,此標識用于聲明某個類擁有克隆的功能,像 final 關鍵字一樣;
* 使用 Java 中的注解;
* 實現某個接口;
* 繼承某個類。
先說第一個,為了一個重要但不常用的克隆功能, 單獨新增一個類標識,這顯然不合適;再說第二個,因為克隆功能出現的比較早,那時候還沒有注解功能,因此也不能使用;第三點基本滿足我們的需求,第四點和第一點比較類似,為了一個克隆功能需要犧牲一個基類,并且 Java 只能單繼承,因此這個方案也不合適。采用排除法,無疑使用實現接口的方式是那時最合理的方案了,而且在 Java 語言中一個類可以實現多個接口。
* [ ] 那為什么要在 Object 中添加一個 clone() 方法呢?
因為 clone() 方法語義的特殊性,因此最好能有 JVM 的直接支持,既然要 JVM 直接支持,就要找一個 API 來把這個方法暴露出來才行,最直接的做法就是把它放入到一個所有類的基類 Object 中,這樣所有類就可以很方便地調用到了。
#### 小結
本課時我們講了淺克隆和深克隆的概念,以及 Object 對 clone() 方法的約定;還演示了數組的 copyOf() 方法其實為淺克隆,以及深克隆的 5 種實現方式;最后我們講了 Java 語言中克隆的設計思路猜想,希望這些內容能切實的幫助到你。
#### 課后問答
* 1、Arrays.copyOf1.8中測試結論還是淺拷貝
講師回復: Arrays.copyOf() 是淺克隆
* 2、PeoplenewPeople (1,2,3);People p2;p2 = p1;這樣算克隆嗎
講師回復: 這應該叫賦值吧
* 3、Arrays.copyOf 的 執行結果寫錯了吧
講師回復: 嗯,沒有啊,Arrays.copyOf() 淺克隆修改一個另一個也變了。
- 前言
- 開篇詞
- 開篇詞:大廠技術面試“潛規則”
- 模塊一:Java 基礎
- 第01講:String 的特點是什么?它有哪些重要的方法?
- 第02講:HashMap 底層實現原理是什么?JDK8 做了哪些優化?
- 第03講:線程的狀態有哪些?它是如何工作的?
- 第04講:詳解 ThreadPoolExecutor 的參數含義及源碼執行流程?
- 第05講:synchronized 和 ReentrantLock 的實現原理是什么?它們有什么區別?
- 第06講:談談你對鎖的理解?如何手動模擬一個死鎖?
- 第07講:深克隆和淺克隆有什么區別?它的實現方式有哪些?
- 第08講:動態代理是如何實現的?JDK Proxy 和 CGLib 有什么區別?
- 第09講:如何實現本地緩存和分布式緩存?
- 第10講:如何手寫一個消息隊列和延遲消息隊列?
- 模塊二:熱門框架
- 第11講:底層源碼分析 Spring 的核心功能和執行流程?(上)
- 第12講:底層源碼分析 Spring 的核心功能和執行流程?(下)
- 第13講:MyBatis 使用了哪些設計模式?在源碼中是如何體現的?
- 第14講:SpringBoot 有哪些優點?它和 Spring 有什么區別?
- 第15講:MQ 有什么作用?你都用過哪些 MQ 中間件?
- 模塊三:數據庫相關
- 第16講:MySQL 的運行機制是什么?它有哪些引擎?
- 第17講:MySQL 的優化方案有哪些?
- 第18講:關系型數據和文檔型數據庫有什么區別?
- 第19講:Redis 的過期策略和內存淘汰機制有什么區別?
- 第20講:Redis 怎樣實現的分布式鎖?
- 第21講:Redis 中如何實現的消息隊列?實現的方式有幾種?
- 第22講:Redis 是如何實現高可用的?
- 模塊四:Java 進階
- 第23講:說一下 JVM 的內存布局和運行原理?
- 第24講:垃圾回收算法有哪些?
- 第25講:你用過哪些垃圾回收器?它們有什么區別?
- 第26講:生產環境如何排除和優化 JVM?
- 第27講:單例的實現方式有幾種?它們有什么優缺點?
- 第28講:你知道哪些設計模式?分別對應的應用場景有哪些?
- 第29講:紅黑樹和平衡二叉樹有什么區別?
- 第30講:你知道哪些算法?講一下它的內部實現過程?
- 模塊五:加分項
- 第31講:如何保證接口的冪等性?常見的實現方案有哪些?
- 第32講:TCP 為什么需要三次握手?
- 第33講:Nginx 的負載均衡模式有哪些?它的實現原理是什么?
- 第34講:Docker 有什么優點?使用時需要注意什么問題?
- 彩蛋
- 彩蛋:如何提高面試成功率?