
## 一、下載軟件
[https://www.elastic.co/cn/downloads/elasticsearch](https://www.elastic.co/cn/downloads/elasticsearch)
## 二、elasticsearch常見錯誤
### 2.1. root用戶啟動elasticsearch報錯
Elasticsearch為了安全考慮,不讓使用root啟動,解決方法新建一個用戶,用此用戶進行相關的操作。如果你用root啟動,會出現“java.lang.RuntimeException: can not runelasticsearch as root”錯誤,具體如下所示:

**需要創建新用戶來運行es**
#### 2.1.1. 創建新用戶
~~~
adduser [用戶名]
~~~
#### 2.1.2. 修改新用戶的密碼
~~~
passwd [用戶名]
~~~
#### 2.1.3. 授權sudo
**新創建的用戶并不能使用sudo命令,需要給他添加授權。**
1. 添加sudoers文件可寫權限
~~~
chmod -v u+w /etc/sudoers
~~~
2. 修改sudoers文件
~~~
vim /etc/sudoers
~~~
3. 在sudoers文件中找到如下位置并添加如下內容
**\[用戶名\]??? ALL=(ALL)??? ALL**(如需新用戶使用sudo時不用輸密碼,把最后一個**ALL**改為**NOPASSWD:ALL**即可)

4. 收回sudoers文件可寫權限
~~~
chmod -v u-w /etc/sudoers
~~~
#### 2.1.4. 賦值elasticsearch文件夾的權限給新用戶
改變文件夾及所有子文件(夾)所屬用戶和用戶組
~~~
chown -R zlt:zlt elasticsearch-6.6.1
~~~
### 2.2. JVM虛擬機內存不足
錯誤:“JavaHotSpot(TM) 64-Bit Server VM warning: INFO: error='Cannotallocate memory' (errno=12)”表示內存不足,其配置文件為config目錄下的jvm.options,默認為2g,可以修改為1g。
### 2.3. max\_map\_count過小
錯誤“max virtual memory areas vm.max\_map\_count \[65530\]is too low, increase to at least \[262144\]”,max\_map\_count文件包含限制一個進程可以擁有的VMA(虛擬內存區域)的數量,系統默認是65530,修改成655360。
~~~
#在/etc/sysctl.conf文件最后添加一行
vm.max_map_count=655360
#并執行命令
sysctl -p
~~~
### 2.4. max file descriptors過小
錯誤“max file descriptors \[65535\] for elasticsearchprocess is too low, increase to at least \[65536\]”,maxfile descriptors為最大文件描述符,設置其大于65536即可。
* 解決方法是修改/etc/security/limits.conf文件
> \* 代表所有用戶
> 
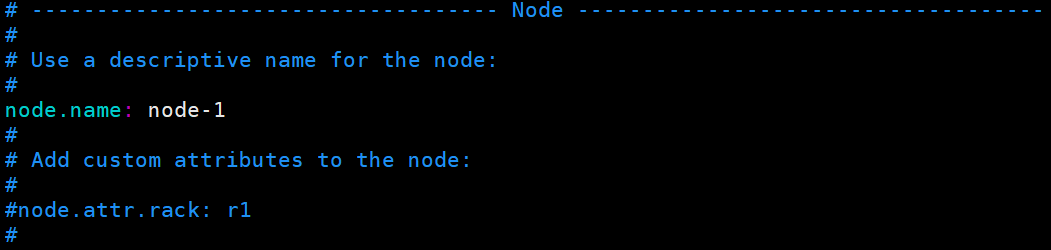
### 2.5. 外網訪問設置
修改config目錄下elasticsearch.yml文件
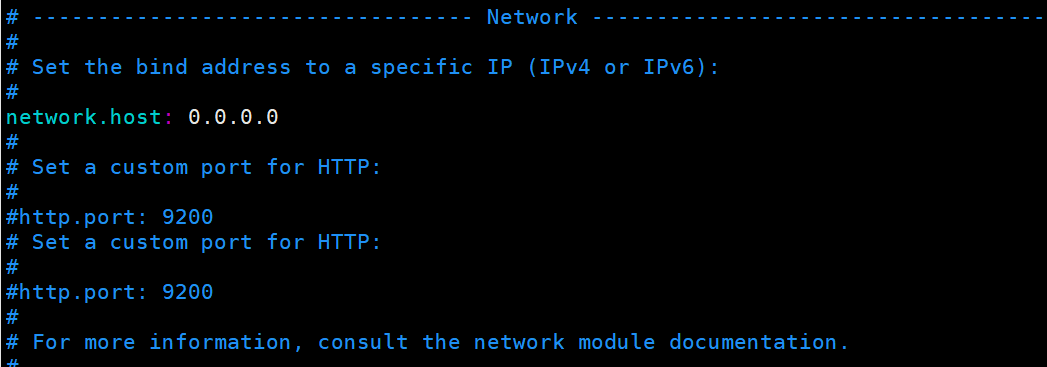

1. 修改network.host為`0.0.0.0`
2. 設置node.name參數
3. 設置cluster.initial\_master\_nodes參數:數組值需與參數node.name相同
### 2.6. elasticsearch-head插件連不上
修改config目錄下elasticsearch.yml文件,在最后新增以下兩個參數
~~~
http.cors.enabled: true
http.cors.allow-origin: "*"
~~~
### 2.7. 配置xpack
#### 2.7.1. 生成證書
到elastsearch的目錄下執行以下命令
~~~
bin/elasticsearch-certutil cert -out config/elastic-certificates.p12 -pass ""
~~~
#### 2.7.2. 修改配置
修改config目錄下elasticsearch.yml文件,在最后新增以下參數
~~~
xpack.security.enabled: true
xpack.security.transport.ssl.enabled: true
xpack.security.transport.ssl.verification_mode: certificate
xpack.security.transport.ssl.keystore.path: elastic-certificates.p12
xpack.security.transport.ssl.truststore.path: elastic-certificates.p12
~~~
## 三、最終elasticsearch.yml的配置
~~~
cluster.name: my-es
network.host: 0.0.0.0
node.name: node-1
cluster.initial_master_nodes: ["node-1"]
http.cors.enabled: true
http.cors.allow-origin: "*"
bootstrap.memory_lock: false
bootstrap.system_call_filter: false
xpack.security.enabled: true
xpack.security.transport.ssl.enabled: true
xpack.security.transport.ssl.verification_mode: certificate
xpack.security.transport.ssl.keystore.path: elastic-certificates.p12
xpack.security.transport.ssl.truststore.path: elastic-certificates.p12
~~~
## 四、運行elasticsearch
### 4.1 切換新用戶
~~~
su zlt
~~~
### 4.2 后臺運行
~~~
bin/elasticsearch -d
~~~
## 五、初始化密碼
到elastsearch的目錄下執行以下命令,兩種方式二選一
1. 自動生成密碼
~~~
bin/elasticsearch-setup-passwords auto
~~~
2. 手動設置密碼
~~~
bin/elasticsearch-setup-passwords interactive
~~~
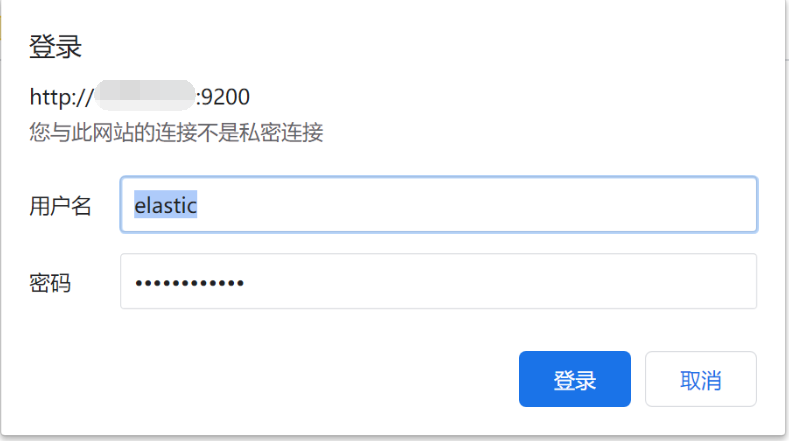
## 六、驗證密碼是否設置成功
打開瀏覽器,輸入我們的elasticsearch的網址,比如本地的[http://localhost:9200/](http://localhost:9200/)?,然后會彈出一個輸入框,讓我們輸入賬號和密碼
## 七、添加索引模板(非必需)
如果是單節點的es需要去掉索引的副本配置,不然會出現`unassigned_shards`

### 7.1. 更新已有索引(非必需)
> * 如果已存在**sys-log-**\* 或者**mysql-slowlog-**\* 的索引才需要執行以下語句
> * 需要修改IP和密碼
~~~
curl -XPUT http://192.168.28.130:9200/sys-log-*/_settings \
-H 'Content-Type: application/json' \
-u elastic:qEnNfKNujqNrOPD9q5kb \
-d '{
"index" : {
"number_of_replicas" : 0
}
}'
curl -XPUT http://192.168.28.130:9200/mysql-slowlog-*/_settings \
-H 'Content-Type: application/json' \
-u elastic:qEnNfKNujqNrOPD9q5kb \
-d '{
"index" : {
"number_of_replicas" : 0
}
}'
~~~
### 7.2. 設置索引模板
#### 7.2.1. 系統日志
> 需要修改IP和密碼
~~~
curl -XPUT http://192.168.28.130:9200/_template/template_sys_log \
-H 'Content-Type: application/json' \
-u elastic:qEnNfKNujqNrOPD9q5kb \
-d '{
"index_patterns" : ["sys-log-*"],
"order" : 0,
"settings" : {
"number_of_replicas" : 0
},
"mappings": {
"properties": {
"message": {
"type": "text",
"fields": {
"keyword": {
"type": "keyword",
"ignore_above": 256
}
},
"analyzer": "ik_max_word"
},
"pid": {
"type": "text"
},
"serverPort": {
"type": "text"
},
"logLevel": {
"type": "text"
},
"traceId": {
"type": "text"
}
}
}
}'
~~~
#### 7.2.2. 慢sql日志
> 需要修改IP和密碼
~~~
curl -XPUT http://192.168.28.130:9200/_template/template_sql_slowlog \
-H 'Content-Type: application/json' \
-u elastic:qEnNfKNujqNrOPD9q5kb \
-d '{
"index_patterns" : ["mysql-slowlog-*"],
"order" : 0,
"settings" : {
"number_of_replicas" : 0
},
"mappings": {
"properties": {
"query_str": {
"type": "text",
"fields": {
"keyword": {
"type": "keyword",
"ignore_above": 256
}
},
"analyzer": "ik_max_word"
}
}
}
}'
~~~
#### 7.2.3. 埋點日志
> 需要修改IP和密碼
~~~
curl -XPUT http://192.168.28.130:9200/_template/template_point_log \
-H 'Content-Type: application/json' \
-u elastic:qEnNfKNujqNrOPD9q5kb \
-d '{
"index_patterns" : ["point-log-*"],
"order" : 0,
"settings" : {
"number_of_replicas" : 0
}
}'
~~~
## 八、安裝IK分詞器
查詢數據,都是使用的默認的分詞器,分詞效果不太理想,會把text的字段分成一個一個漢字,然后搜索的時候也會把搜索的句子進行分詞,所以這里就需要更加智能的分詞器IK分詞器了
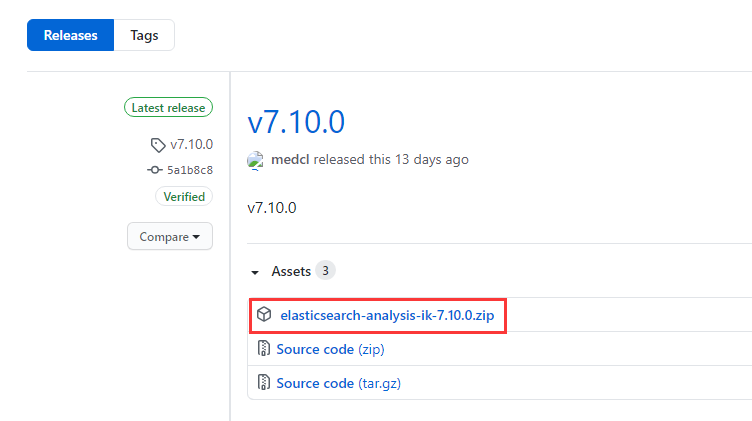
### 8.1. 下載
下載地址:[https://github.com/medcl/elasticsearch-analysis-ik/releases](https://github.com/medcl/elasticsearch-analysis-ik/releases)
> 這里你需要根據你的**Es的版本來下載對應版本的IK**
> 
### 8.2. 解壓-->將文件復制到 es的安裝目錄/plugin/ik下面即可
完成之后效果如下:

### 8.3. 重啟es并檢查插件是否安裝成功
[http://192.168.28.130:9200/\_cat/plugins](http://192.168.28.130:9200/_cat/plugins)

- springcloud
- springcloud的作用
- springboot服務提供者和消費者
- Eureka
- ribbon
- Feign
- feign在微服務中的使用
- feign充當http請求工具
- Hystrix 熔斷器
- Zuul 路由網關
- Spring Cloud Config 分布式配置中心
- config介紹與配置
- Spring Cloud Config 配置實戰
- Spring Cloud Bus
- gateway
- 概念講解
- 實例
- GateWay
- 統一日志追蹤
- 分布式鎖
- 1.redis
- springcloud Alibaba
- 1. Nacos
- 1.1 安裝
- 1.2 特性
- 1.3 實例
- 1. 整合nacos服務發現
- 2. 整合nacos配置功能
- 1.4 生產部署方案
- 環境隔離
- 原理講解
- 1. 服務發現
- 2. sentinel
- 3. Seata事務
- CAP理論
- 3.1 安裝
- 分布式協議
- 4.熔斷和降級
- springcloud與alibba
- oauth
- 1. abstract
- 2. oauth2 in micro-service
- 微服務框架付費
- SkyWalking
- 介紹與相關資料
- APM系統簡單對比(zipkin,pinpoint和skywalking)
- server安裝部署
- agent安裝
- 日志清理
- 統一日志中心
- docker安裝部署
- 安裝部署
- elasticsearch 7.x
- logstash 7.x
- kibana 7.x
- ES索引管理
- 定時清理數據
- index Lifecycle Management
- 沒數據排查思路
- ELK自身組件監控
- 多租戶方案
- 慢查詢sql
- 日志審計
- 開發
- 登錄認證
- 鏈路追蹤
- elk
- Filebeat
- Filebeat基礎
- Filebeat安裝部署
- 多行消息Multiline
- how Filebeat works
- Logstash
- 安裝
- rpm安裝
- docker安裝Logstash
- grok調試
- Grok語法調試
- Grok常用表達式
- 配置中常見判斷
- filter提取器
- elasticsearch
- 安裝
- rpm安裝
- docker安裝es
- 使用
- 概念
- 基礎
- 中文分詞
- 統計
- 排序
- 倒排與正排索引
- 自定義dynamic
- 練習
- nested object
- 父子關系模型
- 高亮
- 搜索提示
- kibana
- 安裝
- docker安裝
- rpm安裝
- 整合
- 收集日志
- 慢sql
- 日志審計s
- 云
- 分布式架構
- 分布式鎖
- Redis實現
- redisson
- 熔斷和降級