
# 一、啟動關閉tomcat
需要先配置CATALINA_HOME
雙擊%CATALINA_HOME%\bin\startup.bat
雙擊%CATALINA_HOME%\bin\shutdown.bat
訪問服務器:http://localhost:8080/index.jsp
因為服務器在本機上,所以主機名為localhost,表示本機
tomcat的默認端口為8080
index.jsp是主頁
# 二、修改端口號
修改端口號,%CATALINA_HOME%\conf\server.xml,修改,把8080修改了即可。
http協議默認端口為80,也就是說http://localhost,等同與http://localhost:80
如果把Tomcat端口號修改成80,那么訪問服務器就可以無需再給出端口號。
# 三.tomcat目錄結構
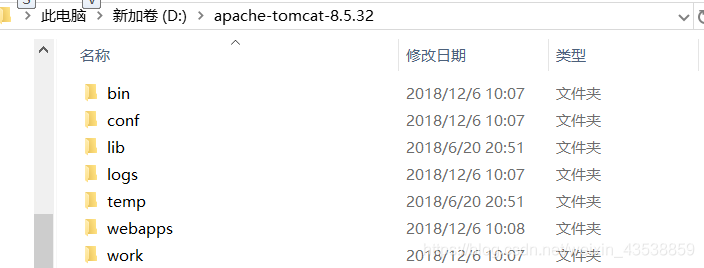
1.bin:二進制可執行文件,例如startup.bat和shutdown.bat
>[danger]/bin目錄
存放windows或者是Linux啟動和關閉tomcat的腳本文件
/bin/catalina.sh
用于啟動和關閉tomcat服務器
/bin/configtest.sh
用于檢查配置文件
/bin/startup.sh
啟動Tomcat腳本
/bin/shutdown.sh
關閉Tomcat腳本
2.conf:配置文件,例如:server.xml、context.xml、web.xml、tomcat-users.xml
>[danger]/conf目錄
存放tomcat服務器的各種全局配置文件其中包括server.xml(Tomcat的主要配置文件)、tomcat-users.xml和web.xml等配置文件
/conf/server.xml
Tomcat 的全局配置文件
/conf/web.xml
為不同的Tomcat配置的web應用設置缺省值的文件
/conf/tomcat-users.xml
Tomcat用戶認證的配置文件
3.lib:tomcat所需jar包
>[danger]/lib目錄
存放Tomcat服務器運行所需的各種JAR文件(不能被web應用訪問)
4.logs:日志文件
>[danger]/logs目錄
存放Tomcat執行時的Log日志文件
/logs/localhost_access_log.*.txt
訪問日志
/logs/localhost.*.log
錯誤和其它日志
/logs/manager.*.log
管理日志
/logs/catalina.*.log
Tomcat啟動或關閉日志文件
5.temp:存放tomcat運行時產生的臨時文件,當tomcat關閉后,這個目錄中的文件可以刪除
>[danger]/temp目錄
存放Tomcat運行時所產臨時文件
6.webapps:這個目錄下的每個文件夾對應一個JavaWeb應用程序
>[danger]/webapps目錄
Tomcat的主要Web發布目錄,默認情況下把Web應用文件放于此目錄(存放我們自己的JSP,Servlet類)
7.work:webapps下的應用程序在運行時會自動生成文件,就在work目錄下。work目錄刪除了也沒問題,但再次運行應用程序還要再生成work目錄和文件。
>[danger]/work目錄
Tomcat的工作目錄,將JSP生成的Servlet源文件和字節碼文件放到這個目錄下
work目錄下的文件
由Tomcat自動生成,這是Tomcat放置它運行期間的中間(intermediate)文件(諸如編譯的JSP文件)地方。 如果當Tomcat運行時,你刪除了這個目錄那么將不能夠執行包含JSP的頁面。
# 四.創建JavaWeb目錄:hello
1. 在webapps目錄下創建一個hello目錄,hello目錄就是項目目錄了;
2. 在hello目錄下創建WEB-INF
3. 在WEB-INF下創建web.xml
4. 在WEB-INF下創建classes目錄
5. 在WEB-INF下創建lib目錄
6. 在hello目錄下創建index.html
在web.xml文件中添加如下內容:
```
<?xml version="1.0" encoding="UTF-8"?>
<web-app version="2.5"
xmlns="http://java.sun.com/xml/ns/javaee"
xmlns:xsi="http://www.w3.org/2001/XMLSchema-instance"
xsi:schemaLocation="http://java.sun.com/xml/ns/javaee
http://java.sun.com/xml/ns/javaee/web-app_2_5.xsd">
</web-app>
```
在index.html中添加如下內容:
```
<html>
<head>
<!--如果是html頁面,charset設置為gb2312,可以防止出現亂碼-->
<meta charset="gb2312"/>
<title>index.html</title></head>
<body>
<h1>hello主頁</h1>
</body>
</html>
```
啟動tomcat,打開客戶端訪問http://localhost:8080/hello/index.html
配置外部應用
外部應用既是把應用程序不放到Tomcat的wabapps目錄下!而已放在外面,例如:d:/hello
在conf/server.xml下配置,指定外部應用的路徑。
```
<Host name="localhost" appBase="webapps"
unpackWARs="true" autoDeploy="true">
<Context path="yiniuedu_hello" docBase="d:/hello"/>
</Host>
```
在元素下添加元素,path為URL訪問路徑,docBase為外部應用的目錄。
在瀏覽器地址欄中訪問:http://localhost:8080/yiniuedu_hello/index.html
在conf/catalna/localhost下添加配置文件,指定外部應用路徑
在conf/catalna/localhost目錄下創建yiniuedu_hello.xml文件,其中yiniuedu_hello就是URL訪問路徑
在yiniuedu_hello.xml文件中添加:,docBase指定外部應用的目錄。
缺省web應用
在webapps目錄下有一個ROOT目錄,它是缺省web應用,訪問這個應用的路徑:http://localhost:8080/index.jsp
如果把web應用的內部放到webapps/ROOT下,訪問URL路徑中不用給出應用名稱。
配置虛擬主機
希望:http://cms.yiniuedu.com訪問web應用。
這需要把域名http://cms.yiniuedu.com映射成IP地址:127.0.0.1
需要把tomcat端口號修改為80
需要在server.xml中配置主機,并指定主機的應用目錄
在應用目錄中添加名為ROOT的web應用。
1). 找到C:\WINDOWS\system32\drivers\etc\hosts文件,添加127.0.0.1 http://cms.yiniuedu.com
2). 在conf/server.xml中修改端口為80
3). 在conf/server.xml中添加元素
```
<Host name="cms.yiniuedu.com" appBase="d:/myapps" unpackWARs="true" autoDeploy="true">
</Host>
```
* name:指定該主機域名為cms.yiniuedu.com
* appBase:指定該主機的應用目錄為d:/myapps
4). 在d:/myapps下創建名為ROOT的web應用。
# 五、tomcat服務器頂層結構
免費、開源、跨平臺的Tomcat無疑是我們開始學習Java EE的第一個服務器,會用對于日常開發完全夠用了,但是還是要學一下Tomcat相關的原理和設計思想等,對于以后相關的擴展和優化有著重要的作用。下邊是學習Tomcat,翻看Tomcat源碼的一些總結和感悟,作為筆記查看。
## 1、Tomcat服務器頂層結構
俗話說,站在巨人的肩膀上看世界,一般學習的時候也是先總覽一下整體,然后逐個部分個個擊破,最后形成思路,了解具體細節。Tomcat 的結構很復雜,但是 Tomcat 也非常的模塊化,找到了 Tomcat 最核心的模塊,問題才可以游刃而解。先上一張Tomcat的頂層結構圖,如下:
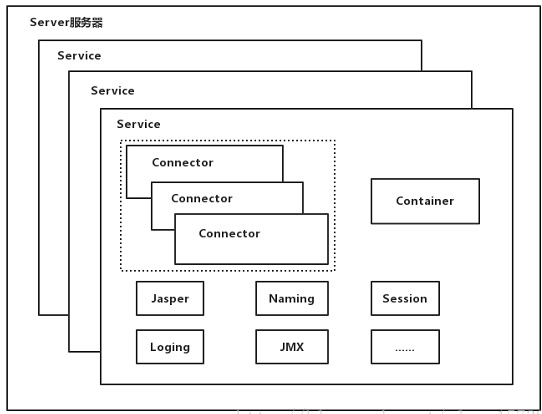
Tomcat中最頂層的容器是Server,代表著整個服務器,從上圖中可以看出,一個Server可以包含至少一個Service,用于具體提供服務。
Service主要包含兩個部分:Connector和Container。從上圖中可以看出 Tomcat 的心臟就是這兩個組件,他們的作用如下:
Connector用于處理鏈接相關的事情,并提供Socket與Request和Response相關的轉化;
Container用于封裝和管理Servlet,以及具體處理Request請求;
一個Tomcat中只有一個Server,一個Server可以包含多個Service,一個Service只有一個Container,但是可以有多個Connectors,這是因為一個服務可以有多個連接,如同時提供http和https鏈接,也可以提供向相同協議不同端口的連接。
多個 Connector 和一個 Container 就形成了一個 Service,有了 Service 就可以對外提供服務了,但是 Service 還要一個生存的環境,必須要有人能夠給她生命、掌握其生死大權,那就非 Server 莫屬了。所以整個 Tomcat 的生命周期由 Server 控制。
另外,上述的包含關系或者說是父子關系,都可以在tomcat的conf目錄下的server.xml配置文件中看出,下圖是刪除了注釋內容之后的一個完整的server.xml配置文件(Tomcat版本為8.0)
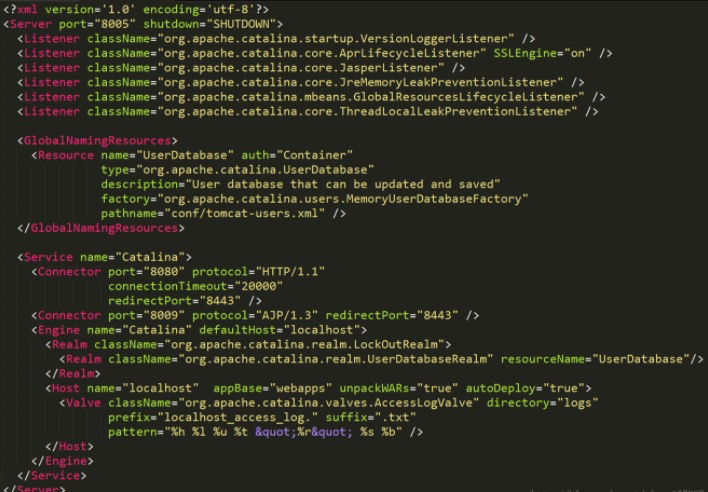
詳細的配置文件文件內容可以到Tomcat官網查看:[http://tomcat.apache.org/tomcat-8.0-doc/index.html](http://tomcat.apache.org/tomcat-8.0-doc/index.html)
上邊的配置文件,還可以通過下邊的一張結構圖更清楚的理解:
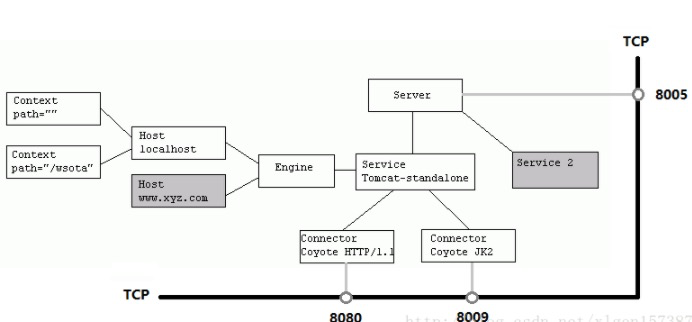
Server標簽設置的端口號為8005,shutdown=”SHUTDOWN” ,表示在8005端口監聽“SHUTDOWN”命令,如果接收到了就會關閉Tomcat。一個Server有一個Service,當然還可以進行配置,一個Service有多個,Service左邊的內容都屬于Container的,Service下邊是Connector。
總結:
Tomcat中只有一個Server,一個Server可以有多個Service,一個Service可以有多個Connector和一個Container。
## 2、Tomcat的啟動過程
首先看一張Tomcat啟動的時序圖,如下:
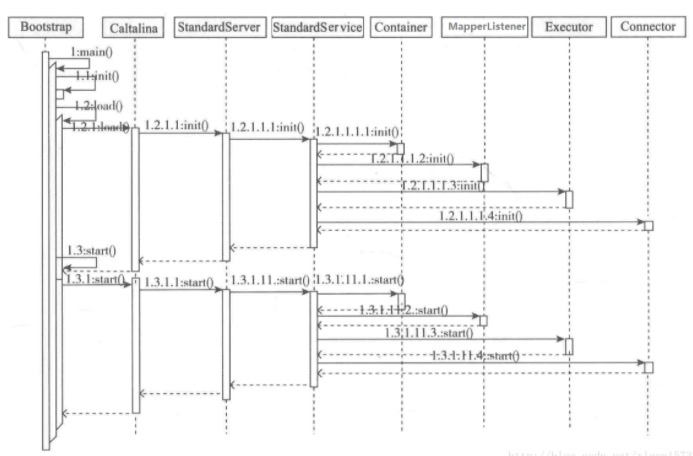
Tomcat的啟動入口main方法是在Bootstrap類里,但具體的執行過程是在Catalina里邊,這樣做可以使得把啟動的入口和具體的管理類進行分開,從而可以方便的創建多種啟動的方式。
Catalina是整個Tomcat的管理類,他有三個方法load、start、stop分別用來管理整個服務器的生命周期。load方法用于加載tomcat/conf目錄下的server.xml配置文件,用來創建Server并調用Server的init方法進行初始化操作,start用于啟動服務器器,stop用于停止服務器,start和stop方法在內部分別調用Server的start和stop方法,load方法在內部調用了 Server的init方法,這三個方法都會按層次分逐層調用相應的方法。
從上述的時序圖,按著從上到下,從左到右的順序,完全可以了解整個Tomcat的啟動順序。
上圖中看到了幾個陌生的名字,下邊具體說明。
### 2.1、Bootstrap的啟動過程
Bootstrap作為Tomcat的啟動入口,其main方法如下:
```
public static void main(String args[]) {
//首先判斷Bootstrap daemon 是否為空,就是創建一個Bootstrap實例daemon
if (daemon == null) {
// Don't set daemon until init() has completed
Bootstrap bootstrap = new Bootstrap();
try {
bootstrap.init(); //初始化ClassLoader,并用ClassLoader創建了一個Catalina實例,并將這個實例賦值給了cataLinaDaemon
} catch (Throwable t) {
handleThrowable(t);
t.printStackTrace();
return;
}
daemon = bootstrap;
} else {
// When running as a service the call to stop will be on a new
// thread so make sure the correct class loader is used to prevent
// a range of class not found exceptions.
Thread.currentThread().setContextClassLoader(daemon.catalinaLoader);
}
try {
String command = "start"; //指定默認的執行指令是start
if (args.length > 0) {
command = args[args.length - 1];
}
if (command.equals("startd")) {
args[args.length - 1] = "start";
daemon.load(args); //BootStrap的load方法,其實是調用Calatina的load方法
daemon.start();
} else if (command.equals("stopd")) {
args[args.length - 1] = "stop";
daemon.stop();
} else if (command.equals("start")) {
daemon.setAwait(true); //setWait方法 主要是為了設置Server啟動完成后是否進入等待狀態的標志,如果為true則進入,否則不進入
daemon.load(args); //load方法用于加載配置文件,創建并初始化Server
daemon.start(); //start方法用于啟動服務器
} else if (command.equals("stop")) {
daemon.stopServer(args);
} else if (command.equals("configtest")) {
daemon.load(args);
if (null == daemon.getServer()) {
System.exit(1);
}
System.exit(0);
} else {
log.warn("Bootstrap: command \"" + command + "\" does not exist.");
}
} catch (Throwable t) {
// Unwrap the Exception for clearer error reporting
if (t instanceof InvocationTargetException &&
t.getCause() != null) {
t = t.getCause();
}
handleThrowable(t);
t.printStackTrace();
System.exit(1);
}
}
```
(1)上述執行的bootstrap.init()方法源代碼如下:
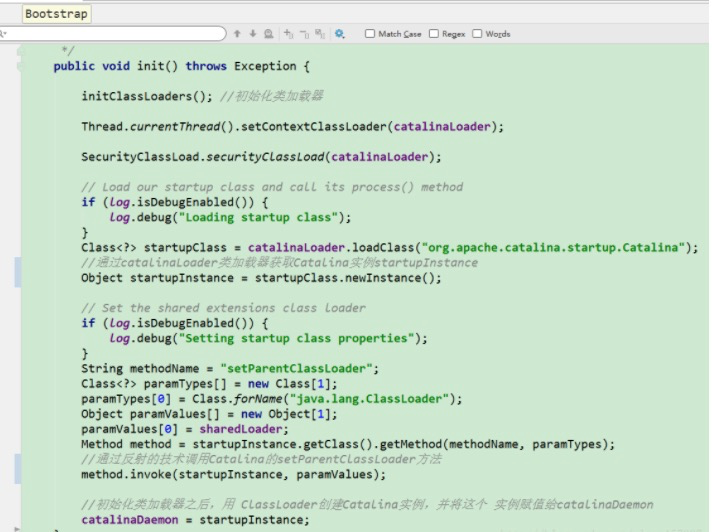
(2)main方法里邊,首先創建一個Bootstrap,并執行init方法進行初始化,然后出來main方法里傳入的參數,如果參數為空,默認為start。
(3)在init方法里初始化ClassLoader,并用ClassLoader創建了Catalina實例,然后賦值給catalinaDaemon變量,后邊對命令的操作都要使用catalinaDaemon來具體的執行;
(4)在start命令的處理調用的時候有三個方法:setAwait、load
、start。這三個方法在內部調用了Clatalina的相應的方法進行具體的執行,只不過是用反射來調用的。
### 2.2、Catalina的啟動過程
Catalina的啟動主要調用setAwait、load和start方法來實現,setAwait方法用于設置Server啟動完成后是否進入等待狀態的標志,如果為true則進入,否則不進入;load方法用于加載配置文件,創建并初始化Server;start用于啟動服務器。
Catalina的load方法根據con/server.xml文件進行創建對象的,并賦值給server屬性。
### 2.3、Server的啟動過程
Server是一個接口,繼承自Lifecycle ,接口定義如下:
```
public interface Server extends Lifecycle {
}
```
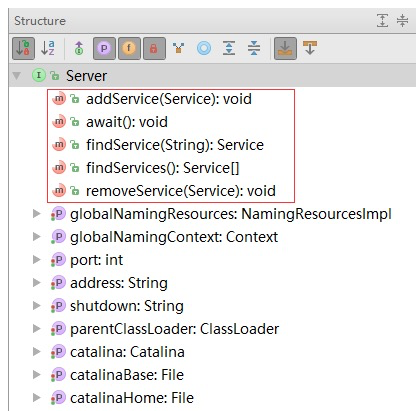
看接口的結構圖可以看出,其中包含了addService、findService、removeService三個主要的方法,用來增加、查找、刪除Service。Server的init方法和start方法分別循環調用了每個Service方init方法和start方法來啟動所有的Service。
Server 的默認實現是:org.apache.catalina.core.StandardServer,繼承關系圖如下:
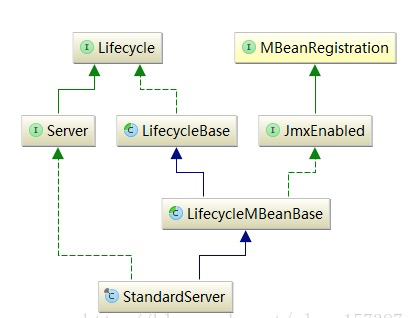
StandardServer的initInternal和startInternal方法分別循環調用了每一個Service的start和init方法。

### 2.4、Service的啟動過程
Service是一個接口,繼承自Lifecycle ,接口定義如下:
~~~
public interface Service extends Lifecycle {
}
~~~
Service 接口定義的方法和屬性如下:
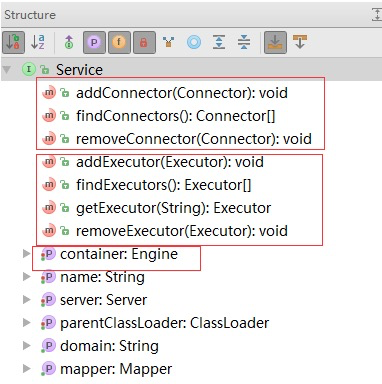
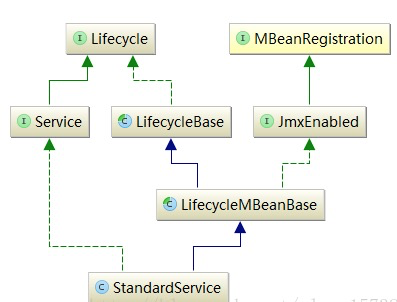
Service的默認實現是:org.apache.catalina.core.StandardService。StandardService和StandardServer有相似的繼承關系,如下圖:
StandardService的initInternal方法如下:
```
@Override
protected void initInternal() throws LifecycleException {
super.initInternal();
if (engine != null) {
engine.init();
}
// Initialize any Executors
for (Executor executor : findExecutors()) {
if (executor instanceof JmxEnabled) {
((JmxEnabled) executor).setDomain(getDomain());
}
executor.init();
}
// Initialize mapper listener
mapperListener.init();
// Initialize our defined Connectors
synchronized (connectorsLock) {
for (Connector connector : connectors) {
connector.init();
}
}
}
```
StandardService的startInternal方法如下
```
@Override
protected void startInternal() throws LifecycleException {
if(log.isInfoEnabled())
log.info(sm.getString("standardService.start.name", this.name));
setState(LifecycleState.STARTING);
// Start our defined Container first
if (engine != null) {
synchronized (engine) {
engine.start();
}
}
synchronized (executors) {
for (Executor executor: executors) {
executor.start();
}
}
mapperListener.start();
// Start our defined Connectors second
synchronized (connectorsLock) {
for (Connector connector: connectors) {
// If it has already failed, don't try and start it
if (connector.getState() != LifecycleState.FAILED) {
connector.start();
}
}
}
}
```
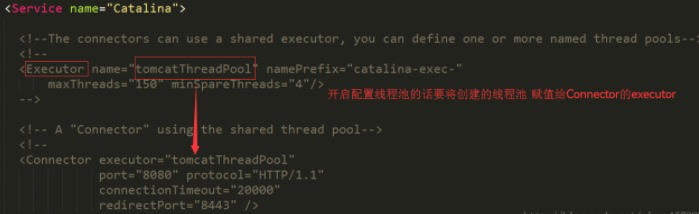
可以看出,StandardService的initInternal和startInternal方法主要調用container、executors、mapperListener、connectors的init和start方法。
mapperListener是Mapper的監聽器,用來監聽Container容器的變化;executors是用在connectors中管理線程的線程池,在server.xml文件中可以看到,默認是注釋的:
## 3、總結
上述的幾小節,大致記錄了一下Tomcat的整體結構,在上邊介紹的時候,也有一些沒有寫到的東西,比如說Tomcat生命周期管理的接口Lifecycle、Connector、Container以及Tomcat如何進行通信,如何解析和處理具體的Http請求,這些會在以后的學習中不斷記錄下來。
- Java Web項目開發學習手冊
- 一、B/S開發環境搭建
- 1.1 tomcat服務器目錄結構及作用
- 1.2 在IDE開發工具上配置tomcat服務器
- 1.3 簡單web項目在tomcat服務器上運行的方法
- 1.4 開發工具設置
- 1.5 總結
- 二、Servlet技術應用
- 2.1 HttpServlet中的主要方法及應用
- 2.1.1 基于Eclipse完成一個JavaWeb項目
- 2.2 HttpRequest,HttpResponse的應用
- 2.2.1客戶端請求
- 2.2.2服務器響應
- 2.2.3Servlet HTTP 狀態碼
- 2.2.4圖片驗證碼類
- 2.2.5注冊模擬實現(帶驗證碼)
- 2.3 ServletConfig對象和ServletContext對象的概念
- 2.4 總結
- 三、JSP技術應用
- 3.1 JSP基本語法
- 3.2 JSP標簽和指令
- 3.3 JSP中的隱式對象
- 3.4 常用應用操作
- 3.4.1 JSP客戶端請求
- 3.4.2 JSP服務器響應
- 3.4.3 HTTP狀態碼
- 3.4.4 表單處理
- 3.4.5 過濾器
- 3.4.6 Cookie處理
- 3.4.7 Session處理
- 3.4.8 文件上傳
- 3.4.9 日期處理
- 3.4.10 頁面重定向
- 3.4.11 點擊量統計
- 3.4.12 自動刷新
- 3.4.13 發送郵件
- 3.5 JSP高級應用
- 3.5.1 JSP標準標簽庫(JSTL)
- 3.5.2 JSP連接數據庫
- 3.5.3 JSP XML數據處理
- 3.5.4 JSP JavaBean
- 3.5.5 自定義標簽
- 3.5.6 表達式語言
- 3.5.7 異常處理
- 3.5.8 調試
- 3.5.9 JSP國際化
- 3.6 實踐代碼
- 3.6.1 實踐代碼
- 3.6.2 項目實戰
- 3.7 總結
- 四、MVC思想的理解和搭建MVC
- 4.1 MVC設計模式的思想
- 4.2 MVC設計模式的實現步驟
- 4.3 項目實踐
- 4.4 總結
- 五、EL表達式和JSTL技術
- 5.1 EL表達式及其應用
- 5.2 常用的JSTL標簽的應用
- 5.3 項目實踐
- 5.4 總結
- 六、Cookie和Session
- 6.1 cookie對象的概念和應用
- 6.2 session對象的概念和應用
- 6.3 項目實踐
- 6.4 總結
- 七、過濾器技術應用
- 7.1 Filter的概念及應用
- 7.2 Filter、FilterChain、FilterConfig 介紹
- 7.3 用戶登錄過濾案例
- 7.4 項目實戰
- 7.5總結
- 八、異步請求技術
- 8.1 JSON數據格式
- 8.2 使用AJAX實現異步請求
- 8.3 用戶名校驗案例
- 8.4小結
- 綜合項目技術實訓
- 1.BS項目開發項目實戰
- 2.項目需求分析和系統設計
- 2.1需求分析
- 2.2類型模型設計
- 2.3原型設計
- 3.項目數據庫分析和系統設計
- 4.BS項目編程實現
- 4.1搭建框架和命名規約
- 4.2實現步驟
- 4.2.1創建實體類
- 4.2.2創建過濾器類
- 4.2.3創建工具類
- 4.2.4創建DAO接口及其實現類
- 4.2.5創建Service接口及其實現類
- 4.2.6創建測試類
- 4.2.7創建控制器類
- 5.企業開發流程規范
- 6.總結
- 九、練習題及答案
- 企業開發常用技術
- 1.Maven技術
- Java命名規范解讀
- 參考資料
- 開發中常用的應用服務器和Web服務器