
# Spring Boot 2 – OAuth2 Auth 和資源服務器
> 原文: [https://howtodoinjava.com/spring-boot2/oauth2-auth-server/](https://howtodoinjava.com/spring-boot2/oauth2-auth-server/)
在本 **Spring Security oauth2** 教程中,學習構建**授權服務器**來對您的身份進行身份驗證,以提供`access_token`,您可以使用該服務器向資源服務器**請求數據**。
## 1\. 概述
OAuth 2 是一種授權方法,用于通過 HTTP 協議提供對受保護資源的訪問。 首先,oauth2 使第三方應用程序可以獲得對 HTTP 服務的有限訪問權限:
* 通過協調資源所有者和 HTTP 服務之間的批準交互來代表資源所有者
* 或允許第三方應用程序代表自己獲取訪問權限。
#### 1.1. 角色
OAuth 定義了四個角色:
* **資源所有者** – 應用程序的用戶。
* **客戶端** – 需要訪問資源服務器上用戶數據的應用程序(用戶正在使用)。
* **資源服務器** – 存儲用戶數據和 http 服務,這些服務可以將用戶數據返回到經過身份驗證的客戶端。
* **授權服務器** – 負責驗證用戶的身份并提供授權令牌。 資源服務器接受此令牌并驗證您的身份。
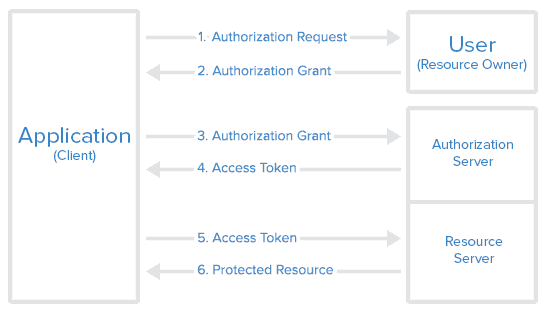
Oauth2 流程
#### 1.2. 訪問令牌與刷新令牌
**訪問令牌**是表示頒發給客戶端的授權的字符串。 令牌代表資源所有者授予并由資源服務器和授權服務器強制執行的特定訪問范圍和持續時間。
**刷新令牌**由授權服務器發布(與訪問令牌一起)給客戶端,用于在當前訪問令牌變為無效或過期時獲取新的訪問令牌,或用于獲取具有相同權限的其他訪問令牌或更窄的范圍(訪問令牌的生存期和權限可能比資源所有者授權的要短)。 授權服務器可以決定是否發出刷新令牌。
* 訪問令牌的責任是在數據過期之前訪問數據。
* 當現有訪問令牌過期時,刷新令牌的職責是請求新的訪問令牌。
## 2\. Oauth2 – 授權服務器
要使用[ spring security oauth2 模塊](https://spring.io/projects/spring-security-oauth)創建授權服務器,我們需要使用注解`@EnableAuthorizationServer`并擴展類`AuthorizationServerConfigurerAdapter`。
`OAuth2AuthorizationServer.java`
```java
import org.springframework.beans.factory.annotation.Autowired;
import org.springframework.context.annotation.Configuration;
import org.springframework.security.crypto.bcrypt.BCryptPasswordEncoder;
import org.springframework.security.oauth2.config.annotation.configurers.ClientDetailsServiceConfigurer;
import org.springframework.security.oauth2.config.annotation.web.configuration.AuthorizationServerConfigurerAdapter;
import org.springframework.security.oauth2.config.annotation.web.configuration.EnableAuthorizationServer;
import org.springframework.security.oauth2.config.annotation.web.configurers.AuthorizationServerSecurityConfigurer;
@Configuration
@EnableAuthorizationServer
public class OAuth2AuthorizationServer extends AuthorizationServerConfigurerAdapter
{
@Autowired
private BCryptPasswordEncoder passwordEncoder;
@Override
public void configure(AuthorizationServerSecurityConfigurer security) throws Exception {
security
.tokenKeyAccess("permitAll()")
.checkTokenAccess("isAuthenticated()")
.allowFormAuthenticationForClients();
}
@Override
public void configure(ClientDetailsServiceConfigurer clients) throws Exception {
clients
.inMemory()
.withClient("clientapp").secret(passwordEncoder.encode("123456"))
.authorizedGrantTypes("password", "authorization_code", "refresh_token")
.authorities("READ_ONLY_CLIENT")
.scopes("read_profile_info")
.resourceIds("oauth2-resource")
.redirectUris("http://localhost:8081/login")
.accessTokenValiditySeconds(120)
.refreshTokenValiditySeconds(240000);
}
}
```
* Spring Security oauth 公開了兩個用于檢查令牌的端點(`/oauth/check_token`和`/oauth/token_key`),這些令牌默認情況下在`denyAll()`之后受到保護。`tokenKeyAccess()`和`checkTokenAccess()`方法打開這些端點供使用。
* `ClientDetailsServiceConfigurer`用于定義客戶端詳細信息服務的內存中或 JDBC 實現。我們使用了內存實現。它具有以下重要屬性:
`clientId` – (必填)客戶端 ID。
`password` – (對于受信任的客戶端是必需的)客戶端密碼(如果有)。
`scope` – 客戶端受限的范圍。 如果范圍未定義或為空(默認值),則客戶端不受范圍的限制。
`authorizedGrantTypes` – 授權給客戶端使用的授權類型。 默認值為空。
`previlege` – 授予客戶端的權限(常規的 Spring Security 權限)。
`redirectUris` – 將用戶代理重定向到客戶端的重定向端點。 它必須是一個絕對 URL。
## 3\. Oauth2 – 資源服務器
要創建資源服務器組件,請使用`@EnableResourceServer`注解并擴展`ResourceServerConfigurerAdapter`類。
`OAuth2ResourceServer.java`
```java
import org.springframework.context.annotation.Configuration;
import org.springframework.security.config.annotation.web.builders.HttpSecurity;
import org.springframework.security.oauth2.config.annotation.web.configuration.EnableResourceServer;
import org.springframework.security.oauth2.config.annotation.web.configuration.ResourceServerConfigurerAdapter;
@Configuration
@EnableResourceServer
public class OAuth2ResourceServer extends ResourceServerConfigurerAdapter
{
@Override
public void configure(HttpSecurity http) throws Exception {
http
.authorizeRequests()
.antMatchers("/api/**").authenticated()
.antMatchers("/").permitAll();
}
}
```
上面的 config 在所有從`/api`開始的端點上啟用保護。 其他所有端點均可自由訪問。
資源服務器還提供了一種對用戶本身進行身份驗證的機制。 在大多數情況下,它將是基于表單的登錄名。
`SecurityConfig.java`
```java
import org.springframework.context.annotation.Bean;
import org.springframework.context.annotation.Configuration;
import org.springframework.core.annotation.Order;
import org.springframework.security.config.annotation.authentication.builders.AuthenticationManagerBuilder;
import org.springframework.security.config.annotation.web.builders.HttpSecurity;
import org.springframework.security.config.annotation.web.configuration.WebSecurityConfigurerAdapter;
import org.springframework.security.crypto.bcrypt.BCryptPasswordEncoder;
@Configuration
@Order(1)
public class SecurityConfig extends WebSecurityConfigurerAdapter {
@Override
protected void configure(HttpSecurity http) throws Exception {
http
.antMatcher("/**")
.authorizeRequests()
.antMatchers("/oauth/authorize**", "/login**", "/error**")
.permitAll()
.and()
.authorizeRequests()
.anyRequest().authenticated()
.and()
.formLogin().permitAll();
}
@Override
protected void configure(AuthenticationManagerBuilder auth) throws Exception {
auth
.inMemoryAuthentication()
.withUser("humptydumpty").password(passwordEncoder().encode("123456")).roles("USER");
}
@Bean
public BCryptPasswordEncoder passwordEncoder(){
return new BCryptPasswordEncoder();
}
}
```
在[`WebSecurityConfigurerAdapter`](https://howtodoinjava.com/spring5/security5/security-java-config-enablewebsecurity-example/)類上方,設置基于表單的登錄頁面,并使用`permitAll()`打開授權 URL。
## 4\. Oauth2 保護的 REST 資源
出于演示目的,我僅創建了一個 API,該 API 會返回登錄用戶的姓名和電子郵件。
`RestResource.java`
```java
import org.springframework.http.ResponseEntity;
import org.springframework.security.core.context.SecurityContextHolder;
import org.springframework.security.core.userdetails.User;
import org.springframework.stereotype.Controller;
import org.springframework.web.bind.annotation.RequestMapping;
@Controller
public class RestResource
{
@RequestMapping("/api/users/me")
public ResponseEntity<UserProfile> profile()
{
//Build some dummy data to return for testing
User user = (User) SecurityContextHolder.getContext().getAuthentication().getPrincipal();
String email = user.getUsername() + "@howtodoinjava.com";
UserProfile profile = new UserProfile();
profile.setName(user.getUsername());
profile.setEmail(email);
return ResponseEntity.ok(profile);
}
}
```
`UserProfile.java`
```java
public class UserProfile
{
private String name;
private String email;
//Setters and getters
@Override
public String toString() {
return "UserProfile [name=" + name + ", email=" + email + "]";
}
}
```
## 5\. 演示
我們有一個 API `http://localhost:8080/api/users/me`,可以通過直接在登錄名中輸入用戶名/密碼來訪問它,但是第三方應用程序不能像在瀏覽器中那樣訪問 API。 他們需要 oauth2 令牌。
#### 5.1. 從用戶獲取授權授權代碼
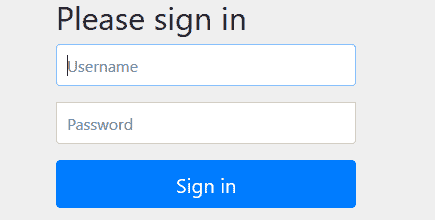
如上面的序列圖所示,第一步是從 URL:`http://localhost:8080/oauth/authorize?client_id=clientapp&response_type=code&scope=read_profile_info`獲得資源所有者的授權授予
它將帶來一個登錄頁面。 提供用戶名和密碼。 對于此演示,請使用`humptydumpty`和`123456`。
登錄頁面
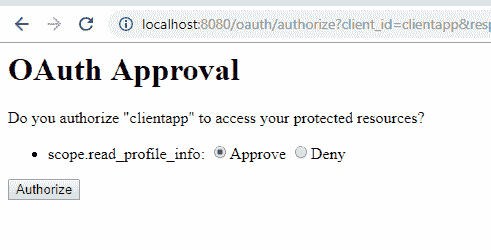
登錄后,您將被重定向到“授予訪問權限”頁面,您可以在其中選擇授予對第三方應用程序的訪問權限。
獲取權限授權
它將重定向到類似`http://localhost:8081/login?code=EAR76A`的 URL。 這里`'EAR76A'`是第三方應用程序的授權代碼。
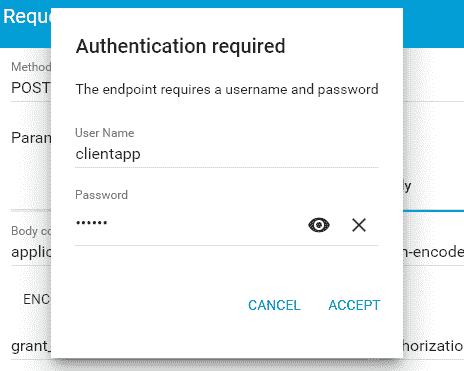
#### 5.2. 從授權服務器獲取訪問令牌
現在,應用程序將使用授權授予來獲取訪問令牌。 在這里,我們需要提出以下要求。 使用此處第一步中獲得的代碼。
`Access token request from postman`
```java
http://localhost:8080/oauth/token
Headers:
Content-Type: application/x-www-form-urlencoded
authorization: Basic Y2xpZW50YXBwOjEyMzQ1Ng==
Form data - application/x-www-form-urlencoded:
grant_type=authorization_code
code=EAR76A
redirect_uri=http://localhost:8081/login
```
它將在單獨的窗口中詢問客戶端應用程序憑據。
客戶端授權
或從 cURL 發出類似請求。
`Access token request from cURL`
```java
curl -X POST --user clientapp:123456 http://localhost:8081/oauth/token
-H "content-type: application/x-www-form-urlencoded"
-d "code=FfrzTj&grant_type=authorization_code&redirect_uri=http%3A%2F%2Flocalhost%3A8082%2Flogin&scope=read_user_info"
```
`Access token response`
```java
{
"access_token": "59ddb16b-6943-42f5-8e2f-3acb23f8e3c1",
"token_type": "bearer",
"refresh_token": "cea0aa8f-f732-44fc-8ba3-5e868d94af64",
"expires_in": 4815,
"scope": "read_profile_info"
}
```
> 閱讀更多:[如何在 Windows 中執行 cURL 命令](https://howtodoinjava.com/for-fun-only/curl-in-windows/)
#### 5.3. 從資源服務器訪問用戶數據
獲得訪問令牌后,我們可以轉到資源服務器以獲取受保護的用戶數據。
達到以下要求:
`Get resource request`
```java
curl -X GET http://localhost:8080/api/users/me
-H "authorization: Bearer 59ddb16b-6943-42f5-8e2f-3acb23f8e3c1"
```
它將返回響應。
`Get resource response`
```java
{"name":"humptydumpty","email":"humptydumpty@howtodoinjava.com"}
```
## 6\. Spring Security oauth2 應用程序的 Maven 依賴項
此 **spring security 5 oauth2 示例**使用的 pom 文件是:
`pom.xml`
```java
<?xml version="1.0" encoding="UTF-8"?>
<project xmlns="http://maven.apache.org/POM/4.0.0"
xmlns:xsi="http://www.w3.org/2001/XMLSchema-instance"
xsi:schemaLocation="http://maven.apache.org/POM/4.0.0 http://maven.apache.org/xsd/maven-4.0.0.xsd">
<modelVersion>4.0.0</modelVersion>
<parent>
<groupId>org.springframework.boot</groupId>
<artifactId>spring-boot-starter-parent</artifactId>
<version>2.1.4.RELEASE</version>
<relativePath /> <!-- lookup parent from repository -->
</parent>
<groupId>com.howtodoinjava</groupId>
<artifactId>spring-oauth2-resource-server-demo</artifactId>
<version>0.0.1-SNAPSHOT</version>
<name>spring-oauth2-resource-server-demo</name>
<description>Demo project for Spring Boot</description>
<properties>
<java.version>1.8</java.version>
</properties>
<dependencies>
<dependency>
<groupId>org.springframework.security.oauth.boot</groupId>
<artifactId>spring-security-oauth2-autoconfigure</artifactId>
<version>2.1.8.RELEASE</version>
</dependency>
<dependency>
<groupId>org.springframework.boot</groupId>
<artifactId>spring-boot-starter-web</artifactId>
</dependency>
<dependency>
<groupId>org.springframework.boot</groupId>
<artifactId>spring-boot-starter-test</artifactId>
<scope>test</scope>
</dependency>
<dependency>
<groupId>org.springframework.security</groupId>
<artifactId>spring-security-test</artifactId>
<scope>test</scope>
</dependency>
</dependencies>
<build>
<plugins>
<plugin>
<groupId>org.springframework.boot</groupId>
<artifactId>spring-boot-maven-plugin</artifactId>
</plugin>
</plugins>
</build>
</project>
```
將您的問題留在我的評論中。
學習愉快!
參考文獻:
[Oauth2 協議](https://tools.ietf.org/html/rfc6749)
[OAuth2 自動配置](https://docs.spring.io/spring-security-oauth2-boot/docs/current/reference/htmlsingle/)
[下載源碼](https://github.com/lokeshgupta1981/SpringExamples/tree/master/oauth2)
- HowToDoInJava Spring 教程
- Spring 5
- Spring 5 教程
- Spring 5 的新功能和增強功能
- Spring 使用注解配置 Bean
- Spring bean – XML 配置
- Spring – @Lazy加載
- Spring DispatcherServlet – 它是如何工作的?
- Spring @PostMapping示例 – @GetMapping示例
- Spring 5 MVC + Hibernate 5 示例
- Spring 和 CORS
- Spring Security 5 – Java 配置
- Spring Security 5 登錄表單示例
- Spring
- Spring 教程
- Spring – IoC 容器
- Spring – 控制反轉與依賴注入
- Spring 5 – Bean 范圍
- Spring – Bean 生命周期
- Spring BeanPostProcessor示例
- SpringBean 自動裝配 – @Autowired
- Spring 注解
- Spring – 原型注解
- Spring @Scheduled – 安排任務的 4 種方法
- Spring 定時器任務
- Spring – 應用事件
- Spring i18n – ResourceBundleMessageSource
- Spring ResourceLoaderAware - 在 Spring 中讀取文件
- Spring 屬性編輯器 – CustomEditorConfigurer示例
- Spring – 使用JavaMailSender發送電子郵件
- Spring 的無版本模式(最新版本)
- Spring 面試問答
- 編寫配置文件的 13 個 Spring 最佳實踐
- SpringBoot 2
- SpringBoot 教程
- spring-boot-starter-parent示例
- spring-boot-starter Maven 模板
- Spring Boot 多模塊 Maven 項目示例
- Spring Boot 注解
- Spring Boot2 @SpringBootApplication自動配置
- Spring Boot 和 AOP
- Spring Boot 日志指南
- Spring Boot Devtools 教程
- Spring Boot WAR 包示例
- Spring Boot 2 REST API 示例
- Spring Boot Crud 操作示例與 Hibernate
- Spring Boot 2 – OAuth2 Auth 和資源服務器
- 在 Spring Boot 2 中進行測試
- Spring RestTemplate – Spring REST 客戶端示例
- Spring Boot – CRUD 應用程序
- Spring Boot Hibernate 配置示例
- Spring Boot – 數據源配置
- Spring Boot 異常處理 – @ExceptionHandler示例
- Spring Boot 緩存示例教程
- 使用 Spring Boot 的 SpringRetry 模塊示例
- Spring Boot Security Rest 基本身份驗證示例
- Spring Boot 和 H2 數據庫
- Spring Boot 2 和 ehcache 3 示例
- Spring Boot 2 與 Gson
- Spring Boot Remoting – Spring RMI 注解示例
- SpringBoot – 發送帶有附件的電子郵件
- Spring Boot 面試問題
- SpringBoot
- SpringBoot – CommandLineRunner接口示例
- Spring Boot – 配置 Jetty 服務器
- Spring Boot 更改嵌入式服務器的默認端口
- Spring Boot – 更改上下文路徑
- Spring Boot SSL(HTTPS)示例
- Spring Boot – 獲取所有已加載的帶有類類型信息的 bean
- Spring Boot – 自定義PropertyEditor配置示例
- Spring Boot @Scheduled注解示例
- Spring Boot Jersey 示例
- Spring Boot SOAP Web 服務示例
- Spring Boot SOAP 客戶端 – WebServiceTemplate示例
- 帶有嵌入式 ActiveMQ 的 Spring Boot JMSTemplate
- Spring Boot Hello World 示例 – Spring Boot REST 示例
- Spring Boot JSP 視圖解析器示例
- SpringBoot – 執行器
- Spring Boot – 帶有 JAX-RS 注解的基于角色的安全性
- Spring Boot RSS feed 和 ROAM
- Spring Boot ehcache 2 示例
- SpringBatch
- Spring Batch + Spring Boot Java 配置示例
- Spring Batch 事件監聽器
- Spring Batch ItemProcessor示例
- 使用 Spring TaskScheduler進行 Spring Batch 作業調度
- Spring Batch Quartz Java 配置示例
- Spring Batch + Quartz + H2 Jdbcjobstore 示例
- 在 Quartz 作業中注入 Spring 依賴項
- Spring Batch FlatFileItemReader – 讀取 CSV 示例
- Spring Batch FlatFileItemWriter – 寫入 CSV 文件
- Spring Batch MultiResourceItemReader – 讀取多個 CSV 文件示例
- Spring Batch 讀取后刪除或存檔文件
- Spring Batch 已處理記錄的計數示例
- Spring Batch CSV 到數據庫 – Java 注解配置示例
- Spring Cloud
- 微服務 – 定義,原理和優勢
- 服務監控 – Hystrix,Eureka 管理員和 Spring Boot 管理員
- Hoverfly – 微服務虛擬化示例
- ELK 堆棧示例教程
- Docker 的 Hello World 示例
- 集成 Git 的 Spring Cloud Config Server
- 使用 Netflix Eureka 進行 Spring Cloud 服務發現
- Consul 服務注冊和發現示例
- Hystrix 斷路器模式 – SpringCloud
- 如何將 Spring Boot 應用程序部署到 Cloud Foundry 平臺
- Netflix Zuul 示例 – Zuul API 網關模式 – Spring Cloud 教程
- Spring Cloud Zipkin 和 Sleuth 示例
- Spring cloud ribbon 和 Eureka – 客戶端負載均衡器示例
- Spring AOP
- Spring AOP 教程示例
- Spring AOP – AspectJ 注解配置示例
- Spring AOP + AspectJ XML 配置示例
- Spring AOP AspectJ @Before注解示例
- Spring AOP AspectJ @After注解示例
- Spring AOP AspectJ @Around注解示例
- Spring AOP AspectJ @AfterReturning注解示例
- Spring AOP AspectJ @AfterThrowing示例
- Spring AOP 事前建議示例
- Spring AOP 事后建議示例
- Spring AOP 圍繞建議示例
- Spring AOP 返回后建議示例
- Spring AOP 拋出后建議示例
- Spring AOP AspectJ 切入點表達式示例
- Spring AOP – 切面順序
- 帶有加載時織入的非公開方法上的 Spring 事務
- Spring 熱門 AOP 面試問題及答案
- Spring MVC
- Spring MVC 教程
- Spring MVC Hello World 示例
- 使用 Maven 和 JSTL 的 Spring MVC Hello World 示例
- Spring @RequestMapping注解示例
- Spring MVC 自定義驗證器示例
- Spring Bean 驗證 – JSR-303 注解
- Spring MVC 填充和驗證下拉列表示例
- Spring MVC 示例 – 顯示,驗證和提交表單
- Spring MessageSourceAware Java Bean 示例
- Spring MVC XmlViewResolver配置示例
- Spring MVC 國際化(i18n)和本地化(i10n)示例
- Spring MVC 攔截器示例 – XML 和 Java 注解配置
- Spring HandlerInterceptor示例
- Spring MVC 在 ajax 和 jquery 中使用進度條上傳多個文件
- Spring MVC 多文件上傳示例
- Spring MVC 下載文件控制器示例
- Spring MVC 面試問題與答案
- Spring MVC InternalResourceViewResolver配置示例
- Spring MVC ResourceBundleViewResolver配置示例
- Spring MVC SimpleMappingExceptionResolver示例
- Spring MVC:<context:annotation-config>與<context:component-scan>
- ContextLoaderListener與DispatcherServlet
- SpringSecurity
- SpringSecurity 教程
- 具有保護切入點的 Spring 方法安全性
- Spring Security Siteminder 預身份驗證示例
- Spring Security 登錄表單示例
- 使用 JSP Taglibs 的 Spring 視圖層安全
- Spring Security – JDBC 用戶服務示例
- Spring Security UserDetailsS??ervice示例
- Spring Security 基本身份驗證示例
- 使用 JUnit 測試 Spring Security Auth
- 使用@PreAuthorize和@Secured的 Spring 方法安全性
- Spring ORM
- Spring 3.2.5 AbstractRoutingDataSource示例
- Spring 3 和 Hibernate 4 集成示例教程
- Spring Hibernate 集成示例
- Spring REST
- Spring REST JSON 響應示例
- Spring REST XML 響應示例
- Spring REST 控制器示例
- 使用 JPA 配置的 Spring REST CRUD 示例
- Spring REST 異常處理示例
- Spring REST 請求主體和參數驗證示例
- Spring REST 自定義令牌認證示例
- Spring REST – 多部分上傳和下載示例
- Spring REST Multipart – 多部分上傳示例
- Spring REST – HTTP OPTIONS 請求處理器示例
- Spring REST – 訪問被拒絕請求的 JSON 響應
- Spring RestTemplate – Spring REST 客戶端示例
- Spring WebFlux
- Spring WebFlux 教程
- Spring Boot WebFlux WebSocket 示例
- 使用@WebFluxTest和WebTestClient進行 Spring Boot Webflux 測試
- HowToDoInJava Java 教程
- 核心 Java 教程
- 什么是 Java 編程語言?
- 什么是 Java JDK,JRE 和 JVM – 深入分析
- Java 命名約定
- Java 類路徑
- Java 變量
- Java 運算符指南
- Java 關鍵字
- Java 中的數據類型
- Java 中的原始數據類型
- Java 包裝器類 – 自動裝箱,拆箱和轉換示例
- Java 中的語句類型
- Java 控制流語句
- Java 中的標簽語句
- Java 字符串類指南
- Java 創建類 – 如何創建對象?
- 如何在 Java 中創建不可變的類
- Java main()方法
- Java 注釋
- Java 按值傳遞與按引用傳遞
- Java 系統屬性
- Java 靜態 – 變量,方法,塊,類和導入語句
- Java 中的靜態導入語句
- Java hashCode()和equals() – 契約,規則和最佳實踐
- Java this和super之間的區別
- 32 位 Java 與 64 位 Java 之間的區別
- java.exe和javaw.exe之間的區別
- Java 查看/生成類文件的字節碼
- Java 中的小端和大端
- Java 命令行參數
- 在 Java 中比較浮點數或雙精度數的正確方法
- Java 遞歸指南
- Java 偶對
- Java 元組 – 使用 Java 中的元組
- sun.misc.Unsafe類的用法
- Java UUID 生成器示例
- Java 12 教程
- Java 12 – 新特性和增強特性
- 收集器teeing()方法示例
- 字符串indent(count) – Java 中的行左縮進
- 精簡數字格式
- Java 11 教程
- Java 11 的新特性和增強特性
- String.isBlank() – 在 Java 中檢查空白或空字符串
- String.lines() – 獲取行流 – Java 11
- String.repeat() – 在 Java 中重復字符串 N 次
- String.strip() – 刪除開頭和結尾的空格
- 文件readString() API – 將文件讀取為 Java 中的字符串
- 文件writeString() API – 用 Java 將字符串寫入文件
- Java 10 教程
- Java 10 特性和增強特性
- Java 版本 – 基于時間的發行版本控制
- Java var – 局部變量類型推斷
- Java 9 教程
- Java 9 特性和增強特性
- Java 9 – 精簡字符串改進 [JEP 254]
- Java 模塊教程
- Java 9 – JShell
- Java – 日期流
- Java 9 Stream API 的改進
- Java 9 中的不可變集合和工廠方法
- 接口中的私有方法 – Java 9
- Java 8 教程
- Java 8 教程
- Java 8 forEach
- Java 8 流 API
- Java 流裝箱示例
- Lambda 表達式
- Java 8 – 函數式接口
- Java 8 方法引用示例
- Java 默認方法教程
- Java 8 Optional:完整參考
- Java 謂詞示例 – 謂詞過濾器
- Java 8 – 日期和時間示例
- Java 8 列出目錄中的所有文件 – 六個示例
- Java 8 – 逐行讀取文件
- Java 8 寫入文件示例
- Java WatchService API 教程
- Java 8 解析字符串為日期
- Java 8 – 連接字符串數組 – 將數組轉換為字符串
- Java Base64 編碼和解碼示例
- Math 類中的 Java 精確算術運算支持
- Java 8 帶有 lambda 的Comparator示例
- 使用Pattern.compile()方法將 Java 正則表達式作為謂詞
- Java 字符串連接(CSV)示例
- Java 8 兩個日期之間的差異
- Java – 內部與外部迭代
- Java 中的安全隨機數生成
- Java 7 教程
- Java 7 的更改,特性和增強
- Java 菱形運算符 – Java 中的<>運算符
- 帶字符串的 Java switch case
- Java 7 中的try-with-resources
- Java 7 中數字字面值的下劃線
- Java 抑制異常示例
- Java 7 – 異常處理增強
- Fork/Join 框架教程:ForkJoinPool示例
- 自動重新加載屬性的 Java WatchService示例
- 面向對象原則
- Java OOP 概念 – 面向對象的原則
- Java 訪問修飾符
- Java 構造器
- Java 實例初始化器塊
- Java 中的抽象示例
- Java 封裝與抽象
- Java 繼承
- Java 多態示例
- Java 方法重載與方法重載
- 接口與 Java 中的抽象類
- Java extends與implements關鍵字
- Java instanceof運算符
- Java 中的多重繼承
- 關聯,聚合和組合
- Java 并發指南
- Java 并發教程
- Java 多線程的發展和主題
- Java 并發性 – 線程安全性?
- 并發與并行
- Java 比較和交換示例 – CAS 算法
- Java synchronized關鍵字
- Java 中的對象級別鎖與類級別鎖
- Java 中Runnable與Thread之間的區別
- 如何在 Java 中使用wait(),notify()和notifyAll()?
- Java 并發性 – yield()和join()之間的區別
- Java 中 sleep()和wait()之間的區別
- 鎖和監視器之間的區別 – Java 并發
- Java Callable Future示例
- 如何使用UncaughtExceptionHandler重新啟動線程
- 使用ThreadPoolExecutor和Semaphore限制任務提交率
- Java 執行器框架教程和最佳實踐
- Java 線程間通信 – PipedReader和PipedWriter
- Java 死鎖示例和解決方案
- Java 集合
- Java 中的集合
- Java 中的數組
- Java ArrayList指南
- Java LinkedList類
- Java HashMap指南
- Java Hashtable類
- Java LinkedHashMap類
- Java TreeMap類
- Java HashSet類
- Java LinkedHashSet類
- Java TreeSet類
- Java Comparable接口示例
- Java Comparator接口示例
- Java Iterator接口示例
- Java ListIterator接口
- Java Spliterator接口
- Java PriorityQueue類
- Java PriorityBlockingQueue類
- Java ArrayBlockingQueue類
- Java TransferQueue – Java LinkedTransferQueue類
- Java CopyOnWriteArrayList類
- Java CopyOnWriteArraySet類
- 如何在 Java 中對數組,列表,映射和集合進行排序
- Java 面試的 40 個熱門問答集
- Java IO 教程
- Java IO 教程和示例
- Java I/O 如何在較低級別上內部工作?
- Java 標準 IO 與 Java NIO
- 如何在 Java 中復制目錄
- 用 Java 遞歸刪除目錄
- Java – 創建新文件
- Java – 寫入文件
- Java – 附加到文件
- Java 創建只讀文件示例
- Java 將文件讀取為字符串(已針對 Java 8 更新)
- Java 將文件讀取到byte[]數組
- Java – 逐行讀取文件 – LineNumberReader
- Java BufferedReader示例
- Java – BufferedWriter
- Java 讀寫屬性文件示例
- 從資源文件夾讀取文件 – Spring 示例
- Java – 讀寫 UTF-8 編碼數據
- Java 中如何檢查文件是否存在
- Java 文件復制 – 用 Java 復制文件的 4 種方法
- Java FilenameFilter示例 – 查找/刪除某些擴展名的文件
- Java FileFilter示例
- Java – 創建臨時文件
- Java – 寫入臨時文件
- Java – 刪除臨時文件
- Java – 讀取控制臺輸入
- Java – 使用Scanner類讀取類型安全輸入
- 在 Java 中將字符串轉換為InputStream
- 在 Java 中將InputStream轉換為字符串
- Java – 創建受密碼保護的 Zip 文件
- Java – 解壓縮帶有子目錄的文件
- 使用 Java 在 Linux 中管理不超過 N GB 的系統日志文件
- 在 Java 中生成 SHA 或 MD5 文件校驗和哈希
- Java 日期時間教程
- Java – 日期和時間 API
- Java – 日期驗證
- Java – 日期格式
- Java LocalDate類
- Java LocalTime類
- Java LocalDateTime類
- Java ZonedDateTime類
- Java 8 – Period
- Java 8 DateTimeFormatter
- Java 8 – TemporalAdjusters
- Java 8 – TemporalQuery
- Java 8 – DayOfWeek
- Java 日期 – 解析,格式和轉換
- Java 語言環境 – 創建和設置默認語言環境
- Java 枚舉教程
- Java 枚舉
- 帶有字符串值的 Java 枚舉
- 枚舉真的是最好的單例嗎?
- 枚舉器和迭代器之間的區別?
- Java 異常
- Java try-finally塊
- Java throw關鍵字
- Java 受檢與非受檢的異常
- Java 同步和異步異常
- Java NullPointerException - 如何在 Java 中有效處理空指針
- Java 自定義異常 – 最佳實踐
- 構造器可以聲明初始化器塊中引發的受檢異常
- Java 泛型教程
- 完整的 Java 泛型教程
- Java 泛型 PECS - 生產者extends消費者super
- Java 垃圾回收
- Java 垃圾收集算法(直到 Java 9)
- JVM 內存模型/結構和組件
- Java 內存管理 – 垃圾回收算法
- Java 序列化教程
- Java 序列化 – 執行正確的序列化
- Java serialVersionUID – 如何生成serialVersionUID
- Java 外部化示例 – 更有效的序列化
- Java 中Externalizable與Serializable之間的區別
- 將 Java 對象序列化為 XML – XMLEncoder和XMLDecoder示例
- Java 中反序列化過程如何發生?
- 使用readObject和writeObject的 Java 自定義序列化
- 使用內存序列化的 Java 深層復制
- 字符串方法
- Java String.concat()方法示例
- Java String.hashCode()方法示例
- Java String.contains()方法示例
- Java String.compareTo()方法示例
- Java String.compareToIgnoreCase()方法示例
- Java String.equals()方法 – 字符串比較
- Java String.equalsIgnoreCase()方法 – 不區分大小寫的比較
- Java String.charAt()方法示例
- Java String.indexOf()方法示例
- Java String.lastIndexOf()方法示例
- Java String.intern()方法示例
- Java String.split()方法示例
- Java String.replace()方法示例
- Java String.replaceFirst()方法示例
- Java String.replaceAll()方法示例
- Java String.substring()方法示例
- Java String.startsWith()示例
- Java String.endsWith()方法示例
- Java String.toUpperCase()方法示例
- Java String.toLowerCase()方法示例
- Java 正則表達式教程
- Java 正則表達式教程
- Java 僅允許字母數字字符的正則表達式
- Java 正則表達式 – 信用卡號驗證
- Java 正則表達式 – 加拿大郵政編碼驗證
- 貨幣符號的 Java 正則表達式
- 使用 Java 正則表達式進行日期驗證
- 使用 Java 正則表達式進行電子郵件驗證
- Java 正則表達式密碼驗證示例
- 適用于希臘語擴展或希臘語腳本的 Java 正則表達式
- 驗證 ISBN(國際標準書號)的 Java 正則表達式
- 檢查輸入文本的最小/最大長度的 Java 正則表達式
- 限制文本中的行數的 Java 正則表達式
- 限制輸入中的單詞數的 Java 正則表達式
- 驗證 SSN(社會安全號碼)的 Java 正則表達式
- Java 正則表達式 – 英國郵政編碼驗證
- Java 正則表達式 – 美國郵政編碼驗證
- 驗證商標符號的 Java 正則表達式
- 驗證國際電話號碼的 Java 正則表達式
- 北美電話號碼的 Java 正則表達式
- Java NIO 教程
- NIO 教程
- 如何創建路徑 – Java NIO
- 使用緩沖區 – Java NIO 2.0
- Java 通道教程 – NIO 2.0
- 3 種讀取文件的方法 – Java NIO
- Java 8 – 逐行讀取文件
- Java 內存映射文件 – Java MappedByteBuffer
- Java NIO – 分散/聚集或向量 IO
- 通道之間的數據傳輸 – Java NIO
- HowToDoInJava 其它教程
- Maven 教程
- 如何在 Windows 上安裝 Maven
- Maven – 設置文件
- Maven – 依賴管理
- Maven 依賴范圍
- Maven - POM 文件
- Maven – 父子 POM 示例
- Maven – 本地,遠程和中央倉庫
- Maven 本地倉庫位置以及如何更改?
- M2_REPO – 在 Eclipse 中更改 Maven 倉庫的位置
- Maven 代理設置 – Eclipse,命令行和全局設置
- Maven 強制最低 Java 版本
- Maven 創建 Java 項目 – 交互式與非交互式模式
- 在 Eclipse 中逐步創建 Maven Web 項目
- 多模塊 Maven 項目 – 控制臺
- Eclipse 中的 Maven 多模塊項目
- Maven – 創建 Java 源文件夾
- Maven BOM – 物料清單依賴項
- 在 Eclipse 中導入 Maven 遠程原型目錄
- Eclipse 項目中的 Maven 自定義原型
- 已解決:Java 編譯器級別與已安裝的 Java 項目方面的版本不匹配
- Maven ant 插件 – 從pom.xml生成build.xml
- Maven IntelliJ IDEA 項目
- Spring MVC JSTL 配置示例
- Tomcat Maven 插件示例
- Maven – Spring Boot 胖/Uber Jar
- Maven Shade 插件 – UberJar/胖 Jar 示例
- Maven – 刪除所有損壞的 jar/依賴項
- Gradle 教程 – 安裝和 HelloWorld 示例
- Log4j2 教程
- Log4j2 JSON 配置示例
- Log4j2 屬性文件示例
- Log4j2 xml 配置示例
- Log4j2 RollingFileAppender示例
- Log4j2 多個附加器示例
- Log4j2 LevelRangeFilter示例
- Log4j2 HTMLLayout配置示例
- Log4j2 ThreadContext – 相同事務的魚標日志
- Log4j2 – 有用的轉換模式示例
- 為 JUnit 測試用例配置 Log4j2
- Log4j 教程
- log4j.properties示例 – Log4j 屬性文件示例
- log4j.xml示例 – Log4j xml 配置示例
- Log4j Maven 配置示例
- Log4j 日志級別 – Log4j2 日志級別示例
- Log4j ConsoleAppender配置示例
- Log4jRollingFileAppender配置示例
- Log4j SocketAppender和套接字服務器示例
- Log4j JDBCAppender – 在數據庫中創建日志
- Log4j XMLLayout – 以 XML 格式創建日志
- Log4j HTMLLayout – 以 HTML 格式創建日志
- Log4j – 在運行時重新加載日志記錄級別
- SLF4j 與 Log4j – 哪個更好?
- RESTEasy + Tomcat 7 + Log4j 日志記錄示例
- Dropwizard 教程
- Dropwizard 教程
- Dropwizard 教程 – HelloWorld 示例
- Dropwizard – BasicAuth 安全示例
- Dropwizard 運行狀況檢查配置示例
- Dropwizard 客戶端 – Jersey/HTTP 配置和示例
- [已解決] Dropwizard – 無法解析配置(無法將類型 ID “http”解析為子類型)
- RESTEasy 教程
- JAX-RS 2.0 教程
- RESTEasy + JBOSS 7 HelloWorld 應用
- 面向初學者的 RESTEasy 示例教程
- JAX-RS @Path URI 匹配 – 靜態和正則 URI
- Java REST HATEOAS 示例
- RESTEasy + Tomcat 7 + SLF4J 日志示例
- RESTEasy + Tomcat 7 + Log4j 記錄示例
- RESTEasy - 文件下載示例
- RESTEasy 文件上傳 - HTML 表單示例
- RESTEasy 文件上傳 - HttpClient示例
- 使用 Ajax 的 JAX-RS 自定義驗證示例
- 使用 Hibernate 驗證器供應器進行 RESTEasy Bean 驗證
- RESTEasy ContainerRequestFilter - RESTEasy 安全過濾器示例
- RESTEasy 基本認證和授權教程
- RESTEasy JAXB XML 示例
- RESTEasy Jettison JSON 示例
- Jackson 的 RESTEasy JSON 示例
- RESTEasy ExceptionMapper – 異常處理示例
- RESTEasy 客戶端 API
- 使用java.net包的 RESTful 客戶端
- 使用 RESTful API 的 RESTEasy 客戶端
- Apache HttpClient GET 和 POST 示例
- RESTEasy Javascript/Ajax 客戶端演示
- JAX-RS 2.0 RESTEasy 3.0.2.Final 客戶端 API 示例
- RESTEasy 最佳實踐
- RESTEasy - 與ResteasyProviderFactory共享上下文數據
- RESTEasy ExceptionMapper – 異常處理示例
- 使用 ETag 的 RESTEasy 緩存控制示例
- RESTEasy – 啟用 Gzip 壓縮內容編碼
- 比較 SOAP 與 RESTful Web 服務
- Jersey 教程
- Jersey HelloWorld 例子
- Jersey2 HelloWorld 示例 – Jersey2 教程
- jersey-quickstart-webapp HelloWorld 示例
- Jersey 使用過濾器記錄請求和響應實體
- Jersey - 如何在 REST API 響應中設置 Cookie
- Jersey 文件下載示例 – StreamingOutput
- Jersey 文件上傳示例 – Jersey2 MultiPartFeature
- Jersey - Ajax 多文件上傳示例
- Jersey 異常處理 – Jersey ExceptionMapper示例
- Jersey + MOXy JSON 示例
- Jersey + JSONP 示例
- Jersey + Google Gson 示例
- Jersey REST API 安全示例
- Jersey 客戶端
- Jersey 客戶端示例 – Jersey2 客戶端 API
- Jersey REST 客戶端認證示例
- Jersey 客戶端 - 設置 Cookie 示例
- JDBC 教程
- Java JDBC 教程
- Java – JDBC 連接示例(MySQL)
- Java – JDBC 驅動類型
- JDBC SELECT查詢示例
- JDBC SQL INSERT查詢示例
- JDBC SQL DELETE查詢示例
- Java JDBC PreparedStatement示例
- JDBC 性能優化技巧
- Hiberate 教程
- Hiberate 教程
- Hibernate 示例 – HelloWorld 示例逐步簡介
- Hibernate 獲取實體示例 – get與load方法
- Hibernate 插入查詢教程
- Hiberate 合并和刷新實體
- Hibernate 4 – 獲取延遲加載的實體引用
- 從數據庫中插入/選擇 Blob 的 Hiberate 示例
- Hiberate save()和saveOrUpdate()方法
- Hiberate 實體/持久化生命周期狀態
- Hibernate 4:如何構建SessionFactory
- Hiberate 實體等價和等同
- Hibernate JPA 級聯類型
- Hibernate 延遲加載教程
- Hiberate 條件查詢示例
- Hibernate HQL(Hiberate 查詢語言)示例
- Hibernate @NamedQuery教程
- Hibernate – 如何定義實體之間的關聯映射
- 通過示例了解 Hibernate 一級緩存
- Hiberate 二級緩存如何工作?
- Hibernate EhCache 配置教程
- Hibernate OSCache 配置示例教程
- Hibernate C3P0 連接池配置教程
- Hiberate 內存數據庫
- Hibernate 驗證器 – Java Bean 驗證示例
- Hibernate 驗證器 CDI – @HibernateValidator示例
- [已解決] UnexpectedTypeException - 找不到約束驗證器
- Hiberate 注解
- Hibernate / JPA2 持久化注解教程
- Hiberate 注解與映射 – 優缺點
- @Immutable和@NaturalId – 特定于 Hiberate 的注解
- Hibernate @NaturalId示例教程
- Hiberate 一對多映射注解示例
- Hiberate 多對多映射注解示例
- Hiberate 一對一映射注解示例
- JUnit5 教程
- JUnit5 教程
- JUnit5 測試生命周期
- JUnit5 @BeforeAll注解示例
- JUnit5 @BeforeEach注解示例
- JUnit5 @AfterEach注解示例
- JUnit5 @AfterAll注解示例
- JUnit5 @RepeatedTest注解示例
- JUnit5 @Disabled測試示例
- JUnit5 @Tag注解示例
- JUnit5 預期的異常 – assertThrows()示例
- JUnit5 斷言示例
- JUnit5 假設示例
- JUnit5 測試套件示例
- JUnit5 和 Gradle
- JUnit5 Maven 依賴項
- JUnit5 – 在 Eclipse 中執行測試
- Eclipse 的 JUnit5 測試模板
- JUnit5 與 JUnit4
- JUnit4 教程
- JUnit 教程
- JUnit 測試套件示例
- JUnit JUnitCore示例
- 使用 Maven 執行 JUnit 測試用例
- JUnit4 – 基于假設的測試用例
- Junit 預期異常測試用例示例
- JUnit 測試監聽器– JUnit RunListener示例
- JUnit 測試超時 – JUnit5 超時示例
- JUnit 有序測試執行示例
- JUnit 參數化測試示例
- Junit 參數化測試 – @Theory和@DataPoints
- JUnit – 使用TemporaryFolder和@Rule創建臨時文件/文件夾
- TestNG 教程
- TestNG 教程
- TestNG 教程(使用 Eclipse)
- 如何從 Maven 運行testng.xml
- TestNG 注解教程
- TestNG – 預期異常和預期消息教程
- TestNG – 如何禁用/忽略測試方法
- TestNG 并行執行測試,類和套件
- TestNG – 依賴測試示例
- TestNG – 超時測試教程
- TestNG @Parameters – 測試參數示例
- TestNG @DataProvider – 測試參數示例
- TestNG @Factory注解教程
- TestNG – @Factory和@DataProvider之間的區別
- TestNG 的前后注解
- TestNG – 測試組,元組,默認組示例
- Mockito 教程
- Mockito2 教程 – JUnit Mockito 示例
- Mockito 注解– @Mock,@Spy,@Captor,@InjectMock
- Mockito – @Mock和@InjectMock注解之間的區別
- Mockito – 驗證具有不同參數的多個方法調用
- Spring Boot,Mockito 和 Junit – 單元測試服務層
- [已解決] IllegalStateException:無法初始化插件MockMaker
- 使用 PowerMock 進行模擬測試(帶有 JUnit 和 Mockito)
- TypeScript 教程
- TypeScript 教程
- TypeScript 類型
- TypeScript 聯合類型
- 字符串字面值類型
- TypeScript 變量 – var,let和const
- TypeScript 模板字符串
- TypeScript 算術運算符
- TypeScript 邏輯運算符
- TypeScript 比較運算符
- TypeScript for…of循環
- TypeScript 中的展開運算符
- TypeScript 中的數組
- TypeScript 中的枚舉
- TypeScript 映射
- TypeScript 集合
- TypeScript 函數 – 剩余,可選和默認參數
- TypeScript 函數或方法重載
- 轉譯器(Transpiler)與編譯器
- JavaScript 中的真值和假值
- 相等運算符(==)與嚴格相等運算符(===)
- JavaScript 中的undefined vs null
- JavaScript 變量提升
- tsconfig.json – TypeScript 編譯器配置
- Angular(2.x)教程
- Angular 開發工作區設置
- [已解決] Npm 安裝掛起或時間過長
- 模擬 REST 服務器來偽造在線 API
- Angular 插值
- Angular 組件
- Angular 模板和視圖
- Angular 服務示例
- 帶有 RxJS Observable的 Angular HttpClient示例
- AngularJS(1.x)教程
- AngularJS 教程 – HelloWorld 示例
- AngularJS – jQueryLite(jqLit??e)教程
- AngularJS 服務(內置和自定義)
- AngularJS Spring MVC Rest 示例
- JavaScript / jQuery 教程
- Ajax 教程 – 面向初學者的 Ajax 指南
- 完整的 jQuery Ajax($.ajax)教程
- jQuery 深度克隆示例
- jQuery 選擇器 – 完整列表
- jQuery – 所有選擇器(“*”) – 通用選擇器
- jQuery – 檢測剪切,復制或粘貼事件
- jQuery 檢測ENTER鍵按下事件
- jQuery – Keypress和Keydown事件之間的區別
- 關于 StackOverflow 的最佳 jQuery 討論
- JavaScript – 相等(==)與身份(===)運算符
- 您必須知道的 JavaScript 變量范圍規則
- JavaScript:定義全局變量的正確方法
- 在 JavaScript 中實現 MVC 和 PubSub
- JavaScript DOM 對象與 jQuery 對象
- Jasmine 單元測試教程及示例
- JavaScript 日志 – 在 JSON 中屏蔽敏感信息
- Android 教程
- Android 教程:關鍵概念
- Android 教程:在 Windows 上安裝 Android
- Android 教程:如何創建 Android 應用/項目
- Android 教程:Android 項目結構,文件和資源
- Android 清單:指定 Android 應用和 SDK 版本
- 如何加快緩慢的 Android AVD / 模擬器
- Hadoop 教程
- Hadoop – 大數據教程
- Hadoop MapReduce 初學者教程
- HDFS – Hadoop 分布式文件系統架構教程
- Brewer 的 CAP 定理簡述
- Java 云開發簡介和工具
- MongoDB 教程
- MongoDB 簡介:為什么選擇 MongoDB?
- 如何在 Windows 上安裝 MongoDB
- Java MongoDB:使用 GridFS API 獲取/保存圖像
- Java MongoDB:在集合中插入文檔的示例
- MongoDB 查找文檔示例
- 微服務 – 定義,原理和好處
- Apache Kafka 教程
- Apache Kafka – 簡介
- Apache Kafka – Windows 10 入門
- Kafka 的 Spring Boot – HelloWorld 示例
- Spring Boot Kafka JsonSerializer示例
- JMS 教程
- JMS 教程 – Java 消息服務教程
- JMS 點對點消息示例
- JMS 發布/訂閱消息示例
- HornetQ 教程
- HornetQ 單體 – 基本的 JMS 消息傳遞示例
- 使用 Maven 的 HornetQ 獨立服務器示例
- Spring3 Hornetq 獨立集成示例
- Gson 教程
- Gson 教程
- Gson 安裝
- GSON – 序列化和反序列化 JSON
- Gson – JSON 輸出的精美打印
- GSON – 將 JSON 數組解析為 Java 數組或列表
- GSON – 序列化和反序列化 JSON 為集
- Gson – 序列化和反序列化包含自定義對象的HashMap
- Gson – GsonBuilder配置示例
- Gson - 序列化NULL值
- Gson @Since – 版本支持
- Gson @SerializedName
- Gson – 排除或忽略字段
- Gson - JsonReader
- Gson - JsonParser
- Gson – 自定義序列化和反序列化
- Gson – 快速指南
- JAXB 教程
- JAXB 注解
- JAXB @XmlRootElement注解示例
- JAXB @XmlElementWrapper注解示例
- JAXB Marshaller(編組器)示例
- JAXB Unmarshaller(解組器)示例
- JAXB 讀取 XML 到 Java 對象的示例
- 使用 Moxy 和 Jaxb 將 JSON 轉換為 Java 對象的示例
- JAXB 將 Java 對象寫入 XML 的示例
- JAXB 將對象轉換為 JSON 的示例
- JAXB – 在 Java 中編組和解組HashMap
- JAXB – 編組和解組對象列表或集合
- 使用 Eclipse 從 JAXB Java 類生成 XSD
- JAXB 模式驗證
- [已解決]:javax.xml.bind.JAXBException:java.util.ArrayList或其任何超類不是此上下文的已知類
- [已解決]:線程“main”com.sun.xml.internal.bind.v2.runtime.IllegalAnnotationsException中的異常:3 個IllegalAnnotationExceptions計數
- 沒有@XmlRootElement的 JAXB 編組 – 缺少@XmlRootElement錯誤
- 不帶 jaxb 注解的解組
- Jackson 教程
- Jackson2 – 將 Java 對象轉換為 JSON,并將 JSON 字符串轉換為對象
- Jackson 將對象轉換為 json 并將 json 轉換為對象
- Jackson – 將 JSON 轉換為Map并將Map轉換為 JSON
- Java XML 教程
- Java 讀取 XML – Java DOM 解析器示例
- Java SAX 解析器 – XML 讀取示例
- Java JDOM2 – XML 讀取示例
- 使用 Java StAX 解析器讀取 XML – 游標和迭代器 API
- DOM 與 Java 中的 SAX 解析器
- Java 將 XML 轉換為屬性 – 從 XML 文件讀取屬性
- Java 將屬性文件轉換為 XML 文件
- Java 字符串到 XML – 將字符串解析為 XML DOM 的示例
- Java XML 轉換為字符串 – 將 XML 對象寫入文件的示例
- Java XPath 示例 – XPath 教程
- Java xpath 示例 – 在 xml 文件上求值 xpath
- Java8 xpath 示例 – 在字符串上求值 xpath
- Java XPath 表達式示例
- Java XPath NamespaceContext – 命名空間解析示例
- Java XPath 從 XML 獲取屬性值
- 在 Java 中使用 xpath 查找具有屬性值的 xml 元素
- Java XPath – 檢查節點或屬性是否存在?
- Eclipse 教程
- 在 Eclipse 中導入 Maven 遠程原型目錄
- 使用 Eclipse 快速搜索插件進行更快的文本搜索
- 如何在 Eclipse 中顯示非英文 unicode(例如中文)字符
- 如何在 Eclipse 中增加控制臺輸出限制
- 創建 Eclipse 模板以加快 Java 編程
- 在 5 分鐘內使 Eclipse 更快
- 如何在印地語中編譯和運行 Java 程序
- Java 覆蓋最終靜態方法 – 方法是覆蓋還是隱藏?
- [已解決] 在 Eclipse 的 Java 構建路徑中找不到超類“javax.servlet.http.HttpServlet”
- 版本控制系統教程
- 分布式版本控制系統如何工作?
- 版本控制系統(VCS)如何工作?
- 如何從 Google Code 項目中簽出源代碼
- Tomcat 教程
- Tomcat – 架構和server.xml配置
- 如何在默認的 HTTP 端口 80 中運行 tomcat
- Tomcat – 啟用/禁用目錄列表
- Tomcat SSL 或 HTTPS 配置示例
- 通過單個服務器安裝運行 Tomcat 的多個實例
- Tomcat Maven 插件示例
- Spring,Tomcat – 獲取負載均衡器后面的真實 IP
- Web 服務器如何工作?
- Linux 教程
- JStack 線程轉儲分析器
- 使用 Java 在 Linux 中管理系統日志文件不超過 N GB
- Swagger – Spring REST 示例
- GoF 設計模式
- 設計模式
- 創建型設計模式
- Java 單例模式介紹
- Java 中的構建器設計模式
- Java 工廠模式說明
- 抽象工廠模式解釋
- Java 中的原型設計模式
- 行為型設計模式
- 責任鏈設計模式
- 命令設計模式
- 迭代器設計模式
- 中介者設計模式
- 備忘錄設計模式
- 觀察者設計模式
- 狀態設計模式
- 策略設計模式
- 模板方法設計模式
- 訪問者設計模式示例
- 結構型設計模式
- Java 中的適配器設計模式
- 橋接設計模式
- 組合設計模式
- Java 中的裝飾器設計模式
- 外觀設計模式
- 享元設計模式
- 代理設計模式
- 設計原則
- Java 中的 SOLID 原則(含示例)
- 開閉原則
- 單一責任原則
- Java 最佳實踐
- Java 最佳實踐指南
- 編寫好的單元測試的 FIRST 原則
- 您應該如何對 DAO 層進行單元測試
- JUnit 最佳實踐指南
- 不良單元測試用例的 8 個跡象
- 20 個 Java 異常處理最佳實踐
- 13 個編寫 Spring 配置文件的最佳實踐
- Java Web 應用性能改進技巧
- Java 算法
- Java 算法和實現
- 冒泡排序 Java 示例
- 插入排序 Java 示例
- 歸并排序 Java 示例
- 快速排序 Java 示例
- 選擇排序 Java 示例
- Java AES 加密解密示例
- 使用 Soundex 算法實現語音搜索
- Java 比較和交換示例 – CAS 算法
- Python 教程
- Python 教程
- 如何在 Sublime 編輯器中安裝 Python 包
- Python – 注釋
- Python – 變量
- Python – 數據類型
- Python – 關鍵字
- Python – 字符串
- Python – 列表
- Python – 元組
- Python max()和min()– 在列表或數組中查找最大值和最小值
- Python 找到 N 個最大的或最小的項目
- Python 讀寫 CSV 文件
- Python httplib2 – HTTP GET 和 POST 示例
- Python 將元組解包為變量或參數
- Python 解包元組 – 太多值無法解包
- Python 多重字典示例 – 將單個鍵映射到字典中的多個值
- Python OrderedDict – 有序字典
- Python 字典交集 – 比較兩個字典
- Python 優先級隊列示例
- RxJava 教程
- 完整的 Java Servlet 教程
- vaadin 教程
- 使用 Maven 的 vaadin HelloWorld Web 應用
- Vaadin ComboBox示例
- vaadin 文本字段示例
- Vaadin Spring Security BasicAuth 示例
- SQL 教程
- SQL – 不使用臨時表刪除重復行
- 查找員工的第 N 高薪的 SQL 查詢
- SQLException:用戶root@localhost的訪問被拒絕
- Struts2 教程
- Struts2 HelloWorld 示例
- Struts2 HelloWorld 注解示例
- 使用@InterceptorRef的 Struts2 自定義攔截器示例
- Struts2 – 如何正確設置結果路徑
- Spring4 + Struts2 + Hibernate 集成教程
- [已解決] 無法找到ref-name引用的攔截器類
- [已解決]:找不到擴展名properties或xml的結果類型
- 數據結構教程
- 使用數組的 Java 棧實現
- Java 中的自定義列表實現示例
- HTML5 教程
- HTML5 – <section>標簽示例
- HTML5 字符集 – 字符編碼聲明
- HTML5 DOCTYPE聲明示例
- Java 題目
- Java 面試題目與答案
- Java 中的無效代碼和無法訪問的代碼
- Java 字符串回文 – Java 數字回文示例
- 檢測LinkedList中的無限循環的示例
- 復合賦值運算符i += j與 Java 中的i = i + j不同
- Java 中的 HiLo 猜謎游戲
- Java 題目 – 查找所有重復的元素
- Java 題目 – TreeMap的放置操作
- 題目 – 返回所有字符串中的第 N 長字符串
- Java 題目:好的字符串 – 壞的字符串
- 題目 – 檢查字符串是否完整(包含所有字母)
- Java 中的反轉字符串 - 單詞反轉字符串
- 用 Java 計算階乘的 3 種方法
- Java 中的 FizzBu??zz 解決方案
- 從 Java 中的序列/數組中查找缺失的數字
- Java – 不使用“new”關鍵字創建對象
- 面試問題
- Java 面試問題
- Java 字符串面試問題與答案
- Java 核心面試問題 – 第 1 部分
- Java 核心面試問題 – 第 2 部分
- Java 核心面試問題 – 第 3 部分
- Java 面試的 40 個熱門問答集
- 中級開發人員的 Java 面試問題
- 針對 Oracle 企業管理器項目的實際 Java 面試問題
- HashMap和ConcurrentHashMap面試問題
- Java 版本和新特性