# 如何使用 JUnit 進行單元測試
> 原文: [https://javatutorial.net/how-to-use-junit-for-unit-testing](https://javatutorial.net/how-to-use-junit-for-unit-testing)
## 什么是軟件測試,為什么有用?
最簡單的測試軟件是評估其是否滿足所有要求,并檢查與當前狀態相關的任何不良行為和錯誤。

## 用 Java 測試
Java 有多種可用的測試框架,但是,在本教程中,我們將重點介紹 JUnit,因為它是最受歡迎的框架之一。
## 關于 JUnit 的一些知識
[JUnit](https://javatutorial.net/how-to-use-junit-for-unit-testing) 是一個 Java 框架,它允許我們編寫和運行自動測試。 隨著框架的最新更新,JUnits 的可讀性大大提高。
## 設置 JUnit
如果您使用的是通用的 [IDE](https://javatutorial.net/choose-your-java-ide-eclipse-netbeans-and-intellij-idea) ,例如 Eclipse,IntelliJ 或 NetBeans,則默認情況下已安裝 JUnit。 如果您不使用 IDE,而僅使用 Maven 或 Gradle,則需要在`pom.xml`或 gradle 文件中將其安裝。
如果在 Eclipse 中創建 [Maven](https://javatutorial.net/how-to-install-maven-on-windows-linux-and-mac) 項目,然后選擇`archetype-quickstart`并轉到`pom.xml`文件,您將看到 Eclipse 自動將 JUnit 添加為依賴項。
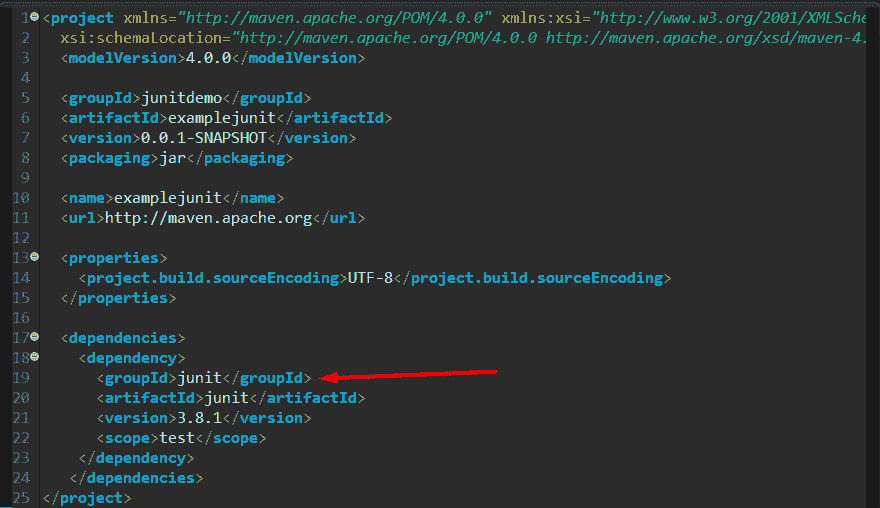
但是,版本是 3.8.1。 我們不想要那樣,我們想要 JUnit 4 或 JUni5。
### JUnit 4
因此,讓我們刪除默認版本,然后將其替換為較新的版本,如下所示:
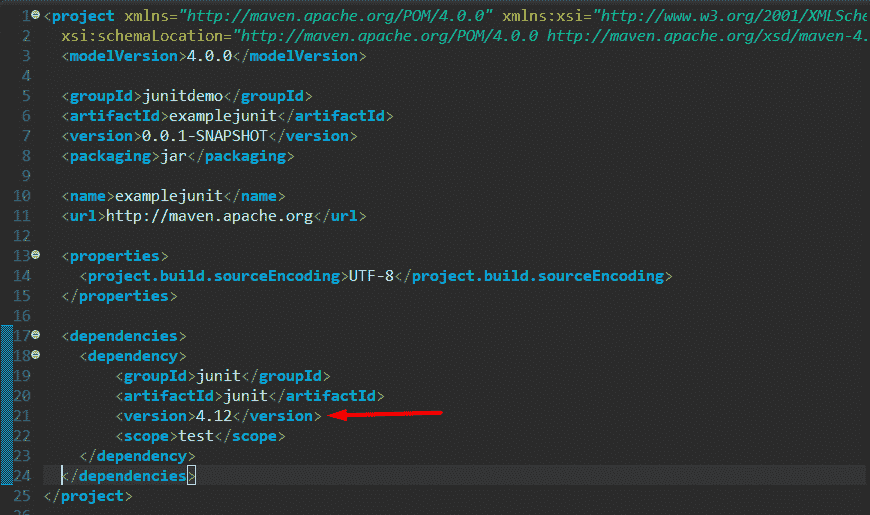
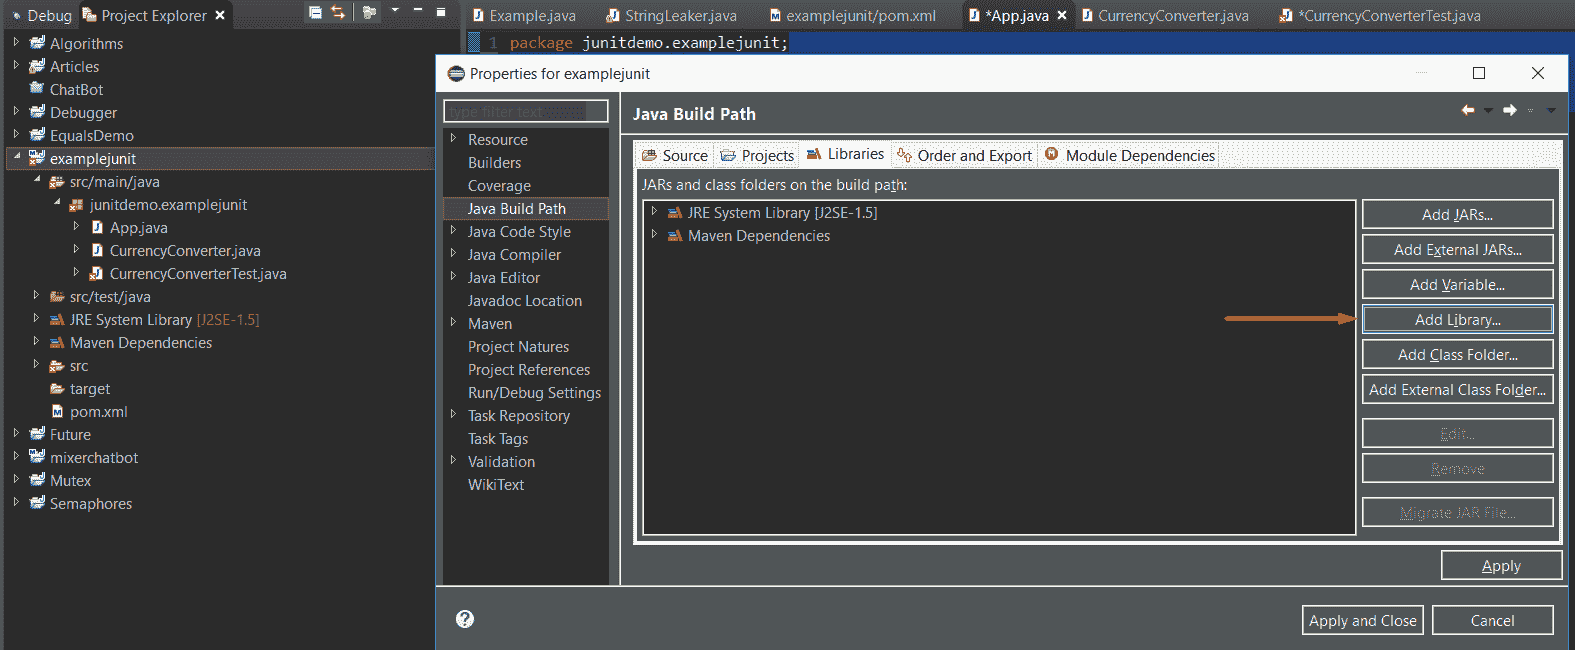
但是,在將其添加為依賴項并且無法識別`org.junit`之后,請執行以下操作:
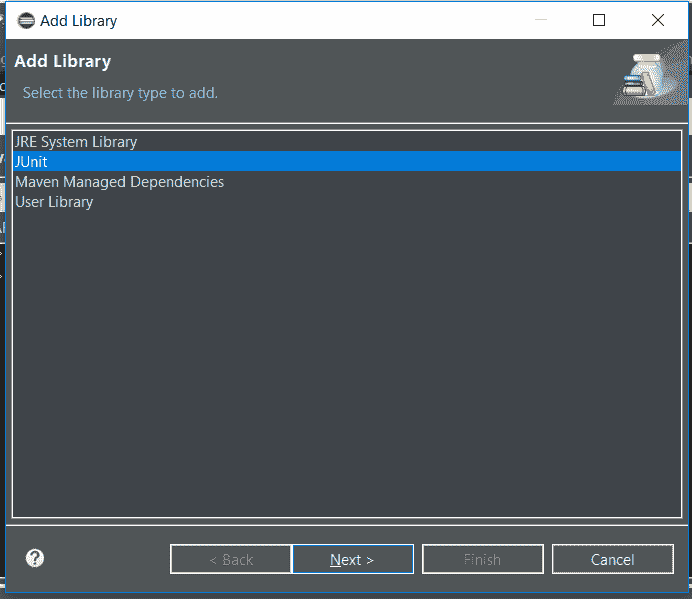
在 Eclipse 中:屬性 -> Java 構建路徑 -> 庫 -> 添加庫 -> JUnit
## 如何使用 JUnit 示例
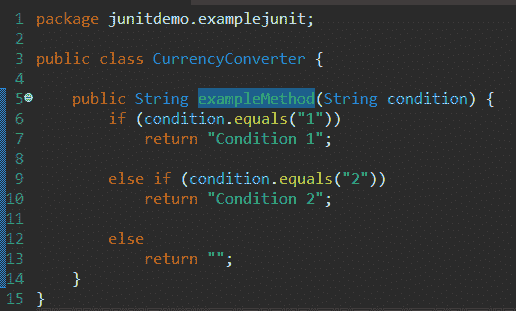
這是我的簡單程序,我們將在以下程序上運行 JUnit 測試:
### 我的測試類
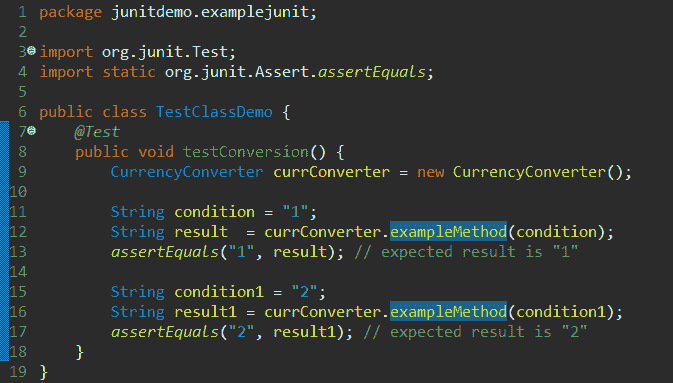
好的! 我們只在`exmipeMethod`方法上運行了 2 個測試。
### 分解
注意,方法`testConversion()`帶有 JUnit `@Test`注釋。 這樣做是為了使單元測試運行程序知道此方法代表單元測試,應該執行。 如果沒有此注釋,則不會將其表示為`Test`類,而且不會由測試運行者運行。
`assertEquals()`是執行實際測試的方法。 您真正關心的是第 13 和 17 行。`assertEquals()`方法有兩個參數,第一個參數是預期結果,第二個參數是實際結果。 您可以看到這是多么有用并且非常容易實現。
重要的是要指出,如果預期結果與實際結果匹配,則什么也不會發生,但是,如果預期結果與實際結果不匹配,則`assertEquals`會引發異常,并且測試方法將停止進一步執行。
您可以使用任意數量的測試方法。
## 運行一個 JUnit
### 在 Eclipse 中運行
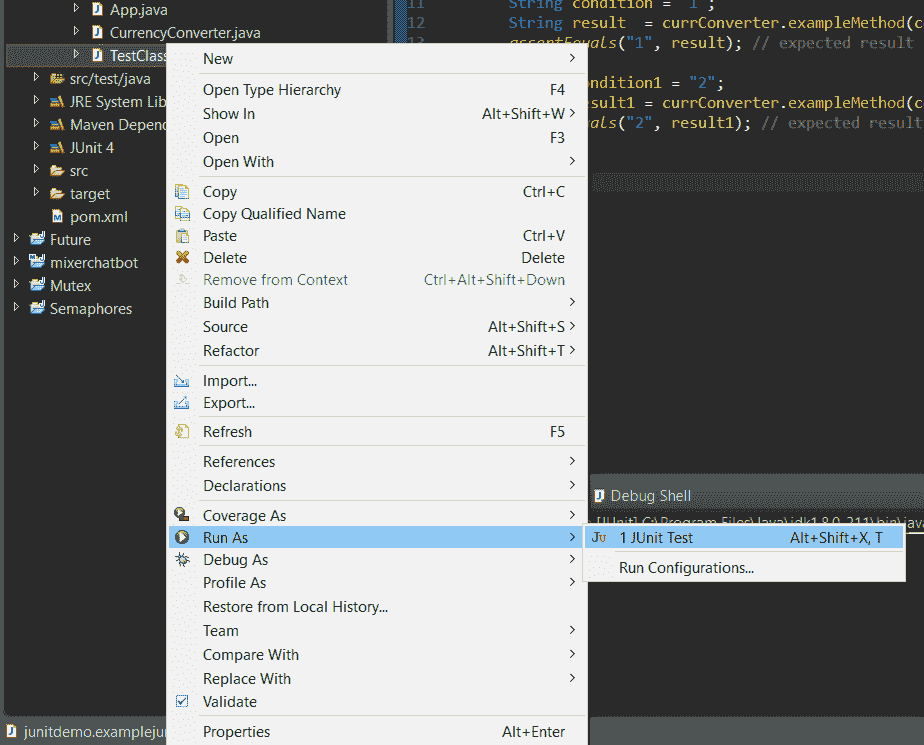
在 Eclipse 中,在 Package Explorer 上,找到 JUnit 測試,右鍵單擊,然后選擇“Run As -> JUnit Test”。
### 在 Maven 中運行
如果要使用 Maven 運行 JUnit,則可以使用`mvn test`運行整個測試套件,也可以運行特定的測試:`mvn -Dtest=TestName test`。
### 在 Gradle 中運行
在 gradle 中,對于整個測試套件:`gradlew test`,對于特定測試:`gradlew -Dtest.single=testName test`。
- JavaTutorialNetwork 中文系列教程
- Java 基礎
- Java 概述
- 在 Ubuntu 上安裝 Java 8 JDK
- Java Eclipse 教程
- Eclipse 快捷方式
- 簡單的 Java 示例
- Java 基本類型
- Java 循環
- Java 數組
- Java 讀取文件示例
- Java 對象和類教程
- 什么是面向對象編程(OOP)
- Java 封裝示例
- Java 接口示例
- Java 繼承示例
- Java 抽象示例
- Java 多態示例
- Java 中的方法重載與方法覆蓋
- Java 控制流語句
- Java 核心
- 如何在 Windows,Linux 和 Mac 上安裝 Maven
- 如何使用 Maven 配置文件
- 如何將自定義庫包含到 Maven 本地存儲庫中
- 如何使用 JUnit 進行單元測試
- 如何使用 Maven 運行 JUnit 測試
- 如何在 Java 中使用 Maven 創建子模塊
- 如何使用 Maven 創建 Java JAR 文件
- 如何使用 Maven 創建 Java WAR 文件
- JVM 解釋
- Java 內存模型解釋示例
- 捕獲 Java 堆轉儲的前 3 種方法
- Java 垃圾收集
- Java 互斥量示例
- Java 信號量示例
- Java 并行流示例
- Java 線程同步
- Java 線程池示例
- Java ThreadLocal示例
- Java 中的活鎖和死鎖
- Java Future示例
- Java equals()方法示例
- Java Lambda 表達式教程
- Java Optional示例
- Java 11 HTTP 客戶端示例
- Java 類加載器介紹
- Java 枚舉示例
- Java hashCode()方法示例
- 如何測試獨立的 Java 應用程序
- SWING JFrame基礎知識,如何創建JFrame
- Java SWING JFrame布局示例
- 在JFrame上顯示文本和圖形
- 與JFrame交互 – 按鈕,監聽器和文本區域
- 如何使用 Maven 創建 Java JAR 文件
- Java Collection新手指南
- 選擇合適的 Java 集合
- Java ArrayList示例
- Java LinkedList示例
- Java HashSet示例
- Java TreeSet示例
- Java LinkedHashSet示例
- Java EnumSet示例
- Java ConcurrentHashSet示例
- Java HashMap示例
- Java LinkedHashMap示例
- Java TreeMap示例
- Java EnumMap示例
- Java WeakHashMap示例
- Java IdentityHashMap示例
- Java SortedMap示例
- Java ConcurrentMap示例
- Java Hashtable示例
- Java 中ArrayList和LinkedList之間的區別
- Java HashMap迭代示例
- Java HashMap內聯初始化
- Java 中HashMap和TreeMap之間的區別
- Java 圖示例
- Java 深度優先搜索示例
- Java 廣度優先搜索示例
- 不同的算法時間復雜度
- Java 序列化示例
- Java 反射示例
- Java 中的弱引用
- Java 8 日期時間 API
- Java 基本正則表達式
- 使用 Java 檢索可用磁盤空間
- Java 生成 MD5 哈希和
- Java 增加內存
- Java 屬性文件示例
- 如何在 Eclipse 上安裝 Java 9 Beta
- Java 9 JShell 示例
- Java 9 不可變列表示例
- Java 9 不可變集示例
- Java 9 不可變映射示例
- Java 單例設計模式示例
- Java 代理設計模式示例
- Java 觀察者設計模式示例
- Java 工廠設計模式
- Java 構建器設計模式
- Java 比較器示例
- Java 發送電子郵件示例
- Java volatile示例
- Java Docker 和 Docker 容器簡介
- 安裝和配置 MySQL 數據庫和服務器以供 Spring 使用
- 如何在 Java 中使用 MySQL 連接器
- 如何使用 Eclipse 調試 Java
- Java EE
- 如何在 Windows 10 中設置JAVA_HOME
- JavaBeans 及其組件簡介
- 如何安裝和配置 Tomcat 8
- 如何在 Tomcat 中部署和取消部署應用程序
- 從 Eclipse 運行 Tomcat
- Java Servlet 示例
- Java Servlet POST 示例
- Servlet 請求信息示例
- Servlet 注解示例
- 使用初始化參數配置 Java Web 應用程序
- Java Servlet 文件上傳
- Java JSP 示例
- Glassfish 啟用安全管理
- 如何使用 MySQL 配置 Glassfish 4
- Java 文件上傳 REST 服務
- Glassfish 和 Jetty 的 Java WebSockets 教程
- 基于 Glassfish 表單的身份驗證示例
- 如何使用 Java EE 和 Angular 構建單頁應用程序
- Spring
- 在 Eclipse 中安裝 Spring STS
- 使用 STS 創建簡單的 Spring Web App
- Spring Web Framework 簡介
- Java Docker 和 Docker 容器簡介
- 在 Spring 中實現控制器
- Spring 中的PathVariable注解
- Spring 中的RequestBody注解
- Spring 中的RequestParam注解
- Spring 攔截器
- Spring IOC
- Java Spring IoC 容器示例
- Spring 中的DispatcherServlet
- Spring 示例中的依賴注入
- 實現 Spring MVC 控制器
- Spring ORM 簡介
- 什么是 DAO 以及如何使用它
- 如何對 DAO 組件進行單元測試
- 如何對控制器和服務執行單元測試
- 安裝和配置 MySQL 數據庫和服務器以供 Spring 使用
- 如何在 Spring 中處理登錄身份驗證
- Spring Security 簡介及其設置
- 如何使用 Spring 創建 RESTful Web 服務
- Spring CSRF 保護
- Spring 中基于 OAuth2 的身份驗證和授權
- Spring Boot 簡介
- Spring MVC 框架介紹
- Spring JDBC 簡介
- 如何 docker 化 Spring 應用程序
- Spring 的@Autowired注解
- Spring AOP 中的核心概念和建議類型
- Sping Bean 簡介
- 如何在 Java 中使用 MySQL 連接器
- 安卓
- 安裝和配置 Android Studio
- 將 Android 設備連接到 Android Studio
- Android 簡介,活動,意圖,服務,布局
- 創建一個簡單的 Android 應用
- 運行和調試 Android 應用程序
- 在虛擬設備上運行 Android 應用程序
- Android 活動示例
- Android 意圖示例
- Android 服務示例
- Android 線性布局示例
- Android 相對布局示例
- Android Web 視圖示例
- Android 列表視圖示例
- Android 網格視圖示例
- 帶有ListAdapter的 Android ListView示例
- Android SQLite 數據庫介紹
- Android SQLite 數據庫示例
- Android 動畫教程
- Android 中的通知
- Android 中的事件處理
- 如何在 Android 中發送帶有附件的電子郵件
- 雜項
- 選擇您的 JAVA IDE:Eclipse,NetBeans 和 IntelliJ IDEA
- Java S3 示例
- 如何在 Ubuntu 上為多個站點配置 Apache
- 如何在 Liferay DXP 中替代現成的(OOTB)模塊
- 簡單的 Git 教程
- 使用 Java 捕獲網絡數據包
- Selenium Java 教程
- 使用特定工作區運行 Eclipse
- 在 Eclipse 中安裝 SVN
- 如何運行 NodeJS 服務器
- SQL 內連接示例
- SQL 左連接示例
- SQL 右連接示例
- SQL 外連接示例
- 樹莓派
- Raspberry Pi 3 規格
- 將 Raspbian 安裝到 SD 卡
- Raspberry Pi 首次啟動
- 遠程連接到 Raspberry Pi
- 建立 Raspberry Pi 遠程桌面連接
- Raspberry Pi Java 教程
- 使用 PWM 的 Raspberry Pi LED 亮度調節
- Raspberry Pi 控制電機速度
- Raspberry Pi 用 Java 控制直流電機的速度和方向
