# Android 相對布局示例
> 原文: [https://javatutorial.net/android-relative-layout-example](https://javatutorial.net/android-relative-layout-example)
本教程通過示例說明了 Android 中的相對布局。
Android 中的布局對于基于 GUI 的應用程序非常重要。 在上一教程中,我們學習了[線性布局](https://javatutorial.net/android-linear-layout-example),本教程介紹了 Android 中的相對布局。
## 相對布局
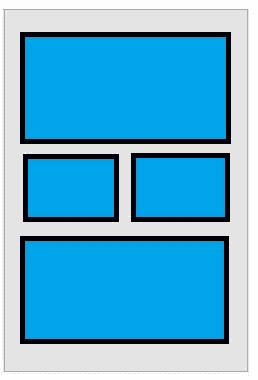
顧名思義,相對布局顯示組件之間的相對位置。 可以相對于連續元素或父組件來指定位置。 相對布局是 Android 提供的最靈活的布局。 它使您可以在屏幕上放置元素。 默認情況下,它將所有組件設置在布局的左上方。 下圖顯示了相對布局的外觀,

相對布局
## 相對布局屬性
以下是相對布局的屬性。
* `Id`:定義布局 ID
* `Gravity`*它指定對象在 x-y 平面中的位置。
* `IgnoreGravity`:被添加以忽略特定組件上的重力。
## 相對布局構造函數
相對布局具有四個不同的構造函數
* `RelativeLayout(Contetxt context)`
* `RelativeLayout(Contetxt context, AttributeSet attribute)`
* `RelativeLayout(Contetxt context, AttributeSet attribute, int defStyleAttribute)`
* `RelativeLayout(Contetxt context, AttributeSet attribute, int defStyleAttribute, in defStyleRes)`
## 相對布局的方法
以下是相對布局的幾種重要方法
* `setGravity()`:它將子視圖的重力設置為居中,向左或向右。
* `setHorizo??ntalGravity()`:用于水平定位元素。
* `setVerticalGravity()`:用于垂直放置元素。
* `requestLayout()`:用于請求布局。
* `setIgnoreGravity()`:用于忽略任何特定元素的重力。
* `getGravity()`:用于獲取元素的位置。
* `getAccessibilityClassName()`:返回對象的類名稱。
## 相對布局的 XML 屬性
相對布局具有以下 XML 屬性。
`android:layout_above`,它將給定組件的底部邊緣定位在給定組件 ID 上方。
`android:layout_alignBaseline`,它將給定組件的基線置于給定組件 ID 的基線之上。
`android:layout_alignBottom`,它在給定組件 ID 的底部對齊。
`android:layout_alignEnd`,它在給定組件 ID 的末尾對齊。
`android:layout_alignLeft`,它將組件定位在給定組件 ID 的左側。
`android:layout_alignRight`,將該組件定位在給定組件 ID 的右側。
## 相對布局示例
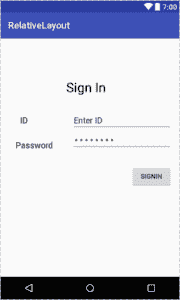
以下示例顯示了 Android 中的相對布局。 創建一個空的活動并將相對布局從調色板拖到屏幕上。 然后拖動所需的 GUI 組件。 這是 xml 文件。
```java
<?xml version="1.0" encoding="utf-8"?>
<RelativeLayout android:layout_width="368dp"
android:layout_height="495dp"
xmlns:tools="http://schemas.android.com/tools"
tools:layout_editor_absoluteX="8dp"
tools:layout_editor_absoluteY="8dp"
xmlns:android="http://schemas.android.com/apk/res/android">
<TextView
android:id="@+id/textView"
android:layout_width="wrap_content"
android:layout_height="wrap_content"
android:layout_alignParentLeft="true"
android:layout_alignParentStart="true"
android:layout_alignParentTop="true"
android:layout_marginLeft="141dp"
android:layout_marginStart="141dp"
android:layout_marginTop="89dp"
android:text="Sign In"
android:textColor="@android:color/black"
android:textColorLink="@android:color/black"
android:textSize="28sp" />
<TextView
android:id="@+id/textView2"
android:layout_width="wrap_content"
android:layout_height="wrap_content"
android:layout_marginTop="43dp"
android:text="ID"
android:textColor="@android:color/black"
android:textSize="18sp"
android:typeface="normal"
android:layout_below="@+id/textView"
android:layout_alignLeft="@+id/textView5"
android:layout_alignStart="@+id/textView5"
android:layout_marginLeft="10dp"
android:layout_marginStart="10dp" />
<EditText
android:id="@+id/editText"
android:layout_width="wrap_content"
android:layout_height="wrap_content"
android:ems="10"
android:inputType="textPersonName"
android:text="Enter ID"
android:layout_alignBaseline="@+id/textView2"
android:layout_alignBottom="@+id/textView2"
android:layout_alignLeft="@+id/editText2"
android:layout_alignStart="@+id/editText2" />
<TextView
android:id="@+id/textView5"
android:layout_width="wrap_content"
android:layout_height="wrap_content"
android:textSize="18sp"
android:textColor="@android:color/black"
android:text="Password"
android:layout_alignBottom="@+id/editText2"
android:layout_alignParentLeft="true"
android:layout_alignParentStart="true"
android:layout_marginLeft="32dp"
android:layout_marginStart="32dp" />
<EditText
android:id="@+id/editText2"
android:layout_width="wrap_content"
android:layout_height="wrap_content"
android:layout_alignParentEnd="true"
android:layout_alignParentRight="true"
android:layout_below="@+id/editText"
android:ems="10"
android:text="Password"
android:inputType="textPassword" />
<Button
android:id="@+id/S"
android:layout_width="wrap_content"
android:layout_height="wrap_content"
android:layout_alignParentEnd="true"
android:layout_alignParentRight="true"
android:layout_below="@+id/editText2"
android:layout_marginTop="32dp"
android:text="SignIn" />
</RelativeLayout>
```
這是輸出的樣子

相對布局示例
您可以從[鏈接](https://github.com/JavaTutorialNetwork/Tutorials/blob/master/RelativeLayout.rar)下載源代碼。
- JavaTutorialNetwork 中文系列教程
- Java 基礎
- Java 概述
- 在 Ubuntu 上安裝 Java 8 JDK
- Java Eclipse 教程
- Eclipse 快捷方式
- 簡單的 Java 示例
- Java 基本類型
- Java 循環
- Java 數組
- Java 讀取文件示例
- Java 對象和類教程
- 什么是面向對象編程(OOP)
- Java 封裝示例
- Java 接口示例
- Java 繼承示例
- Java 抽象示例
- Java 多態示例
- Java 中的方法重載與方法覆蓋
- Java 控制流語句
- Java 核心
- 如何在 Windows,Linux 和 Mac 上安裝 Maven
- 如何使用 Maven 配置文件
- 如何將自定義庫包含到 Maven 本地存儲庫中
- 如何使用 JUnit 進行單元測試
- 如何使用 Maven 運行 JUnit 測試
- 如何在 Java 中使用 Maven 創建子模塊
- 如何使用 Maven 創建 Java JAR 文件
- 如何使用 Maven 創建 Java WAR 文件
- JVM 解釋
- Java 內存模型解釋示例
- 捕獲 Java 堆轉儲的前 3 種方法
- Java 垃圾收集
- Java 互斥量示例
- Java 信號量示例
- Java 并行流示例
- Java 線程同步
- Java 線程池示例
- Java ThreadLocal示例
- Java 中的活鎖和死鎖
- Java Future示例
- Java equals()方法示例
- Java Lambda 表達式教程
- Java Optional示例
- Java 11 HTTP 客戶端示例
- Java 類加載器介紹
- Java 枚舉示例
- Java hashCode()方法示例
- 如何測試獨立的 Java 應用程序
- SWING JFrame基礎知識,如何創建JFrame
- Java SWING JFrame布局示例
- 在JFrame上顯示文本和圖形
- 與JFrame交互 – 按鈕,監聽器和文本區域
- 如何使用 Maven 創建 Java JAR 文件
- Java Collection新手指南
- 選擇合適的 Java 集合
- Java ArrayList示例
- Java LinkedList示例
- Java HashSet示例
- Java TreeSet示例
- Java LinkedHashSet示例
- Java EnumSet示例
- Java ConcurrentHashSet示例
- Java HashMap示例
- Java LinkedHashMap示例
- Java TreeMap示例
- Java EnumMap示例
- Java WeakHashMap示例
- Java IdentityHashMap示例
- Java SortedMap示例
- Java ConcurrentMap示例
- Java Hashtable示例
- Java 中ArrayList和LinkedList之間的區別
- Java HashMap迭代示例
- Java HashMap內聯初始化
- Java 中HashMap和TreeMap之間的區別
- Java 圖示例
- Java 深度優先搜索示例
- Java 廣度優先搜索示例
- 不同的算法時間復雜度
- Java 序列化示例
- Java 反射示例
- Java 中的弱引用
- Java 8 日期時間 API
- Java 基本正則表達式
- 使用 Java 檢索可用磁盤空間
- Java 生成 MD5 哈希和
- Java 增加內存
- Java 屬性文件示例
- 如何在 Eclipse 上安裝 Java 9 Beta
- Java 9 JShell 示例
- Java 9 不可變列表示例
- Java 9 不可變集示例
- Java 9 不可變映射示例
- Java 單例設計模式示例
- Java 代理設計模式示例
- Java 觀察者設計模式示例
- Java 工廠設計模式
- Java 構建器設計模式
- Java 比較器示例
- Java 發送電子郵件示例
- Java volatile示例
- Java Docker 和 Docker 容器簡介
- 安裝和配置 MySQL 數據庫和服務器以供 Spring 使用
- 如何在 Java 中使用 MySQL 連接器
- 如何使用 Eclipse 調試 Java
- Java EE
- 如何在 Windows 10 中設置JAVA_HOME
- JavaBeans 及其組件簡介
- 如何安裝和配置 Tomcat 8
- 如何在 Tomcat 中部署和取消部署應用程序
- 從 Eclipse 運行 Tomcat
- Java Servlet 示例
- Java Servlet POST 示例
- Servlet 請求信息示例
- Servlet 注解示例
- 使用初始化參數配置 Java Web 應用程序
- Java Servlet 文件上傳
- Java JSP 示例
- Glassfish 啟用安全管理
- 如何使用 MySQL 配置 Glassfish 4
- Java 文件上傳 REST 服務
- Glassfish 和 Jetty 的 Java WebSockets 教程
- 基于 Glassfish 表單的身份驗證示例
- 如何使用 Java EE 和 Angular 構建單頁應用程序
- Spring
- 在 Eclipse 中安裝 Spring STS
- 使用 STS 創建簡單的 Spring Web App
- Spring Web Framework 簡介
- Java Docker 和 Docker 容器簡介
- 在 Spring 中實現控制器
- Spring 中的PathVariable注解
- Spring 中的RequestBody注解
- Spring 中的RequestParam注解
- Spring 攔截器
- Spring IOC
- Java Spring IoC 容器示例
- Spring 中的DispatcherServlet
- Spring 示例中的依賴注入
- 實現 Spring MVC 控制器
- Spring ORM 簡介
- 什么是 DAO 以及如何使用它
- 如何對 DAO 組件進行單元測試
- 如何對控制器和服務執行單元測試
- 安裝和配置 MySQL 數據庫和服務器以供 Spring 使用
- 如何在 Spring 中處理登錄身份驗證
- Spring Security 簡介及其設置
- 如何使用 Spring 創建 RESTful Web 服務
- Spring CSRF 保護
- Spring 中基于 OAuth2 的身份驗證和授權
- Spring Boot 簡介
- Spring MVC 框架介紹
- Spring JDBC 簡介
- 如何 docker 化 Spring 應用程序
- Spring 的@Autowired注解
- Spring AOP 中的核心概念和建議類型
- Sping Bean 簡介
- 如何在 Java 中使用 MySQL 連接器
- 安卓
- 安裝和配置 Android Studio
- 將 Android 設備連接到 Android Studio
- Android 簡介,活動,意圖,服務,布局
- 創建一個簡單的 Android 應用
- 運行和調試 Android 應用程序
- 在虛擬設備上運行 Android 應用程序
- Android 活動示例
- Android 意圖示例
- Android 服務示例
- Android 線性布局示例
- Android 相對布局示例
- Android Web 視圖示例
- Android 列表視圖示例
- Android 網格視圖示例
- 帶有ListAdapter的 Android ListView示例
- Android SQLite 數據庫介紹
- Android SQLite 數據庫示例
- Android 動畫教程
- Android 中的通知
- Android 中的事件處理
- 如何在 Android 中發送帶有附件的電子郵件
- 雜項
- 選擇您的 JAVA IDE:Eclipse,NetBeans 和 IntelliJ IDEA
- Java S3 示例
- 如何在 Ubuntu 上為多個站點配置 Apache
- 如何在 Liferay DXP 中替代現成的(OOTB)模塊
- 簡單的 Git 教程
- 使用 Java 捕獲網絡數據包
- Selenium Java 教程
- 使用特定工作區運行 Eclipse
- 在 Eclipse 中安裝 SVN
- 如何運行 NodeJS 服務器
- SQL 內連接示例
- SQL 左連接示例
- SQL 右連接示例
- SQL 外連接示例
- 樹莓派
- Raspberry Pi 3 規格
- 將 Raspbian 安裝到 SD 卡
- Raspberry Pi 首次啟動
- 遠程連接到 Raspberry Pi
- 建立 Raspberry Pi 遠程桌面連接
- Raspberry Pi Java 教程
- 使用 PWM 的 Raspberry Pi LED 亮度調節
- Raspberry Pi 控制電機速度
- Raspberry Pi 用 Java 控制直流電機的速度和方向
