
# 實現 Spring MVC 控制器
> 原文: [https://javatutorial.net/implementing-spring-mvc-controllers](https://javatutorial.net/implementing-spring-mvc-controllers)
本教程描述了實現 Spring MVC 控制器的不同方法,并提供了示例。
在我以前的教程,[使用 STS 創建簡單的 Spring Web App](https://javatutorial.net/spring-web-app-sts) 中,我向您展示了如何構建引入控制器的 Spring Boot App。 本教程是對上一個教程的擴展。
在開始實現之前,讓我們快速概述一下控制器如何參與 MVC 工作流程。
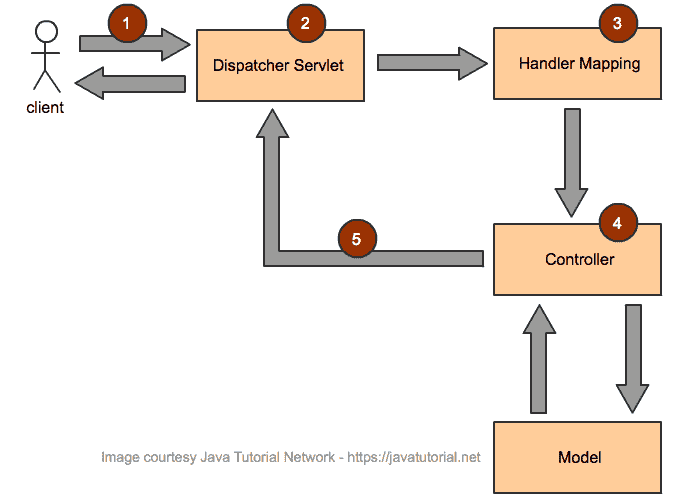
Spring MVC 架構工作流程
1. 來自客戶端的傳入請求由調度器 Servlet 解釋
2. 調度器 Servlet 通過解析請求屬性并使對象對處理程序可用來進行初始處理。
3. 確定并調用適當的處理程序以進一步處理請求。 確定適當控制器上的適當方法
4. 控制器處理請求并返回`ModelAndView`的實例
5. 調度器 Servlet 進一步處理`ModelAndView`的實例,以將響應發送給客戶端
## 在 Spring Boot 應用程序中啟用 JSP
如果要啟用 JSP,則必須執行以下操作:
在`pom.xml`文件中添加以下依賴項:
```java
<dependency>
<groupId>org.apache.tomcat.embed</groupId>
<artifactId>tomcat-embed-jasper</artifactId>
</dependency>
<dependency>
<groupId>javax.servlet</groupId>
<artifactId>jstl</artifactId>
</dependency>
```
在`src/main/resources/application.properties`中添加這兩行
```java
spring.mvc.view.prefix=/WEB-INF/jsp/
spring.mvc.view.suffix=.jsp
```
創建文件夾`src/main/resources/META-INF/resources/WEB-INF/jsp/`并將 JSP 文件放入其中
## 實現 Spring 控制器返回 JSP 頁面
以下示例演示如何在 Spring `Controller`方法中返回 JSP 頁面。 請注意`@Controller`注釋和`@RequestMapping`注釋的用法。 如果我們想返回一個 JSP 頁面,我們將不使用`@ResponseBody`注釋(如第二個示例所示)。
```java
package net.javatutorial.tutorials;
import org.springframework.boot.SpringApplication;
import org.springframework.boot.autoconfigure.SpringBootApplication;
import org.springframework.stereotype.Controller;
import org.springframework.web.bind.annotation.RequestMapping;
@Controller
@SpringBootApplication
public class ControllerExampleJSP {
@RequestMapping("/hellojsp")
String helloJSP() {
return("index");
}
public static void main(String[] args) {
SpringApplication.run(ControllerExampleJSP.class, args);
}
}
```
`@RequestMapping`注釋將網址`http://localhost:8080/hellojsp`插入到控制器的方法`helloJSP()`中。 此方法返回`index.jsp`的解析內容
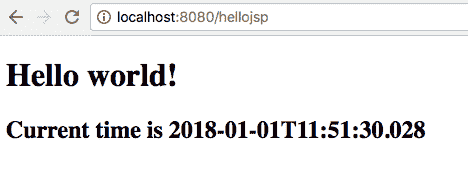
使用 Spring 控制器渲染 JSP 頁面
## 用`ResponseBody`實現控制器
與前面的示例不同,此示例將返回由方法而不是 JSP 頁面生成的`String`。 我們唯一需要更改的就是將`@ResponseBody`注解添加到我們的控制器方法中
```java
package net.javatutorial.tutorials;
import org.springframework.boot.SpringApplication;
import org.springframework.boot.autoconfigure.SpringBootApplication;
import org.springframework.stereotype.Controller;
import org.springframework.web.bind.annotation.RequestMapping;
import org.springframework.web.bind.annotation.ResponseBody;
@Controller
@SpringBootApplication
public class ControllerResponseBodyExample {
@RequestMapping("/helloresponsebody")
@ResponseBody
String helloResponseBody() {
return("Hello World. This is produced by a method annotated with ResponseBody");
}
public static void main(String[] args) {
SpringApplication.run(ControllerResponseBodyExample.class, args);
}
}
```
在瀏覽器中調用`http://localhost:8080/helloresponsebody`將產生以下輸出:
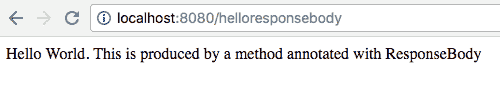
使用 Spring `Controller`和`ResponseBody`進行輸出
## 實現 Spring `RestController`
`@RestController`注釋用作方便注釋,以表示諸如`@Controller`和`@ResponseBody`之類的注釋。 在類級別使用時,控制器可以處理 REST API 請求。
```java
package net.javatutorial.tutorials;
import org.springframework.boot.SpringApplication;
import org.springframework.boot.autoconfigure.SpringBootApplication;
import org.springframework.web.bind.annotation.RequestMapping;
import org.springframework.web.bind.annotation.RestController;
@RestController
@SpringBootApplication
public class RestControllerExample {
@RequestMapping("/hellorest")
String helloRest() {
return("Hello World. This is produced by the rest conntroller method");
}
public static void main(String[] args) {
SpringApplication.run(RestControllerExample.class, args);
}
}
```
在瀏覽器中調用`http://localhost:8080/hellorest`將產生以下輸出:
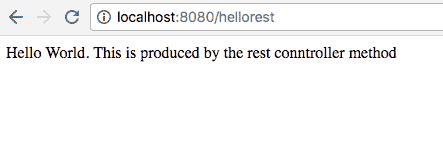
使用 Spring `RestController`輸出
## 在方法和類級別使用`@RequestMapping`注釋
Spring 4.3 引入了諸如`@GetMapping`,`@PostMapping`和`@PutMapping`等注解,以指定常見 HTTP 方法類型(如 GET,POST 和 PUT)的映射。 這些注釋增強了代碼的可讀性。
以下示例演示了如何在方法和類級別上使用映射注釋。
```java
package net.javatutorial.tutorials;
import org.springframework.boot.SpringApplication;
import org.springframework.boot.autoconfigure.SpringBootApplication;
import org.springframework.web.bind.annotation.GetMapping;
import org.springframework.web.bind.annotation.RequestMapping;
import org.springframework.web.bind.annotation.RestController;
@RestController
@RequestMapping("/user/*")
@SpringBootApplication
public class MethodAndClassLevelAnnotations {
@RequestMapping
String login() {
return("Login method called");
}
@GetMapping("/logout")
String logout() {
return("Logout method called");
}
public static void main(String[] args) {
SpringApplication.run(MethodAndClassLevelAnnotations.class, args);
}
}
```
向以下網址`http://localhost:8080/user/`發出請求,將調用`login()`方法。 注意,注釋`login()`方法的`@RequestMapping`沒有參數。
在類級別使用的`@RequestMapping("/user/*")`注釋用作兜底方法,以使用`/*`表示的不同路徑來處理所有請求。
請求`http://localhost:8080/user/logout`將調用`logout()`方法。 `@GetMapping`注釋是一個組合的注釋,用作`@RequestMapping(method = RequestMethod.GET)`
您可以在[我們的 GitHub 存儲庫](https://github.com/JavaTutorialNetwork/Tutorials/tree/master/SpringImplementingControllers)中找到本教程中的代碼示例。
- JavaTutorialNetwork 中文系列教程
- Java 基礎
- Java 概述
- 在 Ubuntu 上安裝 Java 8 JDK
- Java Eclipse 教程
- Eclipse 快捷方式
- 簡單的 Java 示例
- Java 基本類型
- Java 循環
- Java 數組
- Java 讀取文件示例
- Java 對象和類教程
- 什么是面向對象編程(OOP)
- Java 封裝示例
- Java 接口示例
- Java 繼承示例
- Java 抽象示例
- Java 多態示例
- Java 中的方法重載與方法覆蓋
- Java 控制流語句
- Java 核心
- 如何在 Windows,Linux 和 Mac 上安裝 Maven
- 如何使用 Maven 配置文件
- 如何將自定義庫包含到 Maven 本地存儲庫中
- 如何使用 JUnit 進行單元測試
- 如何使用 Maven 運行 JUnit 測試
- 如何在 Java 中使用 Maven 創建子模塊
- 如何使用 Maven 創建 Java JAR 文件
- 如何使用 Maven 創建 Java WAR 文件
- JVM 解釋
- Java 內存模型解釋示例
- 捕獲 Java 堆轉儲的前 3 種方法
- Java 垃圾收集
- Java 互斥量示例
- Java 信號量示例
- Java 并行流示例
- Java 線程同步
- Java 線程池示例
- Java ThreadLocal示例
- Java 中的活鎖和死鎖
- Java Future示例
- Java equals()方法示例
- Java Lambda 表達式教程
- Java Optional示例
- Java 11 HTTP 客戶端示例
- Java 類加載器介紹
- Java 枚舉示例
- Java hashCode()方法示例
- 如何測試獨立的 Java 應用程序
- SWING JFrame基礎知識,如何創建JFrame
- Java SWING JFrame布局示例
- 在JFrame上顯示文本和圖形
- 與JFrame交互 – 按鈕,監聽器和文本區域
- 如何使用 Maven 創建 Java JAR 文件
- Java Collection新手指南
- 選擇合適的 Java 集合
- Java ArrayList示例
- Java LinkedList示例
- Java HashSet示例
- Java TreeSet示例
- Java LinkedHashSet示例
- Java EnumSet示例
- Java ConcurrentHashSet示例
- Java HashMap示例
- Java LinkedHashMap示例
- Java TreeMap示例
- Java EnumMap示例
- Java WeakHashMap示例
- Java IdentityHashMap示例
- Java SortedMap示例
- Java ConcurrentMap示例
- Java Hashtable示例
- Java 中ArrayList和LinkedList之間的區別
- Java HashMap迭代示例
- Java HashMap內聯初始化
- Java 中HashMap和TreeMap之間的區別
- Java 圖示例
- Java 深度優先搜索示例
- Java 廣度優先搜索示例
- 不同的算法時間復雜度
- Java 序列化示例
- Java 反射示例
- Java 中的弱引用
- Java 8 日期時間 API
- Java 基本正則表達式
- 使用 Java 檢索可用磁盤空間
- Java 生成 MD5 哈希和
- Java 增加內存
- Java 屬性文件示例
- 如何在 Eclipse 上安裝 Java 9 Beta
- Java 9 JShell 示例
- Java 9 不可變列表示例
- Java 9 不可變集示例
- Java 9 不可變映射示例
- Java 單例設計模式示例
- Java 代理設計模式示例
- Java 觀察者設計模式示例
- Java 工廠設計模式
- Java 構建器設計模式
- Java 比較器示例
- Java 發送電子郵件示例
- Java volatile示例
- Java Docker 和 Docker 容器簡介
- 安裝和配置 MySQL 數據庫和服務器以供 Spring 使用
- 如何在 Java 中使用 MySQL 連接器
- 如何使用 Eclipse 調試 Java
- Java EE
- 如何在 Windows 10 中設置JAVA_HOME
- JavaBeans 及其組件簡介
- 如何安裝和配置 Tomcat 8
- 如何在 Tomcat 中部署和取消部署應用程序
- 從 Eclipse 運行 Tomcat
- Java Servlet 示例
- Java Servlet POST 示例
- Servlet 請求信息示例
- Servlet 注解示例
- 使用初始化參數配置 Java Web 應用程序
- Java Servlet 文件上傳
- Java JSP 示例
- Glassfish 啟用安全管理
- 如何使用 MySQL 配置 Glassfish 4
- Java 文件上傳 REST 服務
- Glassfish 和 Jetty 的 Java WebSockets 教程
- 基于 Glassfish 表單的身份驗證示例
- 如何使用 Java EE 和 Angular 構建單頁應用程序
- Spring
- 在 Eclipse 中安裝 Spring STS
- 使用 STS 創建簡單的 Spring Web App
- Spring Web Framework 簡介
- Java Docker 和 Docker 容器簡介
- 在 Spring 中實現控制器
- Spring 中的PathVariable注解
- Spring 中的RequestBody注解
- Spring 中的RequestParam注解
- Spring 攔截器
- Spring IOC
- Java Spring IoC 容器示例
- Spring 中的DispatcherServlet
- Spring 示例中的依賴注入
- 實現 Spring MVC 控制器
- Spring ORM 簡介
- 什么是 DAO 以及如何使用它
- 如何對 DAO 組件進行單元測試
- 如何對控制器和服務執行單元測試
- 安裝和配置 MySQL 數據庫和服務器以供 Spring 使用
- 如何在 Spring 中處理登錄身份驗證
- Spring Security 簡介及其設置
- 如何使用 Spring 創建 RESTful Web 服務
- Spring CSRF 保護
- Spring 中基于 OAuth2 的身份驗證和授權
- Spring Boot 簡介
- Spring MVC 框架介紹
- Spring JDBC 簡介
- 如何 docker 化 Spring 應用程序
- Spring 的@Autowired注解
- Spring AOP 中的核心概念和建議類型
- Sping Bean 簡介
- 如何在 Java 中使用 MySQL 連接器
- 安卓
- 安裝和配置 Android Studio
- 將 Android 設備連接到 Android Studio
- Android 簡介,活動,意圖,服務,布局
- 創建一個簡單的 Android 應用
- 運行和調試 Android 應用程序
- 在虛擬設備上運行 Android 應用程序
- Android 活動示例
- Android 意圖示例
- Android 服務示例
- Android 線性布局示例
- Android 相對布局示例
- Android Web 視圖示例
- Android 列表視圖示例
- Android 網格視圖示例
- 帶有ListAdapter的 Android ListView示例
- Android SQLite 數據庫介紹
- Android SQLite 數據庫示例
- Android 動畫教程
- Android 中的通知
- Android 中的事件處理
- 如何在 Android 中發送帶有附件的電子郵件
- 雜項
- 選擇您的 JAVA IDE:Eclipse,NetBeans 和 IntelliJ IDEA
- Java S3 示例
- 如何在 Ubuntu 上為多個站點配置 Apache
- 如何在 Liferay DXP 中替代現成的(OOTB)模塊
- 簡單的 Git 教程
- 使用 Java 捕獲網絡數據包
- Selenium Java 教程
- 使用特定工作區運行 Eclipse
- 在 Eclipse 中安裝 SVN
- 如何運行 NodeJS 服務器
- SQL 內連接示例
- SQL 左連接示例
- SQL 右連接示例
- SQL 外連接示例
- 樹莓派
- Raspberry Pi 3 規格
- 將 Raspbian 安裝到 SD 卡
- Raspberry Pi 首次啟動
- 遠程連接到 Raspberry Pi
- 建立 Raspberry Pi 遠程桌面連接
- Raspberry Pi Java 教程
- 使用 PWM 的 Raspberry Pi LED 亮度調節
- Raspberry Pi 控制電機速度
- Raspberry Pi 用 Java 控制直流電機的速度和方向