
# Android SQLite 數據庫示例
> 原文: [https://javatutorial.net/android-sqlite-database-example](https://javatutorial.net/android-sqlite-database-example)
[上一教程(https://javatutorial.net/android-sqlite-database-introduction)對 Android 中的 SQLite 數據庫進行了簡介。 本教程以示例說明了所有 CRUD(創建,檢索,更新,刪除)功能。
## 示例背景
讓我們開始使用 SQLite 數據庫。 本示例全部有關注冊和登錄過程以及將用戶憑據存儲到數據庫中的逐步說明。 當用戶單擊“注冊”按鈕時,將出現一個新活動,并且用戶填寫該表單,該表單具有四個值,分別是名字,姓氏,電子郵件 ID 和密碼。 當用戶單擊“確定”按鈕時,這些值將保存到數據庫中。 下圖顯示了數據庫中的注冊表的外觀
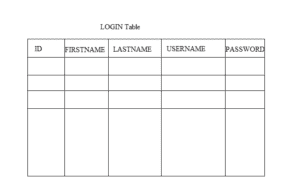
登錄表
## 第 1 步:活動布局
讓我們開始創建用于注冊和登錄的 xml 布局。如上所述,注冊有四個字段和一個確定按鈕。 用戶單擊“確定”按鈕時,將顯示一個對話框,因為已保存值,然后將開始登錄活動。
這是`activity_main.xml`的代碼
```java
<?xml version="1.0" encoding="utf-8"?>
<RelativeLayout android:layout_width="368dp"
android:layout_height="495dp"
xmlns:tools="http://schemas.android.com/tools"
tools:layout_editor_absoluteX="8dp"
tools:layout_editor_absoluteY="8dp"
xmlns:android="http://schemas.android.com/apk/res/android">
<TextView
android:id="@+id/textView2"
android:layout_width="wrap_content"
android:layout_height="wrap_content"
android:layout_alignParentTop="true"
android:layout_centerHorizontal="true"
android:layout_marginTop="104dp"
android:text="Sign In"
android:textColor="@android:color/holo_red_dark"
android:textSize="25sp" />
<EditText
android:id="@+id/Email"
android:layout_width="wrap_content"
android:layout_height="wrap_content"
android:layout_below="@+id/textView2"
android:layout_centerHorizontal="true"
android:layout_marginTop="26dp"
android:ems="10"
android:inputType="textPersonName"
android:text="Email ID" />
<EditText
android:id="@+id/Password"
android:layout_width="wrap_content"
android:layout_height="wrap_content"
android:layout_alignEnd="@+id/Email"
android:layout_alignRight="@+id/Email"
android:layout_centerVertical="true"
android:ems="10"
android:inputType="textPassword"
android:text="password" />
<Button
android:id="@+id/buttonSignIn"
android:layout_width="wrap_content"
android:layout_height="wrap_content"
android:layout_alignLeft="@+id/Password"
android:layout_alignStart="@+id/Password"
android:layout_below="@+id/Password"
android:layout_marginTop="52dp"
android:backgroundTint="@color/colorAccent"
android:onClick="SignIN"
android:text="Sign In" />
<Button
android:id="@+id/buttonSignUp"
android:layout_width="wrap_content"
android:layout_height="wrap_content"
android:layout_alignEnd="@+id/Password"
android:layout_alignRight="@+id/Password"
android:layout_alignTop="@+id/buttonSignIn"
android:backgroundTint="@color/colorAccent"
android:onClick="SignUP"
android:text="Sign Up" />
</RelativeLayout>
```
現在為`activity_sign_up.xml`創建另一個布局。 登錄有兩個字段和兩個按鈕,分別是“登錄”和“登錄”。 如果您已經有一個帳戶,請輸入 ID 和密碼并登錄。如果沒有,請單擊“注冊”按鈕并為您創建帳戶。
```java
<?xml version="1.0" encoding="utf-8"?>
<RelativeLayout android:layout_width="368dp"
android:layout_height="495dp"
xmlns:tools="http://schemas.android.com/tools"
tools:layout_editor_absoluteX="8dp"
tools:layout_editor_absoluteY="8dp"
xmlns:android="http://schemas.android.com/apk/res/android">
<TextView
android:id="@+id/tSignUP"
android:layout_width="wrap_content"
android:layout_height="wrap_content"
android:text="Sign Up"
android:textColor="@android:color/holo_red_dark"
android:textSize="25sp"
android:layout_alignParentTop="true"
android:layout_centerHorizontal="true"
android:layout_marginTop="22dp" />
<EditText
android:id="@+id/tFirstName"
android:layout_width="wrap_content"
android:layout_height="wrap_content"
android:layout_below="@+id/tSignUP"
android:layout_centerHorizontal="true"
android:layout_marginTop="26dp"
android:ems="10"
android:inputType="textPersonName"
android:text="First Name" />
<EditText
android:id="@+id/tPassword"
android:layout_width="wrap_content"
android:layout_height="wrap_content"
android:ems="10"
android:inputType="textPassword"
android:text="password"
android:layout_below="@+id/tEmail"
android:layout_alignLeft="@+id/tEmail"
android:layout_alignStart="@+id/tEmail"
android:layout_marginTop="23dp" />
<EditText
android:id="@+id/tLastName"
android:layout_width="wrap_content"
android:layout_height="wrap_content"
android:layout_alignLeft="@+id/tFirstName"
android:layout_alignStart="@+id/tFirstName"
android:layout_below="@+id/tFirstName"
android:layout_marginTop="14dp"
android:ems="10"
android:inputType="textPersonName"
android:text="Last Name" />
<EditText
android:id="@+id/tEmail"
android:layout_width="wrap_content"
android:layout_height="wrap_content"
android:layout_alignEnd="@+id/tLastName"
android:layout_alignRight="@+id/tLastName"
android:layout_below="@+id/tLastName"
android:layout_marginTop="25dp"
android:ems="10"
android:inputType="textPersonName"
android:text="Email ID" />
<Button
android:id="@+id/buttonOK"
android:layout_width="wrap_content"
android:layout_height="wrap_content"
android:layout_alignEnd="@+id/tPassword"
android:layout_alignRight="@+id/tPassword"
android:layout_below="@+id/tPassword"
android:layout_marginTop="47dp"
android:background="@color/colorAccent"
android:onClick="OK"
android:text="OK" />
</RelativeLayout>
```
## 步驟 2:創建數據庫助手類
此類在磁盤上創建數據庫。
```java
package com.example.admin.androiddatabaseexample;
import android.content.Context;
import android.database.sqlite.SQLiteDatabase;
import android.database.sqlite.SQLiteDatabase.CursorFactory;
import android.database.sqlite.SQLiteOpenHelper;
import android.util.Log;
public class DataBaseHelper extends SQLiteOpenHelper {
public DataBaseHelper(Context context, String name, CursorFactory factory, int version) {
super(context, name, factory, version);
}
// Called when no database exists in disk and the helper class needs
// to create a new one.
@Override
public void onCreate(SQLiteDatabase _db) {
try {
_db.execSQL(LoginDatabaseAdapter.DATABASE_CREATE);
}catch(Exception er){
Log.e("Error","exceptioin");
}
}
// Called when there is a database version mismatch meaning that the version
// of the database on disk needs to be upgraded to the current version.
@Override
public void onUpgrade(SQLiteDatabase _db, int _oldVersion, int _newVersion)
{
// Log the version upgrade.
Log.w("TaskDBAdapter", "Upgrading from version " +_oldVersion + " to " +_newVersion + ", which will destroy all old data");
// Upgrade the existing database to conform to the new version. Multiple
// previous versions can be handled by comparing _oldVersion and _newVersion
// values.
// The simplest case is to drop the old table and create a new one.
_db.execSQL("DROP TABLE IF EXISTS " + "LOGIN");
// Create a new one.
onCreate(_db);
}
}
```
## 步驟 3:創建登錄數據庫類
登錄數據庫是一類,您在其中實現所有數據庫編碼。 首先使用四個字段創建用于登錄的表,然后實現所有其他方法。
```java
package com.example.admin.androiddatabaseexample;
import android.app.AlertDialog;
import android.content.ContentValues;
import android.content.Context;
import android.content.DialogInterface;
import android.database.Cursor;
import android.database.SQLException;
import android.database.sqlite.SQLiteDatabase;
import android.util.Log;
import android.widget.Toast;
import java.util.ArrayList;
import java.util.List;
public class LoginDatabaseAdapter {
static final String DATABASE_NAME = "database.db";
String ok="OK";
static final int DATABASE_VERSION = 1;
public static String getPassword="";
public static final int NAME_COLUMN = 1;
// TODO: Create public field for each column in your table.
// SQL Statement to create a new database.
static final String DATABASE_CREATE = "create table LOGIN( ID integer primary key autoincrement,FIRSTNAME text,LASTNAME text,USERNAME text,PASSWORD text); ";
// Variable to hold the database instance
public static SQLiteDatabase db;
// Context of the application using the database.
private final Context context;
// Database open/upgrade helper
private static DataBaseHelper dbHelper;
public LoginDatabaseAdapter(Context _context)
{
context = _context;
dbHelper = new DataBaseHelper(context, DATABASE_NAME, null, DATABASE_VERSION);
}
// Method to openthe Database
public LoginDatabaseAdapter open() throws SQLException
{
db = dbHelper.getWritableDatabase(); return this;
}
// Method to close the Database
public void close()
{
db.close();
}
// method returns an Instance of the Database
public SQLiteDatabase getDatabaseInstance()
{
return db;
}
// method to insert a record in Table
public String insertEntry(String firstName,String lastName,String Id,String password)
{
try {
ContentValues newValues = new ContentValues();
// Assign values for each column.
newValues.put("FIRSTNAME", firstName);
newValues.put("LASTNAME", lastName);
newValues.put("USERNAME", Id);
newValues.put("PASSWORD", password);
// Insert the row into your table
db = dbHelper.getWritableDatabase();
long result=db.insert("LOGIN", null, newValues);
System.out.print(result);
Toast.makeText(context, "User Info Saved", Toast.LENGTH_LONG).show();
}catch(Exception ex) {
System.out.println("Exceptions " +ex);
Log.e("Note", "One row entered");
}
return ok;
}
// method to delete a Record of UserName
public int deleteEntry(String UserName)
{
String where="USERNAME=?";
int numberOFEntriesDeleted= db.delete("LOGIN", where, new String[]{UserName}) ;
Toast.makeText(context, "Number fo Entry Deleted Successfully : "+numberOFEntriesDeleted, Toast.LENGTH_LONG).show();
return numberOFEntriesDeleted;
}
// method to get the password of userName
public String getSinlgeEntry(String userName)
{
db=dbHelper.getReadableDatabase();
Cursor cursor=db.query("LOGIN", null, "USERNAME=?", new String[]{userName}, null, null, null);
if(cursor.getCount()<1) // UserName Not Exist
return "NOT EXIST";
cursor.moveToFirst();
getPassword= cursor.getString(cursor.getColumnIndex("PASSWORD"));
return getPassword;
}
// Method to Update an Existing
public void updateEntry(String userName,String password)
{
// create object of ContentValues
ContentValues updatedValues = new ContentValues();
// Assign values for each Column.
updatedValues.put("USERNAME", userName);
updatedValues.put("PASSWORD", password);
String where="USERNAME = ?";
db.update("LOGIN",updatedValues, where, new String[]{userName});
}
}
```
## 步驟 4:`MainActivity.java`
在該類中,您可以從登錄活動中獲取 ID 和密碼,并在點擊監聽器上實現登錄和注冊按鈕。
```java
package com.example.admin.androiddatabaseexample;
import android.app.AlertDialog;
import android.content.Context;
import android.content.DialogInterface;
import android.content.Intent;
import android.support.v7.app.AppCompatActivity;
import android.os.Bundle;
import android.util.Log;
import android.view.View;
import android.widget.EditText;
public class MainActivity extends AppCompatActivity {
private EditText etUserEmail;
private EditText etPassword;
public String username;
private String password;
String storedPassword;
Context context=this;
LoginDatabaseAdapter loginDataBaseAdapter;
@Override
protected void onCreate(Bundle savedInstanceState) {
super.onCreate(savedInstanceState);
setContentView(R.layout.activity_main);
// create the instance of Databse
loginDataBaseAdapter=new LoginDatabaseAdapter(getApplicationContext());
etUserEmail = (EditText) findViewById(R.id.Email);
etPassword = (EditText) findViewById(R.id.Password);
}
public void SignIN(View view) {
try {
loginDataBaseAdapter = loginDataBaseAdapter.open();
username = etUserEmail.getText().toString();
password = etPassword.getText().toString();
if (username.equals("") || password.equals("")) {
AlertDialog alertDialog = new AlertDialog.Builder(this).create();
alertDialog.setTitle("ALERT!");
alertDialog.setMessage("Fill All Fields");
alertDialog.setButton("OK", new DialogInterface.OnClickListener() {
public void onClick(DialogInterface dialog, int which) {
}
});
alertDialog.show();
}
// fetch the Password form database for respective user name
if (!username.equals("")) {
storedPassword = loginDataBaseAdapter.getSinlgeEntry(username);
// check if the Stored password matches with Password entered by user
if (password.equals(storedPassword)) {
Intent intent1 = new Intent(MainActivity.this, DisplayInfoActivity.class);
startActivity(intent1);
// finish();
}
else
{
AlertDialog alertDialog = new AlertDialog.Builder(this).create();
alertDialog.setTitle("ALERT!");
alertDialog.setMessage("Incorrect Username OR Password");
alertDialog.setButton("OK", new DialogInterface.OnClickListener() {
public void onClick(DialogInterface dialog, int which) {
}
});
alertDialog.show();
}
}
}
catch (Exception ex)
{
Log.e("Error", "error login");
}
}
public void SignUP(View view)
{
Intent intent = new Intent(MainActivity.this, SignUp.class);
startActivity(intent);
}
@Override
protected void onDestroy()
{
// TODO Auto-generated method stub
super.onDestroy();
// Close The Database
loginDataBaseAdapter.close();
}
}
```
## 步驟 5:`SignUp.java`
當用戶在注冊活動中單擊“確定”按鈕時,將出現一個對話框,指出值已添加到數據庫的登錄表中。
```java
package com.example.admin.androiddatabaseexample;
import android.support.v7.app.AppCompatActivity;
import android.os.Bundle;
import android.app.AlertDialog;
import android.content.Context;
import android.content.DialogInterface;
import android.content.Intent;
import android.view.View;
import android.widget.EditText;
public class SignUp extends AppCompatActivity {
Context context=this;
private EditText et_first_name;
private EditText et_last_name;
private EditText et_ID;
private EditText et_password;
private String firstName;
private String lastName;
private String userName;
private String password;
String receieveOk;
LoginDatabaseAdapter loginDataBaseAdapter;
@Override
protected void onCreate(Bundle savedInstanceState)
{
super.onCreate(savedInstanceState);
setContentView(R.layout.activity_sign_up);
// get Instance of Database Adapter
loginDataBaseAdapter=new LoginDatabaseAdapter(getApplicationContext());
loginDataBaseAdapter=loginDataBaseAdapter.open();
et_first_name = (EditText) findViewById(R.id.tFirstName);
et_last_name = (EditText) findViewById(R.id.tLastName);
et_ID = (EditText) findViewById(R.id.tEmail);
et_password = (EditText) findViewById(R.id.tPassword);
}
public void OK(View view)
{
firstName = et_first_name.getText().toString();
lastName = et_last_name.getText().toString();
userName = et_ID.getText().toString();
password = et_ID.getText().toString();
if((firstName.equals(""))||(lastName.equals(""))||(userName.equals(""))||(password.equals("")))
{
//Display Message
AlertDialog alertDialog = new AlertDialog.Builder(this).create();
alertDialog.setTitle("ALERT!");
alertDialog.setMessage("All fields must be filled");
alertDialog.setButton("OK", new DialogInterface.OnClickListener() {
public void onClick(DialogInterface dialog, int which) {
}
});
alertDialog.show();
}
else
{
// Save the Data in Database
receieveOk=loginDataBaseAdapter.insertEntry(firstName,lastName,userName, password);
AlertDialog alertDialog = new AlertDialog.Builder(this).create();
alertDialog.setTitle("SUCCESSFUL!");
alertDialog.setMessage("SIGN IN NOW " + receieveOk);
alertDialog.setButton("OK", new DialogInterface.OnClickListener() {
public void onClick(DialogInterface dialog, int which) {
Intent intent = new Intent(SignUp.this, MainActivity.class);
startActivity(intent);
}
});
alertDialog.show();
finish();
}
}
@Override
protected void onDestroy()
{
// TODO Auto-generated method stub
super.onDestroy();
loginDataBaseAdapter.close();
}
}
```
現在運行您的應用程序并進行測試。 這是正在運行的應用程序的屏幕截圖
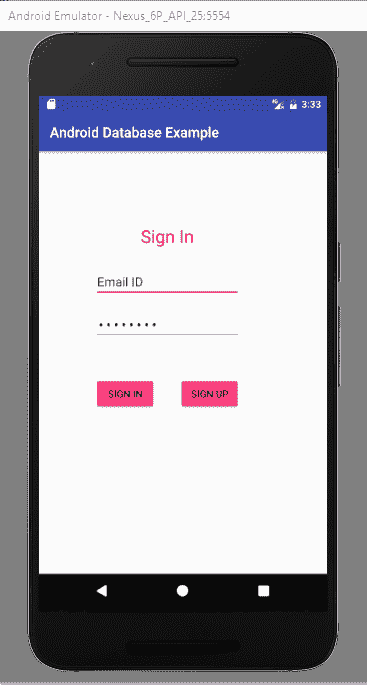
登入
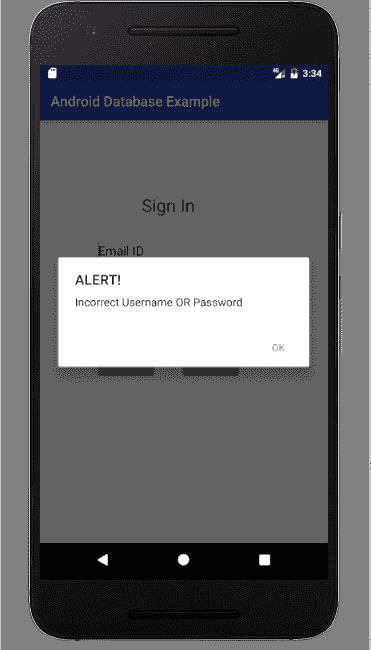
錯誤的 ID 或密碼
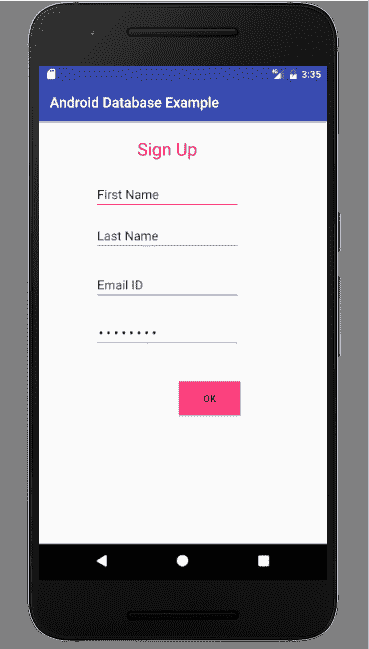
注冊
您可以從[鏈接](https://github.com/JavaTutorialNetwork/Tutorials/blob/master/AndroidDatabaseExample.rar)下載此代碼。
- JavaTutorialNetwork 中文系列教程
- Java 基礎
- Java 概述
- 在 Ubuntu 上安裝 Java 8 JDK
- Java Eclipse 教程
- Eclipse 快捷方式
- 簡單的 Java 示例
- Java 基本類型
- Java 循環
- Java 數組
- Java 讀取文件示例
- Java 對象和類教程
- 什么是面向對象編程(OOP)
- Java 封裝示例
- Java 接口示例
- Java 繼承示例
- Java 抽象示例
- Java 多態示例
- Java 中的方法重載與方法覆蓋
- Java 控制流語句
- Java 核心
- 如何在 Windows,Linux 和 Mac 上安裝 Maven
- 如何使用 Maven 配置文件
- 如何將自定義庫包含到 Maven 本地存儲庫中
- 如何使用 JUnit 進行單元測試
- 如何使用 Maven 運行 JUnit 測試
- 如何在 Java 中使用 Maven 創建子模塊
- 如何使用 Maven 創建 Java JAR 文件
- 如何使用 Maven 創建 Java WAR 文件
- JVM 解釋
- Java 內存模型解釋示例
- 捕獲 Java 堆轉儲的前 3 種方法
- Java 垃圾收集
- Java 互斥量示例
- Java 信號量示例
- Java 并行流示例
- Java 線程同步
- Java 線程池示例
- Java ThreadLocal示例
- Java 中的活鎖和死鎖
- Java Future示例
- Java equals()方法示例
- Java Lambda 表達式教程
- Java Optional示例
- Java 11 HTTP 客戶端示例
- Java 類加載器介紹
- Java 枚舉示例
- Java hashCode()方法示例
- 如何測試獨立的 Java 應用程序
- SWING JFrame基礎知識,如何創建JFrame
- Java SWING JFrame布局示例
- 在JFrame上顯示文本和圖形
- 與JFrame交互 – 按鈕,監聽器和文本區域
- 如何使用 Maven 創建 Java JAR 文件
- Java Collection新手指南
- 選擇合適的 Java 集合
- Java ArrayList示例
- Java LinkedList示例
- Java HashSet示例
- Java TreeSet示例
- Java LinkedHashSet示例
- Java EnumSet示例
- Java ConcurrentHashSet示例
- Java HashMap示例
- Java LinkedHashMap示例
- Java TreeMap示例
- Java EnumMap示例
- Java WeakHashMap示例
- Java IdentityHashMap示例
- Java SortedMap示例
- Java ConcurrentMap示例
- Java Hashtable示例
- Java 中ArrayList和LinkedList之間的區別
- Java HashMap迭代示例
- Java HashMap內聯初始化
- Java 中HashMap和TreeMap之間的區別
- Java 圖示例
- Java 深度優先搜索示例
- Java 廣度優先搜索示例
- 不同的算法時間復雜度
- Java 序列化示例
- Java 反射示例
- Java 中的弱引用
- Java 8 日期時間 API
- Java 基本正則表達式
- 使用 Java 檢索可用磁盤空間
- Java 生成 MD5 哈希和
- Java 增加內存
- Java 屬性文件示例
- 如何在 Eclipse 上安裝 Java 9 Beta
- Java 9 JShell 示例
- Java 9 不可變列表示例
- Java 9 不可變集示例
- Java 9 不可變映射示例
- Java 單例設計模式示例
- Java 代理設計模式示例
- Java 觀察者設計模式示例
- Java 工廠設計模式
- Java 構建器設計模式
- Java 比較器示例
- Java 發送電子郵件示例
- Java volatile示例
- Java Docker 和 Docker 容器簡介
- 安裝和配置 MySQL 數據庫和服務器以供 Spring 使用
- 如何在 Java 中使用 MySQL 連接器
- 如何使用 Eclipse 調試 Java
- Java EE
- 如何在 Windows 10 中設置JAVA_HOME
- JavaBeans 及其組件簡介
- 如何安裝和配置 Tomcat 8
- 如何在 Tomcat 中部署和取消部署應用程序
- 從 Eclipse 運行 Tomcat
- Java Servlet 示例
- Java Servlet POST 示例
- Servlet 請求信息示例
- Servlet 注解示例
- 使用初始化參數配置 Java Web 應用程序
- Java Servlet 文件上傳
- Java JSP 示例
- Glassfish 啟用安全管理
- 如何使用 MySQL 配置 Glassfish 4
- Java 文件上傳 REST 服務
- Glassfish 和 Jetty 的 Java WebSockets 教程
- 基于 Glassfish 表單的身份驗證示例
- 如何使用 Java EE 和 Angular 構建單頁應用程序
- Spring
- 在 Eclipse 中安裝 Spring STS
- 使用 STS 創建簡單的 Spring Web App
- Spring Web Framework 簡介
- Java Docker 和 Docker 容器簡介
- 在 Spring 中實現控制器
- Spring 中的PathVariable注解
- Spring 中的RequestBody注解
- Spring 中的RequestParam注解
- Spring 攔截器
- Spring IOC
- Java Spring IoC 容器示例
- Spring 中的DispatcherServlet
- Spring 示例中的依賴注入
- 實現 Spring MVC 控制器
- Spring ORM 簡介
- 什么是 DAO 以及如何使用它
- 如何對 DAO 組件進行單元測試
- 如何對控制器和服務執行單元測試
- 安裝和配置 MySQL 數據庫和服務器以供 Spring 使用
- 如何在 Spring 中處理登錄身份驗證
- Spring Security 簡介及其設置
- 如何使用 Spring 創建 RESTful Web 服務
- Spring CSRF 保護
- Spring 中基于 OAuth2 的身份驗證和授權
- Spring Boot 簡介
- Spring MVC 框架介紹
- Spring JDBC 簡介
- 如何 docker 化 Spring 應用程序
- Spring 的@Autowired注解
- Spring AOP 中的核心概念和建議類型
- Sping Bean 簡介
- 如何在 Java 中使用 MySQL 連接器
- 安卓
- 安裝和配置 Android Studio
- 將 Android 設備連接到 Android Studio
- Android 簡介,活動,意圖,服務,布局
- 創建一個簡單的 Android 應用
- 運行和調試 Android 應用程序
- 在虛擬設備上運行 Android 應用程序
- Android 活動示例
- Android 意圖示例
- Android 服務示例
- Android 線性布局示例
- Android 相對布局示例
- Android Web 視圖示例
- Android 列表視圖示例
- Android 網格視圖示例
- 帶有ListAdapter的 Android ListView示例
- Android SQLite 數據庫介紹
- Android SQLite 數據庫示例
- Android 動畫教程
- Android 中的通知
- Android 中的事件處理
- 如何在 Android 中發送帶有附件的電子郵件
- 雜項
- 選擇您的 JAVA IDE:Eclipse,NetBeans 和 IntelliJ IDEA
- Java S3 示例
- 如何在 Ubuntu 上為多個站點配置 Apache
- 如何在 Liferay DXP 中替代現成的(OOTB)模塊
- 簡單的 Git 教程
- 使用 Java 捕獲網絡數據包
- Selenium Java 教程
- 使用特定工作區運行 Eclipse
- 在 Eclipse 中安裝 SVN
- 如何運行 NodeJS 服務器
- SQL 內連接示例
- SQL 左連接示例
- SQL 右連接示例
- SQL 外連接示例
- 樹莓派
- Raspberry Pi 3 規格
- 將 Raspbian 安裝到 SD 卡
- Raspberry Pi 首次啟動
- 遠程連接到 Raspberry Pi
- 建立 Raspberry Pi 遠程桌面連接
- Raspberry Pi Java 教程
- 使用 PWM 的 Raspberry Pi LED 亮度調節
- Raspberry Pi 控制電機速度
- Raspberry Pi 用 Java 控制直流電機的速度和方向