
# 使用Flink和Spark Clusters安裝Zeppelin教程
原文鏈接 : [http://zeppelin.apache.org/docs/0.7.2/quickstart/install_with_flink_and_spark_cluster.html](http://zeppelin.apache.org/docs/0.7.2/quickstart/install_with_flink_and_spark_cluster.html)
譯文鏈接 : [http://www.apache.wiki/pages/viewpage.action?pageId=10030622](http://www.apache.wiki/pages/viewpage.action?pageId=10030622)
貢獻者 : [片刻](/display/~jiangzhonglian) [ApacheCN](/display/~apachecn) [Apache中文網](/display/~apachechina)
本教程非常入門級。它假定沒有Linux,git或其他工具的先前知識。如果你仔細地輸入我告訴你的內容,你應該可以讓Zeppelin運行。
## 在群集模式下使用Flink和Spark安裝Zeppelin
本教程假定用戶有一臺機器(真正的或[虛擬的](https://www.virtualbox.org/wiki/Downloads),安裝最新的[Ubuntu 14.04.3服務器](http://www.ubuntu.comhttp://cwiki.apachecn.org/download/server)。
**注意:**根據虛擬機的大小要求,有些用戶在使用默認虛擬機大小時報告了問題,特別是硬盤驅動器至少需要16GB,其他用戶沒有此問題。
有很多關于如何在虛擬盒子上安裝Ubuntu Server的很好的教程,[這里是其中之一](http://ilearnstack.com/2013/04/13/setting-ubuntu-vm-in-virtualbox/)
### 所需程序
假設安裝最少,我們需要在Zeppelin,Flink和Spark之前安裝幾個程序。
* Git
* OpenSSH服務器
* OpenJDK 7
* Maven 3.1+
對于git,openssh-server和OpenJDK 7,我們將使用apt包管理器。
**Git**
從命令提示符:
```
sudo apt-get install git?
```
**OpenSSH服務器**
```
sudo apt-get install openssh-server
```
**OpenJDK** 7
```
sudo apt-get install openjdk-7-jdk openjdk-7-jre-lib
```
```
使用Ubuntu 16.04的筆記:要openjdk-7在Ubuntu 16.04上安裝,必須添加一個存儲庫。?資源
```
```
sudo add-apt-repository ppa:openjdk-r/ppa
sudo apt-get update
sudo apt-get install openjdk-7-jdk openjdk-7-jre-lib
```
```
Maven 3.1+
```
```
Zeppelin需要maven版本3.x.?寫入時在倉庫中可用的版本是2.x,所以maven必須手動安裝。
```
```
清除任何現有版本的maven。
```
```
sudo apt-get purge maven maven2
```
```
下載maven 3.3.9二進制文件。
```
```
wget "http://www.us.apache.org/dist/maven/maven-3/3.3.9/binaries/apache-maven-3.3.9-bin.tar.gz"
```
```
取消歸檔二進制文件并移動到/usr/local目錄。
```
```
tar -zxvf apache-maven-3.3.9-bin.tar.gz
sudo mv ./apache-maven-3.3.9 /usr/local
```
```
創建符號鏈接/usr/bin。
```
```
sudo ln -s /usr/local/apache-maven-3.3.9/bin/mvn /usr/bin/mvn
```
### 安裝Zeppelin
這可以從源代碼快速概述Zeppelin安裝,但是鼓勵讀者查看“?[Zeppelin安裝指南”](http://www.apache.wiki/pages/viewpage.action?pageId=10030536)
**從命令提示符:克隆Zeppelin。**
```
git clone https://github.com/apache/zeppelin.git
```
**輸入Zeppelin根目錄。**
```
cd zeppelin
```
**打包Zeppelin。**
```
mvn clean package -DskipTests -Pspark-1.6 -Dflink.version=1.1.3 -Pscala-2.10
```
```
-DskipTests跳過構建測試 - 你不是開發(還),所以你不需要做測試,克隆版本應該構建。
```
`-Pspark-1.6`告訴maven用Spark 1.6構建一個Zeppelin。這很重要,因為Zeppelin有自己的Spark解釋器,版本必須相同。
`-Dflink.version=1.1.3`?告訴maven專門用Flink版本1.1.3構建Zeppelin。
-?`-Pscala-2.10`告訴maven建立與Scala v2.10。
**注意:**您可能希望包含其他構建標志,例如`-Ppyspark`或`-Psparkr`。有關[詳細信息,](https://github.com/apache/zeppelin#build)請參閱[github的構建部分](https://github.com/apache/zeppelin#build)。
**注意:**您可以針對具有Zeppelin構建配置文件的任何版本的Spark構建。關鍵是要確保您查看匹配版本的Spark來構建。在撰寫本文時,Spark 1.6是最新的Spark版本。
**注意:**構建失敗。現在已經安裝了齊柏林30多次,我會告訴你,有時這個構建似乎沒有理由失敗。只要你沒有編輯任何代碼,由于你所做的事情,構建是不太可能失敗的。往往會發生什么,是maven試圖下載的一些依賴是無法訪問的。如果你的構建失敗了這一步這里有一些提示: - 不要氣餒。?- 向上滾動閱讀日志。那里會有線索。- 重試(即`mvn clean package -DskipTests -Pspark-1.6`再次運行) - 如果有線索不能下載依賴關系等待幾個小時甚至幾天,然后重試。編譯時開源軟件試圖下載所需的所有依賴項,如果一臺服務器是離線的,那么你什么也不能做,但等待它回來。**?- 確保您仔細遵循所有步驟。****?- 請社區幫助您。**[去這里](http://zeppelin.apache.org/community.html)加入用戶郵件列表。人們在那里幫助你。確保復制并粘貼構建輸出(控制臺中發生的所有事件),并將其包含在消息中。
**啟動Zeppelin守護進程。**
```
bin/zeppelin-daemon.sh start
```
```
使用ifconfig以確定主機的IP地址。如果你不熟悉如何做,這里可以找到一個相當全面的文章。
```
在連接到與主機相同網絡的計算機上(或在使用虛擬機的主機操作系統中)打開Web瀏覽器。導航到http://?`yourip`:8080,其中yourip是您發現的IP地址`ifconfig`。
請參閱[Zeppelin教程](http://www.apache.wiki/pages/viewpage.action?pageId=10030571),了解基本的Zeppelin使用情況。還建議您花點時間查看每個Zeppelin安裝中附帶的教程筆記本,并熟悉基本的筆記本功能。
**Flink測試**
創建一個名為“Flink Test”的新筆記本,并復制并粘貼以下代碼。
```
%flink // let Zeppelin know what interpreter to use.
val text = benv.fromElements("In the time of chimpanzees, I was a monkey", // some lines of text to analyze
"Butane in my veins and I'm out to cut the junkie",
"With the plastic eyeballs, spray paint the vegetables",
"Dog food stalls with the beefcake pantyhose",
"Kill the headlights and put it in neutral",
"Stock car flamin' with a loser in the cruise control",
"Baby's in Reno with the Vitamin D",
"Got a couple of couches, sleep on the love seat",
"Someone came in sayin' I'm insane to complain",
"About a shotgun wedding and a stain on my shirt",
"Don't believe everything that you breathe",
"You get a parking violation and a maggot on your sleeve",
"So shave your face with some mace in the dark",
"Savin' all your food stamps and burnin' down the trailer park",
"Yo, cut it")
/* The meat and potatoes:
this tells Flink to iterate through the elements, in this case strings,
transform the string to lower case and split the string at white space into individual words
then finally aggregate the occurrence of each word.
This creates the count variable which is a list of tuples of the form (word, occurances)
counts.collect().foreach(println(_)) // execute the script and print each element in the counts list
*/
val counts = text.flatMap{ _.toLowerCase.split("\\W+") }.map { (_,1) }.groupBy(0).sum(1)
counts.collect().foreach(println(_)) // execute the script and print each element in the counts list
```
```
運行代碼以確保內置的Zeppelin Flink解釋器工作正常。
```
**Spark 測試**
創建一個名為“Spark Test”的新筆記本,并復制并粘貼以下代碼。
```
%spark // let Zeppelin know what interpreter to use.
val text = sc.parallelize(List("In the time of chimpanzees, I was a monkey", // some lines of text to analyze
"Butane in my veins and I'm out to cut the junkie",
"With the plastic eyeballs, spray paint the vegetables",
"Dog food stalls with the beefcake pantyhose",
"Kill the headlights and put it in neutral",
"Stock car flamin' with a loser in the cruise control",
"Baby's in Reno with the Vitamin D",
"Got a couple of couches, sleep on the love seat",
"Someone came in sayin' I'm insane to complain",
"About a shotgun wedding and a stain on my shirt",
"Don't believe everything that you breathe",
"You get a parking violation and a maggot on your sleeve",
"So shave your face with some mace in the dark",
"Savin' all your food stamps and burnin' down the trailer park",
"Yo, cut it"))
/* The meat and potatoes:
this tells spark to iterate through the elements, in this case strings,
transform the string to lower case and split the string at white space into individual words
then finally aggregate the occurrence of each word.
This creates the count variable which is a list of tuples of the form (word, occurances)
*/
val counts = text.flatMap { _.toLowerCase.split("\\W+") }
.map { (_,1) }
.reduceByKey(_ + _)
counts.collect().foreach(println(_)) // execute the script and print each element in the counts list
```
```
運行代碼以確保內置的Zeppelin Flink解釋器工作正常。
```
最后,停止Zeppelin守護進程。從命令提示符運行:
```
bin/zeppelin-daemon.sh stop
```
### 安裝群集
#### Flink集群
##### 下載二進制文件
建議從源頭盡可能推薦,為了簡化本教程,我們將下載Flink和Spark二進制文件。
下載Flink二進制使用?`wget`
```
wget "http://mirror.cogentco.com/pub/apache/flink/flink-1.1.3/flink-1.1.3-bin-hadoop24-scala_2.10.tgz"
tar -xzvf flink-1.1.3-bin-hadoop24-scala_2.10.tgz
```
這將下載Flink 1.1.3,與Hadoop 2.4兼容。您不必為此二進制文件安裝Hadoop,但如果您使用Hadoop,請更改`24`為適當的版本。
啟動Flink群集。
```
flink-1.1.3/bin/start-cluster.sh
```
##### 從源碼編譯
如果您希望從源代碼構建Flink,以下內容將是有益的。請注意,如果您已下載并使用二進制版本,則應跳過此版本。跨平臺的構建工具和版本的不斷變化的性質使得該部分有點不穩定。例如,建議使用Java8和Maven 3.0.3構建Flink,這在撰寫本文時不推薦用于Zeppelin。如果用戶希望嘗試從源代碼構建,本節將提供一些參考。如果遇到錯誤,請聯系Apache Flink社區。
有關更多詳細說明,請參閱[Flink安裝指南](https://github.com/apache/flink/blob/master/README.md)。
返回到您下載的目錄,本教程假定是`$HOME`。克隆Flink,查看release-1.1.3-rc2并構建。
```
cd $HOME
git clone https://github.com/apache/flink.git
cd flink
git checkout release-1.1.3-rc2
mvn clean install -DskipTests
```
```
以獨立模式啟動Flink群集
```
```
build-target/bin/start-cluster.sh
```
##### 確保集群已啟動
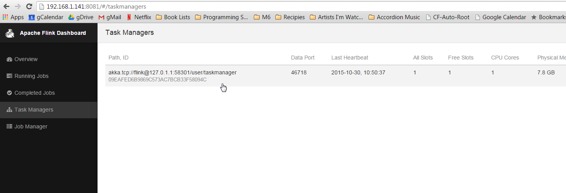
在瀏覽器中,瀏覽http://?`yourip:`8082查看Flink Web-UI。點擊左側導航欄中的“任務管理器”。確保至少有一個任務管理器存在。
如果沒有任務管理器,請使用以下命令重新啟動Flink集群:
(如果是二進制文件)?`flink-1.1.3/bin/stop-cluster.sh flink-1.1.3/bin/start-cluster.sh`
(如果從源代碼構建)?`build-target/bin/stop-cluster.sh build-target/bin/start-cluster.sh`
#### Spark 1.6集群
##### 下載二進制文件
建議從源頭盡可能推薦,為了簡化本教程,我們將下載Flink和Spark二進制文件。
也使用二進制文件
下載Spark Binary使用?`wget`
```
wget "http://d3kbcqa49mib13.cloudfront.net/spark-1.6.3-bin-hadoop2.6.tgz"
tar -xzvf spark-1.6.3-bin-hadoop2.6.tgz
mv spark-1.6.3-bin-hadoop2.6 spark?
```
這將下載Spark 1.6.3,與Hadoop 2.6兼容。您不必為此二進制文件安裝Hadoop,但如果您使用Hadoop,請更改`2.6`為適當的版本。
##### 從源頭構建
Spark是一個非常大的項目,需要相當長的時間來下載和構建。Flink部分列出的類似原因也容易造成故障。如果用戶希望嘗試從源代碼構建,本節將提供一些參考。如果遇到錯誤,請聯系Apache Spark社區。
有關更多詳細說明,請參閱[Spark安裝](https://github.com/apache/spark/blob/master/README.md)指南。
返回到您下載的目錄,本教程假定是$ HOME。克隆Spark,查看分支1.6,并構建。?**注意:**回想一下,我們只是檢查出1.6,因為它是寫作時存在Zeppelin配置文件的最新Spark。您可以自由查看其他版本,只需確保您使用正確版本的Spark構建Zeppelin。但是,如果您使用Spark 2.0,則字數計數示例將需要更改,因為Spark 2.0與以下示例不兼容。
```
cd $HOME
```
克隆,簽出并構建Spark版本1.6.x.
```
git clone https://github.com/apache/spark.git
cd spark
git checkout branch-1.6
mvn clean package -DskipTests
```
##### 啟動Spark群集
```
返回$HOME目錄。
```
```
cd $HOME
```
以獨立模式啟動Spark群集,將webui端口指定為8080以外的其他端口(Zeppelin的webui端口)。
```
spark/sbin/start-master.sh --webui-port 8082
```
**注意:**為什么`--webui-port 8082`?這個文檔的末尾有一個解釋這個解釋。
打開瀏覽器并導航到http://`yourip:`8082,以確保Spark主機正在運行。
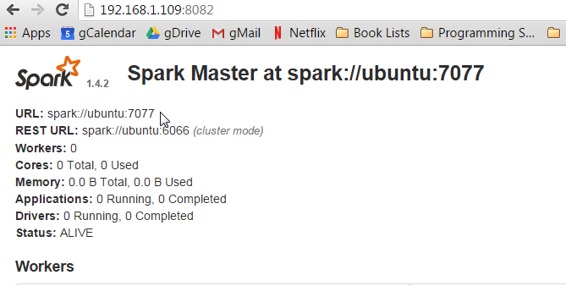
?到頁面頂部會有一個_URL_: spark://?`yourhost:`7077。注意這個URL,Spark Master URI,在后面的步驟中將需要它。
?使用Spark master WebUI中的URI啟動從站:
```
spark/sbin/start-slave.sh spark://yourhostname:7077
```
返回到根目錄并啟動Zeppelin守護程序。
```
cd $HOME
zeppelin/bin/zeppelin-daemon.sh start
```
#### 配置解釋器
打開一個Web瀏覽器,然后訪問Zeppelin web-ui,網址為:http:// yourip:8080。
現在回到Zeppelin web-ui http://`yourip:`8080,這時候點擊右上角的_匿名_,這將打開一個下拉菜單,選擇_口譯員_進入解釋器配置。
在Spark部分中,點擊右上角的編輯按鈕,使屬性值可編輯(看起來像鉛筆)。在Spark解釋器中唯一需要編輯的字段是主字段。我的這個值是從`local[*]`你用來啟動奴隸的URL?改變的`[spark://ubuntu:7077](spark://ubuntu:7077)`。
單擊_保存_更新參數,并在詢問重新啟動解釋器時單擊_確定_。
現在向下滾動到Flink部分。點擊編輯按鈕,改變的值_主_從`local`到`localhost`。再次點擊_保存_。
重新打開示例并再次執行(即您需要單擊屏幕頂部的播放按鈕或段落上的按鈕。
您應該可以檢查Flink和Spark webuis(類似于http://`yourip:`8081,http://`yourip:`8082,http://`yourip:`8083),并查看已針對群集運行作業。
**Digression**對不起,模糊不清,并使用諸如“這樣的”這樣的術語,但是什么網站是在什么端口將取決于你開始的事情的順序。您正在將瀏覽器指向特定端口,即8081,8082和8083\. Flink和Spark都希望將其web-ui放在端口8080上,但運行良好,并且可以使用下一個端口。由于Zeppelin首先啟動,它將會獲得端口8080.當Flink啟動(假設您先啟動Flink),它將嘗試綁定端口8080,看到它已經被占用,并轉到下一個可用,希望8081\. Spark有一個webui為主人和奴隸,所以當他們開始,他們將嘗試綁定已經采取了由Zeppelin),然后8081(已經被Flink的webui),然后8082。?`--webui-port <port>`?`<port>`
### 下一步
查看[教程](http://zeppelin.apache.org/docs/0.7.1/quickstart/tutorial.md),了解更多酷炫的東西,你可以用你的新玩具!
[加入社區](http://zeppelin.apache.org/community.html),提問和貢獻!每一點都有幫助。
- 快速入門
- 什么是Apache Zeppelin?
- 安裝
- 配置
- 探索Apache Zeppelin UI
- 教程
- 動態表單
- 發表你的段落
- 自定義Zeppelin主頁
- 升級Zeppelin版本
- 從源碼編譯
- 使用Flink和Spark Clusters安裝Zeppelin教程
- 解釋器
- 概述
- 解釋器安裝
- 解釋器依賴管理
- 解釋器的模擬用戶
- 解釋員執行Hook(實驗)
- Alluxio 解釋器
- Beam 解釋器
- BigQuery 解釋器
- Cassandra CQL 解釋器
- Elasticsearch 解釋器
- Flink 解釋器
- Geode/Gemfire OQL 解釋器
- HBase Shell 解釋器
- HDFS文件系統 解釋器
- Hive 解釋器
- Ignite 解釋器
- JDBC通用 解釋器
- Kylin 解釋器
- Lens 解釋器
- Livy 解釋器
- Markdown 解釋器
- Pig 解釋器
- PostgreSQL, HAWQ 解釋器
- Python 2&3解釋器
- R 解釋器
- Scalding 解釋器
- Scio 解釋器
- Shell 解釋器
- Spark 解釋器
- 系統顯示
- 系統基本顯示
- 后端Angular API
- 前端Angular API
- 更多
- 筆記本存儲
- REST API
- 解釋器 API
- 筆記本 API
- 筆記本資源 API
- 配置 API
- 憑據 API
- Helium API
- Security ( 安全 )
- Shiro 授權
- 筆記本 授權
- 數據源 授權
- Helium 授權
- Advanced ( 高級 )
- Zeppelin on Vagrant VM ( Zeppelin 在 Vagrant 虛擬機上 )
- Zeppelin on Spark Cluster Mode( Spark 集群模式下的 Zeppelin )
- Zeppelin on CDH ( Zeppelin 在 CDH 上 )
- Contibute ( 貢獻 )
- Writing a New Interpreter ( 寫一個新的解釋器 )
- Writing a new Visualization (Experimental) ( 編寫新的可視化(實驗) )
- Writing a new Application (Experimental) ( 寫一個新的應用程序( 實驗 ) )
- Contributing to Apache Zeppelin ( Code ) ( 向 Apache Zeppelin 貢獻( 代碼 ) )
- Contributing to Apache Zeppelin ( Website ) ( 向 Apache Zeppelin 貢獻(website) )