
# Writing a New Interpreter ( 寫一個新的解釋器 )
原文鏈接 : [http://zeppelin.apache.org/docs/0.7.2/development/writingzeppelininterpreter.html](http://zeppelin.apache.org/docs/0.7.2/development/writingzeppelininterpreter.html)
譯文鏈接 : [http://www.apache.wiki/pages/viewpage.action?pageId=10030728](http://www.apache.wiki/pages/viewpage.action?pageId=10030728)
貢獻者 : [小瑤](/display/~chenyao) [ApacheCN](/display/~apachecn) [Apache中文網](/display/~apachechina)
## 什么是 Apache Zeppelin?Interpreter
**Apache Zeppelin Interpreter**?是一種語言后端。例如,在?**Zeppelin**?中使用?**scala**?代碼,您需要一個?**scala**?解釋器。每個解釋器都屬于一個解釋器組。相同的解釋器中的解釋器可以互相引用。例如,**SparkSqlInterpreter**?可以引用?**SparkInterpreter**?,以便在它們在同一個組中時從其獲取**SparkContext**?。
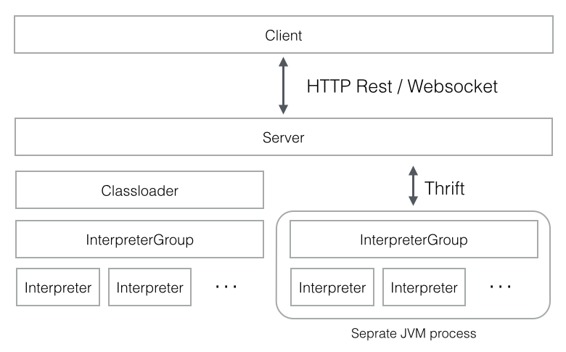
[**InterpreterSetting**?](https://github.com/apache/zeppelin/blob/master/zeppelin-zengine/src/main/java/org/apache/zeppelin/interpreter/InterpreterSetting.java)是給定的**[?InterpreterGroup](https://github.com/apache/zeppelin/blob/master/zeppelin-interpreter/src/main/java/org/apache/zeppelin/interpreter/InterpreterGroup.java)**?和一個啟動/停止解釋器的單元的配置。同一個?**InterpreterSetting**?中的所有解釋器都在單獨的?**JVM**?進程中啟動。解釋器通過?[**Thrift**?](https://github.com/apache/zeppelin/blob/master/zeppelin-interpreter/src/main/thrift/RemoteInterpreterService.thrift)與?**Zeppelin engine**?通信。
在創建新的解釋器時,您可以在 “解釋器設置” 菜單中看到“每個音符”模式的“單獨的解釋器(范圍/隔離)”,每個音符將創建新的解釋器實例。但是它們在同一個?**InterpreterSettings**?中仍然運行在同一個?**JVM**?上。
## 制作你自己的 Interpreter
創建一個新的?**interpreter**?是非常簡單的。只需擴展?[**org.apache.zeppelin.interpreter**?](https://github.com/apache/zeppelin/blob/master/zeppelin-interpreter/src/main/java/org/apache/zeppelin/interpreter/Interpreter.java)抽象類并實現一些方法。您可以在構建系統中包含?**org.apache.zeppelin:zeppelin-interpreter:[VERSION]?artifact**。您應該將您的 jar 放在您的解釋器目錄下,并具有特定的目錄名稱。?**Zeppelin**?服務器遞歸地讀取解釋器目錄,并初始化包括您自己的解釋器在內的?**interpreter**?。
有三個位置可以存儲您的?**interpreter group**,**name**?和 其他信息。?**Zeppelin**?服務器嘗試找到以下位置。接下來,?**Zeppelin**?嘗試在您的解釋器?**jar**?中找到**?interpreter-setting.json**。
```
{ZEPPELIN_INTERPRETER_DIR}/{YOUR_OWN_INTERPRETER_DIR}/interpreter-setting.json
```
以下是您自己的?**interpreter**?上的?**interpreter-setting.json**?的例子。
```
[
{
"group": "your-group",
"name": "your-name",
"className": "your.own.interpreter.class",
"properties": {
"properties1": {
"envName": null,
"propertyName": "property.1.name",
"defaultValue": "propertyDefaultValue",
"description": "Property description"
},
"properties2": {
"envName": PROPERTIES_2,
"propertyName": null,
"defaultValue": "property2DefaultValue",
"description": "Property 2 description"
}, ...
},
"editor": {
"language": "your-syntax-highlight-language",
"editOnDblClick": false
}
},
{
...
}
]
```
最后,?**Zeppelin**?使用以下靜態初始化:
```
static {
Interpreter.register("MyInterpreterName", MyClassName.class.getName());
}
```
**靜態初始化已被棄用,直到 0.6.0 才會被支持。**
在解釋器配置過程中,名稱將會稍后出現在解釋器名稱選項框中。解釋器的名字是您以后寫的,以確定應使用此解釋器解釋的段落。
```
%MyInterpreterName
some interpreter specific code...
```
## Editor setting for Interpreter ( 解釋器的編輯器設置 )
您可以將編輯器對象添加到**?interpreter-setting.json**?文件中以指定段落編輯器設置。
### Language ( 語言 )
如果解釋器使用特定的編程語言(如 Scala , Python , SQL ),則通常建議將語法突出顯示添加到注釋段落編輯器中。
要查看支持的語言列表,請參閱?**zeppelin-web / bower_components / ace-builds / src-noconflict**?或?[**github.com/ajaxorg/ace-builds**?](https://github.com/ajaxorg/ace-builds/tree/master/src-noconflict)下的?**model?- *.js**?文件。
如果要添加一組新的語法高亮:
1. 將?**model-*.js**?文件添加到**?zeppelin-web / bower.json**?(當內置時,?**zeppelin-web / src / index.html**?將自動更改)。
將語言字段添加到編輯對象。請注意,如果您不指定語言字段,則您的解釋器將使用純文本模式進行語法突出顯示。假設您要將語言設置為?**java**?,然后添加:
```
"editor": {
"language": "java"
}
```
### Edit on double click ( 雙擊編輯 )
如果您的解釋器使用標記語言(如?**markdown**?或?**HTML**?),請將?**editOnDblClick**?設置為?**true**?,以便文本編輯器在對話框上雙擊并在段落運行中關閉。否則將其設置為?**false**?。
```
"editor": {
"editOnDblClick": false
}
```
## Install your interpreter binary ( 安裝你的解釋器二進制文件?)
一旦您構建了您的解釋器,您可以將其放在解釋器目錄下,并具有所有的依賴關系。
```
[ZEPPELIN_HOME]/interpreter/[INTERPRETER_NAME]/
```
## Configure your interpreter ( 配置您的解釋器?)
要配置您的解釋器,您需要遵循以下步驟:
1. 將解釋器類名添加到?**conf / zeppelin-site.xml**?中的?**zeppelin.interpreters**?屬性。屬性值以逗號分隔?**[INTERPRETER_CLASS_NAME]**?。例如,
```
<property>
<name>zeppelin.interpreters</name>
<value>org.apache.zeppelin.spark.SparkInterpreter,org.apache.zeppelin.spark.PySparkInterpreter,org.apache.zeppelin.spark.SparkSqlInterpreter,org.apache.zeppelin.spark.DepInterpreter,org.apache.zeppelin.markdown.Markdown,org.apache.zeppelin.shell.ShellInterpreter,org.apache.zeppelin.hive.HiveInterpreter,com.me.MyNewInterpreter</value>
</property>
```
2. 將您的解釋器添加到當沒有?**zeppelin-site.xml**?時使用的默認配置。
3. 通過運行**?./bin/zeppelin-daemon.sh**?啟動?**Zeppelin**?。
在解釋器頁面中,單擊+創建按鈕并配置您的解釋器屬性。現在你已經完成并準備好使用你的解釋器。
注意
使用 **zeppelin** 發布的解釋器有一個默認配置,當沒有 **conf / zeppelin-site.xml** 時使用。
## Use your interpreter ( 使用你的解釋器 )
### 0.5.0
在?**[NOTE]**?的指令中,**%[INTERPRETER_NAME]**?指令會調用您的解釋器。請注意,**zeppelin.interpreters**?中的第一個解釋器配置將是默認配置。
例如:
```
%myintp
val a = "My interpreter"
println(a)
```
### 0.6.0 and later
在一個注釋的內部,**%INTERPRETER_GROUP].[INTERPRETER_NAME]**?指令將會調用您的解釋器。
您可以省略?**[INTERPRETER_GROUP]**?或**?[INTERPRETER_NAME]**?。如果您忽略**?[INTERPRETER_NAME]**?,則會在**?[INTERPRETER_GROUP]**?中選擇第一個可用的解釋器。同樣,如果您跳過**?[INTERPRETER_GROUP]**?,則會從默認解釋器組中選擇?**[INTERPRETER_NAME]**?。
例如,如果**?mygrp group**?中有兩個解釋器?**myintp1**?和?**myintp2**?,可以像?**myintp1**?一樣調用:
```
%mygrp.myintp1
codes for myintp1
```
你可以像?**myintp2**?一樣調用
```
%mygrp.myintp2
codes for myintp2
```
如果省略您的解釋器名稱,它將在?**group ( myintp1?)**?中選擇第一個可用的解釋器。
```
%mygrp
codes for myintp1
```
當您的**?interpreter group**?被選為 默認組 時,您只能省略您的**?interpreter group**?。
```
%myintp2
codes for myintp2
```
## Examples ( 示例 )
查看一些與?**Zeppelin**?發布的?**interpreters**?。
* [spark](https://github.com/apache/zeppelin/tree/master/spark)
* [markdown](https://github.com/apache/zeppelin/tree/master/markdown)
* [shell](https://github.com/apache/zeppelin/tree/master/shell)
* [jdbc](https://github.com/apache/zeppelin/tree/master/jdbc)
## Contributing a new Interpreter to Zeppelin releases ( 為 Zeppelin 發行新的解釋器 )
我們歡迎對新的解釋器的貢獻。請按照以下幾個步驟進行:
* 首先,在?[這里](https://zeppelin.apache.org/contribution/contributions.html)?查看一般性貢獻指南。
* 按照上述[?“解釋器自己的解釋器部分”](/pages/viewpage.action?pageId=10031094)?和?[“編輯器設置”](/pages/viewpage.action?pageId=10031094)?中的步驟進行。
* 添加您的解釋器,如上面的?[配置您的解釋器部分](/pages/viewpage.action?pageId=10031094)?;還將其添加到示例模板?**[zeppelin-site.xml.template](https://github.com/apache/zeppelin/blob/master/conf/zeppelin-site.xml.template)**?中。
* 添加測試!他們由?[Travis?](https://travis-ci.org/apache/zeppelin)經營所有變化,重要的是他們是獨立的。
* 將您的解釋器作為**?pom.xml**?中的模塊。
* 添加有關如何在?**docs / interpreter /**?下使用解釋器的文檔。以?**Markdown**?風格[為例](https://github.com/apache/zeppelin/blob/master/docs/interpreter/elasticsearch.md)。確保您列出配置設置,并提供在?**Markdown**?的代碼框中使用解釋器的工作示例。根據需要鏈接到圖片(圖片應轉到**?docs / assets / themes / zeppelin / img / docs-img /**?)。并在導航菜單(**docs / _includes / themes / zeppelin / _navigation.html**)中添加您的文檔的鏈接。
* 最重要的是,確保所有依賴關系的傳遞關閉的許可證在?[許可證文件?](https://github.com/apache/zeppelin/blob/master/zeppelin-distribution/src/bin_license/LICENSE)中列出。
* 提交您的更改,并在?[**GitHub**?上的項目?**Mirror**](https://github.com/apache/zeppelin)?上打開一個[**?Pull**?請求](https://github.com/apache/zeppelin/pulls);檢查以確保?**Travis CI**?構建正在通過。
- 快速入門
- 什么是Apache Zeppelin?
- 安裝
- 配置
- 探索Apache Zeppelin UI
- 教程
- 動態表單
- 發表你的段落
- 自定義Zeppelin主頁
- 升級Zeppelin版本
- 從源碼編譯
- 使用Flink和Spark Clusters安裝Zeppelin教程
- 解釋器
- 概述
- 解釋器安裝
- 解釋器依賴管理
- 解釋器的模擬用戶
- 解釋員執行Hook(實驗)
- Alluxio 解釋器
- Beam 解釋器
- BigQuery 解釋器
- Cassandra CQL 解釋器
- Elasticsearch 解釋器
- Flink 解釋器
- Geode/Gemfire OQL 解釋器
- HBase Shell 解釋器
- HDFS文件系統 解釋器
- Hive 解釋器
- Ignite 解釋器
- JDBC通用 解釋器
- Kylin 解釋器
- Lens 解釋器
- Livy 解釋器
- Markdown 解釋器
- Pig 解釋器
- PostgreSQL, HAWQ 解釋器
- Python 2&3解釋器
- R 解釋器
- Scalding 解釋器
- Scio 解釋器
- Shell 解釋器
- Spark 解釋器
- 系統顯示
- 系統基本顯示
- 后端Angular API
- 前端Angular API
- 更多
- 筆記本存儲
- REST API
- 解釋器 API
- 筆記本 API
- 筆記本資源 API
- 配置 API
- 憑據 API
- Helium API
- Security ( 安全 )
- Shiro 授權
- 筆記本 授權
- 數據源 授權
- Helium 授權
- Advanced ( 高級 )
- Zeppelin on Vagrant VM ( Zeppelin 在 Vagrant 虛擬機上 )
- Zeppelin on Spark Cluster Mode( Spark 集群模式下的 Zeppelin )
- Zeppelin on CDH ( Zeppelin 在 CDH 上 )
- Contibute ( 貢獻 )
- Writing a New Interpreter ( 寫一個新的解釋器 )
- Writing a new Visualization (Experimental) ( 編寫新的可視化(實驗) )
- Writing a new Application (Experimental) ( 寫一個新的應用程序( 實驗 ) )
- Contributing to Apache Zeppelin ( Code ) ( 向 Apache Zeppelin 貢獻( 代碼 ) )
- Contributing to Apache Zeppelin ( Website ) ( 向 Apache Zeppelin 貢獻(website) )