
作為前端人員要回答這個問題,需要了解這三個知識點:
* 同步
* 異步
* Async/Await
首先,**js 是單線程的(重復三遍)**,所謂單線程, 通俗的講就是,一根筋,執行代碼是一行一行的往下走(即所謂的**同步**), 如果上面的沒執行完,就癡癡的等著(是不是很像戀愛中在路邊等她/他的你,假裝 new 了個對象,啊哈哈哈,調皮一下很開心), 還是舉個 ?? 吧:
~~~javascript
// chrome 75
function test() {
let d = Date.now();
for (let i = 0; i < 1e8; i++) {}
console.log(Date.now() - d); // 62ms左右
}
function test1() {
let d = Date.now();
console.log(Date.now() - d); // 0
}
test();
test1();
~~~
上面僅僅是一個 for 循環,而在實際應用中,會有大量的網絡請求,它的響應時間是不確定的,這種情況下也要癡癡的等么?顯然是不行的,因而 js 設計了異步,即 發起網絡請求(諸如 IO 操作,定時器),由于需要等服務器響應,就先不理會,而是去做其他的事兒,等請求返回了結果的時候再說(即**異步**)。 那么如何實現異步呢?其實我們平時已經在大量使用了,那就是`callback`,例如:
~~~javascript
$.ajax({
url: 'http://xxx',
success: function(res) {
console.log(res);
},
});
~~~
success 作為函數傳遞過去并不會立即執行,而是等請求成功了才執行,即**回調函數**(callback)
~~~javascript
const fs = require('fs');
fs.rename('舊文件.txt', '新文件.txt', err => {
if (err) throw err;
console.log('重命名完成');
});
~~~
和網絡請求類似,等到 IO 操作有了結果(無論成功與否)才會執行第三個參數:`(err)=>{}`
從上面我們就可以看出,**實現異步的核心就是回調鉤子**,將 cb 作為參數傳遞給異步執行函數,當有了結果后在觸發 cb。想了解更多,去看看`event-loop`機制吧。
至于 async/await 是如何出現的呢,在 es6 之前,大多 js 數項目中會有類似這樣的代碼:
~~~javascript
ajax1(url, () => {
ajax2(url, () => {
ajax3(url, () => {
// do something
});
});
});
~~~
這種函數嵌套,大量的回調函數,使代碼閱讀起來晦澀難懂,不直觀,形象的稱之為**回調地獄(callback hell)**,所以為了在寫法上能更通俗一點,es6+陸續出現了`Promise`、`Generator`、`Async/await`,力求在寫法上簡潔明了,可讀性強。
\=========================我是分割線==========================
以上只是鋪墊,下面在進入正題 ??,開始說道說道主角:`async/await`
\=========================我是分割線==========================
`async/await`是參照`Generator`封裝的一套異步處理方案,可以理解為`Generator`的語法糖,
所以了解`async/await`就不得不講一講`Generator`,
而`Generator`又依賴于迭代器`Iterator`,
所以就得先講一講`Iterator`,
而`Iterator`的思想呢又來源于單向鏈表,
終于找到源頭了:**單向鏈表**
## 1. 單向鏈表
> wiki:鏈表(Linked list)是一種常見的基礎數據結構,是一種[線性表](https://zh.wikipedia.org/wiki/%E7%BA%BF%E6%80%A7%E8%A1%A8),但是并不會按線性的順序儲存數據,而是在每一個節點里存到下一個節點的[指針](https://zh.wikipedia.org/wiki/%E6%8C%87%E6%A8%99_(%E9%9B%BB%E8%85%A6%E7%A7%91%E5%AD%B8))(Pointer)。由于不必須按順序儲存,鏈表在插入的時候可以達到 o(1)的復雜度,比另一種線性表[順序表](https://zh.wikipedia.org/wiki/%E9%A1%BA%E5%BA%8F%E8%A1%A8)快得多,但是查找一個節點或者訪問特定編號的節點則需要 o(n)的時間,而順序表響應的時間復雜度分別是 o(logn)和 o(1)。
總結一下鏈表優點:
* 無需預先分配內存
* 插入/刪除節點不影響其他節點,效率高(典型的例子:dom 操作)
單向鏈表:是鏈表中最簡單的一種,它包含兩個域,一個信息域和一個指針域。這個鏈接指向列表中的下一個節點,而最后一個節點則指向一個空值。
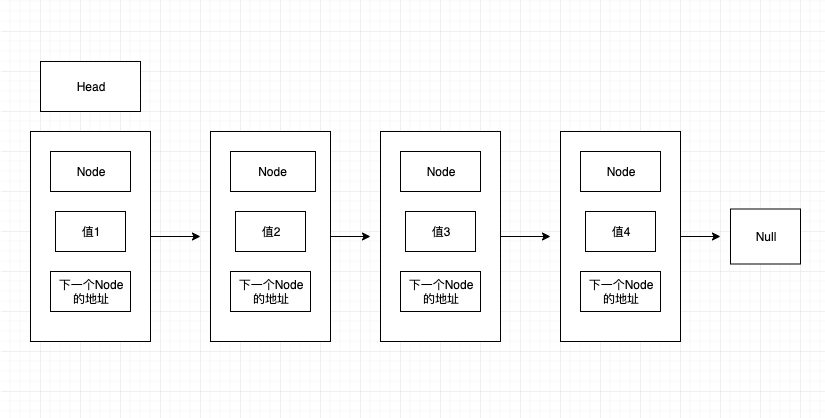
一個單向鏈表包含兩個值: 當前節點的值和一個指向下一個節點的鏈接
單鏈特點:節點的鏈接方向是單向的;相對于數組來說,單鏈表的的隨機訪問速度較慢,但是單鏈表刪除/添加數據的效率很高。
理解 js 原型鏈/作用域鏈的話,理解這個很容易,他們是相通的。編程語言中,數組的長度是固定的,所以數組中的增加和刪除比較麻煩,需要頻繁的移動數組中的其他元素,而 js 作為一門動態語言,數組本質是一個類似數組的對象,是動態的,不需要預先分配內存~
那么如何設計一個單向鏈表呢?這個取決于我們需要哪些操作,通常有:
* append(element):追加節點
* insert(element,index):在索引位置插入節點
* remove(element):刪除第一個匹配到的節點
* removeAt(index):刪除指定索引節點
* removeAll(element):刪除所有匹配的節點
* get(index):獲取指定索引的節點信息
* set(element,index):修改指定索引的節點值
* indexOf(element):獲取某節點的索引位置
* clear():清除所有節點
* length():返回節點長度
* printf():打印節點信息
看到這些方法是不是有些許熟悉,當你用原生 js 或 jq 時常會用上面類似的方法,現在根據上面列出的方法進行實現一個單向鏈:
~~~javascript
// 節點模型
class LinkNode {
constructor(element, next) {
this.element = element;
this.next = next;
}
}
class LinkedList {
constructor() {
this._head = null;
this._size = 0;
this._errorBoundary = this._errorBoundary.bind(this);
this._getNodeByIndex = this._getNodeByIndex.bind(this);
this.append = this.append.bind(this);
this.insert = this.insert.bind(this);
this.remove = this.remove.bind(this);
this.removeAt = this.removeAt.bind(this);
this.removeAll = this.removeAll.bind(this);
this.getElement = this.getElement.bind(this);
this.setIndex = this.setIndex.bind(this);
this.indexOf = this.indexOf.bind(this);
this.clear = this.clear.bind(this);
this.length = this.length.bind(this);
this.printf = this.printf.bind(this);
}
// 邊界檢驗
_errorBoundary(index) {
if (index < 0 || index >= this._size) {
throw `超出邊界(${0}~${this._size}),目標位置${index}不存在!`;
}
}
// 根據索引獲取目標對象
_getNodeByIndex(index) {
this._errorBoundary(index);
let obj = this._head;
for (let i = 0; i < index; i++) {
obj = obj.next;
}
return obj;
}
// 追加節點
append(element) {
if (this._size === 0) {
this._head = new LinkNode(element, null);
} else {
let obj = this._getNodeByIndex(this._size - 1);
obj.next = new LinkNode(element, null);
}
this._size++;
}
// 在索引位置插入節點
insert(element, index) {
if (index === 0) {
this._head = new LinkNode(element, this._head);
} else {
let obj = this._getNodeByIndex(index - 1);
obj.next = new LinkNode(element, obj.next);
}
this._size++;
}
// 刪除第一個匹配到的節點
remove(element) {
if (this._size < 1) return null;
if (this._head.element == element) {
this._head.element = this._head.next;
this._size--;
return element;
} else {
let temp = this._head;
while (temp.next) {
if (temp.next.element == element) {
temp.next = temp.next.next;
this._size--;
return element;
} else {
temp = temp.next;
}
}
}
return null;
}
// 刪除指定索引節點
removeAt(index) {
this._errorBoundary(index);
let element = null;
if (index === 0) {
element = this._head.element;
this._head = this._head.next;
} else {
let prev = this._getNodeByIndex(index - 1);
element = prev.next.element;
prev.next = prev.next.next;
}
this._size--;
return element;
}
// 刪除所有匹配的節點
removeAll(element) {
// 創建虛擬頭節點,
let v_head = new LinkNode(null, this._head);
let tempNode = v_head;
// let tempEle = null;
while (tempNode.next) {
if (tempNode.next.element == element) {
tempNode.next = tempNode.next.next;
this._size--;
// tempEle = element;
} else {
tempNode = tempNode.next;
}
}
this._head = v_head.next;
}
// 獲取指定索引的節點信息
getElement(index) {
return this._getNodeByIndex(index).element;
}
// 修改指定索引的節點值
setIndex(element, index) {
this._errorBoundary(index);
let obj = this._getNodeByIndex(index);
obj.element = element;
}
// 獲取某節點的索引位置
indexOf(element) {
let obj = this._head;
let index = -1;
for (let i = 0; i < this._size; i++) {
if (obj.element == element) {
index = i;
break;
}
obj = obj.next;
}
return index;
}
// 清除所有節點
clear() {
this._head = null;
this._size = 0;
}
// 返回節點長度
length() {
return this._size;
}
// 打印節點信息
printf() {
let obj = this._head;
const arr = [];
while (obj != null) {
arr.push(obj.element);
obj = obj.next;
}
const str = arr.join('->');
return str || null;
}
}
const obj = new LinkedList();
obj.append(0);
obj.append(1);
obj.append(2);
obj.printf();
// "0->1->2"
obj.insert(3, 3);
obj.printf();
// "0->1->2->3"
obj.remove(3);
obj.printf();
// "0->1->2"
obj.removeAt(0);
obj.printf();
// "1->2"
obj.setIndex(0, 0);
obj.printf();
// "0->2"
obj.indexOf(2);
// 1
obj.length();
// 2
obj.clear();
obj.printf();
// null
~~~
[查看源碼](https://github.com/Mr-jiangzhiguo/book/code/linked.js)
通過以上,我假裝你明白什么是單向鏈表,并且能夠用代碼實現一個單向鏈表了,下一步開始說一說**迭代器**`Iterator`
## 2. Iterator
`Iterator`翻譯過來就是 **迭代器(遍歷器)** 讓我們先來看看它的遍歷過程(類似于單向鏈表):
* 創建一個**指針對象**,指向當前數據結構的起始位置
* 第一次調用指針對象的`next`方法,將指針指向數據結構的第一個成員
* 第二次調用指針對象的`next`方法,將指針指向數據結構的第二個成員
* 不斷的調用指針對象的`next`方法,直到它指向數據結構的結束位置
一個對象要變成可迭代的,必須實現`@@iterator`方法,即對象(或它原型鏈上的某個對象)必須有一個名字是`Symbol.iterator`的屬性(原生具有該屬性的有:字符串、數組、類數組的對象、Set 和 Map):
| 屬性 | 值 |
| --- | --- |
| [Symbol.iterator]: | 返回一個對象的無參函數,被返回對象符合迭代器協議 |
當一個對象需要被迭代的時候(比如開始用于一個`for..of`循環中),它的`@@iterator`方法被調用并且無參數,然后返回一個用于在迭代中獲得值的迭代器
迭代器協議:產生一個有限或無限序列的值,并且當所有的值都已經被迭代后,就會有一個默認的返回值
當一個對象只有滿足下述條件才會被認為是一個迭代器:
它實現了一個`next()`的方法,該方法**必須返回一個對象**,對象有兩個必要的屬性:
* `done`(bool)
* true:迭代器已經超過了可迭代次數。這種情況下,value 的值可以被省略
* 如果迭代器可以產生序列中的下一個值,則為 false。這等效于沒有指定 done 這個屬性
* `value`迭代器返回的任何 JavaScript 值。done 為 true 時可省略
根據上面的規則,咱們來自定義一個簡單的迭代器:
~~~javascript
const makeIterator = arr => {
let nextIndex = 0;
return {
next: () =>
nextIndex < arr.length
? { value: arr[nextIndex++], done: false }
: { value: undefined, done: true },
};
};
const it = makeIterator(['人月', '神話']);
console.log(it.next()); // { value: "人月", done: false }
console.log(it.next()); // { value: "神話", done: false }
console.log(it.next()); // {value: undefined, done: true }
~~~
我們還可以自定義一個可迭代對象:
~~~javascript
const myIterable = {};
myIterable[Symbol.iterator] = function*() {
yield 1;
yield 2;
yield 3;
};
for (let value of myIterable) {
console.log(value);
}
// 1
// 2
// 3
//or
console.log([...myIterable]); // [1, 2, 3]
~~~
了解了迭代器,下面可以進一步了解生成器了
## 3. Generator
`Generator`:生成器對象是生成器函數(GeneratorFunction)返回的,它符合**可迭代協議**和**迭代器協議**,既是迭代器也是可迭代對象,可以調用`next`方法,但它不是函數,更不是構造函數
生成器函數(GeneratorFunction):
> function\* name([param[, param[, ... param]]]) { statements }
>
> * name:函數名
> * param:參數
> * statements:js 語句
調用一個生成器函數并不會馬上執行它里面的語句,而是返回一個這個生成器的迭代器對象,當這個迭代器的`next()`方法被首次(后續)調用時,其內的語句會執行到第一個(后續)出現`yield`的位置為止(讓執行處于**暫停狀**),`yield`后緊跟迭代器要返回的值。或者如果用的是`yield*`(多了個星號),則表示將執行權移交給另一個生成器函數(當前生成器**暫停執行**),調用`next()`(再啟動)方法時,如果傳入了參數,那么這個參數會作為**上一條執行的`yield`語句的返回值**,例如:
~~~javascript
function* another() {
yield '人月神話';
}
function* gen() {
yield* another(); // 移交執行權
const a = yield 'hello';
const b = yield a; // a='world' 是 next('world') 傳參賦值給了上一個 yidle 'hello' 的左值
yield b; // b=! 是 next('!') 傳參賦值給了上一個 yidle a 的左值
}
const g = gen();
g.next(); // {value: "人月神話", done: false}
g.next(); // {value: "hello", done: false}
g.next('world'); // {value: "world", done: false} 將 'world' 賦給上一條 yield 'hello' 的左值,即執行 a='world',
g.next('!'); // {value: "!", done: false} 將 '!' 賦給上一條 yield a 的左值,即執行 b='!',返回 b
g.next(); // {value: undefined, done: false}
~~~
看到這里,你可能會問,`Generator`和`callback`有啥關系,如何處理異步呢?其實二者沒有任何關系,我們只是通過一些方式強行的它們產生了關系,才會有`Generator`處理異步
我們來總結一下`Generator`的本質,暫停,它會讓程序執行到指定位置先暫停(`yield`),然后再啟動(`next`),再暫停(`yield`),再啟動(`next`),而這個暫停就很容易讓它和異步操作產生聯系,因為我們在處理異步時:開始異步處理(網絡求情、IO 操作),然后暫停一下,等處理完了,再該干嘛干嘛。不過值得注意的是,**js 是單線程的(又重復了三遍)**,異步還是異步,callback 還是 callback,不會因為`Generator`而有任何改變
下面來看看,用`Generator`實現異步:
~~~javascript
const promisify = require('util').promisify;
const path = require('path');
const fs = require('fs');
const readFile = promisify(fs.readFile);
const gen = function*() {
const res1 = yield readFile(path.resolve(__dirname, '../data/a.json'), { encoding: 'utf8' });
console.log(res1);
const res2 = yield readFile(path.resolve(__dirname, '../data/b.json'), { encoding: 'utf8' });
console.log(res2);
};
const g = gen();
const g1 = g.next();
console.log('g1:', g1);
g1.value
.then(res1 => {
console.log('res1:', res1);
const g2 = g.next(res1);
console.log('g2:', g2);
g2.value
.then(res2 => {
console.log('res2:', res2);
g.next(res2);
})
.catch(err2 => {
console.log(err2);
});
})
.catch(err1 => {
console.log(err1);
});
// g1: { value: Promise { <pending> }, done: false }
// res1: {
// "a": 1
// }
// {
// "a": 1
// }
// g2: { value: Promise { <pending> }, done: false }
// res2: {
// "b": 2
// }
// {
// "b": 2
// }
~~~
以上代碼是`Generator`和`callback`結合實現的異步,可以看到,仍然需要手動執行`.then`層層添加回調,但由于`next()`方法返回對象`{value: xxx,done: true/false}`所以我們可以簡化它,寫一個自動執行器:
~~~javascript
const promisify = require('util').promisify;
const path = require('path');
const fs = require('fs');
const readFile = promisify(fs.readFile);
function run(gen) {
const g = gen();
function next(data) {
const res = g.next(data);
// 深度遞歸,只要 `Generator` 函數還沒執行到最后一步,`next` 函數就調用自身
if (res.done) return res.value;
res.value.then(function(data) {
next(data);
});
}
next();
}
run(function*() {
const res1 = yield readFile(path.resolve(__dirname, '../data/a.json'), { encoding: 'utf8' });
console.log(res1);
// {
// "a": 1
// }
const res2 = yield readFile(path.resolve(__dirname, '../data/b.json'), { encoding: 'utf8' });
console.log(res2);
// {
// "b": 2
// }
});
~~~
說了這么多,怎么還沒有到`async/await`,客官別急,馬上來了(其實我已經漏了一些內容沒說:Promise 和 callback 的關系,thunk 函數,co 庫,感興趣的可以去 google 一下,yuanyifeng 老師講的[es6 入門](http://es6.ruanyifeng.com/)非常棒,我時不時的都會去看一看)
## 4\. Async/Await
首先,`async/await`是`Generator`的語法糖,上面*我是分割線*下的第一句已經講過,先來看一下二者的對比:
~~~javascript
// Generator
run(function*() {
const res1 = yield readFile(path.resolve(__dirname, '../data/a.json'), { encoding: 'utf8' });
console.log(res1);
const res2 = yield readFile(path.resolve(__dirname, '../data/b.json'), { encoding: 'utf8' });
console.log(res2);
});
// async/await
const readFile = async ()=>{
const res1 = await readFile(path.resolve(__dirname, '../data/a.json'), { encoding: 'utf8' });
console.log(res1);
const res2 = await readFile(path.resolve(__dirname, '../data/b.json'), { encoding: 'utf8' });
console.log(res2);
return 'done';
}
const res = readFile();
~~~
可以看到,`async function`代替了`function*`,`await`代替了`yield`,同時也無需自己手寫一個自動執行器`run`了
現在再來看看`async/await`的特點:
* 當`await`后面跟的是 Promise 對象時,才會異步執行,其它類型的數據會同步執行
* 執行`const res = readFile();`返回的仍然是個 Promise 對象,上面代碼中的`return 'done';`會直接被下面`then`函數接收到
~~~javascript
res.then(data => {
console.log(data); // done
});
~~~
## 摘自
[第 9 題:Async/Await 如何通過同步的方式實現異步](https://www.muyiy.cn/question/async/9.html)
- 文檔說明
- 大廠面試題
- HTML
- 001.如何遍歷一個dom樹
- 002.為什么操作DOM會很慢
- 003.瀏覽器渲染HTML的步驟
- 004.DOM和JavaScript的關系
- JS
- 001.數組扁平化并去重排序
- 002.高階函數
- 003.sort() 對數組進行排序
- 004.call 、 apply 和bind的區別
- 006.0.1+0.2為什么等于0.30000000000000004
- 011.var、let、const 的區別及實現原理?
- 010.new操作符都做了什么
- 009.a.b.c.d 和 a['b']['c']['d'],哪個性能更高?
- 016.什么是防抖和節流?有什么區別?如何實現?
- 017.['1', '2', '3'].map(parseInt) what & why ?
- 018.為什么 for 循環嵌套順序會影響性能?
- 019.介紹模塊化發展歷程
- 020.push輸出問題
- 021.判斷數組的三個方法
- 022.全局作用域中,用 const 和 let 聲明的變量不在 window 上,那到底在哪里?如何去獲取?
- 023.輸出以下代碼的執行結果并解釋為什么
- 024.ES6 代碼轉成 ES5 代碼的實現思路是什么
- 025.為什么普通 for 循環的性能遠遠高于 forEach 的性能,請解釋其中的原因。
- 026.數組里面有10萬個數據,取第一個元素和第10萬個元素的時間相差多少
- 027.變量類型
- 028.原型和原型鏈
- 029.作用域和閉包
- 030. 異步
- 031.ES6/7 新標準的考查
- 024.事件冒泡/事件代理
- 025.手寫 XMLHttpRequest 不借助任何庫
- 026.什么是深拷貝?
- 0027.克隆數組的方法
- 0028.ES6之展開運算符(...)
- 0029.arguments
- 0030. requestAnimationFrame
- 0031.遞歸爆棧問題與解決
- 021.簡單改造下面的代碼,使之分別打印 10 和 20
- 032.箭頭函數與普通函數
- 033.去除掉html標簽字符串里的所有屬性
- 034.查找公共父節點
- 035.Promise
- 0036.JSON.stringify ()
- CSS
- 001. BFC
- 002.介紹下 BFC、IFC、GFC 和 FFC
- 003.分析比較 opacity: 0、visibility: hidden、display: none 優劣和適用場景
- 004.怎么讓一個 div 水平垂直居中
- 005.重排重繪
- 006.inline/block/inline-block的區別
- 007.選擇器的權重和優先級
- 008.盒模型
- 009.清除浮動
- 010.flex
- 011.nth-child和nth-of-type的區別
- 0012.overflow
- 0013.CSS3中translate、transform和translation的區別和聯系
- 0014.flex
- 0015.px、em、rem
- 0016.width:100%
- 網絡
- 001.講解下HTTPS的工作原理
- 002.介紹下 HTTPS 中間人攻擊
- 003.談談你對TCP三次握手和四次揮手的理解
- 004.A、B 機器正常連接后,B 機器突然重啟,問 A 此時處于 TCP 什么狀態
- 005.簡單講解一下http2的多路復用
- 006. 介紹下 http1.0、1.1、2.0 協議的區別?
- 007.永久性重定向(301)和臨時性重定向(302)對 SEO 有什么影響
- 008.URL從輸入到頁面展示的過程
- 009.接口如何防刷
- 010.http狀態碼?
- 0111.跨域/如何解決?
- 012.cookie 和 localStorage 有何區別?
- 013.Fetch API
- 014.跨域Ajax請求時是否帶Cookie的設置
- 0015.協商緩存和強緩存
- 性能優化
- 001.前后端分離的項目如何seo
- 002.性能優化的方法
- 003.防抖和節流
- React
- 001.React 中 setState 什么時候是同步的,什么時候是異步的?
- 002.Virtual DOM 真的比操作原生 DOM 快嗎?談談你的想法。
- 003.Hooks 的特別之處
- 004.元素和組件有什么區別?
- 005.什么是 Pure Components?
- 006.HTML 和 React 事件處理有什么區別?
- 007.如何將參數傳遞給事件處理程序或回調函數?
- 008.如何創建 refs?
- 009.什么是 forward refs?
- 010.什么是 Virtual DOM?
- 011.什么是受控組件、非受控組件?
- 012.什么是 Fragments ?
- 013.為什么React元素有一個$$typeof屬性?
- 014.如何在 React 中創建組件?
- 015.React 如何區分 Class 和 Function?
- 016.React 的狀態是什么?
- 017.React 中的 props 是什么?
- 018.狀態和屬性有什么區別?
- 019.如何在 JSX 回調中綁定方法或事件處理程序?
- 020.什么是 "key" 屬性,在元素數組中使用它們有什么好處?
- 021.為什么順序調用對 React Hooks 很重要?
- 022.setState如何知道該做什么?
- 023.hook規則?
- 024.Hooks 與 Class 中調用 setState 有不同的表現差異么?
- 025.useEffect
- 026.fiber的作用
- 027.context的作用?
- 028.setState何時同步何時異步?
- 029.react性能優化
- 030.fiber
- 031.React SSR
- 異步
- 001.介紹下promise
- 002.Async/Await 如何通過同步的方式實現異步
- 003.setTimeout、Promise、Async/Await 的區別
- 004.JS 異步解決方案的發展歷程以及優缺點
- 005.Promise 構造函數是同步執行還是異步執行,那么 then 方法呢?
- 006.模擬實現一個 Promise.finally
- 012.簡單手寫實現promise
- 015.用Promise對象實現的 Ajax
- 007.簡單實現async/await中的async函數
- 008.設計并實現 Promise.race()
- 009.Async/await
- 010.珠峰培訓promise
- git
- 001.提交但沒有push
- 002.gitignore沒有作用?
- Node
- 001.用nodejs,將base64轉化成png文件
- Koa
- 001.koa和express的區別
- 數據庫
- redux
- 001.redux 為什么要把 reducer 設計成純函數
- 002.在 React 中如何使用 Redux 的 connect() ?
- 003.mapStateToProps() 和 mapDispatchToProps() 之間有什么區別?
- 004.為什么 Redux 狀態函數稱為 reducers ?
- 005.如何在 Redux 中發起 AJAX 請求?
- 006.訪問 Redux Store 的正確方法是什么?
- 007.React Redux 中展示組件和容器組件之間的區別是什么?
- 008.Redux 中常量的用途是什么?
- 009.什么是 redux-saga?
- 設計模式
- 公司題目
- 001.餓了么
- 001.div垂直水平居中(flex、絕對定位)
- 002.React子父組件之間如何傳值
- 003.Emit事件怎么發,需要引入什么
- 004.介紹下React高階組件,和普通組件有什么區別
- 005.一個對象數組,每個子對象包含一個id和name,React如何渲染出全部的name
- 006.在哪個生命周期里寫
- 007.其中有幾個name不存在,通過異步接口獲取,如何做
- 008.渲染的時候key給什么值,可以使用index嗎,用id好還是index好
- 009.webpack如何配sass,需要配哪些loader
- 010.配css需要哪些loader
- 011.如何配置把js、css、html單獨打包成一個文件
- 012.監聽input的哪個事件,在什么時候觸發
- 013.兩個元素塊,一左一右,中間相距10像素
- 014.上下固定,中間滾動布局如何實現
- 016.取數組的最大值(ES5、ES6)
- 017.apply和call的區別
- 018.ES5和ES6有什么區別
- 019.some、every、find、filter、map、forEach有什么區別
- 020.上述數組隨機取數,每次返回的值都不一樣
- 021.如何找0-5的隨機數,95-99呢
- 022.頁面上有1萬個button如何綁定事件
- 023.如何判斷是button
- 024.頁面上生成一萬個button,并且綁定事件,如何做(JS原生操作DOM)
- 025.循環綁定時的index是多少,為什么,怎么解決
- 026.頁面上有一個input,還有一個p標簽,改變input后p標簽就跟著變化,如何處理
- 瀏覽器相關
- 001.性能優化
- 002.web安全
- 003.獲取瀏覽器大小
- 004.從輸入 URL 到頁面加載完成的過程中都發生了什么事情?
- 后端
- 001.分布式
- zuku
- 字節
- webpack
- webpack的打包原理是什么
- Webpack-- 常見面試題
- webscoket