
# 14.3 使用AddressSanifier向CDash報告內存缺陷
**NOTE**:*此示例代碼可以在 https://github.com/dev-cafe/cmake-cookbook/tree/v1.0/chapter-14/recipe-03 中找到,其中包含一個C++示例和一個Fortran例子。該示例在CMake 3.5版(或更高版本)中是有效的,并且已經在GNU/Linux、macOS和Windows上進行過測試。*
AddressSanitizer(ASan)是可用于C++、C和Fortran的內存檢測。它可以發現內存缺陷,比如:在空閑后使用、返回后使用、作用域后使用、緩沖區溢出、初始化順序錯誤和內存泄漏(請參見 https://github.com/google/sanitizers/wiki/AddressSanitizer )。從3.1版本開始,AddressSanitizer是LLVM的一部分;從4.8版本開始,作為GCC的一部分。在這個示例中,我們將在代碼中加入兩個bug,正常的測試中可能無法檢測到。為了檢測這些bug,我們將使用AddressSanitizer工具,并將CTest與動態分析結合起來,從而將缺陷報告給CDash。
## 準備工作
這個例子中,我們將使用兩個源文件和兩個測試集:
```shell
.
├── CMakeLists.txt
├── CTestConfig.cmake
├── dashboard.cmake
├── src
│ ├── buggy.cpp
│ ├── buggy.hpp
│ └── CMakeLists.txt
└── tests
├── CMakeLists.txt
├── leaky.cpp
└── use_after_free.cpp
```
`buggy.cpp`包含有兩個bug:
```c++
#include "buggy.hpp"
#include <iostream>
int function_leaky() {
double *my_array = new double[1000];
// do some work ...
// we forget to deallocate the array
// delete[] my_array;
return 0;
}
int function_use_after_free() {
double *another_array = new double[1000];
// do some work ...
// deallocate it, good!
delete[] another_array;
// however, we accidentally use the array
// after it has been deallocated
std::cout << "not sure what we get: " << another_array[123] << std::endl;
return 0;
}
```
這些函數在相應的頭文件中聲明(`buggy.hpp`):
```c++
#pragma once
int function_leaky();
int function_use_after_free();
```
測試文件`leaky.cpp`中將會驗證`function_leaky`的返回值:
```c++
#include "buggy.hpp"
int main() {
int return_code = function_leaky();
return return_code;
}
```
相應地,`use_after_free.cpp`會檢查`function_use_after_free`的返回值:
```c++
#include "buggy.hpp"
int main() {
int return_code = function_use_after_free();
return return_code;
}
```
## 具體實施
為了使用ASan,我們需要使用特定的標志來編譯代碼。然后,我們將運行測試并將它們提交到面板。
1. 生成bug庫的工作將在` src/CMakeLists.txt`中完成:
```cmake
add_library(buggy "")
target_sources(buggy
PRIVATE
buggy.cpp
PUBLIC
${CMAKE_CURRENT_LIST_DIR}/buggy.hpp
)
target_include_directories(buggy
PUBLIC
${CMAKE_CURRENT_LIST_DIR}
)
```
2. 在文件`src/CMakeLists.txt`中,我們將添加一個選項用于使用ASan:
```cmake
option(ENABLE_ASAN "Enable AddressSanitizer" OFF)
if(ENABLE_ASAN)
if(CMAKE_CXX_COMPILER_ID MATCHES GNU)
message(STATUS "AddressSanitizer enabled")
target_compile_options(buggy
PUBLIC
-g -O1 -fsanitize=address -fno-omit-frame-pointer
)
target_link_libraries(buggy
PUBLIC
asan
)
else()
message(WARNING "AddressSanitizer not supported for this compiler")
endif()
endif()
```
3. 測試在`tests/CMakeLists.txt`中定義:
```cmake
foreach(_test IN ITEMS leaky use_after_free)
add_executable(${_test} ${_test}.cpp)
target_link_libraries(${_test} buggy)
add_test(
NAME
${_test}
COMMAND
$<TARGET_FILE:${_test}>
)
endforeach()
```
4. 主`CMakeLists.txt`與之前的示例基本相同:
```cmake
# set minimum cmake version
cmake_minimum_required(VERSION 3.5 FATAL_ERROR)
# project name and language
project(recipe-03 LANGUAGES CXX)
# require C++11
set(CMAKE_CXX_STANDARD 11)
set(CMAKE_CXX_EXTENSIONS OFF)
set(CMAKE_CXX_STANDARD_REQUIRED ON)
# process src/CMakeLists.txt
add_subdirectory(src)
enable_testing()
# allow to report to a cdash dashboard
include(CTest)
# process tests/CMakeLists.txt
add_subdirectory(tests)
```
5. ` CTestConfig.cmake `也沒有修改:
```cmake
set(CTEST_DROP_METHOD "http")
set(CTEST_DROP_SITE "my.cdash.org")
set(CTEST_DROP_LOCATION "/submit.php?project=cmake-cookbook")
set(CTEST_DROP_SITE_CDASH TRUE)
```
6. 這個示例中,我們使用CTest腳本向CDash提交結果;為此,我們將創建一個文件` dashboard.cmake`(與主`CMakeLists.txt`和`` CTestConfig.cmake`位于同一個目錄下):
```cmake
set(CTEST_PROJECT_NAME "example")
cmake_host_system_information(RESULT _site QUERY HOSTNAME)
set(CTEST_SITE ${_site})
set(CTEST_BUILD_NAME "${CMAKE_SYSTEM_NAME}-${CMAKE_HOST_SYSTEM_PROCESSOR}")
set(CTEST_SOURCE_DIRECTORY "${CTEST_SCRIPT_DIRECTORY}")
set(CTEST_BINARY_DIRECTORY "${CTEST_SCRIPT_DIRECTORY}/build")
include(ProcessorCount)
ProcessorCount(N)
if(NOT N EQUAL 0)
set(CTEST_BUILD_FLAGS -j${N})
set(ctest_test_args ${ctest_test_args} PARALLEL_LEVEL ${N})
endif()
ctest_start(Experimental)
ctest_configure(
OPTIONS
-DENABLE_ASAN:BOOL=ON
)
ctest_build()
ctest_test()
set(CTEST_MEMORYCHECK_TYPE "AddressSanitizer")
ctest_memcheck()
ctest_submit()
```
7. 我們將執行` dashboard.cmake`腳本。注意,我們使用`CTEST_CMAKE_GENERATOR`與生成器選項的方式:
```shell
$ ctest -S dashboard.cmake -D
CTEST_CMAKE_GENERATOR="Unix Makefiles"
Each . represents 1024 bytes of output
. Size of output: 0K
Each symbol represents 1024 bytes of output.
'!' represents an error and '*' a warning.
. Size of output: 1K
```
8. 結果將會出現在CDash網站上:
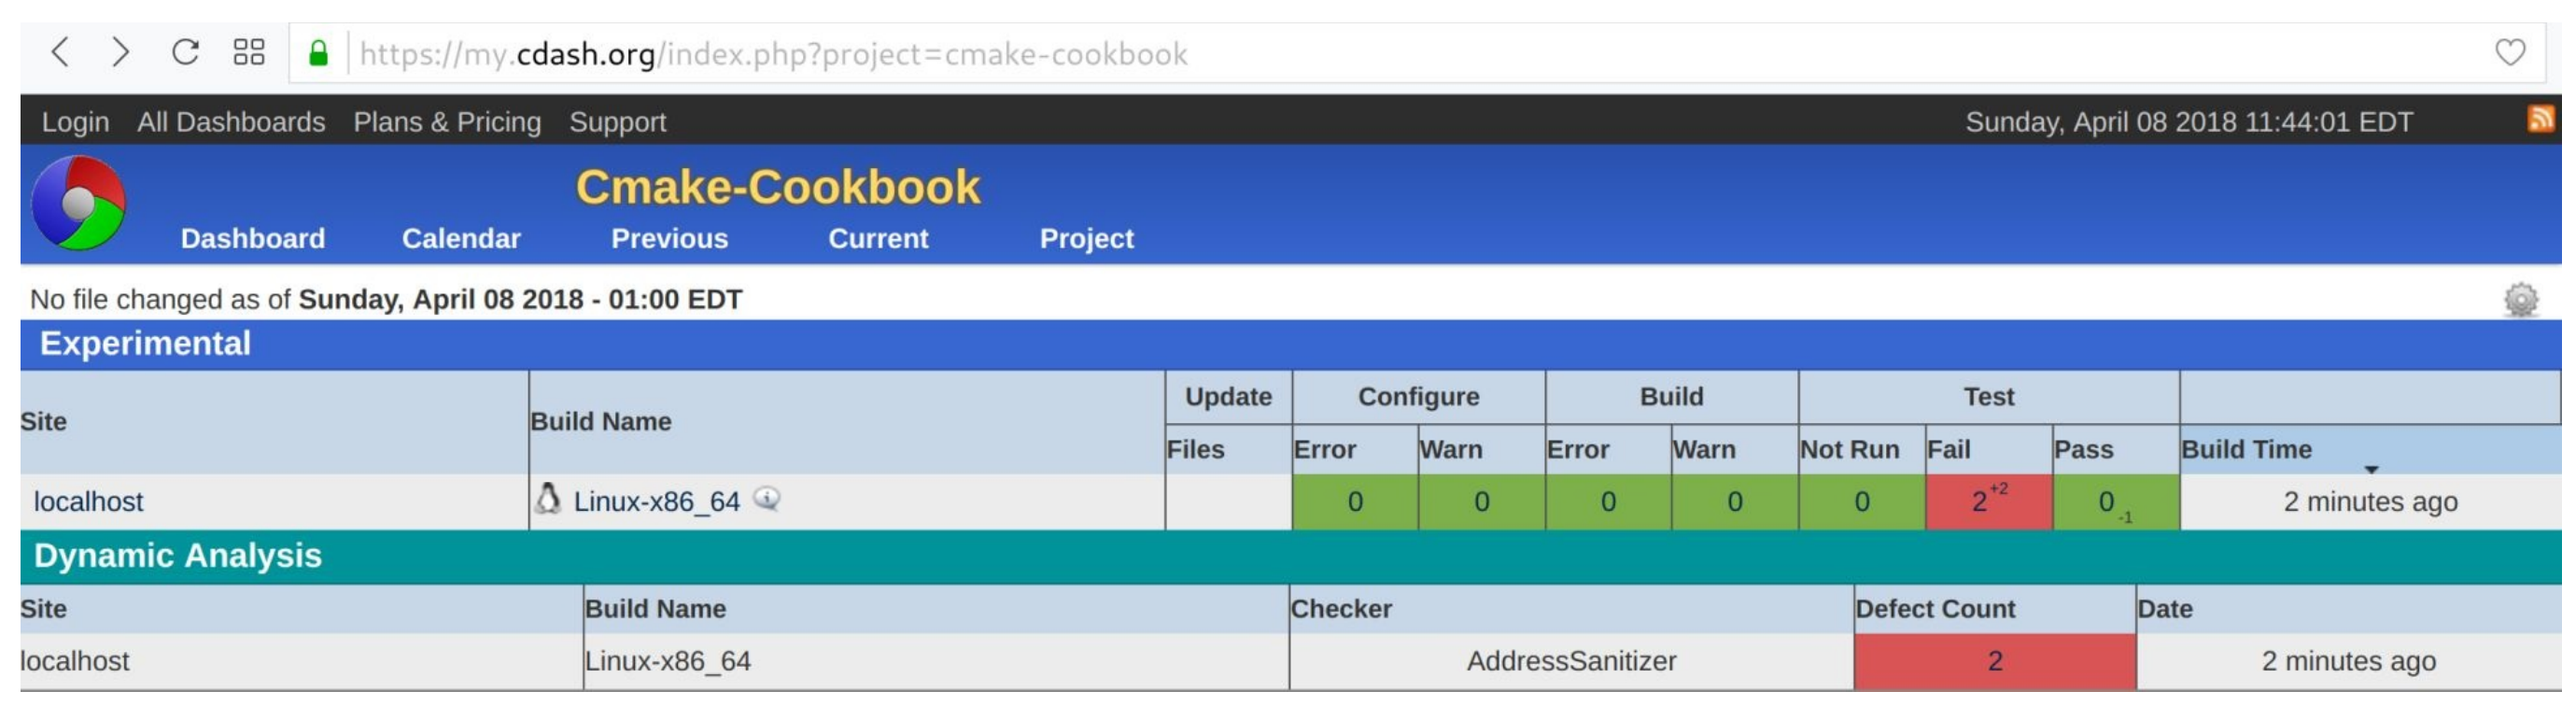
## 具體實施
這個示例中,成功地向儀表板的動態分析部分報告了內存錯誤。我們可以通過瀏覽缺陷詳細信息,得到進一步的了解:
通過單擊各個鏈接,可以瀏覽完整信息的輸出。
注意,也可以在本地生成AddressSanitizer報告。這個例子中,我們需要設置`ENABLE_ASAN`:
```shell
$ mkdir -p build
$ cd build
$ cmake -DENABLE_ASAN=ON ..
$ cmake --build .
$ cmake --build . --target test
Start 1: leaky
1/2 Test #1: leaky ............................***Failed 0.07 sec
Start 2: use_after_free
2/2 Test #2: use_after_free ...................***Failed 0.04 sec
0% tests passed, 2 tests failed out of 2
```
運行`leaky`測試,直接產生以下結果:
```shell
$ ./build/tests/leaky
=================================================================
==18536==ERROR: LeakSanitizer: detected memory leaks
Direct leak of 8000 byte(s) in 1 object(s) allocated from:
#0 0x7ff984da1669 in operator new[](unsigned long) /build/gcc/src/gcc/libsanitizer/asan/asan_new_delete.cc:82
#1 0x564925c93fd2 in function_leaky() /home/user/cmake-recipes/chapter-14/recipe-03/cxx-example/src/buggy.cpp:7
#2 0x564925c93fb2 in main /home/user/cmake-recipes/chapter-14/recipe-03/cxx-example/tests/leaky.cpp:4
#3 0x7ff98403df49 in __libc_start_main (/usr/lib/libc.so.6+0x20f49)
SUMMARY: AddressSanitizer: 8000 byte(s) leaked in 1 allocation(s).
```
相應地,我們可以直接運行`use_after_free`,得到詳細的輸出:
```shell
$ ./build/tests/use_after_free
=================================================================
==18571==ERROR: AddressSanitizer: heap-use-after-free on address 0x6250000004d8 at pc 0x557ffa8b0102 bp 0x7ffe8c560200 sp 0x7ffe8c5601f0
READ of size 8 at 0x6250000004d8 thread T0
#0 0x557ffa8b0101 in function_use_after_free() /home/user/cmake-recipes/chapter-14/recipe-03/cxx-example/src/buggy.cpp:28
#1 0x557ffa8affb2 in main /home/user/cmake-recipes/chapter-14/recipe-03/cxx-example/tests/use_after_free.cpp:4
#2 0x7ff1d6088f49 in __libc_start_main (/usr/lib/libc.so.6+0x20f49)
#3 0x557ffa8afec9 in _start (/home/user/cmake-recipes/chapter-14/recipe-03/cxx-example/build/tests/use_after_free+0xec9)
0x6250000004d8 is located 984 bytes inside of 8000-byte region [0x625000000100,0x625000002040)
freed by thread T0 here:
#0 0x7ff1d6ded5a9 in operator delete[](void*) /build/gcc/src/gcc/libsanitizer/asan/asan_new_delete.cc:128
#1 0x557ffa8afffa in function_use_after_free() /home/user/cmake-recipes/chapter-14/recipe-03/cxx-example/src/buggy.cpp:24
#2 0x557ffa8affb2 in main /home/user/cmake-recipes/chapter-14/recipe-03/cxx-example/tests/use_after_free.cpp:4
#3 0x7ff1d6088f49 in __libc_start_main (/usr/lib/libc.so.6+0x20f49)
previously allocated by thread T0 here:
#0 0x7ff1d6dec669 in operator new[](unsigned long) /build/gcc/src/gcc/libsanitizer/asan/asan_new_delete.cc:82
#1 0x557ffa8affea in function_use_after_free() /home/user/cmake-recipes/chapter-14/recipe-03/cxx-example/src/buggy.cpp:19
#2 0x557ffa8affb2 in main /home/user/cmake-recipes/chapter-14/recipe-03/cxx-example/tests/use_after_free.cpp:4
#3 0x7ff1d6088f49 in __libc_start_main (/usr/lib/libc.so.6+0x20f49)
SUMMARY: AddressSanitizer: heap-use-after-free /home/user/cmake-recipes/chapter-14/recipe-03/cxx-example/src/buggy.cpp:28 in function_use_after_free()
Shadow bytes around the buggy address:
0x0c4a7fff8040: fd fd fd fd fd fd fd fd fd fd fd fd fd fd fd fd
0x0c4a7fff8050: fd fd fd fd fd fd fd fd fd fd fd fd fd fd fd fd
0x0c4a7fff8060: fd fd fd fd fd fd fd fd fd fd fd fd fd fd fd fd
0x0c4a7fff8070: fd fd fd fd fd fd fd fd fd fd fd fd fd fd fd fd
0x0c4a7fff8080: fd fd fd fd fd fd fd fd fd fd fd fd fd fd fd fd
=>0x0c4a7fff8090: fd fd fd fd fd fd fd fd fd fd fd[fd]fd fd fd fd
0x0c4a7fff80a0: fd fd fd fd fd fd fd fd fd fd fd fd fd fd fd fd
0x0c4a7fff80b0: fd fd fd fd fd fd fd fd fd fd fd fd fd fd fd fd
0x0c4a7fff80c0: fd fd fd fd fd fd fd fd fd fd fd fd fd fd fd fd
0x0c4a7fff80d0: fd fd fd fd fd fd fd fd fd fd fd fd fd fd fd fd
0x0c4a7fff80e0: fd fd fd fd fd fd fd fd fd fd fd fd fd fd fd fd
Shadow byte legend (one shadow byte represents 8 application bytes):
Addressable: 00
Partially addressable: 01 02 03 04 05 06 07
Heap left redzone: fa
Freed heap region: fd
Stack left redzone: f1
Stack mid redzone: f2
Stack right redzone: f3
Stack after return: f5
Stack use after scope: f8
Global redzone: f9
Global init order: f6
Poisoned by user: f7
Container overflow: fc
Array cookie: ac
Intra object redzone: bb
ASan internal: fe
Left alloca redzone: ca
Right alloca redzone: cb
==18571==ABORTING
```
如果我們在沒有AddressSanitizer的情況下進行測試(默認情況下`ENABLE_ASAN`是關閉的),就不會報告錯誤:
```shell
$ mkdir -p build_no_asan
$ cd build_no_asan
$ cmake ..
$ cmake --build .
$ cmake --build . --target test
Start 1: leaky
1/2 Test #1: leaky ............................ Passed 0.00 sec
Start 2: use_after_free
2/2 Test #2: use_after_free ................... Passed 0.00 sec
100% tests passed, 0 tests failed out of 2
```
實際上,泄漏只會浪費內存,而`use_after_free`可能會導致未定義行為。調試這些問題的一種方法是使用valgrind (http://valgrind.org )。
與前兩個示例相反,我們使用了CTest腳本來配置、構建和測試代碼,并將報告提交到面板。要了解此示例的工作原理,請仔細查看` dashboard.cmake `腳本。首先,我們定義項目名稱并設置主機報告和構建名稱:
```cmake
set(CTEST_PROJECT_NAME "example")
cmake_host_system_information(RESULT _site QUERY HOSTNAME)
set(CTEST_SITE ${_site})
set(CTEST_BUILD_NAME "${CMAKE_SYSTEM_NAME}-${CMAKE_HOST_SYSTEM_PROCESSOR}")
```
我們的例子中,`CTEST_BUILD_NAME`的計算結果是`Linux-x86_64`。不同的操作系統下,可能會觀察到不同的結果。
接下來,我們為源和構建目錄指定路徑:
```cmake
set(CTEST_SOURCE_DIRECTORY "${CTEST_SCRIPT_DIRECTORY}")
set(CTEST_BINARY_DIRECTORY "${CTEST_SCRIPT_DIRECTORY}/build")
```
我們可以將生成器設置為`Unix Makefile`:
```cmake
set(CTEST_CMAKE_GENERATOR "Unix Makefiles")
```
但是,對于更具可移植性的測試腳本,我們更愿意通過命令行提供生成器:
```shell
$ ctest -S dashboard.cmake -D CTEST_CMAKE_GENERATOR="Unix Makefiles"
```
` dashboard.cmake`中的下一個代碼片段,將計算出機器上可用的CPU芯數量,并將測試步驟的并行級設置為可用CPU芯數量,以使總測試時間最小化:
```cmake
include(ProcessorCount)
ProcessorCount(N)
if(NOT N EQUAL 0)
set(CTEST_BUILD_FLAGS -j${N})
set(ctest_test_args ${ctest_test_args} PARALLEL_LEVEL ${N})
endif()
```
接下來,我們開始測試步驟并配置代碼,將`ENABLE_ASAN`設置為`ON`:
```cmake
ctest_start(Experimental)
ctest_configure(
OPTIONS
-DENABLE_ASAN:BOOL=ON
)
```
` dashboard.cmake `其他命令為映射到構建、測試、內存檢查和提交步驟:
```cmake
ctest_build()
ctest_test()
set(CTEST_MEMORYCHECK_TYPE "AddressSanitizer")
ctest_memcheck()
ctest_submit()
```
## 更多信息
細心的讀者會注意到,在鏈接目標之前,我們沒有在系統上搜索AddressSanitizer。實際中,庫查找工作已經提前做完,以避免在鏈接階段出現意外。
有關AddressSanitizer文檔和示例的更多信息,請參見https://github.com/google/sanitizers/wiki/AddressSanitizer 。AddressSanitizer并不僅限于C和C++。對于Fortran示例,讀者可以參考 https://github.com/dev-cafe/cmake-cookbook/tree/v1.0/chapter-14/recipe-03/fortran-example 。
**NOTE**:*可以在https://github.com/arsenm/sanitizers-cmake 上找到CMake程序,用來查找殺毒程序和調整編譯器標志*
下面的博客文章討論了如何添加對動態分析工具的支持,對我們很有啟發性:https://blog.kitware.com/ctest-cdash-add-support-for-new-dynamic-analysis-tools/
- Introduction
- 前言
- 第0章 配置環境
- 0.1 獲取代碼
- 0.2 Docker鏡像
- 0.3 安裝必要的軟件
- 0.4 測試環境
- 0.5 上報問題并提出改進建議
- 第1章 從可執行文件到庫
- 1.1 將單個源文件編譯為可執行文件
- 1.2 切換生成器
- 1.3 構建和鏈接靜態庫和動態庫
- 1.4 用條件句控制編譯
- 1.5 向用戶顯示選項
- 1.6 指定編譯器
- 1.7 切換構建類型
- 1.8 設置編譯器選項
- 1.9 為語言設定標準
- 1.10 使用控制流
- 第2章 檢測環境
- 2.1 檢測操作系統
- 2.2 處理與平臺相關的源代碼
- 2.3 處理與編譯器相關的源代碼
- 2.4 檢測處理器體系結構
- 2.5 檢測處理器指令集
- 2.6 為Eigen庫使能向量化
- 第3章 檢測外部庫和程序
- 3.1 檢測Python解釋器
- 3.2 檢測Python庫
- 3.3 檢測Python模塊和包
- 3.4 檢測BLAS和LAPACK數學庫
- 3.5 檢測OpenMP的并行環境
- 3.6 檢測MPI的并行環境
- 3.7 檢測Eigen庫
- 3.8 檢測Boost庫
- 3.9 檢測外部庫:Ⅰ. 使用pkg-config
- 3.10 檢測外部庫:Ⅱ. 自定義find模塊
- 第4章 創建和運行測試
- 4.1 創建一個簡單的單元測試
- 4.2 使用Catch2庫進行單元測試
- 4.3 使用Google Test庫進行單元測試
- 4.4 使用Boost Test進行單元測試
- 4.5 使用動態分析來檢測內存缺陷
- 4.6 預期測試失敗
- 4.7 使用超時測試運行時間過長的測試
- 4.8 并行測試
- 4.9 運行測試子集
- 4.10 使用測試固件
- 第5章 配置時和構建時的操作
- 5.1 使用平臺無關的文件操作
- 5.2 配置時運行自定義命令
- 5.3 構建時運行自定義命令:Ⅰ. 使用add_custom_command
- 5.4 構建時運行自定義命令:Ⅱ. 使用add_custom_target
- 5.5 構建時為特定目標運行自定義命令
- 5.6 探究編譯和鏈接命令
- 5.7 探究編譯器標志命令
- 5.8 探究可執行命令
- 5.9 使用生成器表達式微調配置和編譯
- 第6章 生成源碼
- 6.1 配置時生成源碼
- 6.2 使用Python在配置時生成源碼
- 6.3 構建時使用Python生成源碼
- 6.4 記錄項目版本信息以便報告
- 6.5 從文件中記錄項目版本
- 6.6 配置時記錄Git Hash值
- 6.7 構建時記錄Git Hash值
- 第7章 構建項目
- 7.1 使用函數和宏重用代碼
- 7.2 將CMake源代碼分成模塊
- 7.3 編寫函數來測試和設置編譯器標志
- 7.4 用指定參數定義函數或宏
- 7.5 重新定義函數和宏
- 7.6 使用廢棄函數、宏和變量
- 7.7 add_subdirectory的限定范圍
- 7.8 使用target_sources避免全局變量
- 7.9 組織Fortran項目
- 第8章 超級構建模式
- 8.1 使用超級構建模式
- 8.2 使用超級構建管理依賴項:Ⅰ.Boost庫
- 8.3 使用超級構建管理依賴項:Ⅱ.FFTW庫
- 8.4 使用超級構建管理依賴項:Ⅲ.Google Test框架
- 8.5 使用超級構建支持項目
- 第9章 語言混合項目
- 9.1 使用C/C++庫構建Fortran項目
- 9.2 使用Fortran庫構建C/C++項目
- 9.3 使用Cython構建C++和Python項目
- 9.4 使用Boost.Python構建C++和Python項目
- 9.5 使用pybind11構建C++和Python項目
- 9.6 使用Python CFFI混合C,C++,Fortran和Python
- 第10章 編寫安裝程序
- 10.1 安裝項目
- 10.2 生成輸出頭文件
- 10.3 輸出目標
- 10.4 安裝超級構建
- 第11章 打包項目
- 11.1 生成源代碼和二進制包
- 11.2 通過PyPI發布使用CMake/pybind11構建的C++/Python項目
- 11.3 通過PyPI發布使用CMake/CFFI構建C/Fortran/Python項目
- 11.4 以Conda包的形式發布一個簡單的項目
- 11.5 將Conda包作為依賴項發布給項目
- 第12章 構建文檔
- 12.1 使用Doxygen構建文檔
- 12.2 使用Sphinx構建文檔
- 12.3 結合Doxygen和Sphinx
- 第13章 選擇生成器和交叉編譯
- 13.1 使用CMake構建Visual Studio 2017項目
- 13.2 交叉編譯hello world示例
- 13.3 使用OpenMP并行化交叉編譯Windows二進制文件
- 第14章 測試面板
- 14.1 將測試部署到CDash
- 14.2 CDash顯示測試覆蓋率
- 14.3 使用AddressSanifier向CDash報告內存缺陷
- 14.4 使用ThreadSaniiser向CDash報告數據爭用
- 第15章 使用CMake構建已有項目
- 15.1 如何開始遷移項目
- 15.2 生成文件并編寫平臺檢查
- 15.3 檢測所需的鏈接和依賴關系
- 15.4 復制編譯標志
- 15.5 移植測試
- 15.6 移植安裝目標
- 15.7 進一步遷移的措施
- 15.8 項目轉換為CMake的常見問題
- 第16章 可能感興趣的書
- 16.1 留下評論——讓其他讀者知道你的想法