
[TOC]
# Bugly 線上行數信息缺失
檢查混淆文件中下面這行是否存在,否則行數信息在編譯或打包時就已經丟失
```plain
-keepattributes SourceFile,LineNumberTable
```
# Gradle 全局代理配置,提高三方庫下載速度
在已經開啟 Shadowsocks 代理的前提下,
修改 $HOME/.gradle/gradle.properties 文件,增加如下配置:
```plain
org.gradle.jvmargs=-DsocksProxyHost=127.0.0.1 -DsocksProxyPort=1080
```
參考[知乎回答](https://www.zhihu.com/question/37810416)
若無 Shadowsocks 代理,可更改中央倉庫地址為阿里云的,在項目根目錄 build.gradle 修改如下:
```groovy
buildscript {
repositories {
maven{ url 'http://maven.aliyun.com/nexus/content/groups/public/'}
}
}
allprojects {
repositories {
maven{ url 'http://maven.aliyun.com/nexus/content/groups/public/'}
}
}
```
# 解決國內訪問 s3.amazonaws.com 服務器慢的問題
日常開發中經常性的需要用到亞馬遜服務器(cloud.s3.amazonaws.com)上的資源,但是國內訪問亞馬遜服務器,基本上沒辦法下載成功的。
經 Google,發現可以通過設置 host,強制把訪問節點從美國定向到香港的辦法來解決這個問題。
Windows下,編輯 C:\Windows\System32\drivers\etc\hosts
macOS 下,編輯 /etc/hosts
增加如下解析:
```plain
219.76.4.4 github-cloud.s3.amazonaws.com
```
參考:[https://www.mobibrw.com/2017/6047/comment-page-1](https://www.mobibrw.com/2017/6047/comment-page-1)
# Git 代理配置
為 Git 配置 Socks5 代理:
```plain
git config --global http.proxy 'socks5://127.0.0.1:1080'
git config --global https.proxy 'socks5://127.0.0.1:1080'
```
# Android Studio 簽名后依舊 INSTALL_PARSE_FAILED_NO_CERTIFICATES 的問題
在 Android 7.0 中引入了一項新的應用簽名方案 APK Signature Scheme v2,它能提供更快的應用安裝時間和更多針對未授權 APK 文件更改的保護,但在7.0以下版本系統下,有一定概率出現問題(比如我。。)
問題就是出現在這里,因為我一開始只勾選了 V2,沒勾選 V1,所以在7.0以上設備正常,7.0以下設備報錯:

解決方案:
將 V1、V2全部勾選,這種部署方式可以兼容各個版本系統;或者僅勾選 V1,也就是仍使用舊版簽名方案來部署應用。
具體可參考 Google 文檔:[https://developer.android.com/about/versions/nougat/android-7.0.html#apk_signature_v2](https://developer.android.com/about/versions/nougat/android-7.0.html#apk_signature_v2)
# Android Studio 關閉 AAPT 檢查
在 app 模塊的 build.gradle 文件進行配置:
```groovy
defaultConfig {
...
aaptOptions{
cruncherEnabled = false
}
}
```
# Ubuntu 中 vi 不能正常使用方向鍵與退格鍵的問題
原因:
Ubuntu 預裝的是 vim tiny 版本,而我們需要的是 vim full 版本
解決:
```plain
sudo apt-get remove vim-common
sudo apt-get install vim
```
# 修改 aar 包內 class 文件并重新打包
* 將 .aar 文件重命名為 .zip 文件并解壓
* 將解壓得到的 classes.jar 文件重命名為 .zip 文件并解壓
* 替換目標 class 文件
* 壓縮 class 文件夾至 classes.jar 文件并重命名為 clasess.jar
* 將剛解壓 .aar 文件得到的目錄下的 classes.jar 進行替換,并重新壓縮重命名為 .aar 文件
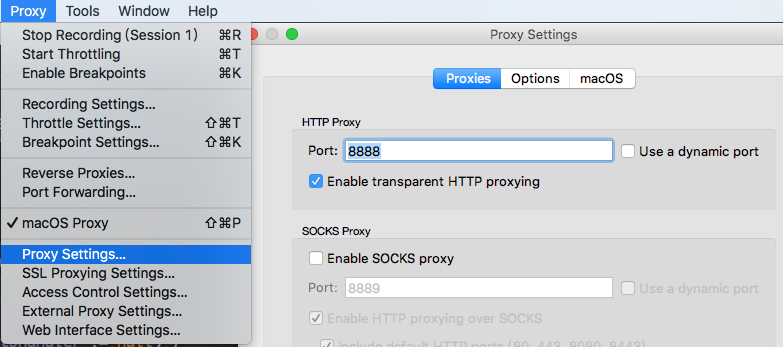
# Charles https抓包
參考文檔:[https://www.jianshu.com/p/5788b1e8da02](https://www.jianshu.com/p/5788b1e8da02)
1、設置Charles代理
2、手機端設置代理
3、手機端安裝證書
?打開chrome或者火狐訪問 chls.pro/ssl 安裝證書,盡量別用系統瀏覽器,如果下載的證書是后綴名是.pem,請改成.crt
4、測試抓包
5、添加代碼(非必需)
如果出現?java.security.cert.CertPathValidatorException: Trust anchor for certification path not found 異常,則需要添加以下代碼到項目中:
```xml
<?xml version="1.0" encoding="utf-8"?>
<network-security-config>
<debug-overrides>
<trust-anchors>
<!-- Trust user added CAs while debuggable only -->
<certificates src="user" /> </trust-anchors>
</debug-overrides>
</network-security-config>
```
```xml
<application
<!--其他配置-->
android:networkSecurityConfig="@xml/network_security_config"
tools:targetApi="n">
```
# WebView debug
1、在應用代碼中為WebView打開debug開關:
```java
if (!BuildConfig.RELEASE_PUBLISH && Build.VERSION.SDK_INT >= Build.VERSION_CODES.KITKAT) {
WebView.setWebContentsDebuggingEnabled(true);
} else {
WebView.setWebContentsDebuggingEnabled(false);
}
```
2、手機打開USB調試,連接電腦
3、在Chrome地址欄輸入:chrome://inspect,界面如下:
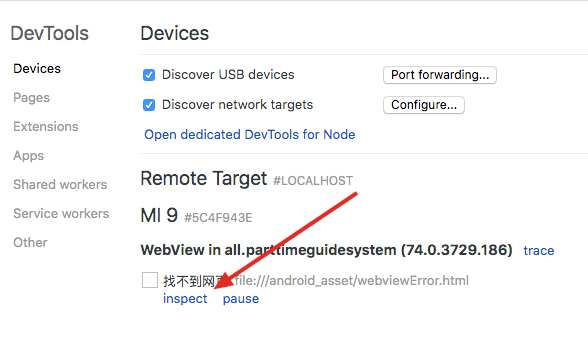
4、點擊inspect按鈕,即可打開調試頁面:
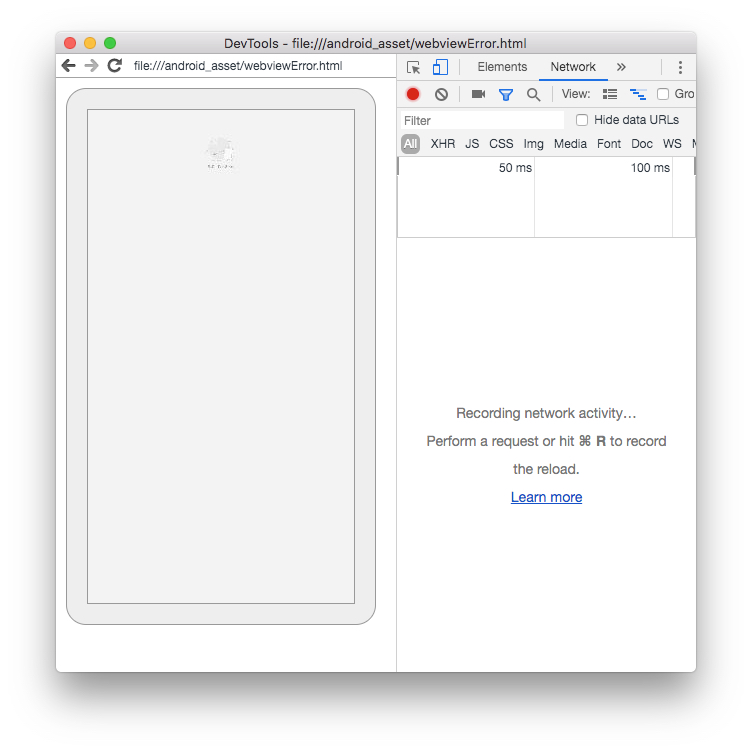
注意:
第一次使用可能會出現白屏,使用梯子,或者配置host:
```plain
# inspect
172.217.14.116 chrome-devtools-frontend.appspot.com
172.217.14.116 chrometophone.appspot.com
```
- 導讀
- Java知識
- Java基本程序設計結構
- 【基礎知識】Java基礎
- 【源碼分析】Okio
- 【源碼分析】深入理解i++和++i
- 【專題分析】JVM與GC
- 【面試清單】Java基本程序設計結構
- 對象與類
- 【基礎知識】對象與類
- 【專題分析】Java類加載過程
- 【面試清單】對象與類
- 泛型
- 【基礎知識】泛型
- 【面試清單】泛型
- 集合
- 【基礎知識】集合
- 【源碼分析】SparseArray
- 【面試清單】集合
- 多線程
- 【基礎知識】多線程
- 【源碼分析】ThreadPoolExecutor源碼分析
- 【專題分析】volatile關鍵字
- 【面試清單】多線程
- Java新特性
- 【專題分析】Lambda表達式
- 【專題分析】注解
- 【面試清單】Java新特性
- Effective Java筆記
- Android知識
- Activity
- 【基礎知識】Activity
- 【專題分析】運行時權限
- 【專題分析】使用Intent打開三方應用
- 【源碼分析】Activity的工作過程
- 【面試清單】Activity
- 架構組件
- 【專題分析】MVC、MVP與MVVM
- 【專題分析】數據綁定
- 【面試清單】架構組件
- 界面
- 【專題分析】自定義View
- 【專題分析】ImageView的ScaleType屬性
- 【專題分析】ConstraintLayout 使用
- 【專題分析】搞懂點九圖
- 【專題分析】Adapter
- 【源碼分析】LayoutInflater
- 【源碼分析】ViewStub
- 【源碼分析】View三大流程
- 【源碼分析】觸摸事件分發機制
- 【源碼分析】按鍵事件分發機制
- 【源碼分析】Android窗口機制
- 【面試清單】界面
- 動畫和過渡
- 【基礎知識】動畫和過渡
- 【面試清單】動畫和過渡
- 圖片和圖形
- 【專題分析】圖片加載
- 【面試清單】圖片和圖形
- 后臺任務
- 應用數據和文件
- 基于網絡的內容
- 多線程與多進程
- 【基礎知識】多線程與多進程
- 【源碼分析】Handler
- 【源碼分析】AsyncTask
- 【專題分析】Service
- 【源碼分析】Parcelable
- 【專題分析】Binder
- 【源碼分析】Messenger
- 【面試清單】多線程與多進程
- 應用優化
- 【專題分析】布局優化
- 【專題分析】繪制優化
- 【專題分析】內存優化
- 【專題分析】啟動優化
- 【專題分析】電池優化
- 【專題分析】包大小優化
- 【面試清單】應用優化
- Android新特性
- 【專題分析】狀態欄、ActionBar和導航欄
- 【專題分析】應用圖標、通知欄適配
- 【專題分析】Android新版本重要變更
- 【專題分析】唯一標識符的最佳做法
- 開源庫源碼分析
- 【源碼分析】BaseRecyclerViewAdapterHelper
- 【源碼分析】ButterKnife
- 【源碼分析】Dagger2
- 【源碼分析】EventBus3(一)
- 【源碼分析】EventBus3(二)
- 【源碼分析】Glide
- 【源碼分析】OkHttp
- 【源碼分析】Retrofit
- 其他知識
- Flutter
- 原生開發與跨平臺開發
- 整體歸納
- 狀態及狀態管理
- 零碎知識點
- 添加Flutter到現有應用
- Git知識
- Git命令
- .gitignore文件
- 設計模式
- 創建型模式
- 結構型模式
- 行為型模式
- RxJava
- 基礎
- Linux知識
- 環境變量
- Linux命令
- ADB命令
- 算法
- 常見數據結構及實現
- 數組
- 排序算法
- 鏈表
- 二叉樹
- 棧和隊列
- 算法時間復雜度
- 常見算法思想
- 其他技術
- 正則表達式
- 編碼格式
- HTTP與HTTPS
- 【面試清單】其他知識
- 開發歸納
- Android零碎問題
- 其他零碎問題
- 開發思路