
[TOC]
本文為《Android開發藝術探索》一書第8章“理解Window和WindowManager”讀書筆記。
# Window和WindowManager
Window表示一個窗口的概念,Window是一個抽象類,它的具體實現是PhoneWindow。
WindowManager是外界訪問Window的入口,創建Window通過WindowManager即可完成。Window的具體實現位于WindowManagerService中,WindowManager和WindowManagerService的交互是一個IPC過程。
## 通過WindowManager創建Window
WindowManager提供了三個方法:addView、updateViewLayout、removeView,這三個方法定義在ViewManager中,而WindowManager繼承自ViewManager。
通過WindowManager的這三個方法,可以創建一個Window(添加View即可),更新Window中的View,以及刪除一個Window(只需刪除其中的View即可)。每一個Window都對應著一個View和一個ViewRootImpl,Window和View是通過ViewRootImpl來建立聯系的。
Window有三種類型,分別是應用Window、子Window和系統Window。應用類Window對應著一個Activity;子Window不能單獨存在,需附屬在特定的父Window之中,比如常見的Dialog;系統Window需要聲明權限才能創建,比如Toast和系統狀態欄。
# Window的內部機制
Window是以View的形式存在的,可以理解為Window是窗戶框,而View是玻璃以及玻璃上的窗花。接下來看看WindowManager的源碼,看如何創建、更新以及刪除Window。
## Window的添加
WindowManager是一個接口,它的實現是WindowManagerImpl。
```java
@Override
public void addView(@NonNull View view, @NonNull ViewGroup.LayoutParams params) {
applyDefaultToken(params);
mGlobal.addView(view, params, mContext.getDisplay(), mParentWindow);
}
```
addView方法通過橋接模式委托給了WindowManagerGlobal類:
```java
private final ArrayList<View> mViews = new ArrayList<View>();
private final ArrayList<ViewRootImpl> mRoots = new ArrayList<ViewRootImpl>();
private final ArrayList<WindowManager.LayoutParams> mParams = new ArrayList<WindowManager.LayoutParams>();
private final ArraySet<View> mDyingViews = new ArraySet<View>();
public void addView(View view, ViewGroup.LayoutParams params, Display display, Window parentWindow) {
// 1、檢查參數是否合法
if (view == null) {
throw new IllegalArgumentException("view must not be null");
}
if (display == null) {
throw new IllegalArgumentException("display must not be null");
}
if (!(params instanceof WindowManager.LayoutParams)) {
throw new IllegalArgumentException("Params must be WindowManager.LayoutParams");
}
final WindowManager.LayoutParams wparams = (WindowManager.LayoutParams) params;
// 2、如果是子Window,調整布局參數
if (parentWindow != null) {
parentWindow.adjustLayoutParamsForSubWindow(wparams);
} else {
// ...
}
ViewRootImpl root;
View panelParentView = null;
// ...
// 3、創建ViewRootImpl
root = new ViewRootImpl(view.getContext(), display);
view.setLayoutParams(wparams);
// 4、將View添加到列表中
mViews.add(view);
mRoots.add(root);
mParams.add(wparams);
// 5、通過ViewRootImpl更新界面,完成Window的添加
try {
root.setView(view, wparams, panelParentView);
} catch (RuntimeException e) {
// ...
}
}
```
可以看到,WindowManagerGlobal類中,維護著幾個列表,分別存儲著
* mViews存儲的是所有Window對應的View
* mRoots存儲的是所有Window對應的ViewRootImpl
* mParams存儲的是所有Window對應的布局參數
* mDyingViews存儲的是正在被刪除的View
添加Window的過程重點關注4和5,即將View添加到列表中以及通過ViewRootImpl更新界面。
看看ViewRootImpl的setView方法:
```java
public void setView(View view, WindowManager.LayoutParams attrs, View panelParentView) {
// ...
mView = view;
requestLayout();
res = mWindowSession.addToDisplay(mWindow, mSeq, mWindowAttributes,
getHostVisibility(), mDisplay.getDisplayId(), mTmpFrame,
mAttachInfo.mContentInsets, mAttachInfo.mStableInsets,
mAttachInfo.mOutsets, mAttachInfo.mDisplayCutout, mInputChannel,
mTempInsets);
// ...
}
```
ViewRootImpl的setView方法中主要做了兩步:更新界面和添加Window。添加Window是通過Session的addToDisplay方法完成的,mWindowSession的類型是IWindowSession,它是一個Binder對象,實現類是Session,Session的內部會通過WindowManagerService來實現Window的添加,是一個IPC調用:
```plain
// IWindowSession.aidl
interface IWindowSession {
int add(IWindow window, int seq, in WindowManager.LayoutParams attrs,
in int viewVisibility, out Rect outContentInsets, out Rect outStableInsets,
out InputChannel outInputChannel);
int addToDisplay(IWindow window, int seq, in WindowManager.LayoutParams attrs,
in int viewVisibility, in int layerStackId, out Rect outFrame,
out Rect outContentInsets, out Rect outStableInsets, out Rect outOutsets,
out DisplayCutout.ParcelableWrapper displayCutout, out InputChannel outInputChannel);
int addWithoutInputChannel(IWindow window, int seq, in WindowManager.LayoutParams attrs,
in int viewVisibility, out Rect outContentInsets, out Rect outStableInsets);
int addToDisplayWithoutInputChannel(IWindow window, int seq, in WindowManager.LayoutParams attrs,
in int viewVisibility, in int layerStackId, out Rect outContentInsets,
out Rect outStableInsets);
void remove(IWindow window);
}
```
```java
// Session.java
// 文件所在目錄: frameworks/base/services/core/java/com/android/server/wm/Session.java
public class Session extends IWindowSession.Stub implements IBinder.DeathRecipient {
//...
@Override
public int addToDisplay(IWindow window, int seq, WindowManager.LayoutParams attrs,
int viewVisibility, int displayId, Rect outContentInsets, Rect outStableInsets,
Rect outOutsets, InputChannel outInputChannel) {
return mService.addWindow(this, window, seq, attrs, viewVisibility, displayId,
outContentInsets, outStableInsets, outOutsets, outInputChannel);
}
}
```
```java
// WindowManagerService.java
public class WindowManagerService extends IWindowManager.Stub
implements Watchdog.Monitor, WindowManagerPolicy.WindowManagerFuncs {
//...
public int addWindow(Session session, IWindow client, int seq,
WindowManager.LayoutParams attrs, int viewVisibility, int displayId,
Rect outContentInsets, Rect outStableInsets, Rect outOutsets,
InputChannel outInputChannel) {
//...
}
}
```
接下來重點看看更新界面的requestLayout方法:
```java
public void requestLayout() {
if (!mHandlingLayoutInLayoutRequest) {
checkThread();
mLayoutRequested = true;
scheduleTraversals();
}
}
```
scheduleTraversals方法代碼如下:
```java
void scheduleTraversals() {
if (!mTraversalScheduled) {
//...
mChoreographer.postCallback(Choreographer.CALLBACK_TRAVERSAL, mTraversalRunnable, null);
// ...
}
}
```
其中的mTraversalRunnable為:
```java
final class TraversalRunnable implements Runnable {
@Override
public void run() {
doTraversal();
}
}
void doTraversal() {
if (mTraversalScheduled) {
//...
performTraversals();
}
}
private void performTraversals() {
//...
performMeasure(childWidthMeasureSpec, childHeightMeasureSpec);
performLayout(lp, mWidth, mHeight);
performDraw();
}
private void performMeasure(int childWidthMeasureSpec, int childHeightMeasureSpec) {
//...
mView.measure(childWidthMeasureSpec, childHeightMeasureSpec);
}
```
可以看到,最終調用performTraversals開始熟悉的測量布局繪制,進行界面更新。測量方法中mView為我們在調用ViewRootImpl的setView方法時添加進來的View。
## Window的刪除
Window的刪除過程同添加過程一樣,都是由WindowManagerImpl橋接給WindowManagerGlobal來實現,看看WindowManagerGlobal的removeView方法:
```java
// WindowManagerGlobal.java
public void removeView(View view, boolean immediate) {
//...
int index = findViewLocked(view, true);
removeViewLocked(index, immediate);
//...
}
// WindowManagerGlobal.java
private int findViewLocked(View view, boolean required) {
final int index = mViews.indexOf(view);
//...
return index;
}
```
先通過遍歷mViews拿到待刪除View的索引,再根據索引刪除View。removeViewLock方法如下:
```java
// WindowManagerGlobal.java
private void removeViewLocked(int index, boolean immediate) {
ViewRootImpl root = mRoots.get(index);
View view = root.getView();
//...
boolean deferred = root.die(immediate);
if (view != null) {
view.assignParent(null);
if (deferred) {
mDyingViews.add(view);
}
}
}
```
根據索引拿到待刪除View對應的ViewRootImpl,刪除操作是由ViewRootImpl的die方法完成的,調用die方法后將View添加到正在等待刪除View的集合mDyingViews中。ViewRootImpl的die方法如下:
```java
// ViewRootImpl.java
boolean die(boolean immediate) {
// 直接刪除,立即操作
if (immediate && !mIsInTraversal) {
doDie();
return false;
}
//...
// 通過Handler發送消息,異步刪除
mHandler.sendEmptyMessage(MSG_DIE);
return true;
}
void doDie() {
if (mAdded) {
dispatchDetachedFromWindow();
}
//...
WindowManagerGlobal.getInstance().doRemoveView(this);
}
```
ViewRootHandler在收到MSG_DIE消息后,也是調用的doDie方法。doDie方法中:
1、調用WindowManager的doRemoveView方法,將當前Window關聯的ViewRootImpl、LayoutParams、View進行移除。
```java
// WindowManagerGlobal.java
void doRemoveView(ViewRootImpl root) {
synchronized (mLock) {
final int index = mRoots.indexOf(root);
if (index >= 0) {
mRoots.remove(index);
mParams.remove(index);
final View view = mViews.remove(index);
mDyingViews.remove(view);
}
}
//...
}
```
2、調用dispatchDetachedFromWindow方法,做的是刪除View的操作:
```java
// ViewRootImpl.java
void dispatchDetachedFromWindow() {
// 1、垃圾回收相關工作,如清除數據和消息、移除回調
// 2、通過Session的remove方法刪除Window
try {
mWindowSession.remove(mWindow);
} catch (RemoteException e) {
}
// 3、回調View的相關方法,方便做些資源回收操作
mView.dispatchDetachedFromWindow();
//...
}
```
Session的remove方法同樣是一個IPC過程,最終會調用WindowManagerService的removeWindow方法。
## Window的更新
Window的更新同樣是由WindowManagerGlobal來完成的。
```java
// WindowManagerGlobal.java
public void updateViewLayout(View view, ViewGroup.LayoutParams params) {
//...
final WindowManager.LayoutParams wparams = (WindowManager.LayoutParams)params;
// 1、為View設置新的LayoutParams
view.setLayoutParams(wparams);
synchronized (mLock) {
int index = findViewLocked(view, true);
// 2、獲取當前View對應的ViewRootImpl
ViewRootImpl root = mRoots.get(index);
// 3、更新LayoutParams集合
mParams.remove(index);
mParams.add(index, wparams);
// 4、為ViewRootImpl設置新的LayoutParams
root.setLayoutParams(wparams, false);
}
}
```
1、為View設置新的LayoutParams
2、為ViewRootImpl設置新的LayoutParams
3、更新LayoutParams集合
在為ViewRootImpl設置新的LayoutParams時,會調用scheduleTraversals方法開始對View重新布局,包括測量、布局、繪制三個過程;此外ViewRootImpl還會通過WindowSession來更新Window的視圖,最終調用WindowManagerService的relayoutWindow來實現,是一個IPC過程。
## 總結
WindowManager是外界操作Window的入口,提供了添加、更新、刪除View三個方法
### Window的添加
1、WindowManager是一個接口,實現類是WindowManagerImpl,WindowManagerImpl的addView方法通過橋接模式委托給了WindowManagerGlobal。
2、WindowManagerGlobal存儲著所有Window對應的View、ViewRootImpl以及LayoutParams
3、WindowManagerGlobal的addView方法中,首先創建一個ViewRootImpl,并通過ViewRootImpl來完成更新界面和添加Window的操作;
4、ViewRootImpl更新界面時,會依次調用根View的測量、布局、繪制方法;再通過WindowSession來完成Window的添加
### Window的刪除
1、Window的刪除操作同樣是由WindowManagerGlobal來完成的
2、首先從所有Window對應View的集合mViews中,獲取待刪除View的索引
3、根據索引拿到待刪除Window對應的ViewRootImpl,具體的刪除工作由ViewRootImpl完成
4、ViewRootImpl首先通過WindowSession的remove方法刪除Window,再調用WindowManager的doRemoveView方法移除待刪除Window對應的ViewRootImpl、LayoutParams、View等
### Window的更新
1、Window的更新操作也是由WindowManagerGlobal來完成
2、首先為View以及ViewRootImpl設置新的LayoutParams,并更新LayoutParams集合
3、ViewRootImpl設置新的LayoutParams時,會調用scheduleTraversals對View進行重新測量、布局、繪制;然后通過WindowSession老更新Window視圖,最終由WindowManagerService的relayoutWindow方法完成Window的更新。
### Session
添加Window、刪除Window都是通過mWindowSession來完成的,mWindowSession的類型是IWindowSession,它是一個Binder代理對象,實現類是Session。Session的內部是通過WindowManagerService來實現Window的添加和刪除的,是一個IPC調用的過程。
# Window的創建源碼分析
## Activity的Window創建
ActivityThread的performLaunchActivity方法完成Activity的啟動過程,在該方法內部會通過類加載器創建Activity的實例對象,并調用其attach方法為其關聯運行過程中需要的一些上下文環境變量等。先看看Activity的attach方法代碼:
```java
// Activity.java
final void attach(Context context, ActivityThread aThread,
Instrumentation instr, IBinder token, int ident,
Application application, Intent intent, ActivityInfo info,
CharSequence title, Activity parent, String id,
NonConfigurationInstances lastNonConfigurationInstances,
Configuration config, String referrer, IVoiceInteractor voiceInteractor,
Window window, ActivityConfigCallback activityConfigCallback, IBinder assistToken) {
//...
mWindow = new PhoneWindow(this, window, activityConfigCallback);
mWindow.setWindowControllerCallback(this);
mWindow.setCallback(this);
mWindow.setOnWindowDismissedCallback(this);
mWindow.getLayoutInflater().setPrivateFactory(this);
//...
mWindow.setWindowManager(
(WindowManager)context.getSystemService(Context.WINDOW_SERVICE),
mToken, mComponent.flattenToString(),
(info.flags & ActivityInfo.FLAG_HARDWARE_ACCELERATED) != 0);
if (mParent != null) {
mWindow.setContainer(mParent.getWindow());
}
mWindowManager = mWindow.getWindowManager();
//...
}
```
可以看到,在attach方法中創建了Window對象,并為其設置回調接口。由于Activity實現了Window的Callback接口,所以Window接收到外界的狀態改變時就會回調Activity的方法,如onAttachedToWindow、dispatchTouchEvent等。
由于Activity的視圖是由setContentView開始的,我們以此為入口:
```java
// Activity.java
public void setContentView(@LayoutRes int layoutResID) {
getWindow().setContentView(layoutResID);
initWindowDecorActionBar();
}
```
PhoneWindow的setContentView代碼如下:
```java
// PhoneWindow.java
public void setContentView(int layoutResID) {
if (mContentParent == null) {
// 1、如果沒有DecorView,就進行創建
installDecor();
} else if (!hasFeature(FEATURE_CONTENT_TRANSITIONS)) {
mContentParent.removeAllViews();
}
if (hasFeature(FEATURE_CONTENT_TRANSITIONS)) {
final Scene newScene = Scene.getSceneForLayout(mContentParent, layoutResID,
getContext());
transitionTo(newScene);
} else {
// 2、將View添加到DecorView的mContentParent中
mLayoutInflater.inflate(layoutResID, mContentParent);
}
mContentParent.requestApplyInsets();
final Callback cb = getCallback();
if (cb != null && !isDestroyed()) {
// 3、回調Activity的onContentChanged方法通知Activity視圖已經發生改變
cb.onContentChanged();
}
mContentParentExplicitlySet = true;
}
```
主要有以下幾個流程:
**1、如果沒有DecorView就進行創建**

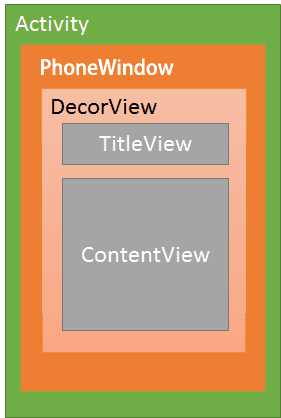
DecorView是一個FrameLayout,是Window的頂級視圖,一般包含標題欄和內容欄,因主體不同可能沒有標題欄,但一定有一個id為`com.android.internal.R.id.content`的ViewGroup,對應著上面代碼中的mContentParent。
當mContentParent為空時,意味著DecorView也不存在,installDecor源碼如下:
```java
// PhoneWindow.java
private void installDecor() {
if (mDecor == null) {
mDecor = generateDecor(-1);
//...
} else {
mDecor.setWindow(this);
}
if (mContentParent == null) {
mContentParent = generateLayout(mDecor);
//...
}
}
// PhoneWindow.java
protected DecorView generateDecor(int featureId) {
//...
return new DecorView(context, featureId, this, getAttributes());
}
// PhoneWindow.java
protected ViewGroup generateLayout(DecorView decor) {
ViewGroup contentParent = (ViewGroup)findViewById(ID_ANDROID_CONTENT);
if (contentParent == null) {
throw new RuntimeException("Window couldn't find content container view");
}
//...
return contentParent;
}
```
installDecor方法會依次創建DecorView、mContentParent。
**2、將View添加到DecorView的mContentParent中**
在PhoneWindow的setContentView方法中,`mLayoutInflater.inflate(layoutResID, mContentParent);`一行代碼將View添加到mContentParent中。
**3、回調Activity的onContentChanged方法,通知Activity視圖已發生改變**
將View成功添加到mContentParent中后,會回調Window.Callback的onContentChanged方法,我們可以重寫Activity的onContentChanged做相關處理。
將View添加到DecorView的mContentParent之后,DecorView還沒被WindowManager添加到Window中。在ActivityThread的handleResumeActivity方法中,會調用Activity的makeVisible方法:
```java
// ActivityThread.java
public void handleResumeActivity(IBinder token, boolean finalStateRequest, boolean isForward,
String reason) {
//...
if (r.activity.mVisibleFromClient) {
r.activity.makeVisible();
}
}
```
```java
// Activity.java
void makeVisible() {
if (!mWindowAdded) {
ViewManager wm = getWindowManager();
// 添加包含DecorView的Window
wm.addView(mDecor, getWindow().getAttributes());
mWindowAdded = true;
}
mDecor.setVisibility(View.VISIBLE);
}
```
至此,Activity中包含DecorView的Window就被創建出來了。
## Dialog的Window創建
Dialog的Window的創建過程和Activity類似。
**1、創建Window**
```java
// Dialog.java
Dialog(@NonNull Context context, @StyleRes int themeResId, boolean createContextThemeWrapper) {
//...
mWindowManager = (WindowManager) context.getSystemService(Context.WINDOW_SERVICE);
final Window w = new PhoneWindow(mContext);
mWindow = w;
w.setCallback(this);
w.setOnWindowDismissedCallback(this);
w.setWindowManager(mWindowManager, null, null);
w.setGravity(Gravity.CENTER);
mListenersHandler = new ListenersHandler(this);
}
```
**2、初始化DecorView并將Dialog視圖添加到DecorView中**
```java
// Dialog.java
public void setContentView(@LayoutRes int layoutResID) {
mWindow.setContentView(layoutResID);
}
```
**3、將DecorView添加到Window中并顯示**
Dialog的顯示:
```java
// Dialog.java
public void show() {
//...
onStart();
mDecor = mWindow.getDecorView();
//...
mWindowManager.addView(mDecor, l);
mShowing = true;
//...
}
```
Dialog的隱藏:
```java
Dialog.java
public void dismiss() {
if (Looper.myLooper() == mHandler.getLooper()) {
dismissDialog();
} else {
mHandler.post(mDismissAction);
}
}
void dismissDialog() {
//...
try {
mWindowManager.removeViewImmediate(mDecor);
} finally {
//...
}
}
```
## Toast的Window創建
Toast屬于系統級Window,Toast的show方法和cancel方法分別用于顯示和隱藏Toast,它們的內部是一個IPC過程。在Toast內部有兩類IPC過程,一類是Toast訪問NotificationManagerService,另一類是NotificationManagerService回調Toast里的TN接口。
```java
// Toast.java
public void show() {
if (mNextView == null) {
throw new RuntimeException("setView must have been called");
}
INotificationManager service = getService();
String pkg = mContext.getOpPackageName();
TN tn = mTN;
tn.mNextView = mNextView;
final int displayId = mContext.getDisplayId();
try {
service.enqueueToast(pkg, tn, mDuration, displayId);
} catch (RemoteException e) {
// Empty
}
}
```
首先看到show方法中調用NotificationManagerService的enqueueToast方法時會把TN對象傳遞過去,后面NotificationManagerService就可以回調TN接口了。
INotificationManager的實現類在NotificationManagerService類中:
```java
// NotificationManagerService.java
private final IBinder mService = new INotificationManager.Stub() {
@Override
public void enqueueToast(String pkg, ITransientNotification callback, int duration) {
//...
synchronized (mToastQueue) {
try {
ToastRecord record;
int index;
// All packages aside from the android package can enqueue one toast at a time
if (!isSystemToast) {
index = indexOfToastPackageLocked(pkg);
} else {
index = indexOfToastLocked(pkg, callback);
}
// If the package already has a toast, we update its toast
// in the queue, we don't move it to the end of the queue.
if (index >= 0) {
record = mToastQueue.get(index);
record.update(duration);
try {
record.callback.hide();
} catch (RemoteException e) {
}
record.update(callback);
} else {
Binder token = new Binder();
mWindowManagerInternal.addWindowToken(token, TYPE_TOAST, DEFAULT_DISPLAY);
record = new ToastRecord(callingPid, pkg, callback, duration, token);
mToastQueue.add(record);
index = mToastQueue.size() - 1;
}
keepProcessAliveIfNeededLocked(callingPid);
// If it's at index 0, it's the current toast. It doesn't matter if it's
// new or just been updated. Call back and tell it to show itself.
// If the callback fails, this will remove it from the list, so don't
// assume that it's valid after this.
if (index == 0) {
showNextToastLocked();
}
} finally {
Binder.restoreCallingIdentity(callingId);
}
}
}
//...
}
```
在enqueueToast方法中,Toast是被封裝為ToastRecord并添加到一個名為mToastQueue的隊列中。可以看到,如果當前應用已經有一個Toast,就更新ToastRecord,否則創建一個新的ToastRecord并添加到隊列。然后執行showNextToastLocked方法:
```java
// NotificationManagerService.java
void showNextToastLocked() {
ToastRecord record = mToastQueue.get(0);
while (record != null) {
try {
record.callback.show(record.token);
scheduleDurationReachedLocked(record);
return;
} catch (RemoteException e) {
//...
}
}
}
```
Toast的顯示是由ToastRecord的callback來完成的,也就是Toast中的TN對象的遠程Binder。Toast顯示以后,NMS還會調用scheduleDurationReachedLocked方法來發送一個延時消息,在相應的時間后移除Toast:
```java
private void scheduleDurationReachedLocked(ToastRecord r) {
mHandler.removeCallbacksAndMessages(r);
Message m = Message.obtain(mHandler, MESSAGE_DURATION_REACHED, r);
long delay = r.duration == Toast.LENGTH_LONG ? LONG_DELAY : SHORT_DELAY;
mHandler.sendMessageDelayed(m, delay);
}
```
來看看TN實現類的代碼:
```java
// Toast.java
private static class TN extends ITransientNotification.Stub {
//...
TN(String packageName, @Nullable Looper looper) {
//...
mHandler = new Handler(looper, null) {
@Override
public void handleMessage(Message msg) {
switch (msg.what) {
case SHOW: {
IBinder token = (IBinder) msg.obj;
handleShow(token);
break;
}
case HIDE: {
handleHide();
mNextView = null;
break;
}
case CANCEL: {
handleHide();
mNextView = null;
try {
getService().cancelToast(mPackageName, TN.this);
} catch (RemoteException e) {
}
break;
}
}
}
};
}
/**
* schedule handleShow into the right thread
*/
@Override
@UnsupportedAppUsage(maxTargetSdk = Build.VERSION_CODES.P, trackingBug = 115609023)
public void show(IBinder windowToken) {
mHandler.obtainMessage(SHOW, windowToken).sendToTarget();
}
/**
* schedule handleHide into the right thread
*/
@Override
public void hide() {
mHandler.obtainMessage(HIDE).sendToTarget();
}
public void cancel() {
mHandler.obtainMessage(CANCEL).sendToTarget();
}
public void handleShow(IBinder windowToken) {
//...
mWM = (WindowManager)context.getSystemService(Context.WINDOW_SERVICE);
//..
try {
mWM.addView(mView, mParams);
trySendAccessibilityEvent();
} catch (WindowManager.BadTokenException e) {
/* ignore */
}
}
@UnsupportedAppUsage
public void handleHide() {
//...
mWM.removeViewImmediate(mView);
}
}
```
最終,在TN的handleShow方法中會將Toast的視圖添加到Window中,在handleHide中將Toast的視圖從Window移除。
# 參考文檔
源碼分析_Android UI何時刷新_Choreographer:[https://www.jianshu.com/p/d7be5308d06e](https://www.jianshu.com/p/d7be5308d06e)
- 導讀
- Java知識
- Java基本程序設計結構
- 【基礎知識】Java基礎
- 【源碼分析】Okio
- 【源碼分析】深入理解i++和++i
- 【專題分析】JVM與GC
- 【面試清單】Java基本程序設計結構
- 對象與類
- 【基礎知識】對象與類
- 【專題分析】Java類加載過程
- 【面試清單】對象與類
- 泛型
- 【基礎知識】泛型
- 【面試清單】泛型
- 集合
- 【基礎知識】集合
- 【源碼分析】SparseArray
- 【面試清單】集合
- 多線程
- 【基礎知識】多線程
- 【源碼分析】ThreadPoolExecutor源碼分析
- 【專題分析】volatile關鍵字
- 【面試清單】多線程
- Java新特性
- 【專題分析】Lambda表達式
- 【專題分析】注解
- 【面試清單】Java新特性
- Effective Java筆記
- Android知識
- Activity
- 【基礎知識】Activity
- 【專題分析】運行時權限
- 【專題分析】使用Intent打開三方應用
- 【源碼分析】Activity的工作過程
- 【面試清單】Activity
- 架構組件
- 【專題分析】MVC、MVP與MVVM
- 【專題分析】數據綁定
- 【面試清單】架構組件
- 界面
- 【專題分析】自定義View
- 【專題分析】ImageView的ScaleType屬性
- 【專題分析】ConstraintLayout 使用
- 【專題分析】搞懂點九圖
- 【專題分析】Adapter
- 【源碼分析】LayoutInflater
- 【源碼分析】ViewStub
- 【源碼分析】View三大流程
- 【源碼分析】觸摸事件分發機制
- 【源碼分析】按鍵事件分發機制
- 【源碼分析】Android窗口機制
- 【面試清單】界面
- 動畫和過渡
- 【基礎知識】動畫和過渡
- 【面試清單】動畫和過渡
- 圖片和圖形
- 【專題分析】圖片加載
- 【面試清單】圖片和圖形
- 后臺任務
- 應用數據和文件
- 基于網絡的內容
- 多線程與多進程
- 【基礎知識】多線程與多進程
- 【源碼分析】Handler
- 【源碼分析】AsyncTask
- 【專題分析】Service
- 【源碼分析】Parcelable
- 【專題分析】Binder
- 【源碼分析】Messenger
- 【面試清單】多線程與多進程
- 應用優化
- 【專題分析】布局優化
- 【專題分析】繪制優化
- 【專題分析】內存優化
- 【專題分析】啟動優化
- 【專題分析】電池優化
- 【專題分析】包大小優化
- 【面試清單】應用優化
- Android新特性
- 【專題分析】狀態欄、ActionBar和導航欄
- 【專題分析】應用圖標、通知欄適配
- 【專題分析】Android新版本重要變更
- 【專題分析】唯一標識符的最佳做法
- 開源庫源碼分析
- 【源碼分析】BaseRecyclerViewAdapterHelper
- 【源碼分析】ButterKnife
- 【源碼分析】Dagger2
- 【源碼分析】EventBus3(一)
- 【源碼分析】EventBus3(二)
- 【源碼分析】Glide
- 【源碼分析】OkHttp
- 【源碼分析】Retrofit
- 其他知識
- Flutter
- 原生開發與跨平臺開發
- 整體歸納
- 狀態及狀態管理
- 零碎知識點
- 添加Flutter到現有應用
- Git知識
- Git命令
- .gitignore文件
- 設計模式
- 創建型模式
- 結構型模式
- 行為型模式
- RxJava
- 基礎
- Linux知識
- 環境變量
- Linux命令
- ADB命令
- 算法
- 常見數據結構及實現
- 數組
- 排序算法
- 鏈表
- 二叉樹
- 棧和隊列
- 算法時間復雜度
- 常見算法思想
- 其他技術
- 正則表達式
- 編碼格式
- HTTP與HTTPS
- 【面試清單】其他知識
- 開發歸納
- Android零碎問題
- 其他零碎問題
- 開發思路