
[TOC]
# 概述
* OkHttpClient將請求參數信息封裝到Request對象中,創建一個Call對象后,發起請求
* 發起請求時,使用責任鏈模式,將請求依次傳遞給各個攔截器進行處理
* 最后由CallServerInterceptor完成網絡請求并返回結果
# OkHttpClient
首先從 OkHttpClient 的構建說起。由官方文檔可知,在絕大多數 App 中,我們都應該只擁有一個 OkHttpClient 對象,這樣所有的 Http 請求可以共用 Response 緩存、共用線程池以及共用連接池,達到節省延遲和內存的目的。
關于 OkHttpClient 我們暫時只關注兩點:Builder 模式和 Call 接口。
## Builder 模式
OkHttpClient 使用了建造者模式,我們可以使用 new OkHttpClient() 來構建默認配置的 OkHttpClient 對象,也可以使用 OkHttpClient.Builder 來構建自定義配置的客戶端。在此處提及一下建造者模式的優點:
* 客戶端在初始化時只需初始化必須參數即可,其他參數可選
* 和 Java bean 類型的初始化相比,可以保證初始化過程中對象的線程安全
* 代碼易編易讀
所以當類的構造器有許多參數時,可以考慮使用 Builder 模式。
## Call 接口
一個標準的 OkHttp 請求格式為 `mClient.newCall(request).enqueue(callback);` 那么我們先來從這里入手開始分析。
OkHttpClient 實現了 Call.Factory 接口:
```java
public interface Call extends Cloneable {
...
interface Factory {
Call newCall(Request request);
}
}
```
具體實現如下:
```java
@Override
public Call newCall(Request request) {
return RealCall.newRealCall(this, request, false /* for web socket */);
}
```
在看 RealCall 之前先來看看 Call 接口,因為 RealCall 實現了 Call 接口,Call 是整個網絡請求過程中的功能核心類,負責請求過程的執行、取消。其接口定義如下:
```java
public interface Call extends Cloneable {
// 返回原始請求
Request request();
// 同步執行請求
Response execute() throws IOException;
// 異步執行請求
void enqueue(Callback responseCallback);
// 退出未完成的請求
void cancel();
boolean isExecuted();
boolean isCanceled();
Call clone();
// 工廠類
interface Factory {
Call newCall(Request request);
}
}
```
注釋已經描述的很清晰了,接下來看看它的實現類 RealCall,先來看看剛才的 newRealCall 方法,newRealCall 是一個靜態方法,根據 OkHttpClient 對象、Request 對象來創建最終執行任務的 RealCall:
```java
static RealCall newRealCall(OkHttpClient client, Request originalRequest, boolean forWebSocket) {
// Safely publish the Call instance to the EventListener.
RealCall call = new RealCall(client, originalRequest, forWebSocket);
call.eventListener = client.eventListenerFactory().create(call);
return call;
}
```
可以看到此處調用 RealCall 的構造器返回了 RealCall 對象,后面我們執行的請求、取消等方法都是操作的這個 RealCall 對象。現在在看 OkHttp 的請求方法就很清晰了:
* 首先使用建造者模式創建 OkHttpClient 對象
* 由于 OkHttpClient 實現了 Call.Factory 接口(newCall 方法),調用 OkHttpClient 對象的 newCall 方法返回一個 RealCall 對象
* 然后就可以操作 RealCall 對象執行請求、取消等一系列操作。
# Get 請求
在 get 請求這一部分我們主要關注 Request 類、攔截器鏈條以及所應用到的責任鏈模式。
## Request 類
一個標準的 OkHttp get 請求示例如下:
```java
public void get(String url, Callback callback) {
Request request = new Request.Builder()
.url(url)
.build();
mClient.newCall(request).enqueue(callback);
}
```
可以看到在創建 RealCall 對象時會傳遞一個 Request 對象給其進行初始化,Request 顧名思義代表一個 http 請求,來看看 Request 的代碼:
```java
public final class Request {
final HttpUrl url;
final String method;
final Headers headers;
final @Nullable RequestBody body;
final Object tag;
// getters and setters...
public static class Builder {
...
}
}
```
Request 的構建也使用了建造者模式,它的成員變量包括請求地址(url)、請求方法(method)、請求頭(headers)、請求體(body)以及用于取消請求的 tag。
## 請求執行過程
### execute 同步請求
在上面 OkHttpClient 的 newCall 實現方法中,OkHttpClient 將其自身以及 Request 對象都傳遞給了創建出來的 RealCall 對象。接著調用 execute 方法或 enqueue 方法執行請求,先來看看 RealCall 類 execute 方法的源碼:
```java
@Override
public Response execute() throws IOException {
synchronized (this) {
// 判斷是否已執行過
if (executed) throw new IllegalStateException("Already Executed");
executed = true;
}
captureCallStackTrace();
// 回調事件監聽器的開始執行方法
eventListener.callStart(this);
try {
// 將當前 Call 加入 Dispatcher 的同步執行任務隊列中
client.dispatcher().executed(this);
// 在當前線程中通過攔截器鏈條獲取返回數據 Response
Response result = getResponseWithInterceptorChain();
if (result == null) throw new IOException("Canceled");
// 返回請求結果
return result;
} catch (IOException e) {
// 請求異常
eventListener.callFailed(this, e);
throw e;
} finally {
// 將 Call 從 Dispatcher 的同步執行隊列移除
client.dispatcher().finished(this);
}
}
```
先根據 executed 變量判斷這個 RealCall 是否已經執行過,執行過則拋出異常。接著回調當前 Call 的事件監聽器告知請求開始執行,同時 Dispatcher 會在同步執行任務隊列中記錄當前 Call。然后就是在當前線程直接獲取返回數據了,最后會將 Call 從 Dispatcher 的同步執行隊列中移除。
### getResponseWithInterceptorChain 方法
#### 責任鏈模式
分析攔截器鏈條前,我們先來復習下責任鏈模式:
> 責任鏈模式是一種對象的行為模式。在責任鏈模式里,很多對象由每一個對象對其下家的引用而連接起來形成一條鏈。請求在這個鏈上傳遞,直到鏈上的某一個對象決定處理此請求。發出這個請求的客戶端并不知道鏈上的哪一個對象最終處理這個請求,這使得系統可以在不影響客戶端的情況下動態地重新組織和分配責任
接下來重點看看在 getResponseWithInterceptorChain 方法中攔截器鏈條是如何工作的。
```java
Response getResponseWithInterceptorChain() throws IOException {
// 添加所有需要的攔截器
List<Interceptor> interceptors = new ArrayList<>();
interceptors.addAll(client.interceptors());
interceptors.add(retryAndFollowUpInterceptor);
interceptors.add(new BridgeInterceptor(client.cookieJar()));
interceptors.add(new CacheInterceptor(client.internalCache()));
interceptors.add(new ConnectInterceptor(client));
if (!forWebSocket) {
interceptors.addAll(client.networkInterceptors());
}
interceptors.add(new CallServerInterceptor(forWebSocket));
// 構建一個具體的攔截器鏈條
Interceptor.Chain chain = new RealInterceptorChain(interceptors, null, null, null, 0,
originalRequest, this, eventListener, client.connectTimeoutMillis(),
client.readTimeoutMillis(), client.writeTimeoutMillis());
return chain.proceed(originalRequest);
}
```
可以看到,首先創建了一個攔截器的集合并添加了一些攔截器。接著根據這些攔截器和其他一些參數創建了 Chain 對象,調用了 Chain 對象的 proceed 方法拿到請求結果。這里攔截器鏈條是典型的責任鏈模式。接下來下面我們一點點分析來看:
#### 攔截器鏈條
通過閱讀官方 Wiki,先來看看攔截器鏈條的整體工作流程:
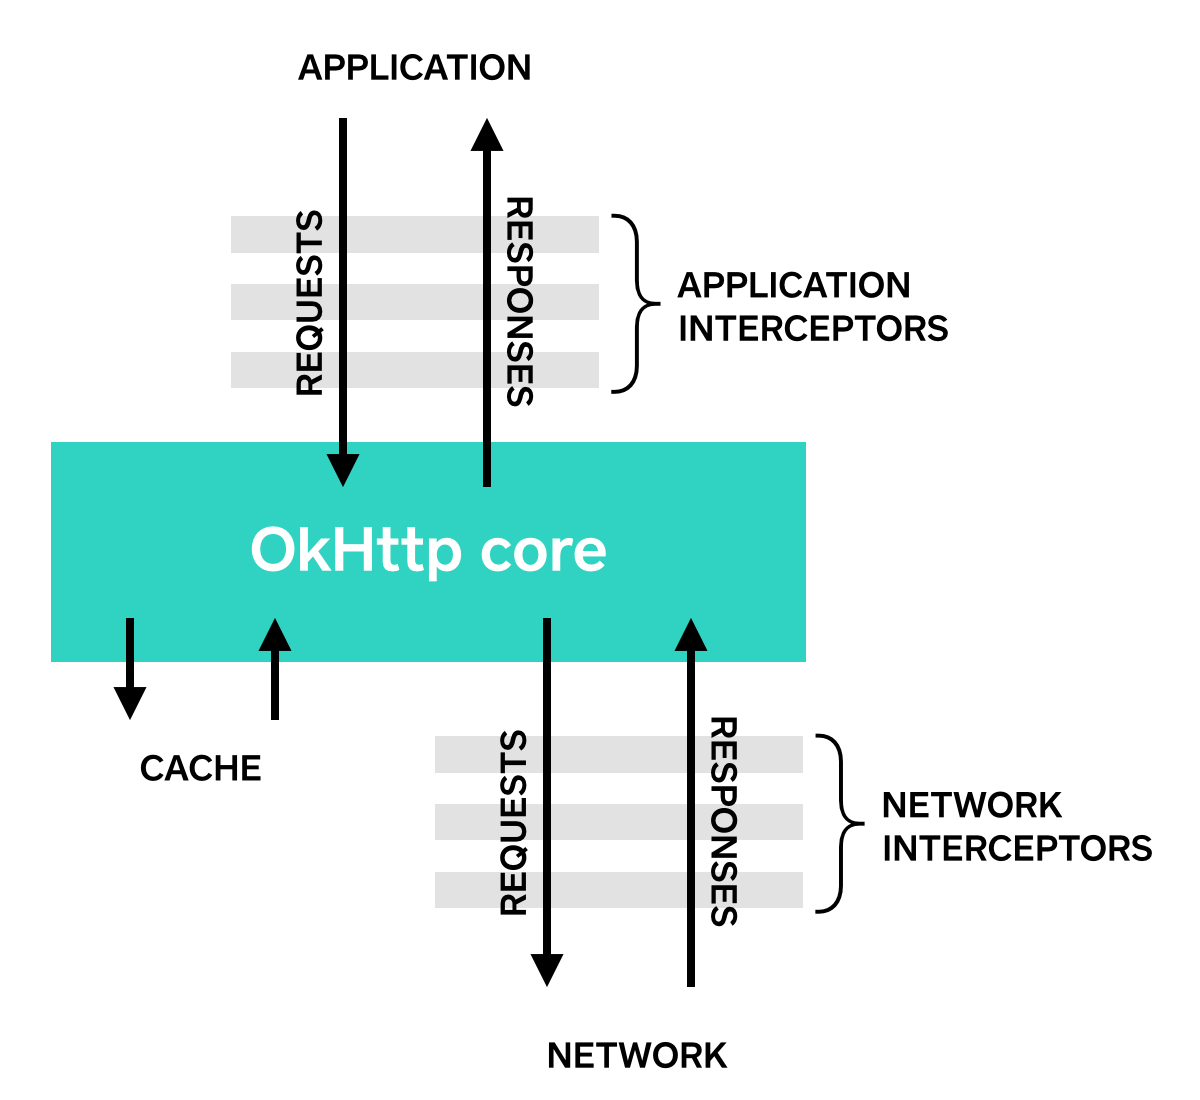
可以看到,一個完整的攔截器鏈條(Interceptor Chain)包括:應用攔截器、OkHttp 核心、網絡攔截器以及最終的網絡請求(CallServerInterceptor)。
##### 攔截器(Interceptor)
先來看看攔截器是什么?來自 Interceptor 源碼注釋
> 觀察,修改并優化性地縮短發出的請求,并返回相應的響應。攔截器通常會在請求或響應中添加,刪除或轉換頭部。
Interceptor 接口源碼如下:
```java
public interface Interceptor {
Response intercept(Chain chain) throws IOException;
interface Chain {
...
}
}
```
僅有一個方法 intercept,接收一個 Chain 參數,并返回相應的響應結果。
OkHttp 默認提供了一些攔截器的實現,比如 CacheInterceptor 來實現緩存,我們也可以自己添加自定義的攔截器來實現特定功能,比如扇貝網開源的這個 Mock 庫 [mock-api](https://github.com/shanbay/mock-api) 就是通過攔截器來實現的,大家可以看看其源碼實現。
##### 鏈條(Chain)
接下來看看 Chain:
```java
interface Chain {
Request request();
Response proceed(Request request) throws IOException;
@Nullable Connection connection();
Call call();
int connectTimeoutMillis();
Chain withConnectTimeout(int timeout, TimeUnit unit);
int readTimeoutMillis();
Chain withReadTimeout(int timeout, TimeUnit unit);
int writeTimeoutMillis();
Chain withWriteTimeout(int timeout, TimeUnit unit);
}
```
Chain 的實現類可以獲取到當前 Reauest、Call、超時時間等等,以便傳遞給責任鏈中下一個處理者使用。
##### 流程分析
1、由 getResponseWithInterceptorChain 方法源碼最后一句 `return chain.proceed(originalRequest);`看到,請求最終的 Response 是調用 RealInterceptorChain 對象的 proceed 方法得到的。RealInterceptorChain 是一個具體的攔截器鏈條實現,可以把它理解為鏈條中的一個鎖鏈,包括了所有的應用攔截器、OkHttp 核心、網絡攔截器以及最終網絡請求的全部實現。

2、來看看 RealInterceptorChain 的 proceed 方法,其中比較關鍵的代碼為下面這一段:
```java
// 此處省略其他代碼...
// Call the next interceptor in the chain.
RealInterceptorChain next = new RealInterceptorChain(interceptors, streamAllocation, httpCodec,
connection, index + 1, request, call, eventListener, connectTimeout, readTimeout,
writeTimeout);
Interceptor interceptor = interceptors.get(index);
Response response = interceptor.intercept(next);
// 此處省略其他代碼...
```
在RealInterceptorChain的proceed方法中,創建了一個新的 RealInterceptorChain 對象,index 加 1。并取到 index 為 0 的攔截器,也就是我們手動添加的攔截器里的第一個(沒添加過就默認為 RetryAndFollowUpInterceptor),執行了第一個攔截器的 intercept 方法,并將剛剛創建的RealInterceptorChain傳入。這樣就完成了第一個攔截器的執行工作。
3、假設第一個攔截器為 RetryAndFollowUpInterceptor,我們來看看它的 intercept 方法拿到攔截器鏈條究竟做了些什么?來看關鍵代碼:
```java
@Override
public Response intercept(Chain chain) throws IOException {
Request request = chain.request();
// 向下轉型為 RealInterceptorChain 對象
RealInterceptorChain realChain = (RealInterceptorChain) chain;
// ...
while (true) {
// 執行 RealInterceptorChain 對象的 proceed 方法
try {
response = realChain.proceed(request, streamAllocation, null, null);
releaseConnection = false;
} catch (IOException e) {
// ...
}
}
// ...
}
```
可以看到,RetryAndFollowUpInterceptor 在它的 intercept 方法中調用了剛剛傳遞過來的 Chain 的 proceed 方法。由于剛才 index 已經加 1,所以這時就會調用整個攔截器鏈條里的第二個攔截器,就像剝洋蔥一樣,依此循環。直到最終調用到 CallServerInterceptor 完成網絡請求。
歸納來看(2019.08更新):
* RealInterceptorChain包括了所有的應用攔截器、OkHttp 核心、網絡攔截器以及最終網絡請求
* RealInterceptorChain對象順著鏈條往下進行傳遞,攜帶有需執行攔截器的index
* interceptor的intercept方法從傳遞過來的RealInterceptorChain對象取出相關信息,并做相應修改后,調用RealInterceptorChain的proceed方法(該方法會調用下一個interceptor的intercept方法),依次傳遞
從整個流程中也可以看出,攔截器鏈條是非常經典的責任鏈模式。Android 中另一個責任鏈模式的經典應用就是事件分發機制,詳情可以看這兩篇博文:[Android 事件分發機制源碼分析(一)觸摸事件](http://xuchongyang.com/2017/07/30/Android%20%E4%BA%8B%E4%BB%B6%E5%88%86%E5%8F%91%E6%9C%BA%E5%88%B6%E6%BA%90%E7%A0%81%E5%88%86%E6%9E%90%EF%BC%88%E4%B8%80%EF%BC%89%E8%A7%A6%E6%91%B8%E4%BA%8B%E4%BB%B6/)、[Android 事件分發機制源碼分析(二)按鍵事件](http://xuchongyang.com/2017/08/03/Android%20%E4%BA%8B%E4%BB%B6%E5%88%86%E5%8F%91%E6%9C%BA%E5%88%B6%E6%BA%90%E7%A0%81%E5%88%86%E6%9E%90%EF%BC%88%E4%BA%8C%EF%BC%89%E6%8C%89%E9%94%AE%E4%BA%8B%E4%BB%B6/)。
### enqueue 異步請求
```java
@Override
public void enqueue(Callback responseCallback) {
synchronized (this) {
// 判斷是否已經執行過
if (executed) throw new IllegalStateException("Already Executed");
executed = true;
}
captureCallStackTrace();
// 回調事件監聽器
eventListener.callStart(this);
// 將當前 Call 加入 Dispatcher 的異步執行任務隊列中
client.dispatcher().enqueue(new AsyncCall(responseCallback));
}
```
直接將 Call 加入到了 Dispatcher 的異步執行隊列中。
先來看看 AsyncCall 的代碼:
```java
final class AsyncCall extends NamedRunnable {
private final Callback responseCallback;
AsyncCall(Callback responseCallback) {
super("OkHttp %s", redactedUrl());
this.responseCallback = responseCallback;
}
...
@Override protected void execute() {
boolean signalledCallback = false;
try {
Response response = getResponseWithInterceptorChain();
if (retryAndFollowUpInterceptor.isCanceled()) {
signalledCallback = true;
responseCallback.onFailure(RealCall.this, new IOException("Canceled"));
} else {
signalledCallback = true;
// 回調請求結果
responseCallback.onResponse(RealCall.this, response);
}
} catch (IOException e) {
if (signalledCallback) {
// Do not signal the callback twice!
Platform.get().log(INFO, "Callback failure for " + toLoggableString(), e);
} else {
// 請求異常
eventListener.callFailed(RealCall.this, e);
responseCallback.onFailure(RealCall.this, e);
}
} finally {
// 將當前 Call 從 Dispatcher 的異步執行隊列中移除
client.dispatcher().finished(this);
}
}
}
```
可以看到,在 exeucte 方法中,依舊是調用 getResponseWithInterceptorChain 方法獲取到請求 Response,并回調 Callback 的相應方法。
其中 AsyncCall 繼承自 NamedRunnable,NamedRunnable 實現如下:
```java
public abstract class NamedRunnable implements Runnable {
protected final String name;
public NamedRunnable(String format, Object... args) {
this.name = Util.format(format, args);
}
@Override
public final void run() {
String oldName = Thread.currentThread().getName();
Thread.currentThread().setName(name);
try {
execute();
} finally {
Thread.currentThread().setName(oldName);
}
}
protected abstract void execute();
}
```
NamedRunnable 的 run 方法會調用 execute 方法,所以 AsyncCall 被執行時,execute 方法就會調用。那么 AsyncCall 何時會被執行呢?接著看傳入 AsyncCall 后的操作。
Dispatcher 的 enqueue 方法如下:
```java
synchronized void enqueue(AsyncCall call) {
if (runningAsyncCalls.size() < maxRequests && runningCallsForHost(call) < maxRequestsPerHost) {
runningAsyncCalls.add(call);
executorService().execute(call);
} else {
readyAsyncCalls.add(call);
}
}
```
其中 maxRequests 的值為 64,maxRequestsPerHost 的值為 5。可以看到,先判斷當前異步執行隊列 Call 數量是否達到最大請求數量 64,以及當前主機正在處理的請求數 是否大于 5,沒有達到最大數量時,直接將當前 Call 加入線程池隊列進行執行,否則先添加到另一個隊列進行等待。
# Post 請求
關于 post 請求,我們重點關注 RequestBody。
一個標準的 post String 請求如下所示:
```java
private static final MediaType MEDIA_TYPE_TEXT = MediaType.parse("text/plain");
public void postString() {
Request request = new Request.Builder()
.url(url)
.post(RequestBody.create(MEDIA_TYPE_TEXT, "test_string"))
.build();
mClient.newCall(request).enqueue(callback);
}
```
## RequestBody
在上面的 post 請求示例中可以看到,我們在構建 Request 對象時,有一個 post(RequestBody)方法,會在這個方法中為 Request 的請求體賦值。
RequestBody 是一個抽象類,源碼組成很簡單,由兩個抽象方法、一個普通方法和一些靜態工廠方法組成:
```java
public abstract class RequestBody {
// 返回媒體類型
public abstract @Nullable MediaType contentType();
// 返回向 sink 寫入數據的長度,未知則為 -1
public long contentLength() throws IOException {
return -1;
}
// 把當前請求的內容寫入 sink
public abstract void writeTo(BufferedSink sink) throws IOException;
...
// 一些靜態工廠方法
}
```
在看請求體的使用流程前,我們先來看看 RequestBody 的幾個靜態工廠方法,這幾個方法也同時對應著我們 post 請求的類型。
OkHttp 的底層實現基于 Okio 庫,關于 Okio 庫可以看這篇文章進行簡單了解。[Android IO簡化之Okio庫](http://www.jianshu.com/p/295073aa554a)
### RequestBody 的創建
RequsetBody 的 create 方法重載如下:
```java
// 通過 byte 數組
public static RequestBody create(final @Nullable MediaType contentType, final byte[] content);
// 通過 byte 數組
public static RequestBody create(final @Nullable MediaType contentType, final byte[] content, final int offset, final int byteCount);
// 通過 String
public static RequestBody create(@Nullable MediaType contentType, String content);
// 通過 ByteString
public static RequestBody create(final @Nullable MediaType contentType, final ByteString content);
// 通過文件
public static RequestBody create(final @Nullable MediaType contentType, final File file);
```
其中第一個方法調用了第二個方法,所以我們只看下面四種方法即可。
#### 通過 byte 數組
```java
public static RequestBody create(final @Nullable MediaType contentType, final byte[] content,final int offset, final int byteCount) {
if (content == null) throw new NullPointerException("content == null");
Util.checkOffsetAndCount(content.length, offset, byteCount);
return new RequestBody() {
@Override public @Nullable MediaType contentType() {
return contentType;
}
@Override public long contentLength() {
return byteCount;
}
@Override public void writeTo(BufferedSink sink) throws IOException {
sink.write(content, offset, byteCount);
}
};
}
```
代碼很簡單,首先判斷是非空,接著檢查數組邊界,最后返回一個 RequestBody 的匿名內部類對象。
#### 通過 String
```java
public static RequestBody create(@Nullable MediaType contentType, String content) {
Charset charset = Util.UTF_8;
if (contentType != null) {
charset = contentType.charset();
if (charset == null) {
charset = Util.UTF_8;
contentType = MediaType.parse(contentType + "; charset=utf-8");
}
}
byte[] bytes = content.getBytes(charset);
return create(contentType, bytes);
}
```
如果未指定字符編碼格式,則默認為 UTF_8 格式。接著根據字符編碼格式將 String 內容轉換為 byte 數組,并調用方法一進行 RequestBody 對象的創建。
#### 通過 ByteString
```java
public static RequestBody create(final @Nullable MediaType contentType, final ByteString content) {
return new RequestBody() {
@Override public @Nullable MediaType contentType() {
return contentType;
}
@Override public long contentLength() throws IOException {
return content.size();
}
@Override public void writeTo(BufferedSink sink) throws IOException {
sink.write(content);
}
};
}
```
對于 ByteString 類型,Sink 可以直接寫入。
#### 通過文件
```java
public static RequestBody create(final @Nullable MediaType contentType, final File file) {
if (file == null) throw new NullPointerException("content == null");
return new RequestBody() {
@Override public @Nullable MediaType contentType() {
return contentType;
}
@Override public long contentLength() {
return file.length();
}
@Override public void writeTo(BufferedSink sink) throws IOException {
Source source = null;
try {
source = Okio.source(file);
sink.writeAll(source);
} finally {
Util.closeQuietly(source);
}
}
};
}
```
File 也可以直接轉換為輸出流,直接寫入 sink。
綜上可以看到,我們可以通過二進制、字符串、文件以及 ByteString 來創建 RequestBody 對象,這些也同時是我們 post 請求可以提交的類型。
RequestBody 還有兩個子類 FormBody 和 MultipartBody,我們來看看。
### FormBody
FormBody 通常用來在請求體中像提交表單一樣提交數據,示例如下:
```java
public void postForm() {
RequestBody formBody = new FormBody.Builder()
.add("search", "tom")
.build();
Request request = new Request.Builder()
.url(url)
.post(formBody)
.build();
mClient.newCall(request).enqueue(callback);
}
```
FormBody 依舊采用了 Builder 模式來構建,這樣可以很方便的添加表單中的鍵值對數據。
### MultipartBody
當我們要提交鍵值對數據時,可以使用 FormBody 來構建。但是假如我們需要一次提交多條信息,比如一張圖片和一條評論,此時 FormBody 就無法滿足需求了,需要使用到 RequestBody 的另一個子類 MultipartBody。
MultipartBody 的每一塊都是一個請求體,通過 Content-Type 的 boundary 分隔符進行分割。
一個請求示例如下:
```java
public void postMultipartBody() {
RequestBody requestBody = new MultipartBody.Builder()
.setType(MultipartBody.FORM)
.addFormDataPart("name", "Tom")
.addFormDataPart("avatar", "avatar.png", RequestBody.create(
MEDIA_TYPE_PNG, new File("web/avatar.png")))
.build();
Request request = new Request.Builder()
.url(url)
.post(requestBody)
.build();
mClient.newCall(request).enqueue(callback);
}
```
由于 MultipartBody 的 MediaType 類型默認為 Multipart.MIX,我們需要手動設置為 MultipartBody.FORM 類型。
MultipartBody 源碼如下:
```java
public final class MultipartBody extends RequestBody {
...
private final ByteString boundary;
private final MediaType originalType;
private final MediaType contentType;
private final List<Part> parts;
MultipartBody(ByteString boundary, MediaType type, List<Part> parts) {...}
...
@Override
public void writeTo(BufferedSink sink) throws IOException {
writeOrCountBytes(sink, false);
}
private long writeOrCountBytes(BufferedSink sink, boolean countBytes) throws IOException {
...
// 循環寫入每一個請求體
for (int p = 0, partCount = parts.size(); p < partCount; p++) {
Part part = parts.get(p);
Headers headers = part.headers;
RequestBody body = part.body;
sink.write(DASHDASH);
sink.write(boundary);
sink.write(CRLF);
// 寫入請求頭
if (headers != null) {
for (int h = 0, headerCount = headers.size(); h < headerCount; h++) {
sink.writeUtf8(headers.name(h))
.write(COLONSPACE)
.writeUtf8(headers.value(h))
.write(CRLF);
}
}
// 寫入 Content-Type
MediaType contentType = body.contentType();
if (contentType != null) {
sink.writeUtf8("Content-Type: ")
.writeUtf8(contentType.toString())
.write(CRLF);
}
// 寫入 Content-Length
long contentLength = body.contentLength();
if (contentLength != -1) {
sink.writeUtf8("Content-Length: ")
.writeDecimalLong(contentLength)
.write(CRLF);
} else if (countBytes) {
// We can't measure the body's size without the sizes of its components.
byteCountBuffer.clear();
return -1L;
}
sink.write(CRLF);
if (countBytes) {
byteCount += contentLength;
} else {
// 寫入請求體
body.writeTo(sink);
}
sink.write(CRLF);
}
sink.write(DASHDASH);
sink.write(boundary);
sink.write(DASHDASH);
sink.write(CRLF);
...
return byteCount;
}
}
public static final class Builder {...}
public static final class Part {...}
```
在調用 writeTo 方法時,會循環寫入每一個請求體的內容。
MultipartBody 依舊采用了 Builder 模式,并對每個請求體進行了抽象為 Part 類。MultipartBody 的 builder 提供了以下幾種方法添加 Part 對象:
```java
// 方法一
public Builder addPart(RequestBody body);
// 方法二
public Builder addPart(Headers headers, RequestBody body);
// 方法三
public Builder addFormDataPart(String name, String value);
// 方法四
public Builder addFormDataPart(String name, String filename, RequestBody body);
// 方法五
public Builder addPart(Part part);
```
前面四種方法都會根據傳入的參數構建出 Part 對象后,調用方法五添加到請求體集合中。我們調用時常用方法三和方法四。
先來看看方法三和方法四的源碼如下:
```java
public Builder addFormDataPart(String name, String value) {
return addPart(Part.createFormData(name, value));
}
public Builder addFormDataPart(String name, @Nullable String filename, RequestBody body) {
return addPart(Part.createFormData(name, filename, body));
}
```
都是分別調用了 Part.createFormData 方法創建 Part 對象,然后添加到 Multipart 所維護的 Part 集合列表。那么上面兩種創建 Part 方法的重載有什么不同呢?
```java
public static Part createFormData(String name, String value) {
return createFormData(name, null, RequestBody.create(null, value));
}
public static Part createFormData(String name, @Nullable String filename, RequestBody body) {
if (name == null) {
throw new NullPointerException("name == null");
}
// 拼接請求頭
StringBuilder disposition = new StringBuilder("form-data; name=");
appendQuotedString(disposition, name);
// 拼接請求頭
if (filename != null) {
disposition.append("; filename=");
appendQuotedString(disposition, filename);
}
// 由請求頭和請求體創建 Part 對象
return create(Headers.of("Content-Disposition", disposition.toString()), body);
}
```
可以看到,第一個方法調用了第二個方法,文件名稱傳值 null,創建 RequestBody 時媒體類型傳值 null,僅僅由 value 參數創建出 RequestBody。
而第二個方法則主要用于上傳文件。
未完待續!
# 參考文檔
[OkHttp 之 MultipartBody 上傳文件](http://www.liziyang.top/2016/12/05/OkHttp%E4%B9%8BMultipartBody%E4%B8%8A%E4%BC%A0%E6%96%87%E4%BB%B6/)
[OKHttp 源碼解析](http://frodoking.github.io/2015/03/12/android-okhttp/)
- 導讀
- Java知識
- Java基本程序設計結構
- 【基礎知識】Java基礎
- 【源碼分析】Okio
- 【源碼分析】深入理解i++和++i
- 【專題分析】JVM與GC
- 【面試清單】Java基本程序設計結構
- 對象與類
- 【基礎知識】對象與類
- 【專題分析】Java類加載過程
- 【面試清單】對象與類
- 泛型
- 【基礎知識】泛型
- 【面試清單】泛型
- 集合
- 【基礎知識】集合
- 【源碼分析】SparseArray
- 【面試清單】集合
- 多線程
- 【基礎知識】多線程
- 【源碼分析】ThreadPoolExecutor源碼分析
- 【專題分析】volatile關鍵字
- 【面試清單】多線程
- Java新特性
- 【專題分析】Lambda表達式
- 【專題分析】注解
- 【面試清單】Java新特性
- Effective Java筆記
- Android知識
- Activity
- 【基礎知識】Activity
- 【專題分析】運行時權限
- 【專題分析】使用Intent打開三方應用
- 【源碼分析】Activity的工作過程
- 【面試清單】Activity
- 架構組件
- 【專題分析】MVC、MVP與MVVM
- 【專題分析】數據綁定
- 【面試清單】架構組件
- 界面
- 【專題分析】自定義View
- 【專題分析】ImageView的ScaleType屬性
- 【專題分析】ConstraintLayout 使用
- 【專題分析】搞懂點九圖
- 【專題分析】Adapter
- 【源碼分析】LayoutInflater
- 【源碼分析】ViewStub
- 【源碼分析】View三大流程
- 【源碼分析】觸摸事件分發機制
- 【源碼分析】按鍵事件分發機制
- 【源碼分析】Android窗口機制
- 【面試清單】界面
- 動畫和過渡
- 【基礎知識】動畫和過渡
- 【面試清單】動畫和過渡
- 圖片和圖形
- 【專題分析】圖片加載
- 【面試清單】圖片和圖形
- 后臺任務
- 應用數據和文件
- 基于網絡的內容
- 多線程與多進程
- 【基礎知識】多線程與多進程
- 【源碼分析】Handler
- 【源碼分析】AsyncTask
- 【專題分析】Service
- 【源碼分析】Parcelable
- 【專題分析】Binder
- 【源碼分析】Messenger
- 【面試清單】多線程與多進程
- 應用優化
- 【專題分析】布局優化
- 【專題分析】繪制優化
- 【專題分析】內存優化
- 【專題分析】啟動優化
- 【專題分析】電池優化
- 【專題分析】包大小優化
- 【面試清單】應用優化
- Android新特性
- 【專題分析】狀態欄、ActionBar和導航欄
- 【專題分析】應用圖標、通知欄適配
- 【專題分析】Android新版本重要變更
- 【專題分析】唯一標識符的最佳做法
- 開源庫源碼分析
- 【源碼分析】BaseRecyclerViewAdapterHelper
- 【源碼分析】ButterKnife
- 【源碼分析】Dagger2
- 【源碼分析】EventBus3(一)
- 【源碼分析】EventBus3(二)
- 【源碼分析】Glide
- 【源碼分析】OkHttp
- 【源碼分析】Retrofit
- 其他知識
- Flutter
- 原生開發與跨平臺開發
- 整體歸納
- 狀態及狀態管理
- 零碎知識點
- 添加Flutter到現有應用
- Git知識
- Git命令
- .gitignore文件
- 設計模式
- 創建型模式
- 結構型模式
- 行為型模式
- RxJava
- 基礎
- Linux知識
- 環境變量
- Linux命令
- ADB命令
- 算法
- 常見數據結構及實現
- 數組
- 排序算法
- 鏈表
- 二叉樹
- 棧和隊列
- 算法時間復雜度
- 常見算法思想
- 其他技術
- 正則表達式
- 編碼格式
- HTTP與HTTPS
- 【面試清單】其他知識
- 開發歸納
- Android零碎問題
- 其他零碎問題
- 開發思路