
[TOC]
# 布局優化
布局優化的思想很簡單,就是盡量減少布局文件的層級。主要從以下幾個方面入手:
* 善于重用布局文件
* 使用ViewStub僅在需要時才加載
* 刪除無用的控件和布局
* 使用性能較好的ViewGroup
## 重用布局文件
### \<include>標簽
\<include>標簽可以允許在一個布局當中引入另外一個布局,那么比如說我們程序的所有界面都有一個公共的部分,這個時候最好的做法就是將這個公共的部分提取到一個獨立的布局文件當中,然后在每個界面的布局文件當中來引用這個公共的布局。
```xml
<?xml version="1.0" encoding="utf-8"?>
<LinearLayout xmlns:android="http://schemas.android.com/apk/res/android"
android:layout_width="match_parent"
android:layout_height="match_parent"
android:orientation="vertical" >
<include
android:layout_width="match_parent"
android:layout_height="wrap_content"
layout="@layout/titlebar" />
......
</LinearLayout>
```
其中,在\<include>標簽當中,我們是可以覆寫所有layout屬性的,即include中指定的layout屬性將會覆蓋掉titlebar中指定的layout屬性。
我們可以覆寫titlebar中的任何一個layout屬性,如layout_gravity、layout_margin等,而非layout屬性則無法在\<include>標簽當中進行覆寫。需要注意的是,如果想要在\<include>標簽當中覆寫layout屬性,必須要將layout_width和layout_height這兩個屬性也進行覆寫,否則覆寫效果將不會生效。
### \<merge>標簽
\<merge>標簽是作為\<include>標簽的一種輔助擴展來使用的,它的主要作用是為了防止在引用布局文件時產生多余的布局嵌套。
比如說我們需要編寫一個確定取消按鈕的公共布局,這樣任何一個界面需要確定和取消功能時就不用再單獨編寫了,新建ok\_cancel\_layout.xml,代碼如下所示:
```xml
<?xml version="1.0" encoding="utf-8"?>
<LinearLayout xmlns:android="http://schemas.android.com/apk/res/android"
android:layout_width="match_parent"
android:layout_height="wrap_content"
android:orientation="vertical" >
<Button
android:id="@+id/ok"
android:layout_width="match_parent"
android:layout_height="wrap_content"
android:layout_marginLeft="20dp"
android:layout_marginRight="20dp"
android:text="OK" />
<Button
android:id="@+id/cancel"
android:layout_width="match_parent"
android:layout_height="wrap_content"
android:layout_marginLeft="20dp"
android:layout_marginRight="20dp"
android:layout_marginTop="10dp"
android:text="Cancel" />
</LinearLayout>
```
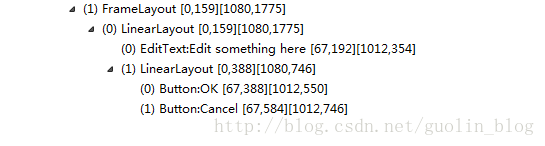
但是把這個布局文件通過\<include>標簽引入時,會造成布局嵌套,也就是又多了一層LinearLayout。布局層次如下:
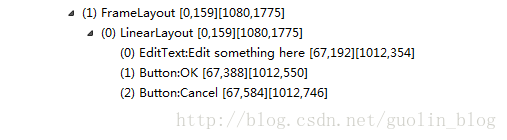
使用\<merge>標簽可以解決這個問題:
```xml
<?xml version="1.0" encoding="utf-8"?>
<merge xmlns:android="http://schemas.android.com/apk/res/android">
<Button
android:id="@+id/ok"
android:layout_width="match_parent"
android:layout_height="wrap_content"
android:layout_marginLeft="20dp"
android:layout_marginRight="20dp"
android:text="OK" />
<Button
android:id="@+id/cancel"
android:layout_width="match_parent"
android:layout_height="wrap_content"
android:layout_marginLeft="20dp"
android:layout_marginRight="20dp"
android:layout_marginTop="10dp"
android:text="Cancel" />
</merge>
```
此時布局層次如下:
## ViewStub僅在需要時才加載
有的時候我們會遇到這樣的場景,就是某個布局當中的元素非常多,但并不是所有元素都一起顯示出來的,而是普通情況下只顯示部分常用的元素,而那些不常用的元素只有在用戶進行特定操作的情況下才會顯示出來。
Android為此提供了一種非常輕量級的控件:ViewStub。ViewStub雖說也是View的一種,但是它沒有大小,沒有繪制功能,也不參與布局,資源消耗非常低,將它放置在布局當中基本可以認為是完全不會影響性能的。
ViewStub 的使用很簡單,在布局文件中像引入其他控件一樣引入 ViewStub:
```xml
<ViewStub android:id="@+id/stub"
android:inflatedId="@+id/subTree"
android:layout="@layout/mySubTree"
android:layout_width="120dip"
android:layout_height="40dip" />
```
需要展示 ViewStub 所引用的視圖時,通過 id 獲取到 ViewStub:
```java
ViewStub stub = (ViewStub) findViewById(R.id.stub);
View inflated = stub.inflate();
// stub.setVisibility(View.VISIBLE);
```
除了調用 inflate 方法,還可以調用 setVisible 方法來展示 ViewStub 所引用的 View。
關于ViewStub的使用,可以參考[ViewStub源碼分析](http://wiki.xuchongyang.com/1262571)
## 使用性能較好的ViewGroup
* 刪除無用的控件和層級
* 不需要嵌套時優先使用LinearLayout和FrameLayout,需要嵌套或者復雜布局時使用ConstraintLayout代替RelativeLayout
* LinearLayout、RelativeLayout、FrameLayout、ConstraintLayout幾種布局的區別
* RelativeLayout 子 View 的排列方式是基于彼此的依賴關系,所以在測量時會在橫向和縱向上分別測量一次
* LinearLayout 為線性排列,在沒有設置 weight 屬性時只測量一次,設置了 weight 屬性也是測量兩次
* FrameLayout會默認把所有控件擺放在布局的左上角,并覆蓋在前一控件的上層,當然可以通過 layout\_gravity 屬性來指定對齊方式
* ConstraintLayout 使用約束的方式來指定各個控件的位置和關系,View 的位置受到三類約束:其他 View、父容器、基準線,并且支持設置比例。可以使布局完全扁平化,性能更高
# 參考
《Android開發藝術探索》任玉剛 著
- 導讀
- Java知識
- Java基本程序設計結構
- 【基礎知識】Java基礎
- 【源碼分析】Okio
- 【源碼分析】深入理解i++和++i
- 【專題分析】JVM與GC
- 【面試清單】Java基本程序設計結構
- 對象與類
- 【基礎知識】對象與類
- 【專題分析】Java類加載過程
- 【面試清單】對象與類
- 泛型
- 【基礎知識】泛型
- 【面試清單】泛型
- 集合
- 【基礎知識】集合
- 【源碼分析】SparseArray
- 【面試清單】集合
- 多線程
- 【基礎知識】多線程
- 【源碼分析】ThreadPoolExecutor源碼分析
- 【專題分析】volatile關鍵字
- 【面試清單】多線程
- Java新特性
- 【專題分析】Lambda表達式
- 【專題分析】注解
- 【面試清單】Java新特性
- Effective Java筆記
- Android知識
- Activity
- 【基礎知識】Activity
- 【專題分析】運行時權限
- 【專題分析】使用Intent打開三方應用
- 【源碼分析】Activity的工作過程
- 【面試清單】Activity
- 架構組件
- 【專題分析】MVC、MVP與MVVM
- 【專題分析】數據綁定
- 【面試清單】架構組件
- 界面
- 【專題分析】自定義View
- 【專題分析】ImageView的ScaleType屬性
- 【專題分析】ConstraintLayout 使用
- 【專題分析】搞懂點九圖
- 【專題分析】Adapter
- 【源碼分析】LayoutInflater
- 【源碼分析】ViewStub
- 【源碼分析】View三大流程
- 【源碼分析】觸摸事件分發機制
- 【源碼分析】按鍵事件分發機制
- 【源碼分析】Android窗口機制
- 【面試清單】界面
- 動畫和過渡
- 【基礎知識】動畫和過渡
- 【面試清單】動畫和過渡
- 圖片和圖形
- 【專題分析】圖片加載
- 【面試清單】圖片和圖形
- 后臺任務
- 應用數據和文件
- 基于網絡的內容
- 多線程與多進程
- 【基礎知識】多線程與多進程
- 【源碼分析】Handler
- 【源碼分析】AsyncTask
- 【專題分析】Service
- 【源碼分析】Parcelable
- 【專題分析】Binder
- 【源碼分析】Messenger
- 【面試清單】多線程與多進程
- 應用優化
- 【專題分析】布局優化
- 【專題分析】繪制優化
- 【專題分析】內存優化
- 【專題分析】啟動優化
- 【專題分析】電池優化
- 【專題分析】包大小優化
- 【面試清單】應用優化
- Android新特性
- 【專題分析】狀態欄、ActionBar和導航欄
- 【專題分析】應用圖標、通知欄適配
- 【專題分析】Android新版本重要變更
- 【專題分析】唯一標識符的最佳做法
- 開源庫源碼分析
- 【源碼分析】BaseRecyclerViewAdapterHelper
- 【源碼分析】ButterKnife
- 【源碼分析】Dagger2
- 【源碼分析】EventBus3(一)
- 【源碼分析】EventBus3(二)
- 【源碼分析】Glide
- 【源碼分析】OkHttp
- 【源碼分析】Retrofit
- 其他知識
- Flutter
- 原生開發與跨平臺開發
- 整體歸納
- 狀態及狀態管理
- 零碎知識點
- 添加Flutter到現有應用
- Git知識
- Git命令
- .gitignore文件
- 設計模式
- 創建型模式
- 結構型模式
- 行為型模式
- RxJava
- 基礎
- Linux知識
- 環境變量
- Linux命令
- ADB命令
- 算法
- 常見數據結構及實現
- 數組
- 排序算法
- 鏈表
- 二叉樹
- 棧和隊列
- 算法時間復雜度
- 常見算法思想
- 其他技術
- 正則表達式
- 編碼格式
- HTTP與HTTPS
- 【面試清單】其他知識
- 開發歸納
- Android零碎問題
- 其他零碎問題
- 開發思路