## Spring Boot 優勢
* 自動裝配
* 內嵌容器
* 應用監控
* Starter 包簡化集成難度。
自動裝配:Spring Boot 會根據某些規則對所有配置的 Bean 進行初始化。可以減少了很多重復性的工作。比如使用 mybatis時,只需要在 pom.xml 中加入 mybatis的 Starter 包,然后配置 mybatis的連接信息,就可以直接使用 @mapper自動裝配來操作數據庫了。
內嵌容器:Spring Boot 應用程序可以不用部署到外部容器中,比如 Tomcat。Spring Boot 應用程序可以直接通過 Maven 命令編譯成可執行的 jar 包,通過 java -jar 命令啟動即可,非常方便。
應用監控:Spring Boot 中自帶監控功能 Actuator,可以實現對程序內部運行情況進行監控,比如 Bean 加載情況、環境變量、日志信息、線程信息等。當然也可以自定義跟業務相關的監控,通過Actuator 的端點信息進行暴露。
Starter 包簡化框架集成難度:將 Bean 的自動裝配邏輯封裝在 Starter 包內部,同時也簡化了 Maven Jar 包的依賴,對框架的集成只需要加入一個 Starter 包的配置,降低了煩瑣配置的出錯幾率。
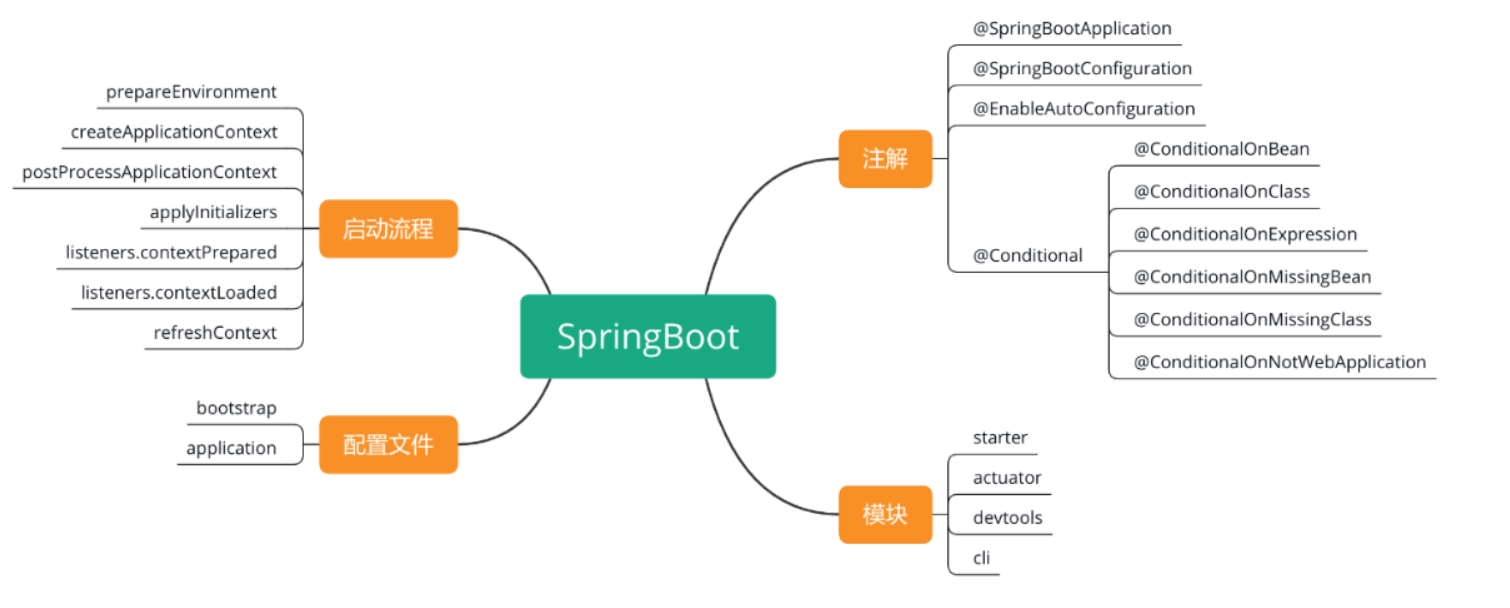
## Spring Boot 框架圖
## Spring Boot 啟動源碼分析
我們知道 Spring Boot 程序的入口是 SpringApplication.run(Application.class, args) 方法,那么就從 run() 方法開始分析吧,它的源碼如下:
```
public ConfigurableApplicationContext run(String... args) {
// 1.創建并啟動計時監控類
StopWatch stopWatch = new StopWatch();
stopWatch.start();
// 2.聲明應用上下文對象和異常報告集合
ConfigurableApplicationContext context = null;
Collection<SpringBootExceptionReporter> exceptionReporters = new ArrayList();
// 3.設置系統屬性 headless 的值
this.configureHeadlessProperty();
// 4.創建所有 Spring 運行監聽器并發布應用啟動事件
SpringApplicationRunListeners listeners = this.getRunListeners(args);
listeners.starting();
Collection exceptionReporters;
try {
// 5.處理 args 參數
ApplicationArguments applicationArguments = new DefaultApplicationArguments(args);
// 6.準備環境
ConfigurableEnvironment environment = this.prepareEnvironment(listeners, applicationArguments);
this.configureIgnoreBeanInfo(environment);
// 7.創建 Banner 的打印類
Banner printedBanner = this.printBanner(environment);
// 8.創建應用上下文
context = this.createApplicationContext();
// 9.實例化異常報告器
exceptionReporters = this.getSpringFactoriesInstances(SpringBootExceptionReporter.class, new Class[]{ConfigurableApplicationContext.class}, context);
// 10.準備應用上下文
this.prepareContext(context, environment, listeners, applicationArguments, printedBanner);
// 11.刷新應用上下文
this.refreshContext(context);
// 12.應用上下文刷新之后的事件的處理
this.afterRefresh(context, applicationArguments);
// 13.停止計時監控類
stopWatch.stop();
// 14.輸出日志記錄執行主類名、時間信息
if (this.logStartupInfo) {
(new StartupInfoLogger(this.mainApplicationClass)).logStarted(this.getApplicationLog(), stopWatch);
}
// 15.發布應用上下文啟動完成事件
listeners.started(context);
// 16.執行所有 Runner 運行器
this.callRunners(context, applicationArguments);
} catch (Throwable var10) {
this.handleRunFailure(context, var10, exceptionReporters, listeners);
throw new IllegalStateException(var10);
}
try {
// 17.發布應用上下文就緒事件
listeners.running(context);
// 18.返回應用上下文對象
return context;
} catch (Throwable var9) {
this.handleRunFailure(context, var9, exceptionReporters, (SpringApplicationRunListeners)null);
throw new IllegalStateException(var9);
}
}
```
## Spring Boot 的啟動流程
* 1.創建并啟動計時監控類
此計時器是為了監控并記錄 Spring Boot 應用啟動的時間的,它會記錄當前任務的名稱,然后開啟計時器。
* 2.聲明應用上下文對象和異常報告集合
此過程聲明了應用上下文對象和一個異常報告的 ArrayList 集合。
* 3.設置系統屬性 headless 的值
設置 Java.awt.headless = true,其中 awt(Abstract Window Toolkit)的含義是抽象窗口工具集。設置為 true 表示運行一個 headless 服務器,可以用它來作一些簡單的圖像處理。
* 4.創建所有 Spring 運行監聽器并發布應用啟動事件
此過程用于獲取配置的監聽器名稱并實例化所有的類。
* 5.初始化默認應用的參數類
也就是說聲明并創建一個應用參數對象。
* 6.準備環境
創建配置并且綁定環境(通過 property sources 和 profiles 等配置文件)。
* 7.創建 Banner 的打印類
Spring Boot 啟動時會打印 Banner 圖片
* 8.創建應用上下文
根據不同的應用類型來創建不同的 ApplicationContext 上下文對象。
* 9.實例化異常報告器
它調用的是 getSpringFactoriesInstances() 方法來獲取配置異常類的名稱,并實例化所有的異常處理類。
* 10.準備應用上下文
此方法的主要作用是把上面已經創建好的對象,傳遞給 prepareContext 來準備上下文,例如將環境變量 environment 對象綁定到上下文中、配置 bean 生成器以及資源加載器、記錄啟動日志等操作。
* 11.刷新應用上下文
此方法用于解析配置文件,加載 bean 對象,并且啟動內置的 web 容器等操作。bean定位,載入和注冊。
* 12.應用上下文刷新之后的事件處理
這個方法的源碼是空的,可以做一些自定義的后置處理操作。
* 13.停止計時監控類
停止此過程第一步中的程序計時器,并統計任務的執行信息。
* 14.輸出日志信息
把相關的記錄信息,如類名、時間等信息進行控制臺輸出。
* 15.發布應用上下文啟動完成事件
觸發所有 SpringApplicationRunListener 監聽器的 started 事件方法。
* 16.執行所有 Runner 運行器
執行所有的 ApplicationRunner 和 CommandLineRunner 運行器。
* 17.發布應用上下文就緒事件
觸發所有的 SpringApplicationRunListener 監聽器的 running 事件。
* 18.返回應用上下文對象
到此為止 Spring Boot 的啟動程序就結束了,我們就可以正常來使用 Spring Boot 框架了,下面我們具體到代碼分析啟動流程。
## springboot內置代碼分析
> 運行流程:
* 1:判斷是否是web環境
```
public SpringApplication(Object... sources) {
initialize(sources);
}
@SuppressWarnings({ "unchecked", "rawtypes" })
private void initialize(Object[] sources) {
if (sources != null && sources.length > 0) {
this.sources.addAll(Arrays.asList(sources));
}
this.webEnvironment = deduceWebEnvironment();
setInitializers((Collection) getSpringFactoriesInstances(
ApplicationContextInitializer.class));
setListeners((Collection) getSpringFactoriesInstances(ApplicationListener.class));
this.mainApplicationClass = deduceMainApplicationClass();
}
private boolean deduceWebEnvironment() {
for (String className : WEB_ENVIRONMENT_CLASSES) {
if (!ClassUtils.isPresent(className, null)) {
return false;
}
}
return true;
}
```
* 2:加載所有classpath下面的META-INF/spring.factories ApplicationContextInitializer
```
@SuppressWarnings({ "unchecked", "rawtypes" })
private void initialize(Object[] sources) {
if (sources != null && sources.length > 0) {
this.sources.addAll(Arrays.asList(sources));
}
this.webEnvironment = deduceWebEnvironment();
setInitializers((Collection) getSpringFactoriesInstances(
ApplicationContextInitializer.class));
setListeners((Collection) getSpringFactoriesInstances(ApplicationListener.class));
this.mainApplicationClass = deduceMainApplicationClass();
}
```
* 3:推斷main方法所在的類
```
private Class<?> deduceMainApplicationClass() {
try {
StackTraceElement[] stackTrace = new RuntimeException().getStackTrace();
for (StackTraceElement stackTraceElement : stackTrace) {
if ("main".equals(stackTraceElement.getMethodName())) {
return Class.forName(stackTraceElement.getClassName());
}
}
}
catch (ClassNotFoundException ex) {
// Swallow and continue
}
return null;
}
```
* 4:加載所有classpath下面的META-INF/spring.factories SpringApplicationRunListener
```
SpringApplicationRunListeners listeners = getRunListeners(args);
listeners.starting();
```
* 5:執行所有SpringApplicationRunListener的started方法
* 6:實例化ApplicationArguments對象
* 7:創建environment
* 8:配置environment,主要是把run方法的參數配置到environment
* 9:執行所有SpringApplicationRunListener的environmentPrepared方法
* 10:如果不是web環境,但是是web的environment,則把這個web的environment轉換成標準的environment
* 11:打印Banner
,banner 信息是在 SpringBootBanner 類中定義的,我們可以通過實現 Banner 接口來自定義 banner 信息,然后通過代碼 setBanner() 方法設置 Spring Boot 項目使用自己自定義 Banner 信息,或者是在 resources 下添加一個 banner.txt,把 banner 信息添加到此文件中,就可以實現自定義 banner 的功能了。
* 12:初始化applicationContext, 如果是web環境,則實例化AnnotationConfigEmbeddedWebApplicationContext對象,否則實例化AnnotationConfigApplicationContext對象
* 13:如果beanNameGenerator不為空,就把beanNameGenerator對象注入到context里面去
* 14:回調所有的ApplicationContextInitializer方法
* 15:執行所有SpringApplicationRunListener的contextPrepared方法
* 16:依次往spring容器中注入:ApplicationArguments,Banner
* 17:加載所有的源到context里面去
* 18:執行所有SpringApplicationRunListener的contextLoaded方法
* 19:執行context的refresh方法,并且調用context的registerShutdownHook方法(這一步執行完成之后,spring容器就完全初始化好了)
```
@Override
public void refresh() throws BeansException, IllegalStateException {
synchronized (this.startupShutdownMonitor) {
//一些準備工作,列如配置屬性源,記錄啟動時間,環境變量準備,部分map的清理工作
prepareRefresh();
//能對xml讀取,轉換為bean,AbstractApplicationContext因為引用了一個beanFactory
//所有她擁有了beanFactory的所有功能。還在此基礎上進一步擴展。做了哪些擴展?
//真正的初始化bean Factory ,設置一些參數,并讀取xml文件,轉換為bean Definition
ConfigurableListableBeanFactory beanFactory = obtainFreshBeanFactory();
// 準備bean 工廠,對beanFactory進行各種功能填充
// Prepare the bean factory for use in this context.
// 此時,spring已經完成對配置文件的解析,也就是beanFactory對bean的解析已經開始
prepareBeanFactory(beanFactory);
try {
// Allows post-processing of the bean factory in context subclasses.
//保留方法 允許在上下文子類中對bean工廠進行后處理。
postProcessBeanFactory(beanFactory);
// 激活各種beanFactory 處理器,按順序執行了
invokeBeanFactoryPostProcessors(beanFactory);
// 執行完invokeBeanFactoryPostProcessors后,beanDefinition 基本都已經找出來了 ,并且新初始了如下 8個 bean 至此已經初始化16個bean
// 注冊攔截bean 創建的 bean 后置處理器 ,執行是在getBean時候
// Register bean processors that intercept bean creation.
// 注冊 BeanPostProcessor 處理 bean的
registerBeanPostProcessors(beanFactory);
// 執行完 registerBeanPostProcessors()方法后,新增了9個后置處理器 至此已經初始化25個bean
// 為此上下文初始化消息源,即不同語言的消息體。國際化處理
// Initialize message source for this context.
initMessageSource();
//執行完新增1個bean 至此已經初始化26個bean
//messageSource -> {DelegatingMessageSource@5542}
//初始化應用消息(事件)廣播器,并放入 ApplicationEventMulticaster bean 中
// Initialize event multicaster for this context.
// 廣播器,會保存相關的監聽器,在有事件發生的時候,會調用相關的監聽器的方法,
// 讓監聽器去執行內部的監聽邏輯
initApplicationEventMulticaster();
//執行完新增一個bean 至此已經初始化27個bean
//applicationEventMulticaster -> {SimpleApplicationEventMulticaster@5595}
//留給子類來初始化其他bean
// Initialize other special beans in specific context subclasses.
onRefresh();
//執行完 onRefresh()新增 29個 bean 至此已經初始化65 個bean
// 將所有監聽器bean,注冊到前面剛剛注冊的消息廣播器。
// 并將沒有發出的事件一并發出去。
// Check for listener beans and register them.
registerListeners();
// 初始化剩下的,非延遲加載的 bean的初始化工作。(也就是非延遲加載的bean,會在這一步實現初始化,其他bean不會))
// ConversionService 設置(這個是干啥的?)
// 配置凍結 、非延遲加載的 bean的初始化工作
// Instantiate all remaining (non-lazy-init) singletons.
//這也是context&bean Factory的區別所在
finishBeanFactoryInitialization(beanFactory);
// 發布相關事件 Last step: publish corresponding event
// 完成刷新過程,通知生命周期處理器,LifecycleProcesser 刷新過程,
// 并同時發出ContextRefreshEvent 通知別人(通知被人干啥.
finishRefresh();
}
}
```
* 20:回調,獲取容器中所有的ApplicationRunner、CommandLineRunner接口,然后排序,依次調用
* 21:執行所有SpringApplicationRunListener的finished方法
## 工作原理總結
* 引導機制
Spring Boot 使用注解代替 xml 配置文件配置應用上下文,稱之為 auto-configuration。在提供自己的組件時,Spring Boot 不會自己來掃描所有的包,而是通過讀取 classpath 下 META-INF/spring.factories 文件中配置的類來開始加載流程。這可以視為 Spring Boot 的引導機制。
在 spring.factories 中,可以配置:
org.springframework.boot.autoconfigure.EnableAutoConfiguration 自動配置類
org.springframework.context.ApplicationContextInitializer 實現該接口可以自定義窗口啟動早期的初始化行為
org.springframework.context.ApplicationListener 實現該接口可以監聽容器事件
配置鍵是接口或注解的全名,配置值是實現類或目標類的全名。在spring.factories中配置的類,都會被 spring 容器加載并實例化為 spring beans。
* Bean裝配
1. 處理注解 @ComponentScan
2. 處理 @Import 注解
3. 處理@ImportResource注解
4. 處理?帶@Bean注解的 方法
抓主線BeanDefinition的定位,載入,注冊過程
* 條件配置
Spring Boot 支持在 @Configuration 和 @Bean 上使用條件注解(Condition annotations),在程序實際運行時動態判定初始化行為。比如根據某配置項、某個類是否存在判斷是否加載某個 bean。
@ConditionalOnClass/@ConditionalOnMissingClass 根據類的存在性判定
@ConditionalOnBean/@ConditionalOnMissingBean 根據bean的存在性判定
@ConditionalOnProperty 根據配置項的存在性判定
@ConditionalOnResource 根據文件的存在性判定
@ConditionalOnWebApplication/@ConditionalOnNotWebApplication 根據是否為Web應用判定
@ConditionalOnExpression 根據 Spring EL 判定
基于“約定優于配置”的思想,條件注解可以用來根據實際情況靈活地配置自己的組件。比如使用@ConditionalOnClass,探測到程序中存在 com.mysql.jdbc.Driver 類,就可以視為應用使用 MySQL 作為數據源,可以自動配置 MySQL 相關的功能;比如使用@ConditionalOnProperty可以根據程序實際的配置項來決定初始化行為。
總結下 Starter 的工作原理
Spring Boot 在啟動時掃描項目所依賴的 JAR 包,尋找包含spring.factories文件的 JAR 包
根據spring.factories 配置加載AutoConfigure類
根據@Conditional注解的條件,進行自動配置并將 Bean 注入 Spring Context。
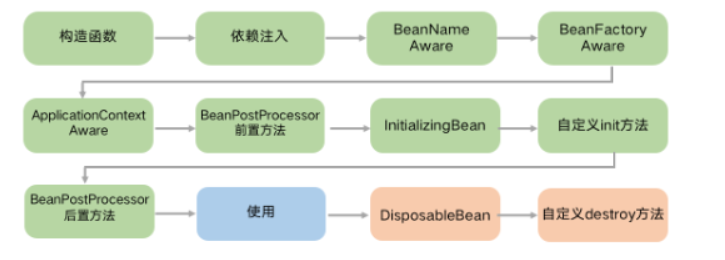
## spring bean生命周期
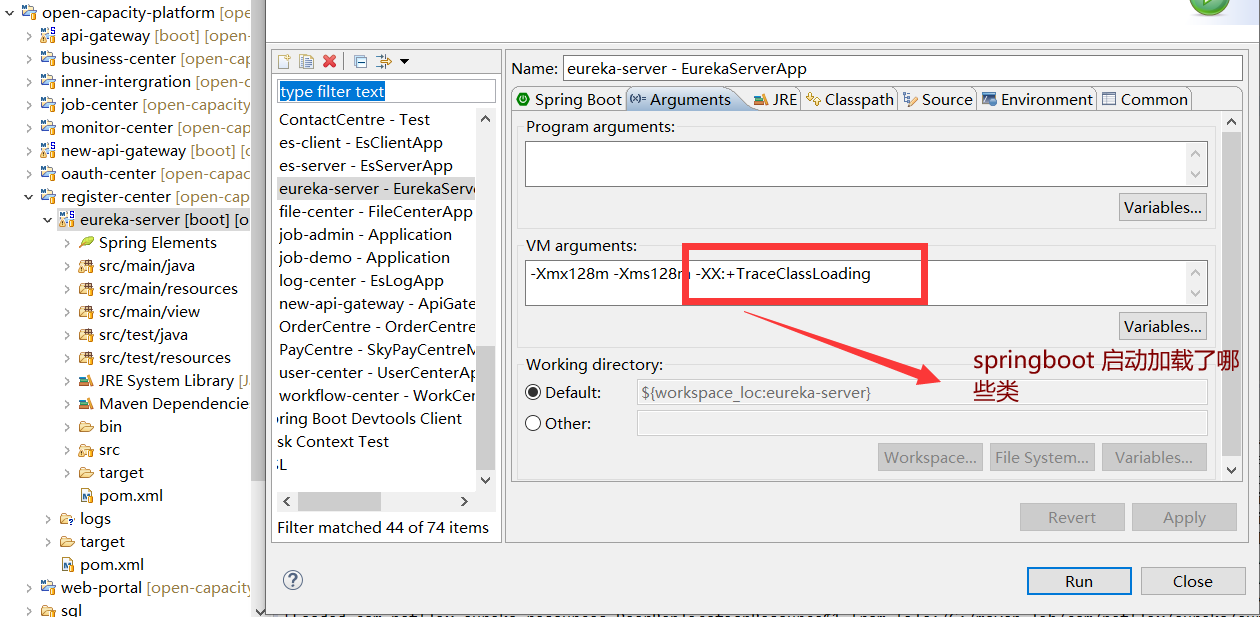
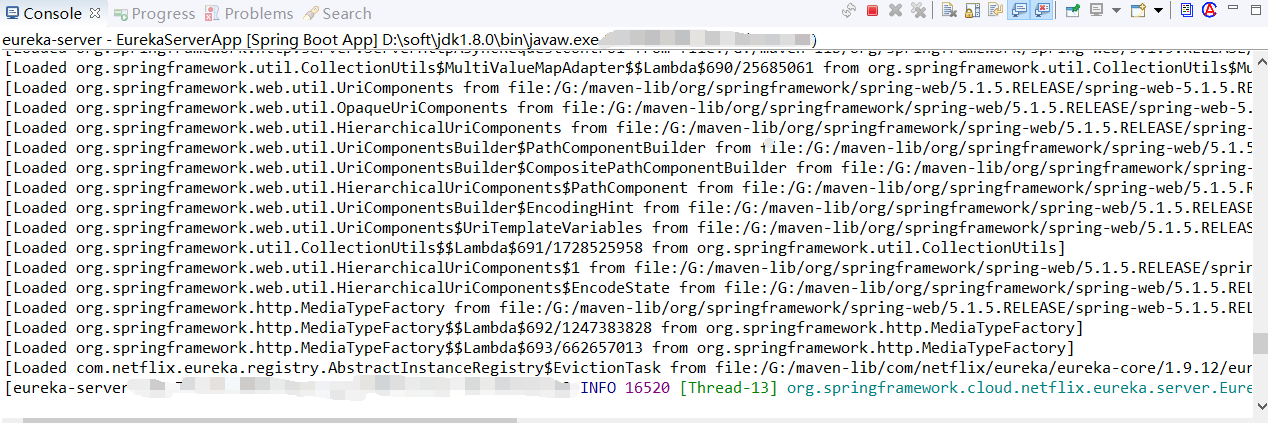
## eureka-server 啟動加載了哪些類
- 前言
- 1.項目說明
- 2.項目更新日志
- 3.文檔更新日志
- 01.快速開始
- 01.maven構建項目
- 02.環境安裝
- 03.STS項目導入
- 03.IDEA項目導入
- 04.數據初始化
- 05.項目啟動
- 06.付費文檔說明
- 02.總體流程
- 1.oauth接口
- 2.架構設計圖
- 3.微服務介紹
- 4.功能介紹
- 5.梳理流程
- 03.模塊詳解
- 01.老版本1.0.1分支模塊講解
- 01.db-core模塊
- 02.api-commons模塊
- 03.log-core模塊
- 04.security-core模塊
- 05.swagger-core模塊
- 06.eureka-server模塊
- 07.auth-server模塊
- 08.auth-sso模塊解析
- 09.user-center模塊
- 10.api-gateway模塊
- 11.file-center模塊
- 12.log-center模塊
- 13.batch-center模塊
- 14.back-center模塊
- 02.spring-boot-starter-web那點事
- 03.自定義db-spring-boot-starter
- 04.自定義log-spring-boot-starter
- 05.自定義redis-spring-boot-starter
- 06.自定義common-spring-boot-starter
- 07.自定義swagger-spring-boot-starter
- 08.自定義uaa-server-spring-boot-starter
- 09.自定義uaa-client-spring-boot-starter
- 10.自定義ribbon-spring-boot-starter
- 11.springboot啟動原理
- 12.eureka-server模塊
- 13.auth-server模塊
- 14.user-center模塊
- 15.api-gateway模塊
- 16.file-center模塊
- 17.log-center模塊
- 18.back-center模塊
- 19.auth-sso模塊
- 20.admin-server模塊
- 21.zipkin-center模塊
- 22.job-center模塊
- 23.batch-center
- 04.全新網關
- 01.基于spring cloud gateway的new-api-gateway
- 02.spring cloud gateway整合Spring Security Oauth
- 03.基于spring cloud gateway的redis動態路由
- 04.spring cloud gateway聚合swagger文檔
- 05.技術詳解
- 01.互聯網系統設計原則
- 02.系統冪等性設計與實踐
- 03.Oauth最簡向導開發指南
- 04.oauth jdbc持久化策略
- 05.JWT token方式啟用
- 06.token有效期的處理
- 07.@PreAuthorize注解分析
- 08.獲取當前用戶信息
- 09.認證授權白名單配置
- 10.OCP權限設計
- 11.服務安全流程
- 12.認證授權詳解
- 13.驗證碼技術
- 14.短信驗證碼登錄
- 15.動態數據源配置
- 16.分頁插件使用
- 17.緩存擊穿
- 18.分布式主鍵生成策略
- 19.分布式定時任務
- 20.分布式鎖
- 21.網關多維度限流
- 22.跨域處理
- 23.容錯限流
- 24.應用訪問次數控制
- 25.統一業務異常處理
- 26.日志埋點
- 27.GPRC內部通信
- 28.服務間調用
- 29.ribbon負載均衡
- 30.微服務分布式跟蹤
- 31.異步與線程傳遞變量
- 32.死信隊列延時消息
- 33.單元測試用例
- 34.Greenwich.RELEASE升級
- 35.混沌工程質量保證
- 06.開發初探
- 1.開發技巧
- 2.crud例子
- 3.新建服務
- 4.區分前后臺用戶
- 07.分表分庫
- 08.分布式事務
- 1.Seata介紹
- 2.Seata部署
- 09.shell部署
- 01.eureka-server
- 02.user-center
- 03.auth-server
- 04.api-gateway
- 05.file-center
- 06.log-center
- 07.back-center
- 08.編寫shell腳本
- 09.集群shell部署
- 10.集群shell啟動
- 11.部署阿里云問題
- 10.網關安全
- 1.openresty https保障服務安全
- 2.openresty WAF應用防火墻
- 3.openresty 高可用
- 11.docker配置
- 01.docker安裝
- 02.Docker 開啟遠程API
- 03.采用docker方式打包到服務器
- 04.docker創建mysql
- 05.docker網絡原理
- 06.docker實戰
- 6.01.安裝docker
- 6.02.管理鏡像基本命令
- 6.03.容器管理
- 6.04容器數據持久化
- 6.05網絡模式
- 6.06.Dockerfile
- 6.07.harbor部署
- 6.08.使用自定義鏡像
- 12.統一監控中心
- 01.spring boot admin監控
- 02.Arthas診斷利器
- 03.nginx監控(filebeat+es+grafana)
- 04.Prometheus監控
- 05.redis監控(redis+prometheus+grafana)
- 06.mysql監控(mysqld_exporter+prometheus+grafana)
- 07.elasticsearch監控(elasticsearch-exporter+prometheus+grafana)
- 08.linux監控(node_exporter+prometheus+grafana)
- 09.micoservice監控
- 10.nacos監控
- 11.druid數據源監控
- 12.prometheus.yml
- 13.grafana告警
- 14.Alertmanager告警
- 15.監控微信告警
- 16.關于接口監控告警
- 17.prometheus-HA架構
- 18.總結
- 13.統一日志中心
- 01.統一日志中心建設意義
- 02.通過ELK收集mysql慢查詢日志
- 03.通過elk收集微服務模塊日志
- 04.通過elk收集nginx日志
- 05.統一日志中心性能優化
- 06.kibana安裝部署
- 07.日志清理方案
- 08.日志性能測試指標
- 09.總結
- 14.數據查詢平臺
- 01.數據查詢平臺架構
- 02.mysql配置bin-log
- 03.單節點canal-server
- 04.canal-ha部署
- 05.canal-kafka部署
- 06.實時增量數據同步mysql
- 07.canal監控
- 08.clickhouse運維常見腳本
- 15.APM監控
- 1.Elastic APM
- 2.Skywalking
- 01.docker部署es
- 02.部署skywalking-server
- 03.部署skywalking-agent
- 16.壓力測試
- 1.ocp.jmx
- 2.test.bat
- 3.壓測腳本
- 4.壓力報告
- 5.報告分析
- 6.壓測平臺
- 7.并發測試
- 8.wrk工具
- 9.nmon
- 10.jmh測試
- 17.SQL優化
- 1.oracle篇
- 01.基線測試
- 02.調優前奏
- 03.線上瓶頸定位
- 04.執行計劃解讀
- 05.高級SQL語句
- 06.SQL tuning
- 07.數據恢復
- 08.深入10053事件
- 09.深入10046事件
- 2.mysql篇
- 01.innodb存儲引擎
- 02.BTree索引
- 03.執行計劃
- 04.查詢優化案例分析
- 05.為什么會走錯索引
- 06.表連接優化問題
- 07.Connection連接參數
- 08.Centos7系統參數調優
- 09.mysql監控
- 10.高級SQL語句
- 11.常用維護腳本
- 12.percona-toolkit
- 18.redis高可用方案
- 1.免密登錄
- 2.安裝部署
- 3.配置文件
- 4.啟動腳本
- 19.消息中間件搭建
- 19-01.rabbitmq集群搭建
- 01.rabbitmq01
- 02.rabbitmq02
- 03.rabbitmq03
- 04.鏡像隊列
- 05.haproxy搭建
- 06.keepalived
- 19-02.rocketmq搭建
- 19-03.kafka集群
- 20.mysql高可用方案
- 1.環境
- 2.mysql部署
- 3.Xtrabackup部署
- 4.Galera部署
- 5.galera for mysql 集群
- 6.haproxy+keepalived部署
- 21.es集群部署
- 22.生產實施優化
- 1.linux優化
- 2.jvm優化
- 3.feign優化
- 4.zuul性能優化
- 23.線上問題診斷
- 01.CPU性能評估工具
- 02.內存性能評估工具
- 03.IO性能評估工具
- 04.網絡問題工具
- 05.綜合診斷評估工具
- 06.案例診斷01
- 07.案例診斷02
- 08.案例診斷03
- 09.案例診斷04
- 10.遠程debug
- 24.fiddler抓包實戰
- 01.fiddler介紹
- 02.web端抓包
- 03.app抓包
- 25.疑難解答交流
- 01.有了auth/token獲取token了為啥還要配置security的登錄配置
- 02.權限數據存放在redis嗎,代碼在哪里啊
- 03.其他微服務和認證中心的關系
- 04.改包問題
- 05.use RequestContextListener or RequestContextFilter to expose the current request
- 06./oauth/token對應代碼在哪里
- 07.驗證碼出不來
- 08./user/login
- 09.oauth無法自定義權限表達式
- 10.sleuth引發線程數過高問題
- 11.elk中使用7x版本問題
- 12.RedisCommandTimeoutException問題
- 13./oauth/token CPU過高
- 14.feign與權限標識符問題
- 15.動態路由RedisCommandInterruptedException: Command interrupted
- 26.學習資料
- 海量學習資料等你來拿
- 27.持續集成
- 01.git安裝
- 02.代碼倉庫gitlab
- 03.代碼倉庫gogs
- 04.jdk&&maven
- 05.nexus安裝
- 06.sonarqube
- 07.jenkins
- 28.Rancher部署
- 1.rancher-agent部署
- 2.rancher-server部署
- 3.ocp后端部署
- 4.演示前端部署
- 5.elk部署
- 6.docker私服搭建
- 7.rancher-server私服
- 8.rancher-agent docker私服
- 29.K8S部署OCP
- 01.準備OCP的構建環境和部署環境
- 02.部署順序
- 03.在K8S上部署eureka-server
- 04.在K8S上部署mysql
- 05.在K8S上部署redis
- 06.在K8S上部署auth-server
- 07.在K8S上部署user-center
- 08.在K8S上部署api-gateway
- 09.在K8S上部署back-center
- 30.Spring Cloud Alibaba
- 01.統一的依賴管理
- 02.nacos-server
- 03.生產可用的Nacos集群
- 04.nacos配置中心
- 05.common.yaml
- 06.user-center
- 07.auth-server
- 08.api-gateway
- 09.log-center
- 10.file-center
- 11.back-center
- 12.sentinel-dashboard
- 12.01.sentinel流控規則
- 12.02.sentinel熔斷降級規則
- 12.03.sentinel熱點規則
- 12.04.sentinel系統規則
- 12.05.sentinel規則持久化
- 12.06.sentinel總結
- 13.sentinel整合openfeign
- 14.sentinel整合網關
- 1.sentinel整合zuul
- 2.sentinel整合scg
- 15.Dubbo與Nacos共存
- 31.Java源碼剖析
- 01.基礎數據類型和String
- 02.Arrays工具類
- 03.ArrayList源碼分析
- 32.面試專題匯總
- 01.JVM專題匯總
- 02.多線程專題匯總
- 03.Spring專題匯總
- 04.springboot專題匯總
- 05.springcloud面試匯總
- 文檔問題跟蹤處理