[TOC]
# **網關**
**api-gateway**
>api-gateway是一款輕量級、高性能、易擴展的基于zuul的網關產品,提供API的統一管理服務、涵蓋API發布、管理、運維的全生命周期管理。對內輔助用戶簡單、快速、低成本、低風險的實現微服務聚合、前后端分離、系統集成等功能;對外面向合作伙伴、開發者開放服務。通過使用API-Gateway,我們能快速幫助用戶實現傳統ESB面臨的主要場景,又能滿足新型業務場景(移動應用等)所需的高性能、安全、可靠等要求。
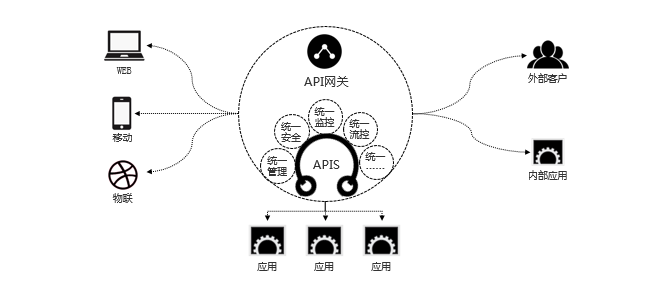
## 通用網關設計
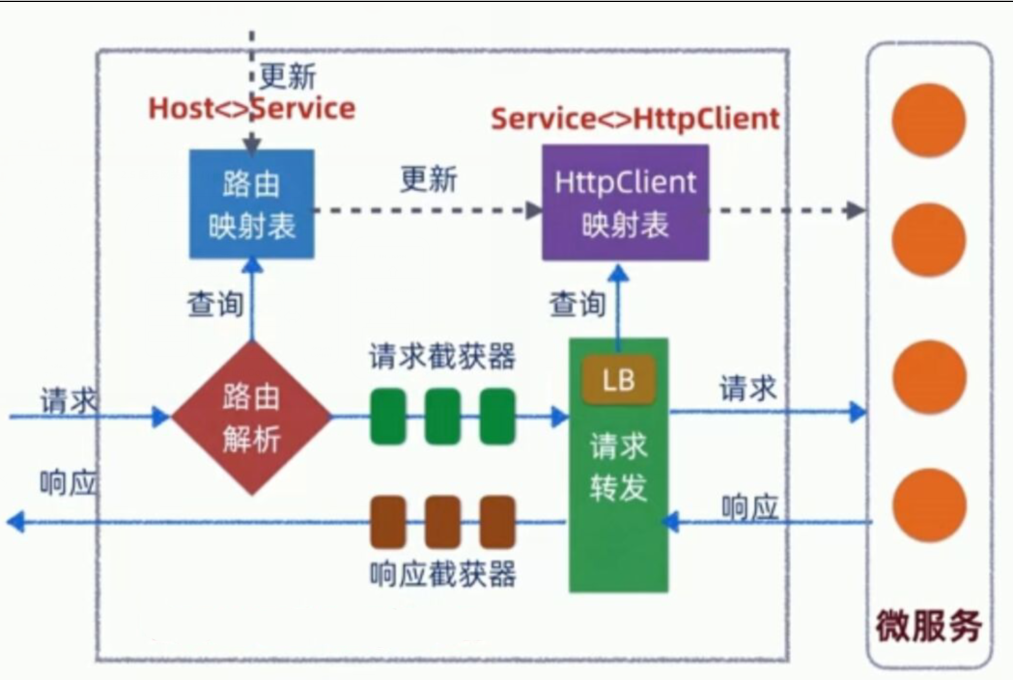
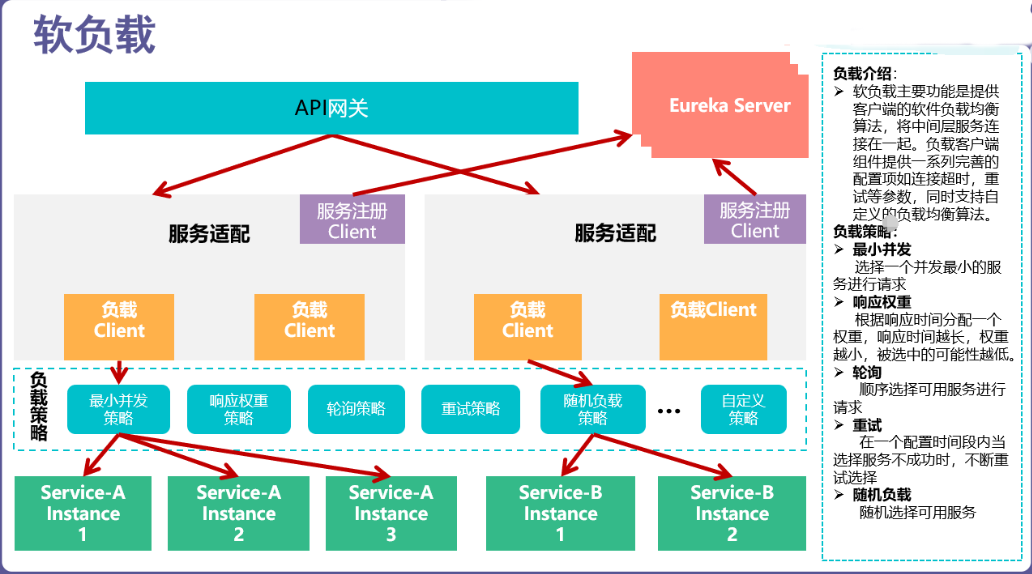
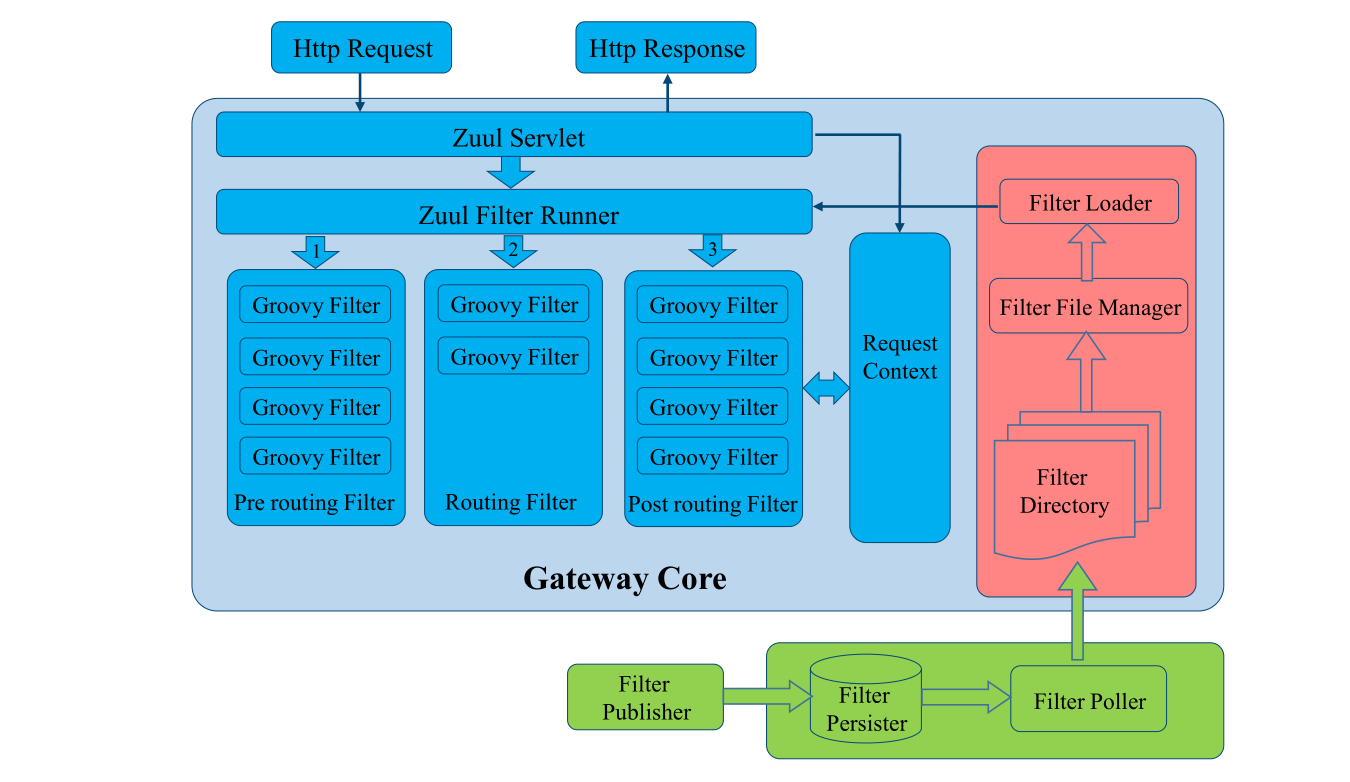
## 軟負載ZUUL
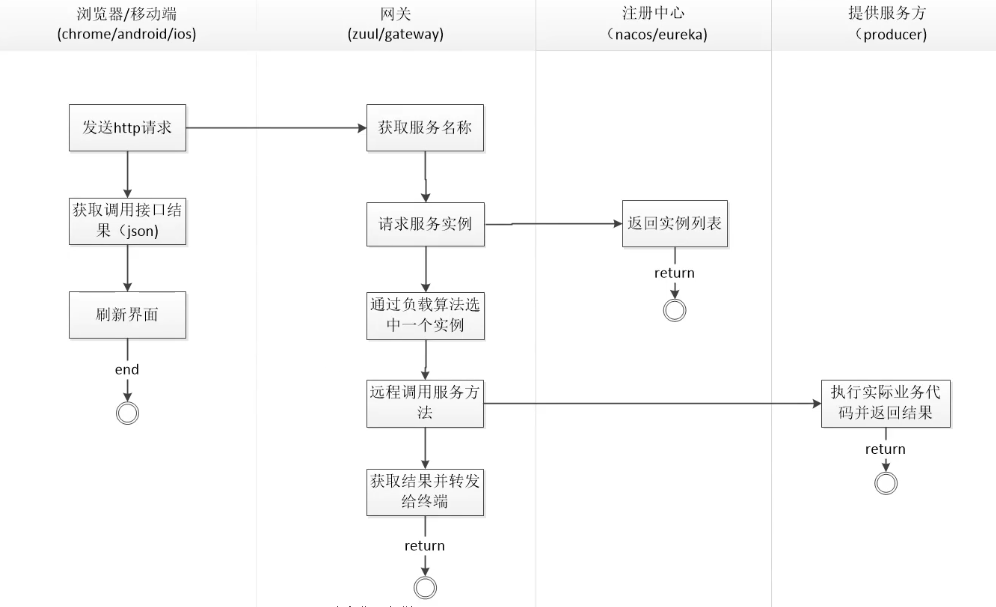
## 網關活動圖
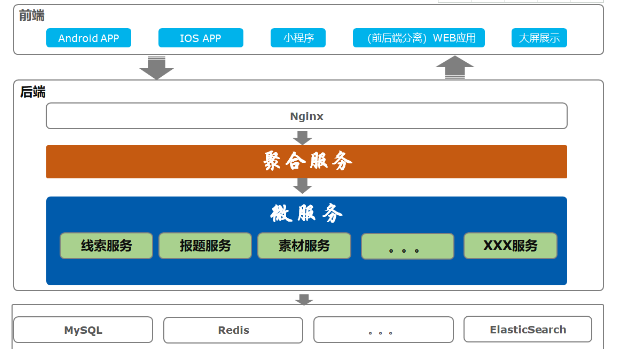
## api-gateway在項目中的位置
## api gateway作用
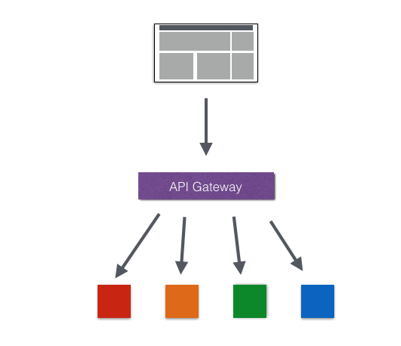
* 簡化客戶端調用復雜度
在微服務架構模式下后端服務的實例數一般是動態的,對于客戶端而言,很難發現動態改變的服務實例的訪問地址信息。因此在基于微服務的項目中為了簡化前端的調用邏輯,通常會引入API Gateway作為輕量級網關,同時API Gateway中也會實現相關的認證邏輯從而簡化內部服務之間相互調用的復雜度。
* 數據裁剪以及聚合
通常而言不同的客戶端在顯示時對于數據的需求是不一致的,比如手機端或者Web端又或者在低延遲的網絡環境或者高延遲的網絡環境。因此為了優化客戶端的使用體驗,API Gateway可以對通用性的響應數據進行裁剪以適應不同客戶端的使用需求,同時還可以將多個API調用邏輯進行聚合,從而減少客戶端的請求數,優化客戶端用戶體驗。
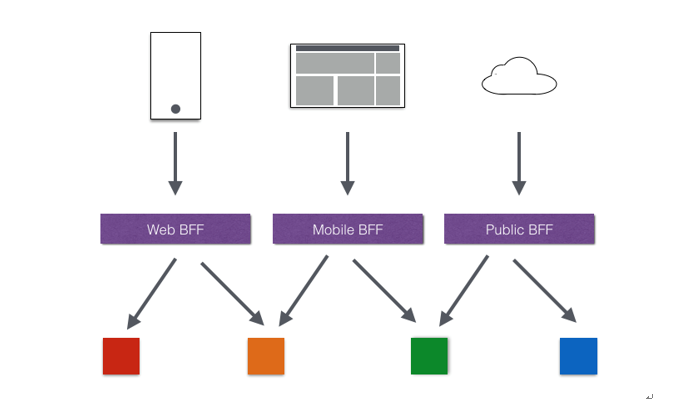
* 多渠道支持
當然我們還可以針對不同的渠道和客戶端提供不同的API Gateway,對于該模式的使用由另外一個大家熟知的方式叫Backend for front-end,在Backend for front-end模式當中,我們可以針對不同的客戶端分別創建其BFF。
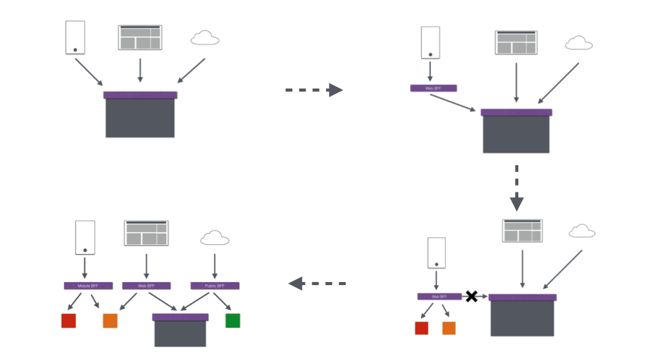
* 遺留系統的微服務改造
對于遺留系統而言進行微服務改造通常是由于原有的系統存在或多或少的問題,比如技術債務,代碼質量,可維護性,可擴展性等等。API Gateway的模式同樣適用于這一類遺留系統的改造,通過微服務化的改造逐步實現對原有系統中的問題的修復,從而提升對于原有業務相應力的提升。通過引入抽象層,逐步使用新的實現替換舊的實現。
在Spring Cloud體系中,Spring Cloud Zuul就是提供負載均衡,反向代理,權限認證的一個API Gateway。
# api-gateway代碼分析
## 開啟ZUUL

## Zuul提供的功能
* 認證鑒權-可以識別訪問資源的每一個請求,拒絕不滿足的請求
* 監控埋點,跟蹤有意義的數據并統計,以便生成有意義的生產視圖
* 熔斷限流,為每一個請求分配容量,并丟棄超過限制的請求
* 抗壓設計,線程池隔離增大并發能力
## 網關的2層超時調優
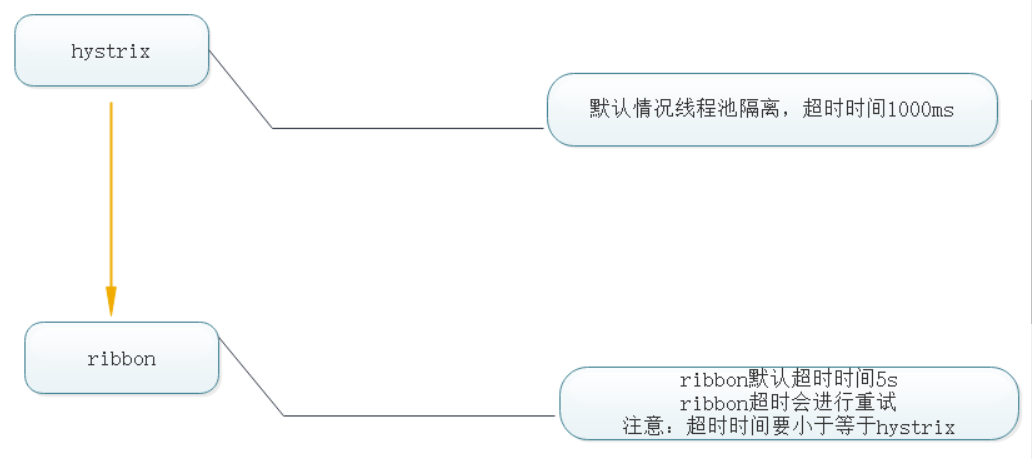
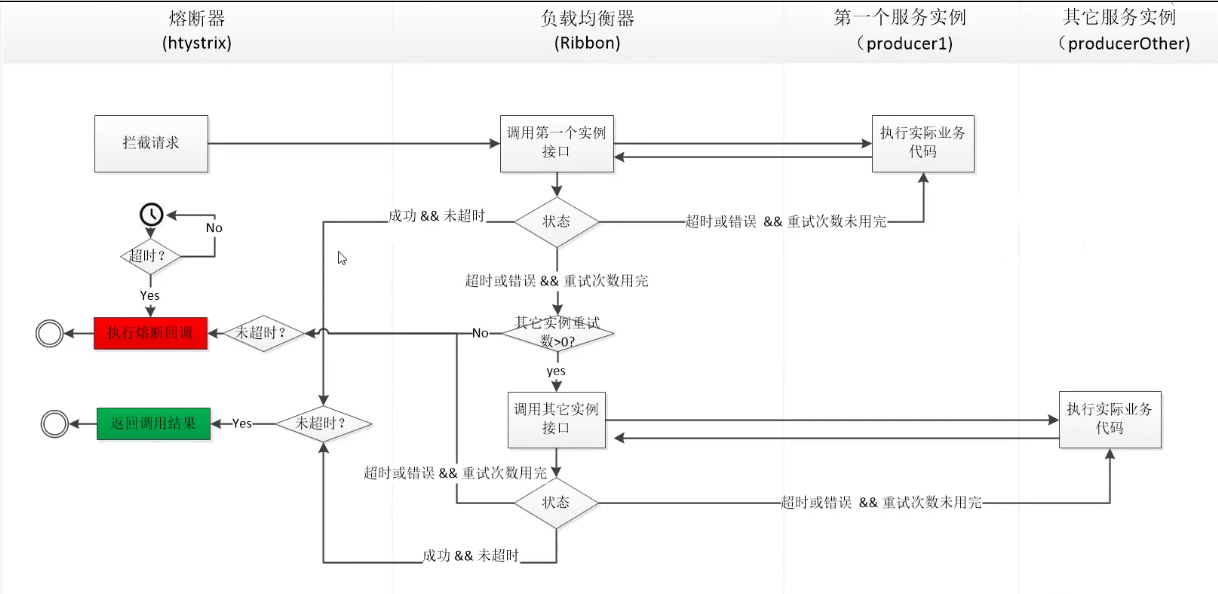
### hystrix ribbon活動圖
### hystrix ribbon配置
```
#設置最大容錯超時時間
hystrix.command.default.execution.isolation.thread.timeoutInMilliseconds: 90000
#設置最大超時時間
ribbon:
eager-load:
enabled: true
ServerListRefreshInterval: 10 #刷新服務列表源的間隔時間
httpclient:
enabled: false
okhttp:
enabled: true
ReadTimeout: 90000
ConnectTimeout: 90000
OkToRetryOnAllOperations: true
MaxAutoRetries: 1
MaxAutoRetriesNextServer: 1
```
## 源碼分析
### zuul內部代碼
### 類圖
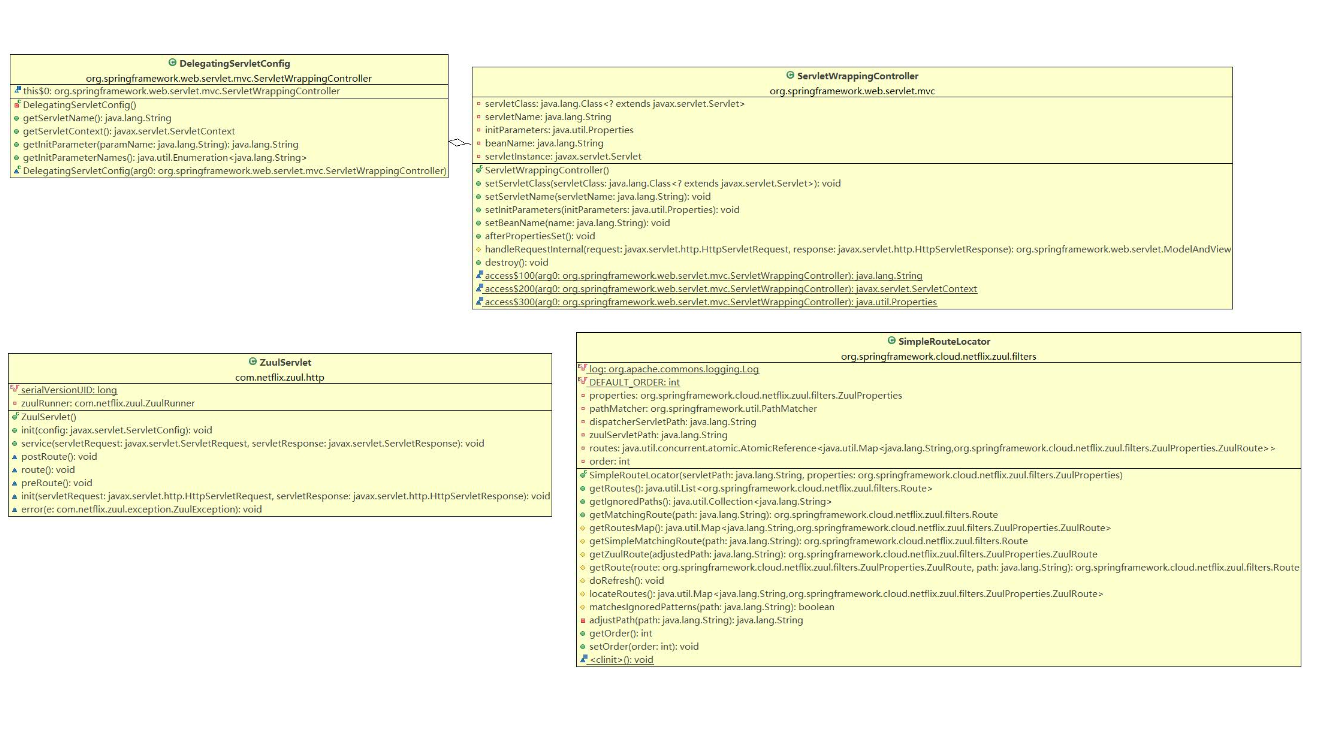
參考:https://www.jianshu.com/p/295e51bc1518
## zuul基于eureka的服務發現路由
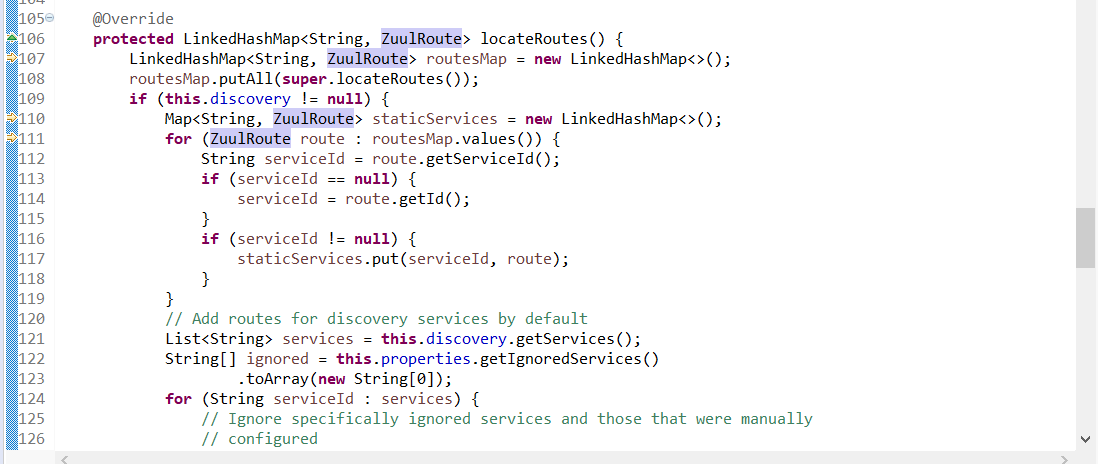
#### 路由注冊相關邏輯
org.springframework.cloud.netflix.zuul.filters.discovery.DiscoveryClientRouteLocator

啟動時配置mapping等信息
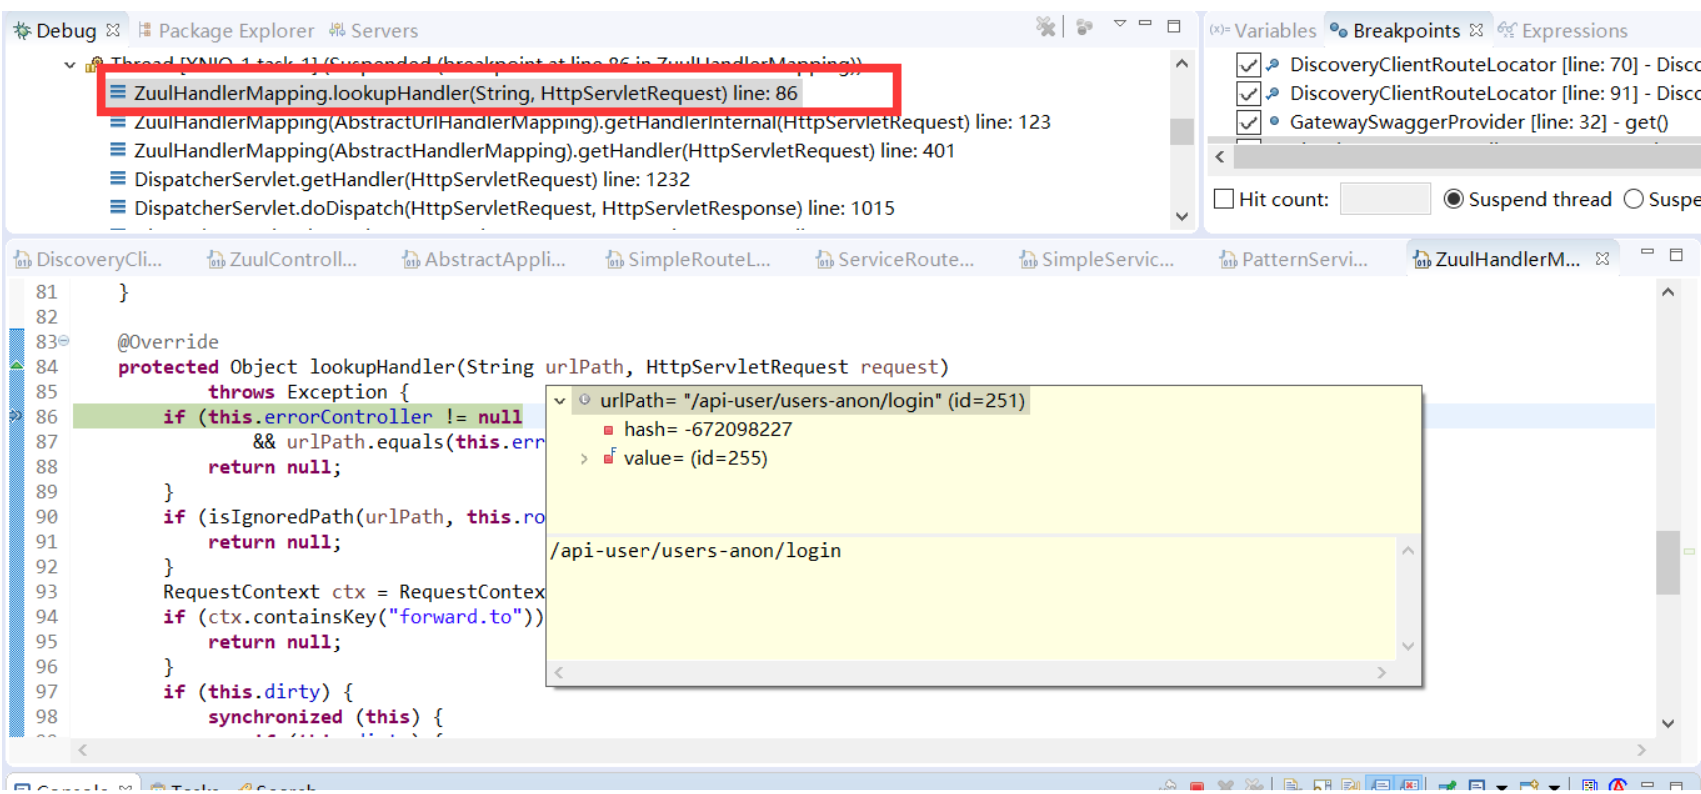
#### zuul轉發邏輯
以訪問[http://127.0.0.1:9200/api-user/users-anon/login?username=admin](http://127.0.0.1:9200/api-user/users-anon/login?username=admin)為例
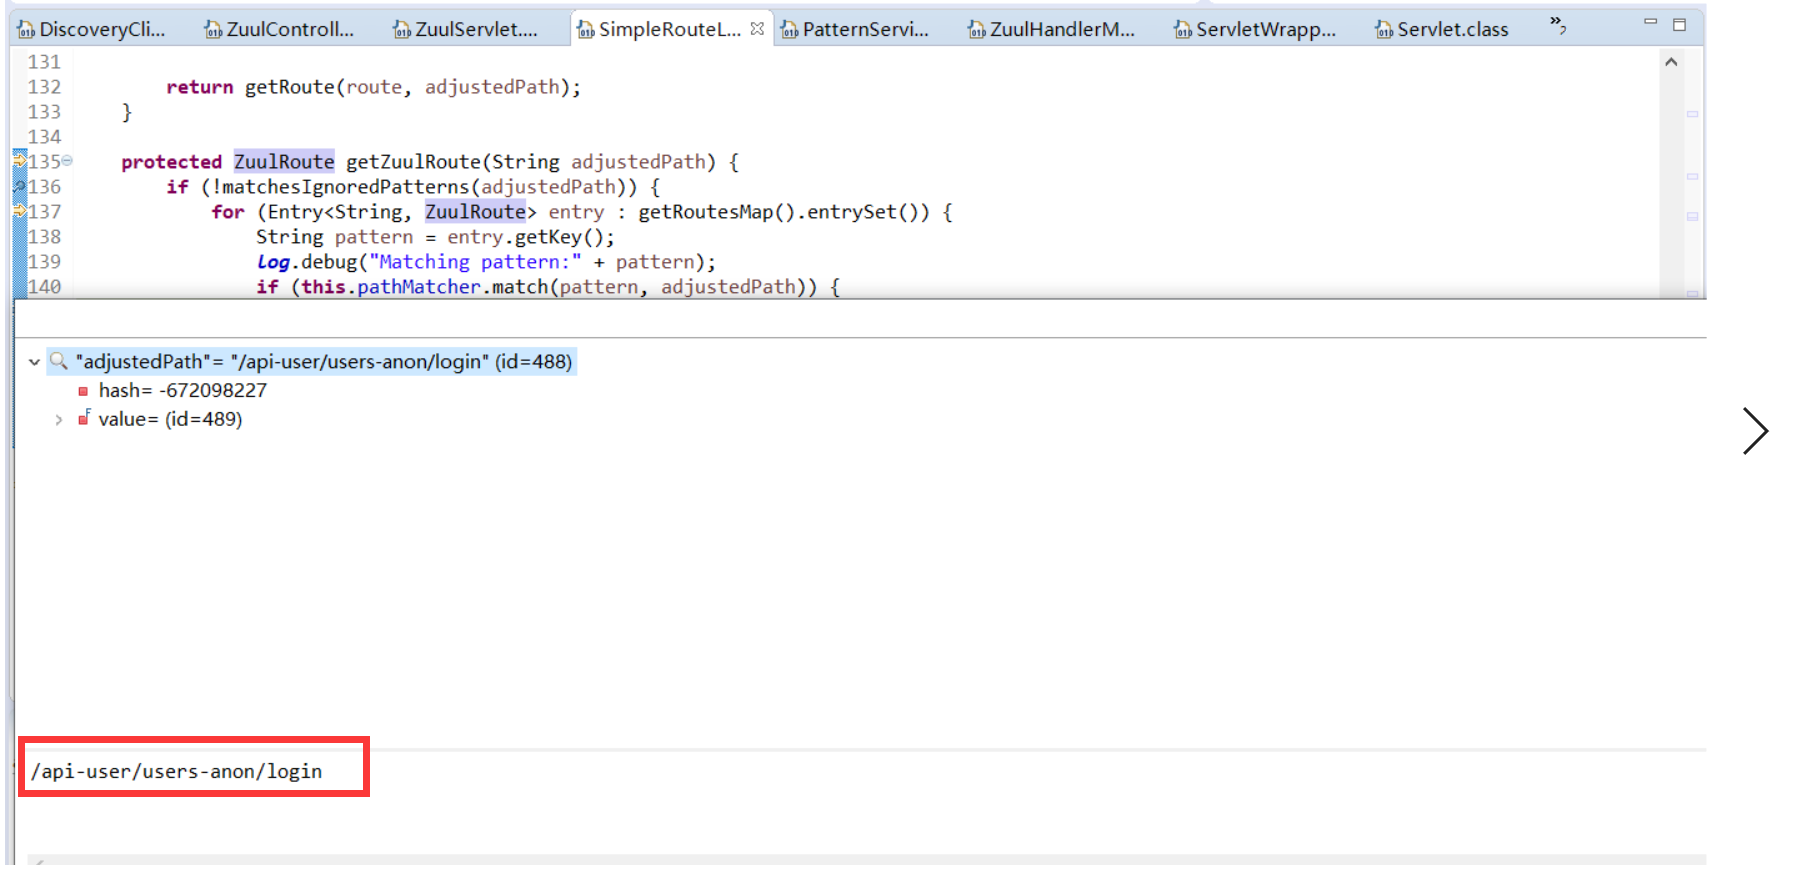
* 通過/api-user/users-anon/login查映射表
* 找到ZuulRoute映射關系
* 執行pre過濾器org.springframework.cloud.netflix.zuul.filters.pre.PreDecorationFilter處理是否增加請求頭等信息
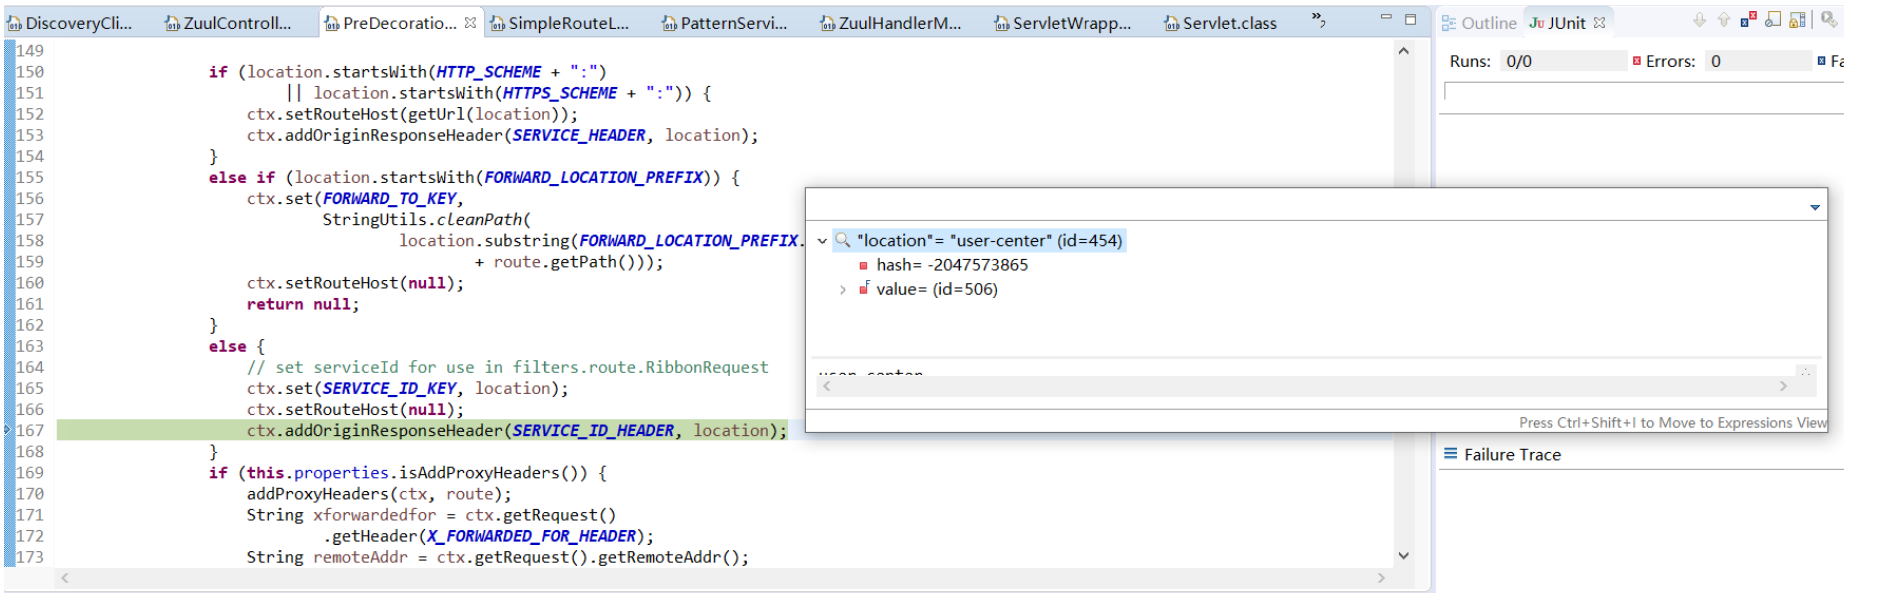
* 執行route過濾器
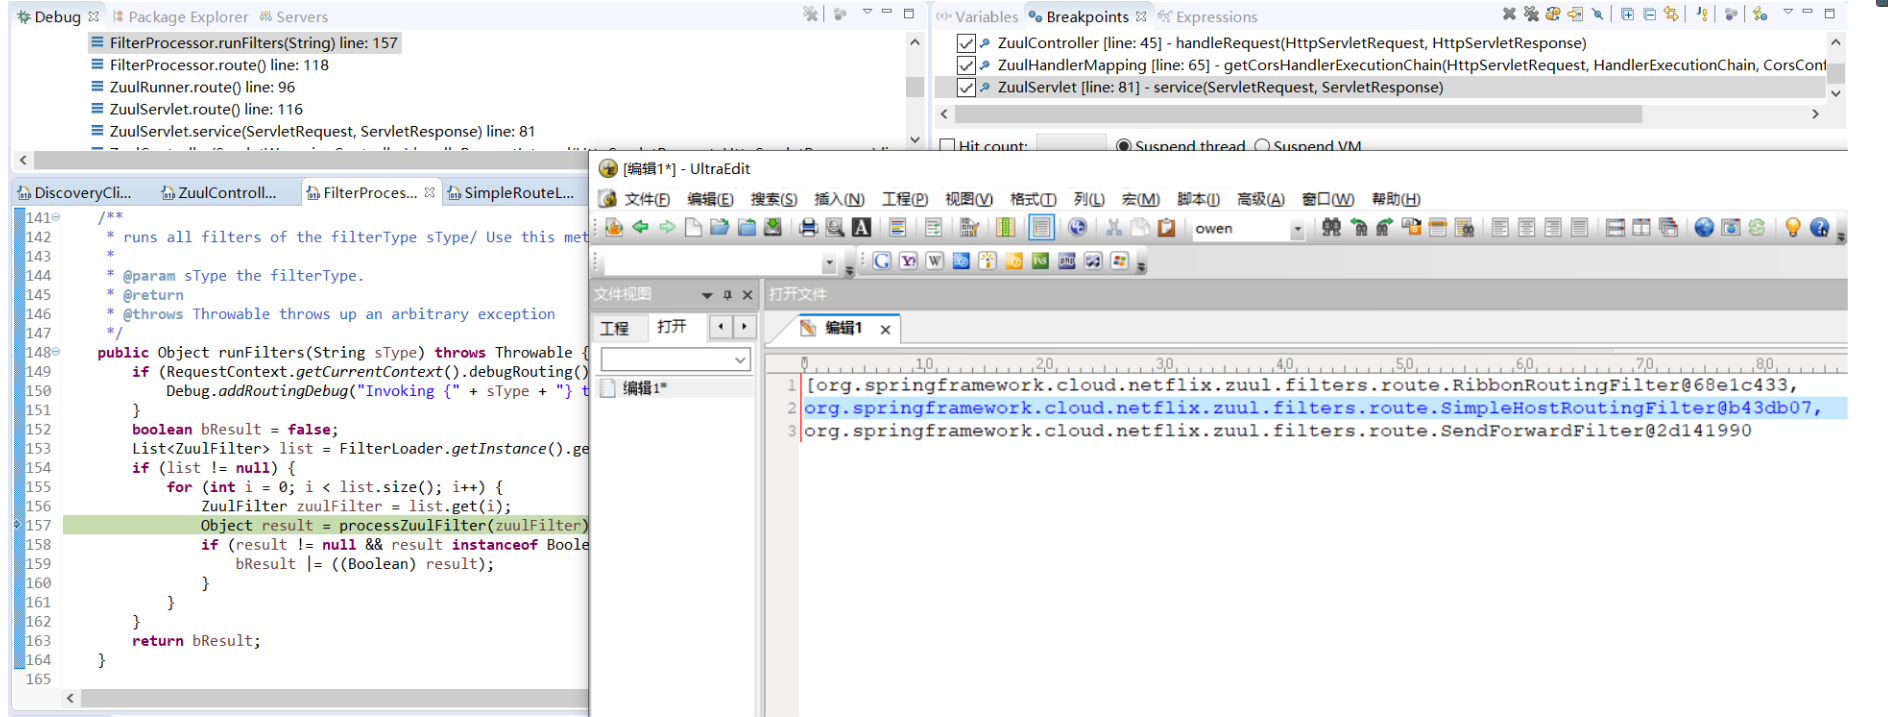
* org.springframework.cloud.netflix.zuul.filters.route.RibbonRoutingFilter

#### 總結

* pre:這種過濾器在請求被轉發之前調用,一般用來實現身份驗證等
* routing:這種路由是用來路由到不同的后端服務的,底層可以使用httpclient或者ribbon請求微服務
* post:當請求轉發到微服務以后,會調用當前類型的過濾器。通常用來為響應天啊及標椎的HTTP Header、收集統計信息,等
* error:當發生錯誤是執行的過濾器
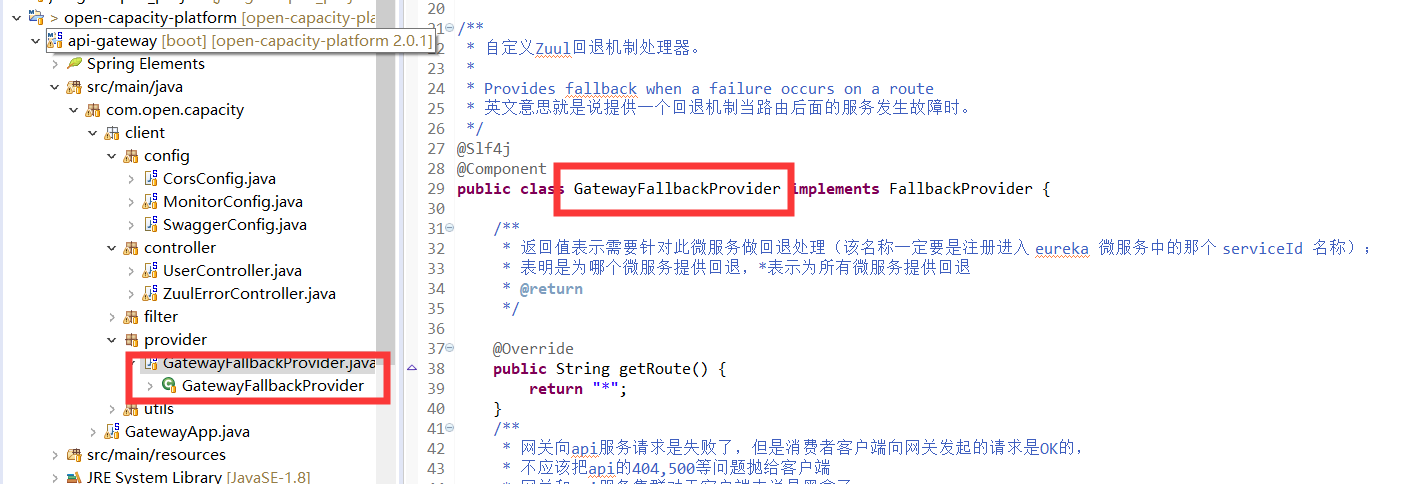
## 網關自定義過濾器
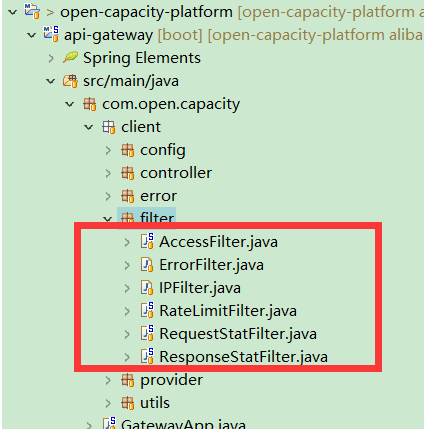

* brave.servlet.TracingFilter :生成traceId
* com.open.capacity.common.filter.TraceContextFilter:傳遞traceId
* com.open.capacity.client.filter.AccessFilter:傳遞token
* com.open.capacity.client.filter.RequestStatFilter::傳遞traceId
* com.open.capacity.client.filter.ResponseStatFilter:響應頭增加traceId
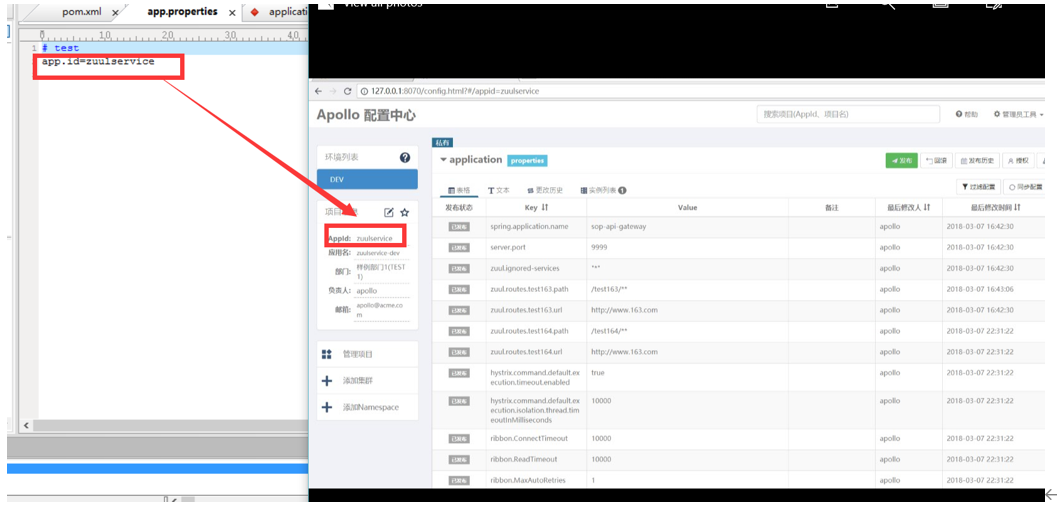
## 基于阿波羅配置中心的動態路由
參考代碼:https://gitee.com/owenwangwen/config-center/tree/master/apollo-gateway

### 阿波羅官方已吸收此案例在github可下載
https://github.com/ctripcorp/apollo-use-cases/tree/master/spring-cloud-zuul/src/main/java/com/ctrip/framework/apollo/use/cases/spring/cloud/zuul
* 創建項目
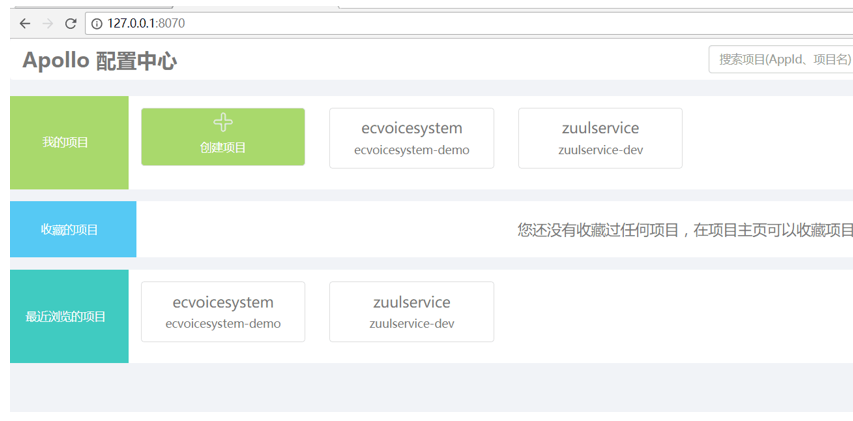
* 創建配置
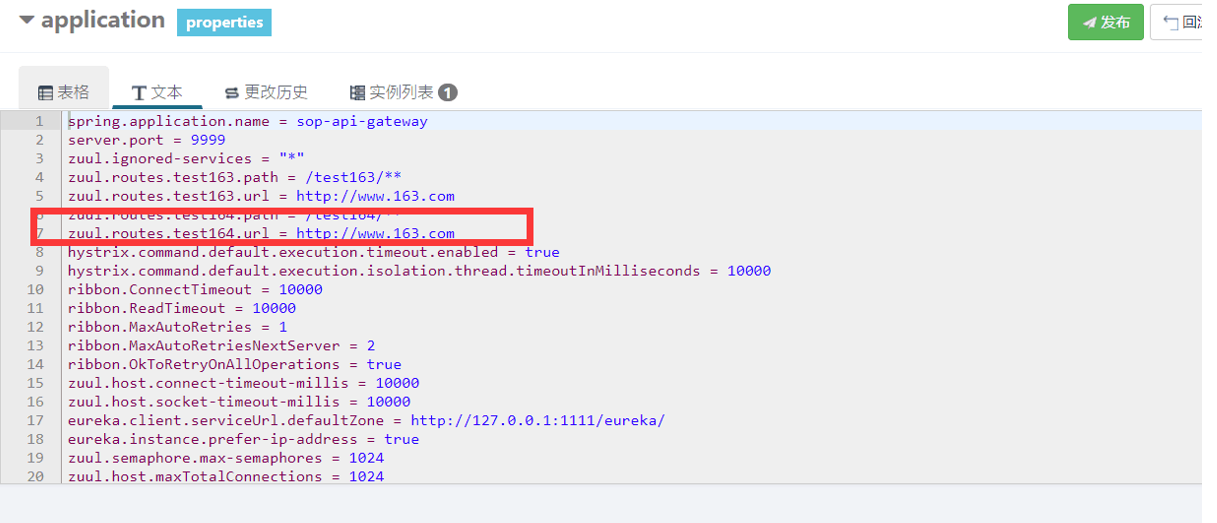
* 項目綁定配置
## api-gateway 構建資源服務器
```
<!-- 資源服務器 -->
<dependency>
<groupId>com.open.capacity</groupId>
<artifactId>uaa-client-spring-boot-starter</artifactId>
</dependency>
```
[uaa-client-spring-boot-starter源碼分析](http://www.hmoore.net/owenwangwen/open-capacity-platform/1234951)
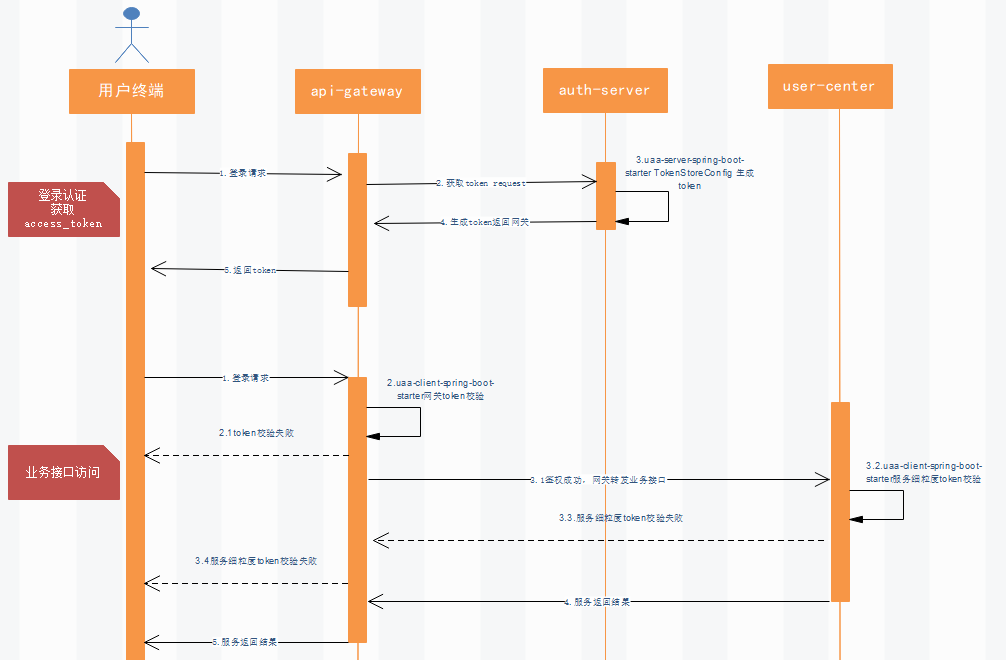
### 網關認證處理流程圖

### 網關白名單
```
security:
oauth2:
ignored: /test163/** , /api-auth/** , /doc.html ,/test111 ,/api-user/users-anon/login, /api-user/users/save, /user-center/users-anon/login,/document.html,**/v2/api-docs,/oauth/** ,/login.html ,/user/login,/**/**.css ,/**/**.js ,/getVersion
token:
store:
type: redis
```
### 網關統一異常
### 認證處理核心代碼
```
public Authentication authenticate(Authentication authentication) throws AuthenticationException {
if (authentication == null) {
throw new InvalidTokenException("Invalid token (token not found)");
}
String token = (String) authentication.getPrincipal();
OAuth2Authentication auth = tokenServices.loadAuthentication(token);
if (auth == null) {
throw new InvalidTokenException("Invalid token: " + token);
}
Collection<String> resourceIds = auth.getOAuth2Request().getResourceIds();
if (resourceId != null && resourceIds != null && !resourceIds.isEmpty() && !resourceIds.contains(resourceId)) {
throw new OAuth2AccessDeniedException("Invalid token does not contain resource id (" + resourceId + ")");
}
checkClientDetails(auth);
if (authentication.getDetails() instanceof OAuth2AuthenticationDetails) {
OAuth2AuthenticationDetails details = (OAuth2AuthenticationDetails) authentication.getDetails();
// Guard against a cached copy of the same details
if (!details.equals(auth.getDetails())) {
// Preserve the authentication details from the one loaded by token services
details.setDecodedDetails(auth.getDetails());
}
}
auth.setDetails(authentication.getDetails());
auth.setAuthenticated(true);
return auth;
```
### 授權流程

### 啟用授權

```
@Bean
public OAuth2WebSecurityExpressionHandler oAuth2WebSecurityExpressionHandler(ApplicationContext applicationContext) {
OAuth2WebSecurityExpressionHandler expressionHandler = new OAuth2WebSecurityExpressionHandler();
expressionHandler.setApplicationContext(applicationContext);
return expressionHandler;
}
```
## 網關認證授權總結

* 訪問者(Accessor)需要訪問某個資源(Resource)是這個場景最原始的需求,但并不是誰都可以訪問資源,也不是任何資源都允許任何人來訪問,所以中間我們要加入一些檢查和防護
* 在訪問資源的所經之路上,可能遇到細菌,病毒,不管怎么樣,對于要防護的資源來說最好的方法就是設關卡點,對于上圖的FilterSecurityInvation,MethodIncation,Jointpoint,這些在spring security oauth中統稱SecuredObjects
* 我們知道在哪里設置關卡點最合適,下一步就是設置關卡,對應FileSecurityInterceptor,MethodSecurityInterceptor,AspectSecurityInterceptor,
這些關卡統一的抽象類是AbstractSecurityInterceptor
* 有關卡點,關卡了以后,到底誰該攔截誰不應該呢,spring security oauth中由 AccessDecisionManager控制
* 最后一個問題,這個誰怎么定義,我們總得知道當前這個訪問者是誰才能告訴AccessDecisionManager攔截還是放行,在spring security oauth框架中AuthenticationManager將解決訪問者身份認證問題,只有確定你在冊了,才可以給授權訪問。AuthenticationManager,AccessDecisionManager,AbstractSecurityInterceptor屬于spring security框架的基礎鐵三角。
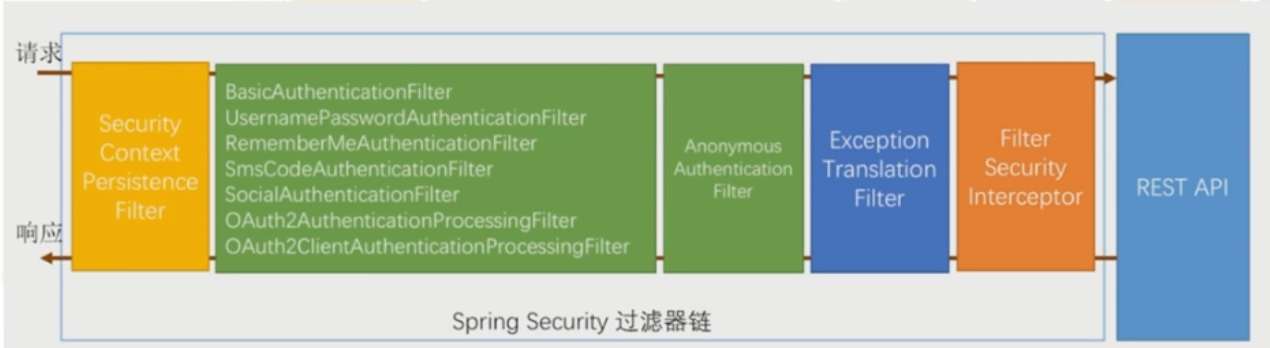
* 有了以上骨架,真正執行防護任務的其實是SecurityFilterChain中定于的一系列Filter,其中ExceptionTranslationFilter,它負責接待或者送客,如果訪問者來訪,對方沒有報上名來,那么,它就會讓訪客去登記認證(找AuthenticationManager做認證),如果對方報上名了,但認證失敗,那么請重新認證送客,送客的方式是拋出相應的Exception,所以名字叫做ExceptionTranslationFilter。
* 最后,這個filter序列中可能不滿足我們的需求,比如增加驗證碼,所以我們需要在其中穿插自己的Filter實現類,為定制和擴展Spring Security Oauth的防護體系。
* spring security內置的filter序列
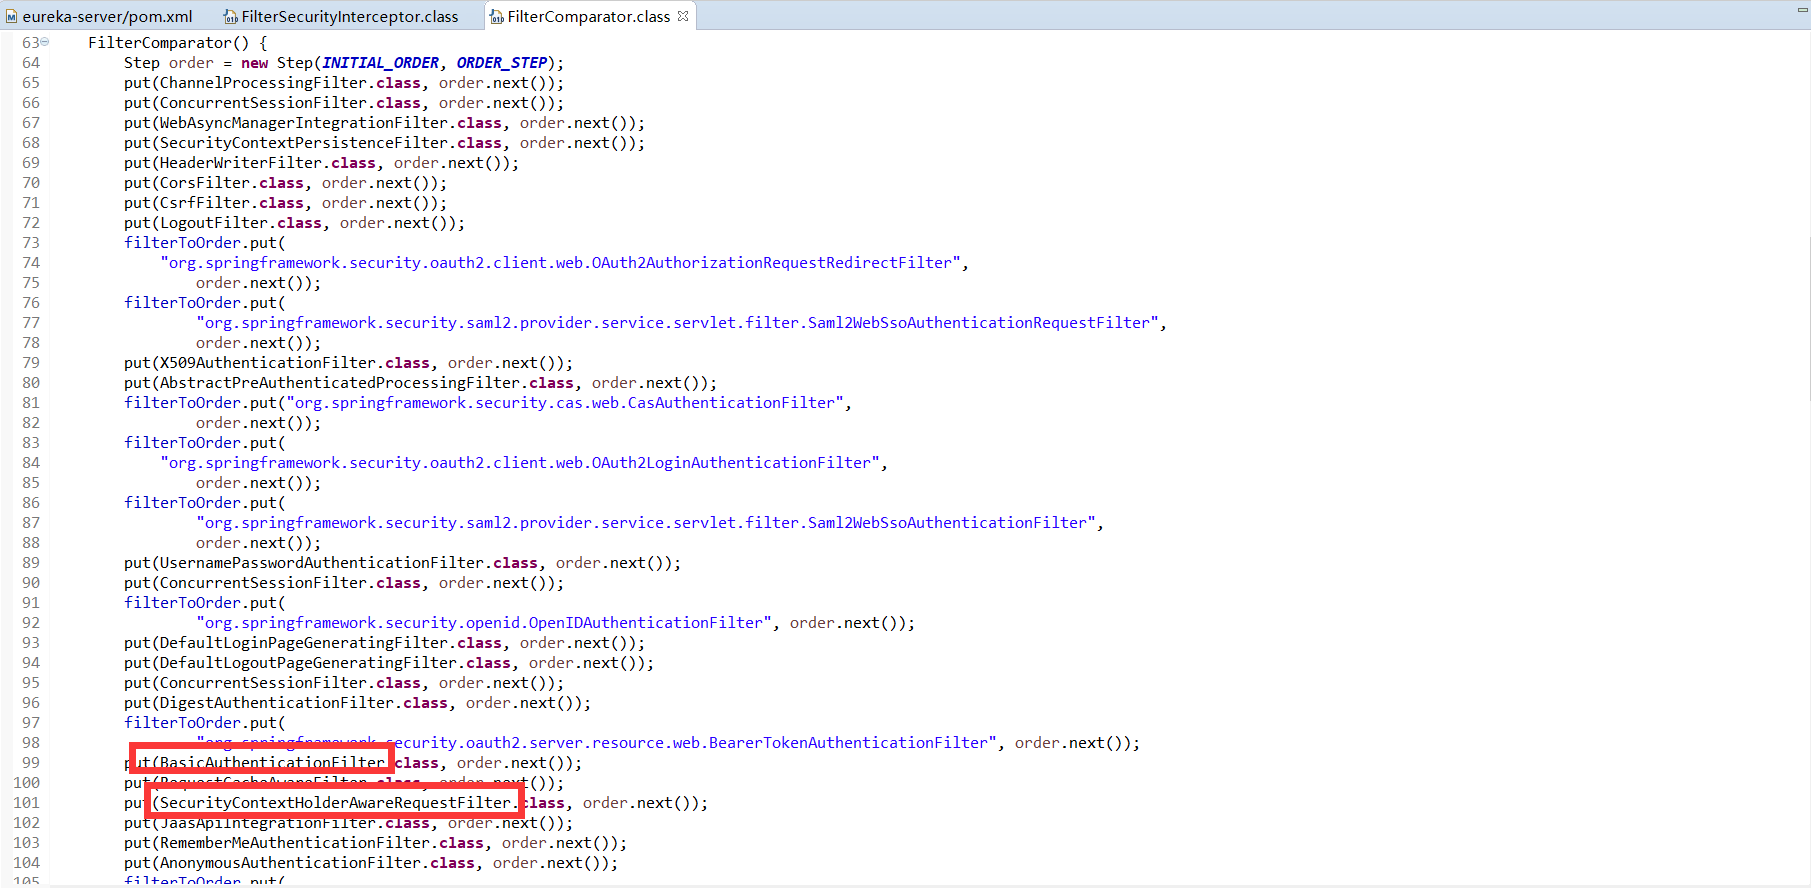
* 執行過濾鏈
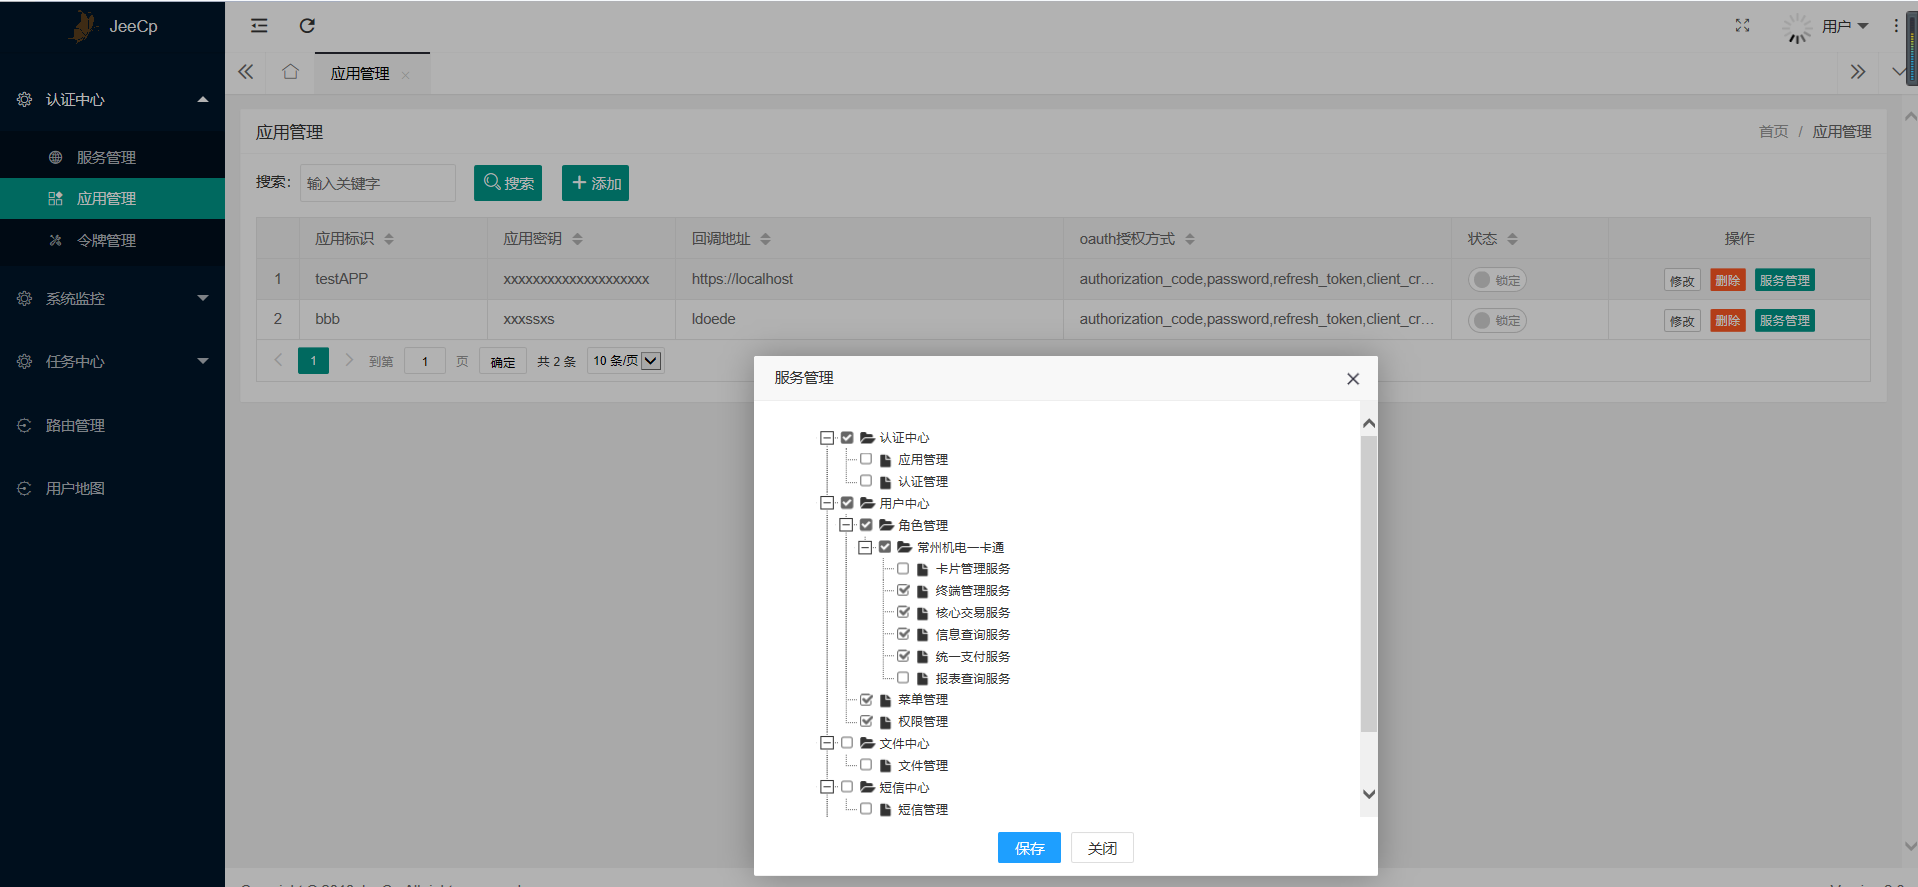
## 網關api權限設計
相同用戶,不同應用的權限隔離
客戶端模式 :
客戶端A 申請的token ,可以訪問/api-user/menu/current ,
客戶端B 申請的token,不讓訪問/api-user/menu/current
密碼模式:
客戶端模式 :
客戶端A admin用戶 申請的token ,可以訪問/api-user/menu/current ,
客戶端B admin用戶 申請的token,不讓訪問/api-user/menu/current
參考issue:[https://gitee.com/owenwangwen/open-capacity-platform/issues/IRG23]()
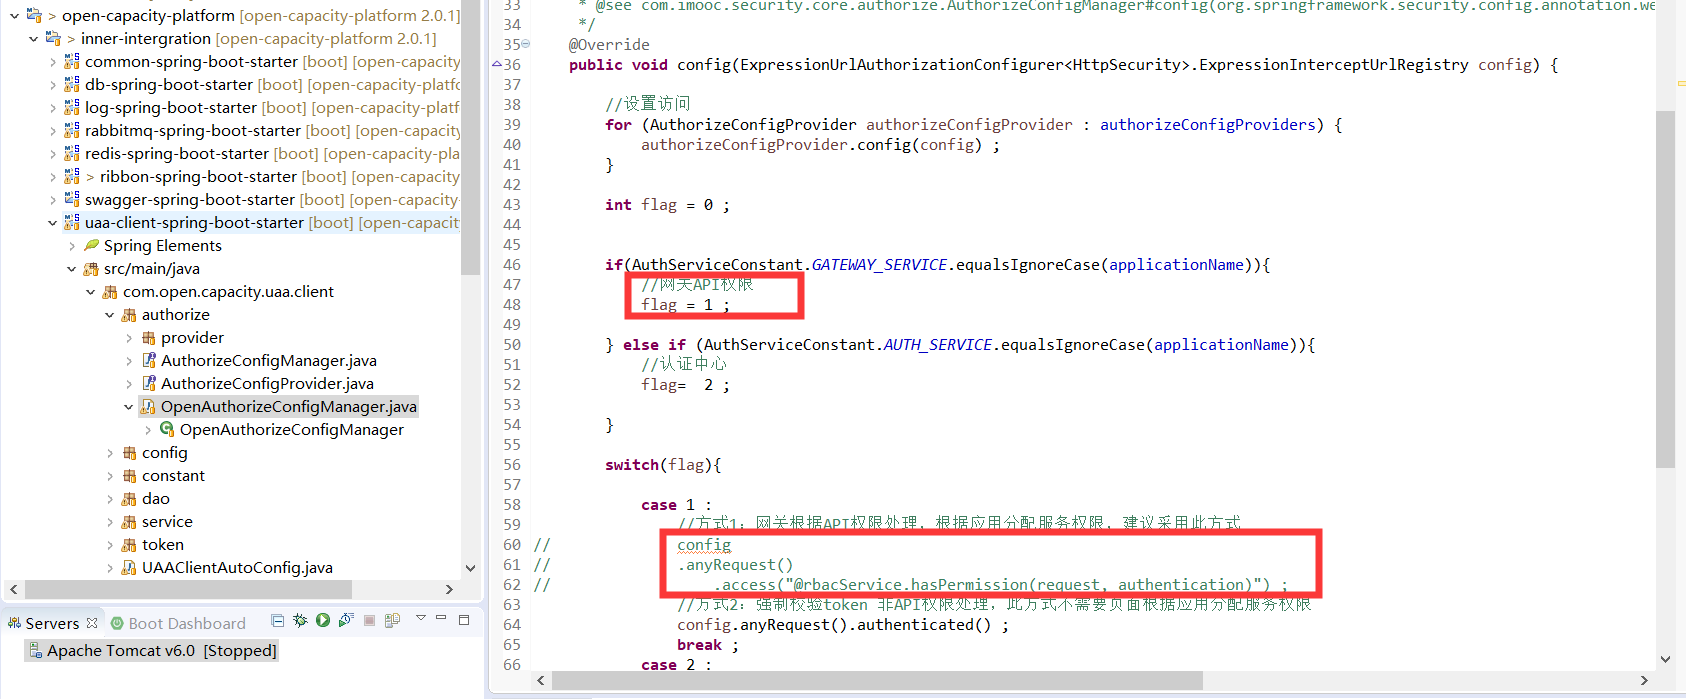
網關引依賴

網關是否開啟基于應用隔離,代碼注釋了,只是基于token的合法性校驗,按建議開啟是否啟用api接口服務權限
OpenAuthorizeConfigManager
> 游樂場買了通票,有些地方可以隨便玩,有些地方另外
> 單獨校驗買票
> config.anyRequest().authenticated() ;
> //這種通票,token校驗正確訪問
> config.anyRequest().access("@rbacService.hasPermission(request, authentication)"); //這種另外
> 單獨校驗,適用于網關對api權限校驗
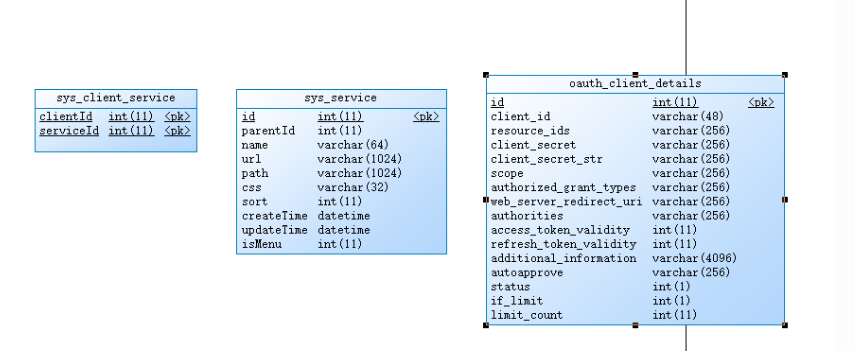
通過clientID隔離服務權限
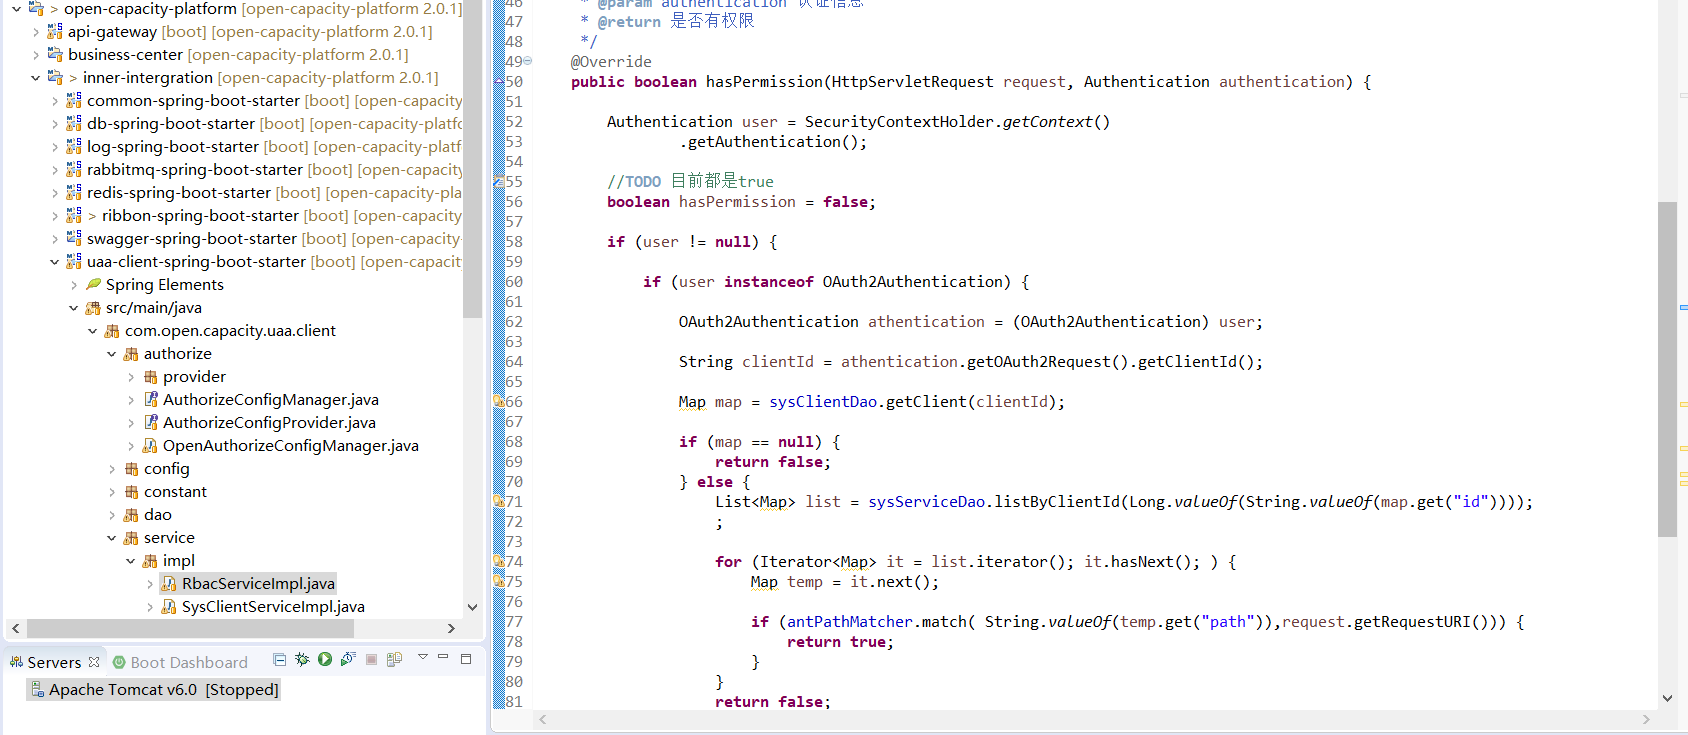
(最新代碼從新封裝到網關,RbacService適用于api-gateway的api權限設計
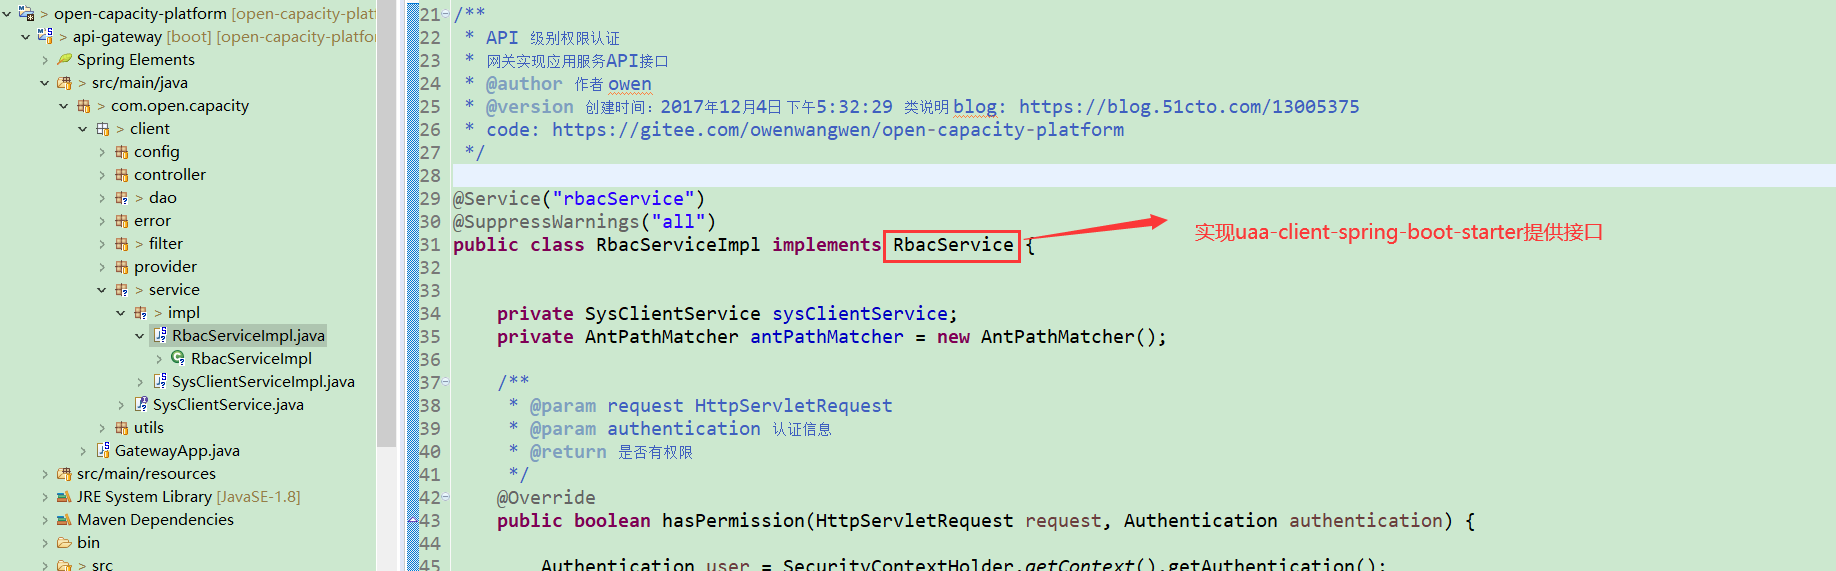)
通過應用分配服務權限
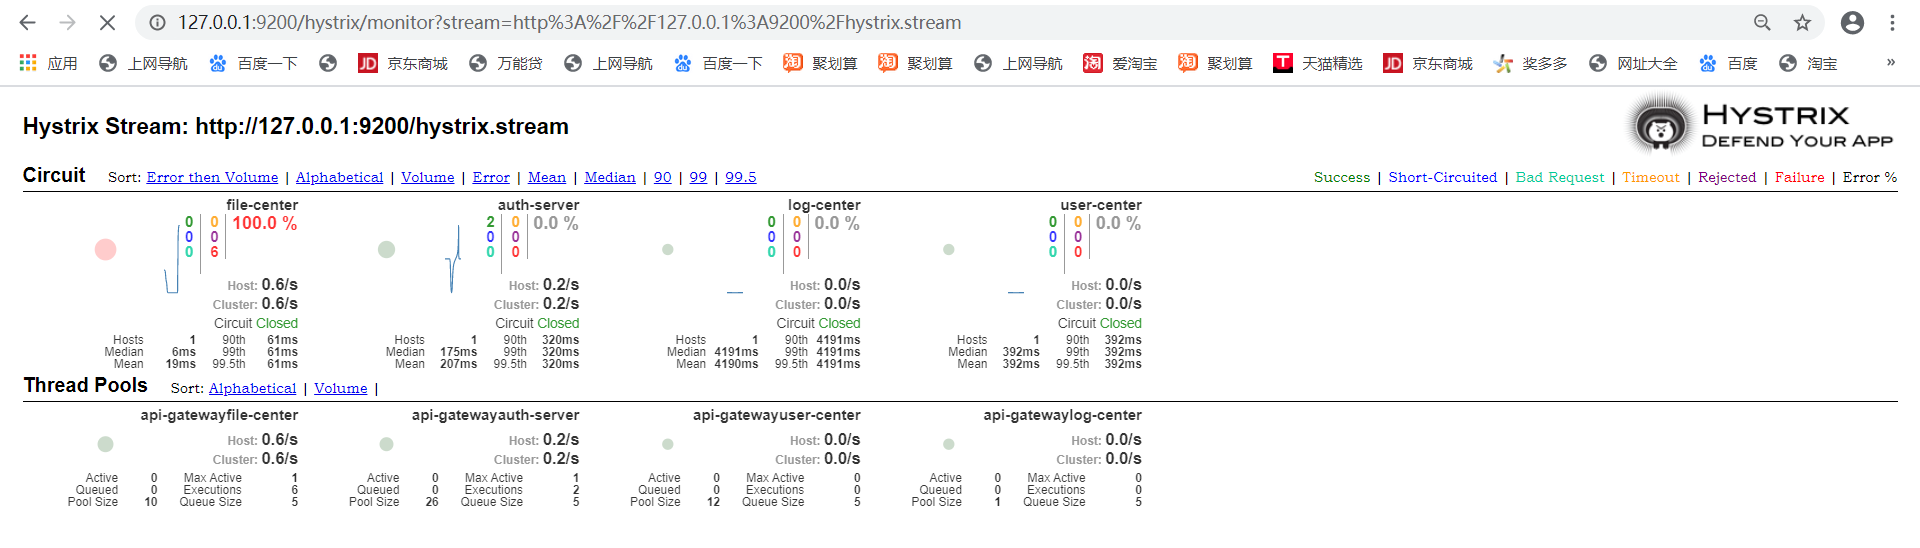
## 網關hystrix-dashboard
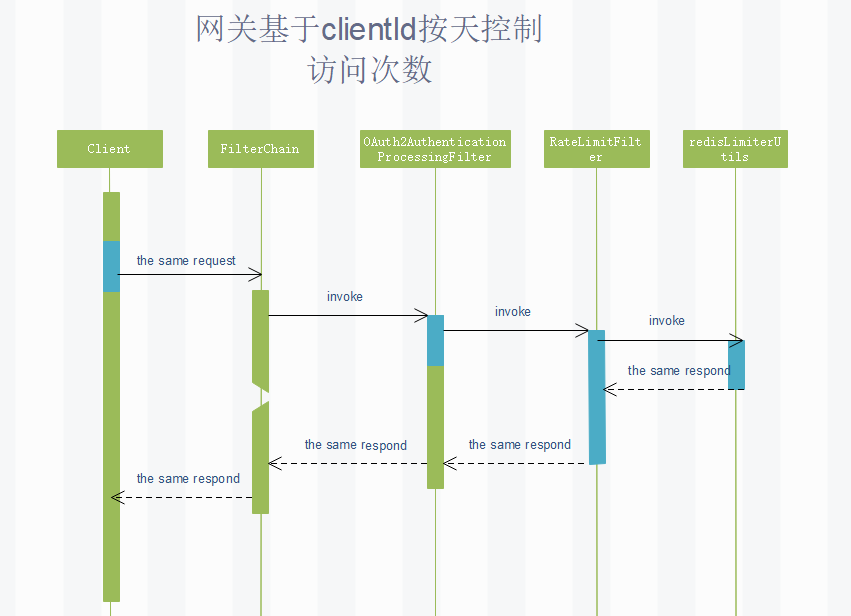
## api-gateway 應用訪問次數控制
### oauth_client_details 增加
| 字段 | 備注 |
| --- | --- |
| if_limit| 是否需要控制訪問次數 |
| limit_count| 訪問閥值 |

### auth-server 啟動
#### redis存儲結構
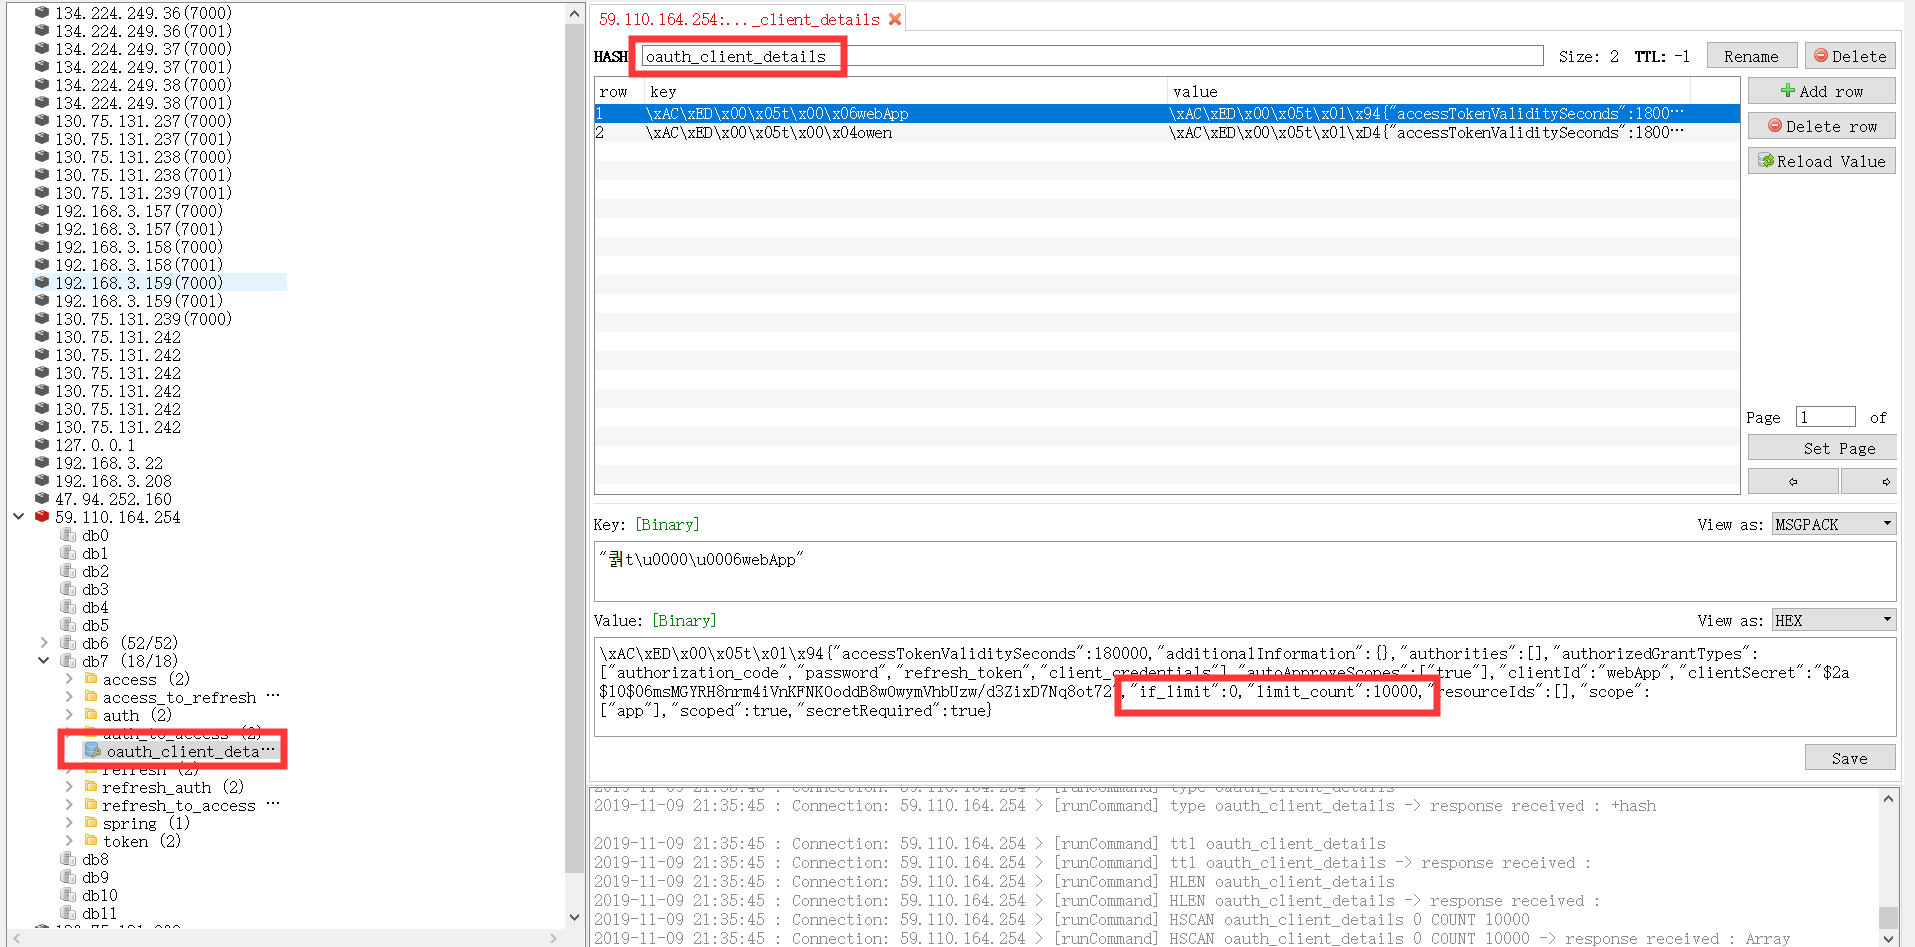
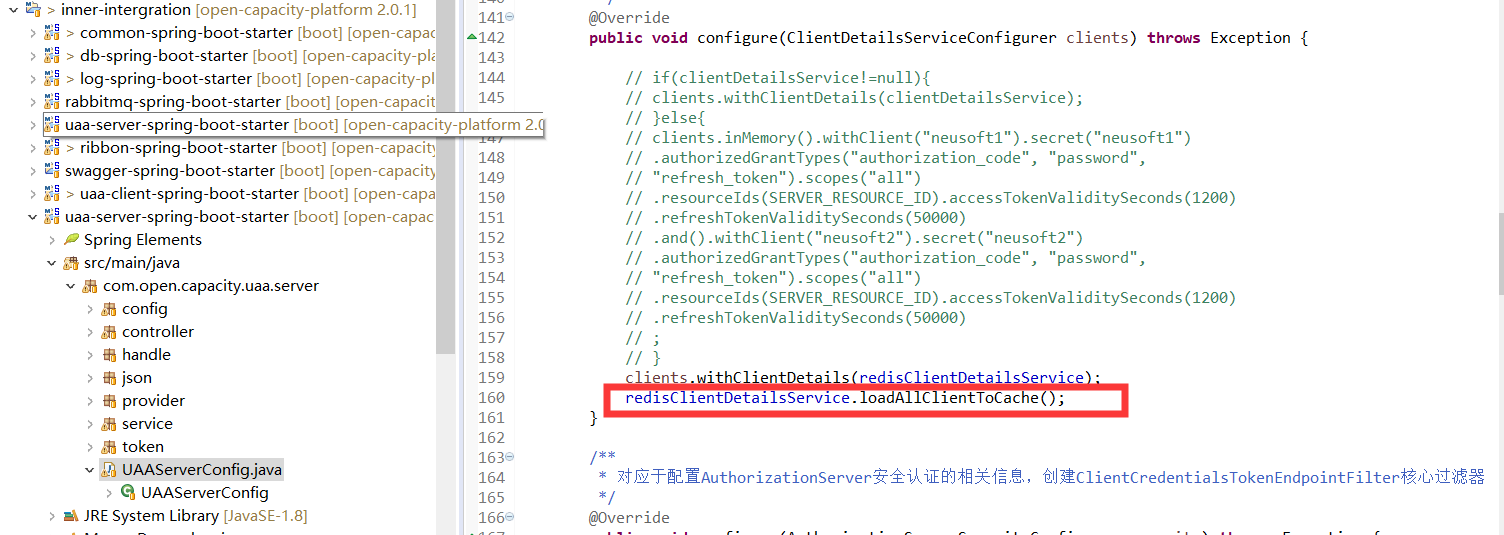
#### 加載oauth_client_details 到redis
#### 應用訪問次數控制過濾器
```
/**
* Created by owen on 2017/9/10. 根據應用 url 限流 oauth_client_details if_limit 限流開關
* limit_count 閾值
*/
@Component
public class RateLimitFilter extends ZuulFilter {
private static Logger logger = LoggerFactory.getLogger(RateLimitFilter.class);
private ThreadLocal<Result> error_info = new ThreadLocal<Result>();
@Autowired
private RedisLimiterUtils redisLimiterUtils;
@Autowired
private ObjectMapper objectMapper;
@Resource
SysClientServiceImpl sysClientServiceImpl;
@Override
public String filterType() {
return "pre";
}
@Override
public int filterOrder() {
return 0;
}
@Override
public boolean shouldFilter() {
return true;
}
@Override
public Object run() {
try {
RequestContext ctx = RequestContext.getCurrentContext();
HttpServletRequest request = ctx.getRequest();
if (!checkLimit(request)) {
logger.error("too many requests!");
error_info.set(Result.failedWith(null, 429, "too many requests!"));
serverResponse(ctx, 429);
return null;
}
} catch (Exception e) {
e.printStackTrace();
}
return null;
}
/***
* 統一禁用輸出
*
* @param ctx
* @param ret_message
* 輸出消息
* @param http_code
* 返回碼
*/
public void serverResponse(RequestContext ctx, int http_code) {
try {
ctx.setSendZuulResponse(false);
outputChineseByOutputStream(ctx.getResponse(), error_info);
ctx.setResponseStatusCode(http_code);
} catch (IOException e) {
StackTraceElement stackTraceElement= e.getStackTrace()[0];
logger.error("serverResponse:" + "---|Exception:" +stackTraceElement.getLineNumber()+"----"+ e.getMessage());
}
}
/**
* 使用OutputStream流輸出中文
*
* @param request
* @param response
* @throws IOException
*/
public void outputChineseByOutputStream(HttpServletResponse response, ThreadLocal<Result> data) throws IOException {
/**
* 使用OutputStream輸出中文注意問題: 在服務器端,數據是以哪個碼表輸出的,那么就要控制客戶端瀏覽器以相應的碼表打開,
* 比如:outputStream.write("中國".getBytes("UTF-8"));//使用OutputStream流向客戶端瀏覽器輸出中文,以UTF-8的編碼進行輸出
* 此時就要控制客戶端瀏覽器以UTF-8的編碼打開,否則顯示的時候就會出現中文亂碼,那么在服務器端如何控制客戶端瀏覽器以以UTF-8的編碼顯示數據呢?
* 可以通過設置響應頭控制瀏覽器的行為,例如: response.setHeader("content-type",
* "text/html;charset=UTF-8");//通過設置響應頭控制瀏覽器以UTF-8的編碼顯示數據
*/
OutputStream outputStream = response.getOutputStream();// 獲取OutputStream輸出流
response.setHeader("content-type", "application/json;charset=UTF-8");// 通過設置響應頭控制瀏覽器以UTF-8的編碼顯示數據,如果不加這句話,那么瀏覽器顯示的將是亂碼
/**
* data.getBytes()是一個將字符轉換成字節數組的過程,這個過程中一定會去查碼表,
* 如果是中文的操作系統環境,默認就是查找查GB2312的碼表, 將字符轉換成字節數組的過程就是將中文字符轉換成GB2312的碼表上對應的數字
* 比如: "中"在GB2312的碼表上對應的數字是98 "國"在GB2312的碼表上對應的數字是99
*/
/**
* getBytes()方法如果不帶參數,那么就會根據操作系統的語言環境來選擇轉換碼表,如果是中文操作系統,那么就使用GB2312的碼表
*/
String msg = objectMapper.writeValueAsString(data.get());
byte[] dataByteArr = msg.getBytes("UTF-8");// 將字符轉換成字節數組,指定以UTF-8編碼進行轉換
outputStream.write(dataByteArr);// 使用OutputStream流向客戶端輸出字節數組
}
public boolean checkLimit(HttpServletRequest request) {
// 解決zuul token傳遞問題
Authentication user = SecurityContextHolder.getContext().getAuthentication();
if (user != null) {
if (user instanceof OAuth2Authentication) {
try {
OAuth2Authentication athentication = (OAuth2Authentication) user;
OAuth2AuthenticationDetails details = (OAuth2AuthenticationDetails) athentication.getDetails();
String clientId = athentication.getOAuth2Request().getClientId();
Map client = sysClientServiceImpl.getClient(clientId);
if(client!=null){
String flag = String.valueOf(client.get("if_limit") ) ;
if("1".equals(flag)){
String accessLimitCount = String.valueOf(client.get("limit_count") );
if (!accessLimitCount.isEmpty()) {
Result result = redisLimiterUtils.rateLimitOfDay(clientId, request.getRequestURI(),
Long.parseLong(accessLimitCount));
if (-1 == result.getResp_code()) {
logger.error("token:" + details.getTokenValue() + result.getResp_msg());
// ((ResultMsg)
// this.error_info.get()).setMsg("clientid:" +
// client_id + ":token:" + accessToken + ":" +
// result.getMsg());
// ((ResultMsg) this.error_info.get()).setCode(401);
return false;
}
}
}
}
} catch (Exception e) {
StackTraceElement stackTraceElement= e.getStackTrace()[0];
logger.error("checkLimit:" + "---|Exception:" +stackTraceElement.getLineNumber()+"----"+ e.getMessage());
}
}
}
return true;
}
}
```
#### RedisLimiterUtils核心類

```
@Component
public class RedisLimiterUtils {
public static final String API_WEB_TIME_KEY = "time_key:";
public static final String API_WEB_COUNTER_KEY = "counter_key:";
private static final String EXCEEDS_LIMIT = "規定的時間內超出了訪問的限制!";
private static Logger logger = LoggerFactory.getLogger(RedisLimiterUtils.class);
@Resource
RedisTemplate<Object, Object> redisTemplate;
@Resource(name = "stringRedisTemplate")
ValueOperations<String, String> ops;
@Resource(name = "redisTemplate")
ValueOperations<Object, Object> objOps;
@Resource
RedisUtil redisUtil;
public Result IpRateLimiter(String ip, int limit, int timeout) {
String identifier = UUID.randomUUID().toString();
String time_key = "time_key:ip:" + ip;
String counter_key = "counter_key:ip:" + ip;
if (!redisUtil.hasKey(time_key) || redisUtil.getExpire(time_key) <= 0) {
redisUtil.set(time_key, identifier, timeout);
redisUtil.set(counter_key, 0);
}
if (redisUtil.hasKey(time_key) && redisUtil.incr(counter_key, 1) > limit) {
logger.info(EXCEEDS_LIMIT);
return Result.failedWith(null, -1, EXCEEDS_LIMIT);
}
return Result.succeedWith(null, 0, "調用次數:" + this.ops.get(counter_key) );
}
public Result clientRateLimiter(String clientid, int limit, int timeout) {
String identifier = UUID.randomUUID().toString();
String time_key = "time_key:clientid:" + clientid;
String counter_key = "counter_key:clientid:" + clientid;
if (!redisUtil.hasKey(time_key) || redisUtil.getExpire(time_key) <= 0) {
redisUtil.set(time_key, identifier, timeout);
redisUtil.set(counter_key, 0);
}
if (redisUtil.hasKey(time_key) && redisUtil.incr(counter_key, 1) > limit) {
logger.info(EXCEEDS_LIMIT);
return Result.failedWith(null, -1, EXCEEDS_LIMIT);
}
return Result.succeedWith(null, 0, "調用次數:" + this.ops.get(counter_key) );
}
public Result urlRateLimiter(String path, int limit, int timeout) {
String identifier = UUID.randomUUID().toString();
String time_key = "time_key:path:" + path;
String counter_key = "counter_key:path:" + path;
if (!redisUtil.hasKey(time_key) || redisUtil.getExpire(time_key) <= 0) {
redisUtil.set(time_key, identifier, timeout);
redisUtil.set(counter_key, 0);
}
if (redisUtil.hasKey(time_key) && redisUtil.incr(counter_key, 1) > limit) {
logger.info(EXCEEDS_LIMIT);
return Result.failedWith(null, -1, EXCEEDS_LIMIT);
}
return Result.succeedWith(null, 0, "調用次數:" + this.ops.get(counter_key) );
}
public Result clientPathRateLimiter(String clientid, String access_path, int limit, int timeout) {
String identifier = UUID.randomUUID().toString();
LocalDate today = LocalDate.now();
String time_key = "time_key:clientid:" + clientid + ":path:" + access_path;
String counter_key = "counter_key:clientid:" + clientid + ":path:" + access_path;
if (!redisUtil.hasKey(time_key) || redisUtil.getExpire(time_key) <= 0) {
redisUtil.set(time_key, identifier, timeout);
redisUtil.set(counter_key, 0);
}
if (redisUtil.hasKey(time_key) && redisUtil.incr(counter_key, 1) > limit) {
logger.info(EXCEEDS_LIMIT);
return Result.failedWith(null, -1, EXCEEDS_LIMIT);
}
return Result.succeedWith(null, 0, "調用次數:" + this.ops.get(counter_key) );
}
public Result rateLimitOfDay(String clientid, String access_path, long limit) {
String identifier = UUID.randomUUID().toString();
LocalDate today = LocalDate.now();
String time_key = "time_key:date:" + today + ":clientid:" + clientid + ":path:" + access_path;
String counter_key = "counter_key:date:" + today + ":clientid:" + clientid + ":path:" + access_path;
if (!redisUtil.hasKey(time_key) || redisUtil.getExpire(time_key) <= 0) {
//當天首次訪問,初始化訪問計數=0,有效期24h
redisUtil.set(time_key, identifier, 24 * 60 * 60);
redisUtil.set(counter_key, 0);
}
//累加訪問次數, 超出配置的limit則返回錯誤
if (redisUtil.incr(counter_key, 1) > limit) {
logger.info("日內超出了訪問的限制!");
return Result.failedWith(null, -1, "日內超出了訪問的限制!");
}
return Result.succeedWith(null, 0, "調用總次數:" + this.ops.get(counter_key) );
}
public Result acquireRateLimiter(String clientid, String access_path, int limit, int timeout) {
String identifier = UUID.randomUUID().toString();
LocalDate today = LocalDate.now();
String time_key = "time_key:date:" + today + ":clientid:" + clientid + ":path:" + access_path;
String counter_key = "counter_key:date:" + today + ":clientid:" + clientid + ":path:" + access_path;
if (!redisUtil.hasKey(time_key) || redisUtil.getExpire(time_key) <= 0) {
redisUtil.set(time_key, identifier, timeout);
redisUtil.set(counter_key, 0);
}
if (redisUtil.hasKey(time_key) && redisUtil.incr(counter_key, 1) > limit) {
logger.info(EXCEEDS_LIMIT);
return Result.failedWith(null, -1, EXCEEDS_LIMIT);
}
return Result.succeedWith(null, 0, "調用次數:" + this.ops.get(counter_key) );
}
public void save(String tokenType, String Token, int timeout) {
redisUtil.set(tokenType, Token, timeout);
}
public String getToken(String tokenType) {
return redisUtil.get(tokenType).toString();
}
public void saveObject(String key, Object obj, long timeout) {
redisUtil.set(key, obj, timeout);
}
public void saveObject(String key, Object obj) {
redisUtil.set(key, obj);
}
public Object getObject(String key) {
return redisUtil.get(key);
}
public void removeObject(String key) {
redisUtil.del(key);
}
}
```
## 生產軟負載NGINX構建ZUUL集群
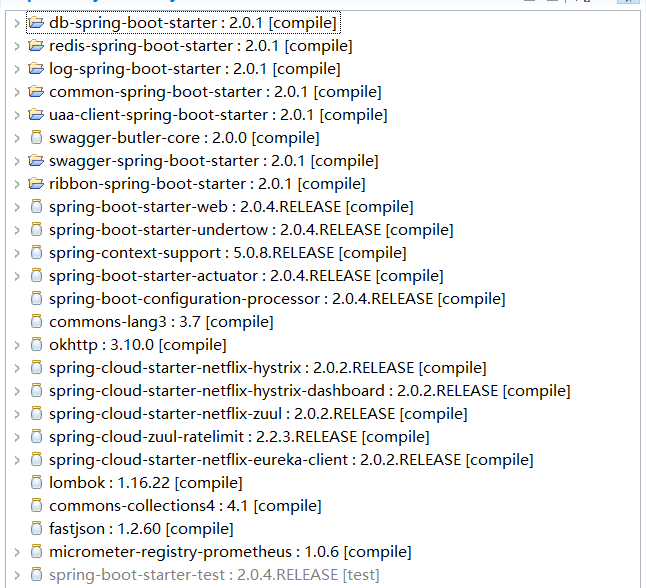
## pom核心依賴
- 前言
- 1.項目說明
- 2.項目更新日志
- 3.文檔更新日志
- 01.快速開始
- 01.maven構建項目
- 02.環境安裝
- 03.STS項目導入
- 03.IDEA項目導入
- 04.數據初始化
- 05.項目啟動
- 06.付費文檔說明
- 02.總體流程
- 1.oauth接口
- 2.架構設計圖
- 3.微服務介紹
- 4.功能介紹
- 5.梳理流程
- 03.模塊詳解
- 01.老版本1.0.1分支模塊講解
- 01.db-core模塊
- 02.api-commons模塊
- 03.log-core模塊
- 04.security-core模塊
- 05.swagger-core模塊
- 06.eureka-server模塊
- 07.auth-server模塊
- 08.auth-sso模塊解析
- 09.user-center模塊
- 10.api-gateway模塊
- 11.file-center模塊
- 12.log-center模塊
- 13.batch-center模塊
- 14.back-center模塊
- 02.spring-boot-starter-web那點事
- 03.自定義db-spring-boot-starter
- 04.自定義log-spring-boot-starter
- 05.自定義redis-spring-boot-starter
- 06.自定義common-spring-boot-starter
- 07.自定義swagger-spring-boot-starter
- 08.自定義uaa-server-spring-boot-starter
- 09.自定義uaa-client-spring-boot-starter
- 10.自定義ribbon-spring-boot-starter
- 11.springboot啟動原理
- 12.eureka-server模塊
- 13.auth-server模塊
- 14.user-center模塊
- 15.api-gateway模塊
- 16.file-center模塊
- 17.log-center模塊
- 18.back-center模塊
- 19.auth-sso模塊
- 20.admin-server模塊
- 21.zipkin-center模塊
- 22.job-center模塊
- 23.batch-center
- 04.全新網關
- 01.基于spring cloud gateway的new-api-gateway
- 02.spring cloud gateway整合Spring Security Oauth
- 03.基于spring cloud gateway的redis動態路由
- 04.spring cloud gateway聚合swagger文檔
- 05.技術詳解
- 01.互聯網系統設計原則
- 02.系統冪等性設計與實踐
- 03.Oauth最簡向導開發指南
- 04.oauth jdbc持久化策略
- 05.JWT token方式啟用
- 06.token有效期的處理
- 07.@PreAuthorize注解分析
- 08.獲取當前用戶信息
- 09.認證授權白名單配置
- 10.OCP權限設計
- 11.服務安全流程
- 12.認證授權詳解
- 13.驗證碼技術
- 14.短信驗證碼登錄
- 15.動態數據源配置
- 16.分頁插件使用
- 17.緩存擊穿
- 18.分布式主鍵生成策略
- 19.分布式定時任務
- 20.分布式鎖
- 21.網關多維度限流
- 22.跨域處理
- 23.容錯限流
- 24.應用訪問次數控制
- 25.統一業務異常處理
- 26.日志埋點
- 27.GPRC內部通信
- 28.服務間調用
- 29.ribbon負載均衡
- 30.微服務分布式跟蹤
- 31.異步與線程傳遞變量
- 32.死信隊列延時消息
- 33.單元測試用例
- 34.Greenwich.RELEASE升級
- 35.混沌工程質量保證
- 06.開發初探
- 1.開發技巧
- 2.crud例子
- 3.新建服務
- 4.區分前后臺用戶
- 07.分表分庫
- 08.分布式事務
- 1.Seata介紹
- 2.Seata部署
- 09.shell部署
- 01.eureka-server
- 02.user-center
- 03.auth-server
- 04.api-gateway
- 05.file-center
- 06.log-center
- 07.back-center
- 08.編寫shell腳本
- 09.集群shell部署
- 10.集群shell啟動
- 11.部署阿里云問題
- 10.網關安全
- 1.openresty https保障服務安全
- 2.openresty WAF應用防火墻
- 3.openresty 高可用
- 11.docker配置
- 01.docker安裝
- 02.Docker 開啟遠程API
- 03.采用docker方式打包到服務器
- 04.docker創建mysql
- 05.docker網絡原理
- 06.docker實戰
- 6.01.安裝docker
- 6.02.管理鏡像基本命令
- 6.03.容器管理
- 6.04容器數據持久化
- 6.05網絡模式
- 6.06.Dockerfile
- 6.07.harbor部署
- 6.08.使用自定義鏡像
- 12.統一監控中心
- 01.spring boot admin監控
- 02.Arthas診斷利器
- 03.nginx監控(filebeat+es+grafana)
- 04.Prometheus監控
- 05.redis監控(redis+prometheus+grafana)
- 06.mysql監控(mysqld_exporter+prometheus+grafana)
- 07.elasticsearch監控(elasticsearch-exporter+prometheus+grafana)
- 08.linux監控(node_exporter+prometheus+grafana)
- 09.micoservice監控
- 10.nacos監控
- 11.druid數據源監控
- 12.prometheus.yml
- 13.grafana告警
- 14.Alertmanager告警
- 15.監控微信告警
- 16.關于接口監控告警
- 17.prometheus-HA架構
- 18.總結
- 13.統一日志中心
- 01.統一日志中心建設意義
- 02.通過ELK收集mysql慢查詢日志
- 03.通過elk收集微服務模塊日志
- 04.通過elk收集nginx日志
- 05.統一日志中心性能優化
- 06.kibana安裝部署
- 07.日志清理方案
- 08.日志性能測試指標
- 09.總結
- 14.數據查詢平臺
- 01.數據查詢平臺架構
- 02.mysql配置bin-log
- 03.單節點canal-server
- 04.canal-ha部署
- 05.canal-kafka部署
- 06.實時增量數據同步mysql
- 07.canal監控
- 08.clickhouse運維常見腳本
- 15.APM監控
- 1.Elastic APM
- 2.Skywalking
- 01.docker部署es
- 02.部署skywalking-server
- 03.部署skywalking-agent
- 16.壓力測試
- 1.ocp.jmx
- 2.test.bat
- 3.壓測腳本
- 4.壓力報告
- 5.報告分析
- 6.壓測平臺
- 7.并發測試
- 8.wrk工具
- 9.nmon
- 10.jmh測試
- 17.SQL優化
- 1.oracle篇
- 01.基線測試
- 02.調優前奏
- 03.線上瓶頸定位
- 04.執行計劃解讀
- 05.高級SQL語句
- 06.SQL tuning
- 07.數據恢復
- 08.深入10053事件
- 09.深入10046事件
- 2.mysql篇
- 01.innodb存儲引擎
- 02.BTree索引
- 03.執行計劃
- 04.查詢優化案例分析
- 05.為什么會走錯索引
- 06.表連接優化問題
- 07.Connection連接參數
- 08.Centos7系統參數調優
- 09.mysql監控
- 10.高級SQL語句
- 11.常用維護腳本
- 12.percona-toolkit
- 18.redis高可用方案
- 1.免密登錄
- 2.安裝部署
- 3.配置文件
- 4.啟動腳本
- 19.消息中間件搭建
- 19-01.rabbitmq集群搭建
- 01.rabbitmq01
- 02.rabbitmq02
- 03.rabbitmq03
- 04.鏡像隊列
- 05.haproxy搭建
- 06.keepalived
- 19-02.rocketmq搭建
- 19-03.kafka集群
- 20.mysql高可用方案
- 1.環境
- 2.mysql部署
- 3.Xtrabackup部署
- 4.Galera部署
- 5.galera for mysql 集群
- 6.haproxy+keepalived部署
- 21.es集群部署
- 22.生產實施優化
- 1.linux優化
- 2.jvm優化
- 3.feign優化
- 4.zuul性能優化
- 23.線上問題診斷
- 01.CPU性能評估工具
- 02.內存性能評估工具
- 03.IO性能評估工具
- 04.網絡問題工具
- 05.綜合診斷評估工具
- 06.案例診斷01
- 07.案例診斷02
- 08.案例診斷03
- 09.案例診斷04
- 10.遠程debug
- 24.fiddler抓包實戰
- 01.fiddler介紹
- 02.web端抓包
- 03.app抓包
- 25.疑難解答交流
- 01.有了auth/token獲取token了為啥還要配置security的登錄配置
- 02.權限數據存放在redis嗎,代碼在哪里啊
- 03.其他微服務和認證中心的關系
- 04.改包問題
- 05.use RequestContextListener or RequestContextFilter to expose the current request
- 06./oauth/token對應代碼在哪里
- 07.驗證碼出不來
- 08./user/login
- 09.oauth無法自定義權限表達式
- 10.sleuth引發線程數過高問題
- 11.elk中使用7x版本問題
- 12.RedisCommandTimeoutException問題
- 13./oauth/token CPU過高
- 14.feign與權限標識符問題
- 15.動態路由RedisCommandInterruptedException: Command interrupted
- 26.學習資料
- 海量學習資料等你來拿
- 27.持續集成
- 01.git安裝
- 02.代碼倉庫gitlab
- 03.代碼倉庫gogs
- 04.jdk&&maven
- 05.nexus安裝
- 06.sonarqube
- 07.jenkins
- 28.Rancher部署
- 1.rancher-agent部署
- 2.rancher-server部署
- 3.ocp后端部署
- 4.演示前端部署
- 5.elk部署
- 6.docker私服搭建
- 7.rancher-server私服
- 8.rancher-agent docker私服
- 29.K8S部署OCP
- 01.準備OCP的構建環境和部署環境
- 02.部署順序
- 03.在K8S上部署eureka-server
- 04.在K8S上部署mysql
- 05.在K8S上部署redis
- 06.在K8S上部署auth-server
- 07.在K8S上部署user-center
- 08.在K8S上部署api-gateway
- 09.在K8S上部署back-center
- 30.Spring Cloud Alibaba
- 01.統一的依賴管理
- 02.nacos-server
- 03.生產可用的Nacos集群
- 04.nacos配置中心
- 05.common.yaml
- 06.user-center
- 07.auth-server
- 08.api-gateway
- 09.log-center
- 10.file-center
- 11.back-center
- 12.sentinel-dashboard
- 12.01.sentinel流控規則
- 12.02.sentinel熔斷降級規則
- 12.03.sentinel熱點規則
- 12.04.sentinel系統規則
- 12.05.sentinel規則持久化
- 12.06.sentinel總結
- 13.sentinel整合openfeign
- 14.sentinel整合網關
- 1.sentinel整合zuul
- 2.sentinel整合scg
- 15.Dubbo與Nacos共存
- 31.Java源碼剖析
- 01.基礎數據類型和String
- 02.Arrays工具類
- 03.ArrayList源碼分析
- 32.面試專題匯總
- 01.JVM專題匯總
- 02.多線程專題匯總
- 03.Spring專題匯總
- 04.springboot專題匯總
- 05.springcloud面試匯總
- 文檔問題跟蹤處理