## 原理
[14.user-center模塊](11.user-center%E6%A8%A1%E5%9D%97.md)
## 改依賴
將eureka-client依賴替換alibaba服務發現組件
```
<!-- 選用nacos時打開-->
<dependency>
<groupId>com.alibaba.cloud</groupId>
<artifactId>spring-cloud-starter-alibaba-nacos-discovery</artifactId>
</dependency>
<!--alibaba sentinel-->
<dependency>
<groupId>com.alibaba.cloud</groupId>
<artifactId>spring-cloud-starter-alibaba-sentinel</artifactId>
</dependency>
<dependency>
<groupId>com.alibaba.cloud</groupId>
<artifactId>spring-cloud-starter-alibaba-nacos-config</artifactId>
</dependency>
```
## 改配置
* eureka client與 nacos client區別
* 使用公共配置
* user-center配置
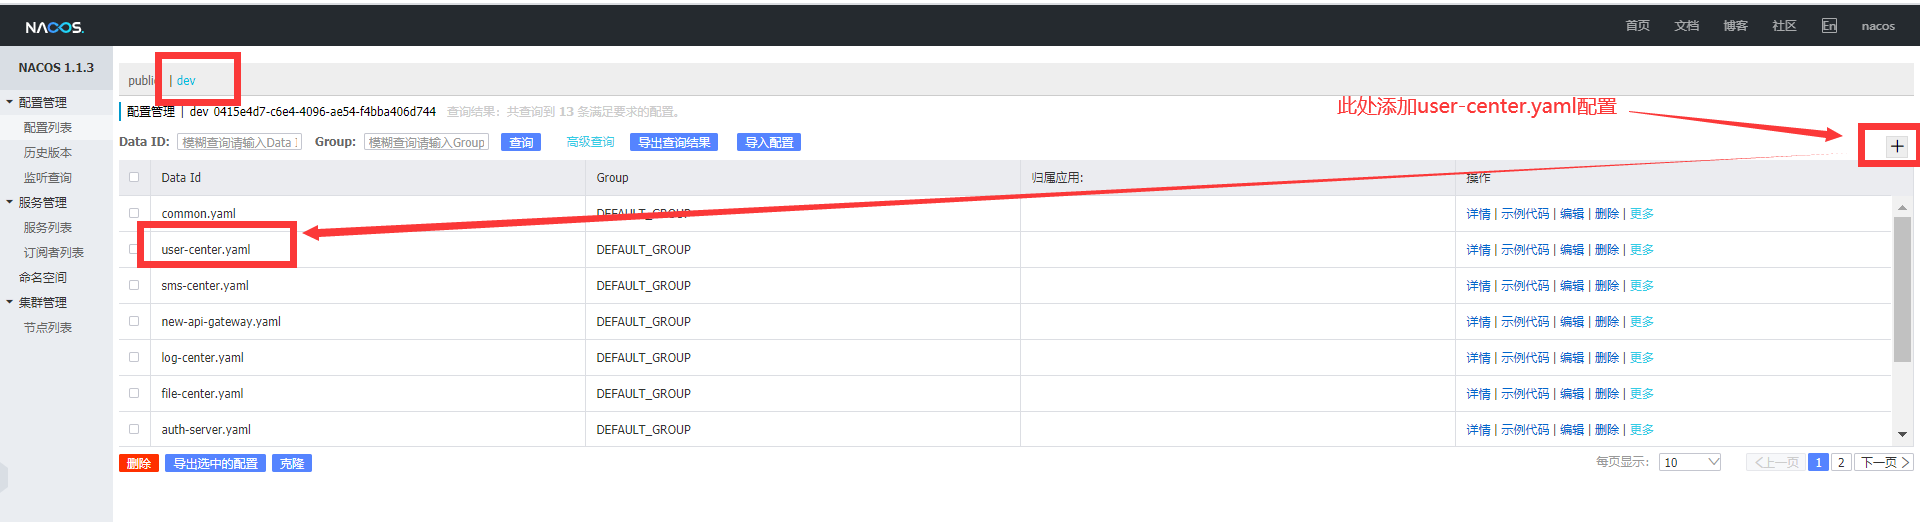
* user-center.yaml
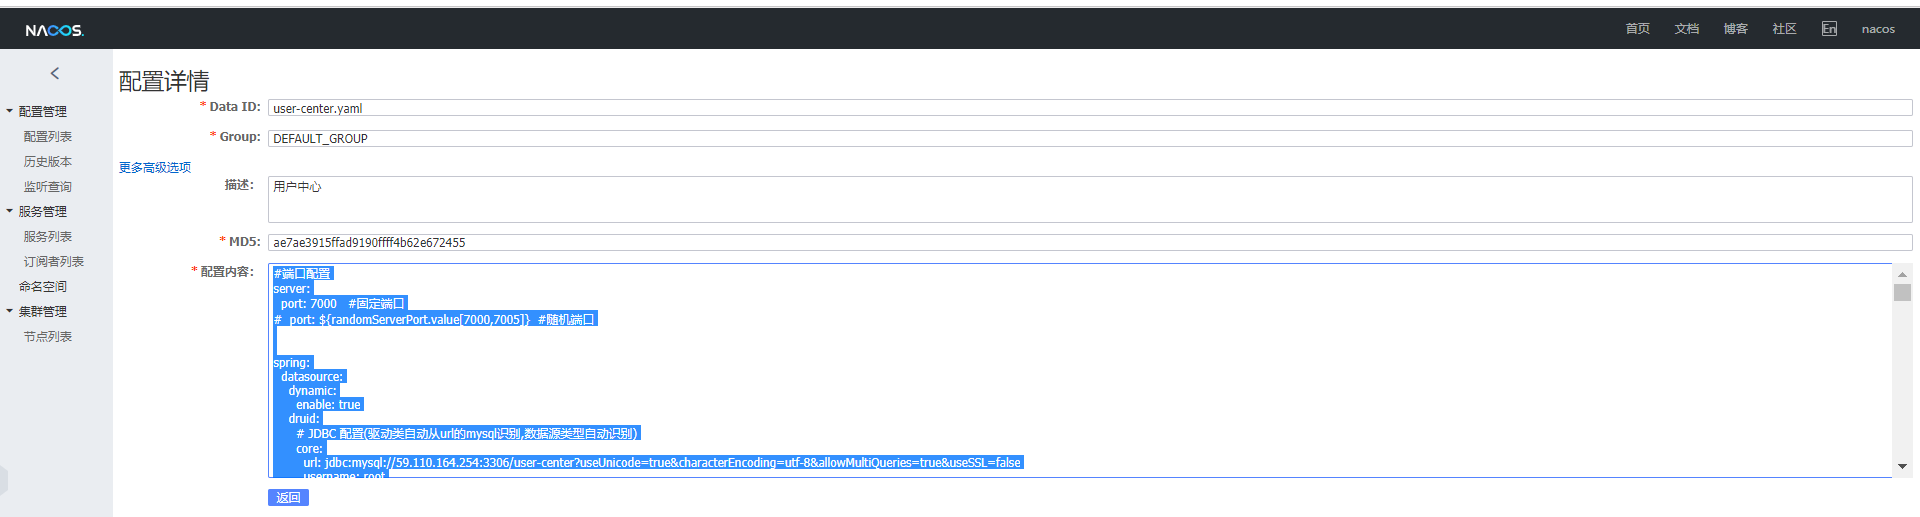
```
#端口配置
server:
port: 7000 #固定端口
# port: ${randomServerPort.value[7000,7005]} #隨機端口
spring:
datasource:
# JDBC 配置(驅動類自動從url的mysql識別,數據源類型自動識別)
url: jdbc:mysql://59.110.164.254:3306/user-center?useUnicode=true&characterEncoding=utf-8&allowMultiQueries=true&useSSL=false
username: root
password: root
driver-class-name: com.mysql.cj.jdbc.Driver
#連接池配置(通常來說,只需要修改initialSize、minIdle、maxActive
initial-size: 1
max-active: 20
min-idle: 1
# 配置獲取連接等待超時的時間
max-wait: 60000
#打開PSCache,并且指定每個連接上PSCache的大小
pool-prepared-statements: true
max-pool-prepared-statement-per-connection-size: 20
validation-query: SELECT 'x'
test-on-borrow: false
test-on-return: false
test-while-idle: true
#配置間隔多久才進行一次檢測,檢測需要關閉的空閑連接,單位是毫秒
time-between-eviction-runs-millis: 60000
#配置一個連接在池中最小生存的時間,單位是毫秒
min-evictable-idle-time-millis: 300000
filters: stat,wall
# WebStatFilter配置,說明請參考Druid Wiki,配置_配置WebStatFilter
#是否啟用StatFilter默認值true
web-stat-filter.enabled: true
web-stat-filter.url-pattern: /*
web-stat-filter.exclusions: "*.js , *.gif ,*.jpg ,*.png ,*.css ,*.ico , /druid/*"
web-stat-filter.session-stat-max-count: 1000
web-stat-filter.profile-enable: true
# StatViewServlet配置
#展示Druid的統計信息,StatViewServlet的用途包括:1.提供監控信息展示的html頁面2.提供監控信息的JSON API
#是否啟用StatViewServlet默認值true
stat-view-servlet.enabled: true
#根據配置中的url-pattern來訪問內置監控頁面,如果是上面的配置,內置監控頁面的首頁是/druid/index.html例如:
#http://110.76.43.235:9000/druid/index.html
#http://110.76.43.235:8080/mini-web/druid/index.html
stat-view-servlet.url-pattern: /druid/*
#允許清空統計數據
stat-view-servlet.reset-enable: true
stat-view-servlet.login-username: admin
stat-view-servlet.login-password: admin
#StatViewSerlvet展示出來的監控信息比較敏感,是系統運行的內部情況,如果你需要做訪問控制,可以配置allow和deny這兩個參數
#deny優先于allow,如果在deny列表中,就算在allow列表中,也會被拒絕。如果allow沒有配置或者為空,則允許所有訪問
#配置的格式
#<IP>
#或者<IP>/<SUB_NET_MASK_size>其中128.242.127.1/24
#24表示,前面24位是子網掩碼,比對的時候,前面24位相同就匹配,不支持IPV6。
#stat-view-servlet.allow=
#stat-view-servlet.deny=128.242.127.1/24,128.242.128.1
# Spring監控配置,說明請參考Druid Github Wiki,配置_Druid和Spring關聯監控配置
#aop-patterns= # Spring監控AOP切入點,如x.y.z.service.*,配置多個英文逗號分隔
################### mysq end ##########################
# zipkin:
# base-url: http://127.0.0.1:11008
redis:
################### redis 單機版 start ##########################
host: 59.110.164.254
port: 6379
timeout: 6000
database: 8
lettuce:
pool:
max-active: 10 # 連接池最大連接數(使用負值表示沒有限制),如果賦值為-1,則表示不限制;如果pool已經分配了maxActive個jedis實例,則此時pool的狀態為exhausted(耗盡)
max-idle: 8 # 連接池中的最大空閑連接 ,默認值也是8
max-wait: 100 # # 等待可用連接的最大時間,單位毫秒,默認值為-1,表示永不超時。如果超過等待時間,則直接拋出JedisConnectionException
min-idle: 2 # 連接池中的最小空閑連接 ,默認值也是0
shutdown-timeout: 100ms
################### redis 單機版 end ##########################
# cluster:
# nodes: 130.75.131.237:7000,130.75.131.238:7000,130.75.131.239:7000,130.75.131.237:7001,130.75.131.238:7001,130.75.131.239:7001
# #130.75.131.237:7000,130.75.131.238:7000,130.75.131.239:7000,130.75.131.237:7001,130.75.131.238:7001,130.75.131.239:7001
# #192.168.3.157:7000,192.168.3.158:7000,192.168.3.159:7000,192.168.3.157:7001,192.168.3.158:7001,192.168.3.159:7001
# timeout: 1000 # 連接超時時間(毫秒)
# lettuce:
# pool:
# max-active: 10 # 連接池最大連接數(使用負值表示沒有限制),如果賦值為-1,則表示不限制;如果pool已經分配了maxActive個jedis實例,則此時pool的狀態為exhausted(耗盡)
# max-idle: 8 # 連接池中的最大空閑連接 ,默認值也是8
# max-wait: 100 # # 等待可用連接的最大時間,單位毫秒,默認值為-1,表示永不超時。如果超過等待時間,則直接拋出JedisConnectionException
# min-idle: 2 # 連接池中的最小空閑連接 ,默認值也是0
# shutdown-timeout: 100ms
mybatis-plus:
global-config:
banner: false
configuration:
log-impl: org.apache.ibatis.logging.stdout.StdOutImpl
mapper-locations: classpath*:com/open/**/dao/*.xml
security:
oauth2:
ignored: /users-anon/** , /doc.html ,/document.html ,/users/save
token:
store:
type: redis
#設置最大超時時間
ribbon:
ServerListRefreshInterval: 10 #刷新服務列表源的間隔時間
OkToRetryOnAllOperations: true
MaxAutoRetries: 1
MaxAutoRetriesNextServer: 1
ReadTimeout: 16000
ConnectTimeout: 16000
#設置最大容錯超時時間
hystrix:
command:
default:
execution:
timeout:
enabled: true
isolation:
thread:
timeoutInMilliseconds: 16000
logging:
level:
com.open.capacity: INFO
org.hibernate: INFO
org.hibernate.type.descriptor.sql.BasicBinder: TRACE
org.hibernate.type.descriptor.sql.BasicExtractor: TRACE
# com.neusoft: DEBUG
# com.netflix: DEBUG #用于心跳檢測輸出的日志
```
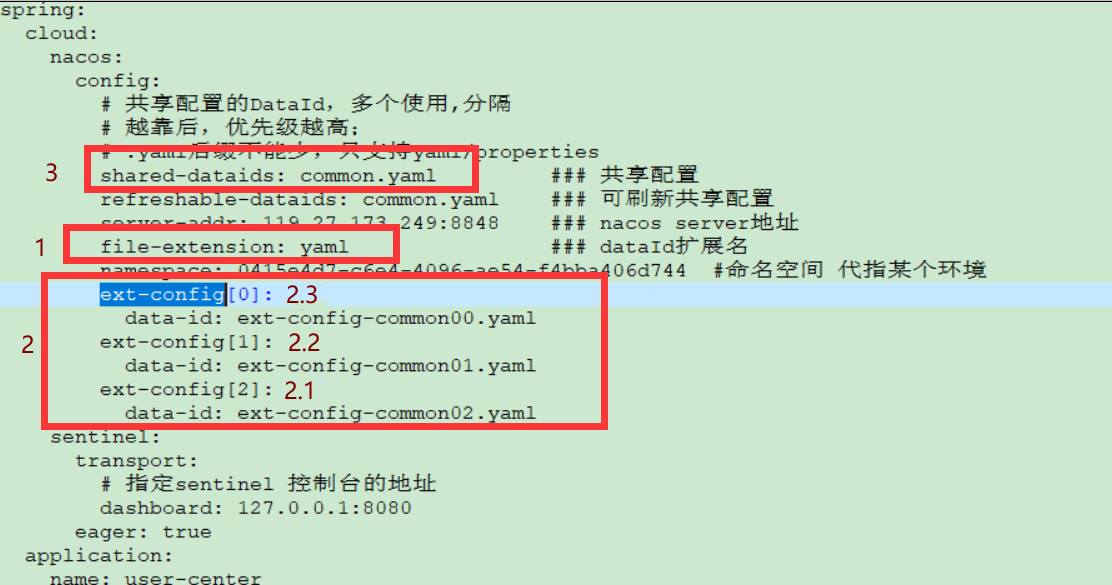
* 配置中心的優先級
Spring Cloud Alibaba Nacos Config 目前提供了三種配置能力從 Nacos 拉取相關的配置。
1: 通過內部相關規則(應用名、擴展名 )自動生成相關的 Data Id 配置
2: 通過?spring.cloud.nacos.config.ext-config[n].data-id?的方式支持多個擴展 Data Id 的配置,多個 Data Id 同時配置時,他的優先級關系是?spring.cloud.nacos.config.ext-config[n].data-id?其中 n 的值越大,優先級越高。(2.1>2.2>2.3)
3: 通過?spring.cloud.nacos.config.shared-dataids?支持多個共享 Data Id 的配置
當三種方式共同使用時,他們的一個優先級關系是:1 > 2 >3,如圖所示:
## 啟動項目
## nacos 源碼分析
### 自動裝配

#### 注冊邏輯
* ->com.alibaba.cloud.nacos.registry.NacosServiceRegistryAutoConfiguration.nacosAutoServiceRegistration(NacosServiceRegistry, AutoServiceRegistrationProperties, NacosRegistration)
* -->org.springframework.cloud.client.serviceregistry.AbstractAutoServiceRegistration.register()
* --->org.springframework.cloud.alibaba.nacos.registry.NacosServiceRegistry.register(Registration)
* ---->com.alibaba.nacos.client.naming.net.NamingProxy.registerService(String, String, Instance)
```
public void registerService(String serviceName, String groupName, Instance instance) throws NacosException {
NAMING_LOGGER.info("[REGISTER-SERVICE] {} registering service {} with instance: {}",
namespaceId, serviceName, instance);
final Map<String, String> params = new HashMap<String, String>(9);
params.put(CommonParams.NAMESPACE_ID, namespaceId);
params.put(CommonParams.SERVICE_NAME, serviceName);
params.put(CommonParams.GROUP_NAME, groupName);
params.put(CommonParams.CLUSTER_NAME, instance.getClusterName());
params.put("ip", instance.getIp());
params.put("port", String.valueOf(instance.getPort()));
params.put("weight", String.valueOf(instance.getWeight()));
params.put("enable", String.valueOf(instance.isEnabled()));
params.put("healthy", String.valueOf(instance.isHealthy()));
params.put("ephemeral", String.valueOf(instance.isEphemeral()));
params.put("metadata", JSON.toJSONString(instance.getMetadata()));
reqAPI(UtilAndComs.NACOS_URL_INSTANCE, params, HttpMethod.POST);
}
```
#### 心跳檢測
* -> java.util.concurrent.ScheduledExecutorService.schedule(Runnable, long, TimeUnit)
```
public long sendBeat(BeatInfo beatInfo) {
try {
if (NAMING_LOGGER.isDebugEnabled()) {
NAMING_LOGGER.debug("[BEAT] {} sending beat to server: {}", namespaceId, beatInfo.toString());
}
Map<String, String> params = new HashMap<String, String>(4);
params.put("beat", JSON.toJSONString(beatInfo));
params.put(CommonParams.NAMESPACE_ID, namespaceId);
params.put(CommonParams.SERVICE_NAME, beatInfo.getServiceName());
String result = reqAPI(UtilAndComs.NACOS_URL_BASE + "/instance/beat", params, HttpMethod.PUT);
JSONObject jsonObject = JSON.parseObject(result);
if (jsonObject != null) {
return jsonObject.getLong("clientBeatInterval");
}
} catch (Exception e) {
NAMING_LOGGER.error("[CLIENT-BEAT] failed to send beat: " + JSON.toJSONString(beatInfo), e);
}
return 0L;
}
```
#### 健康檢測
* com.alibaba.cloud.nacos.endpoint.NacosDiscoveryEndpointAutoConfiguration.nacosDiscoveryHealthIndicator(NacosDiscoveryProperties)
```
public boolean serverHealthy() {
try {
String result = reqAPI(UtilAndComs.NACOS_URL_BASE + "/operator/metrics", new HashMap<String, String>(2));
JSONObject json = JSON.parseObject(result);
String serverStatus = json.getString("status");
return "UP".equals(serverStatus);
} catch (Exception e) {
return false;
}
}
```
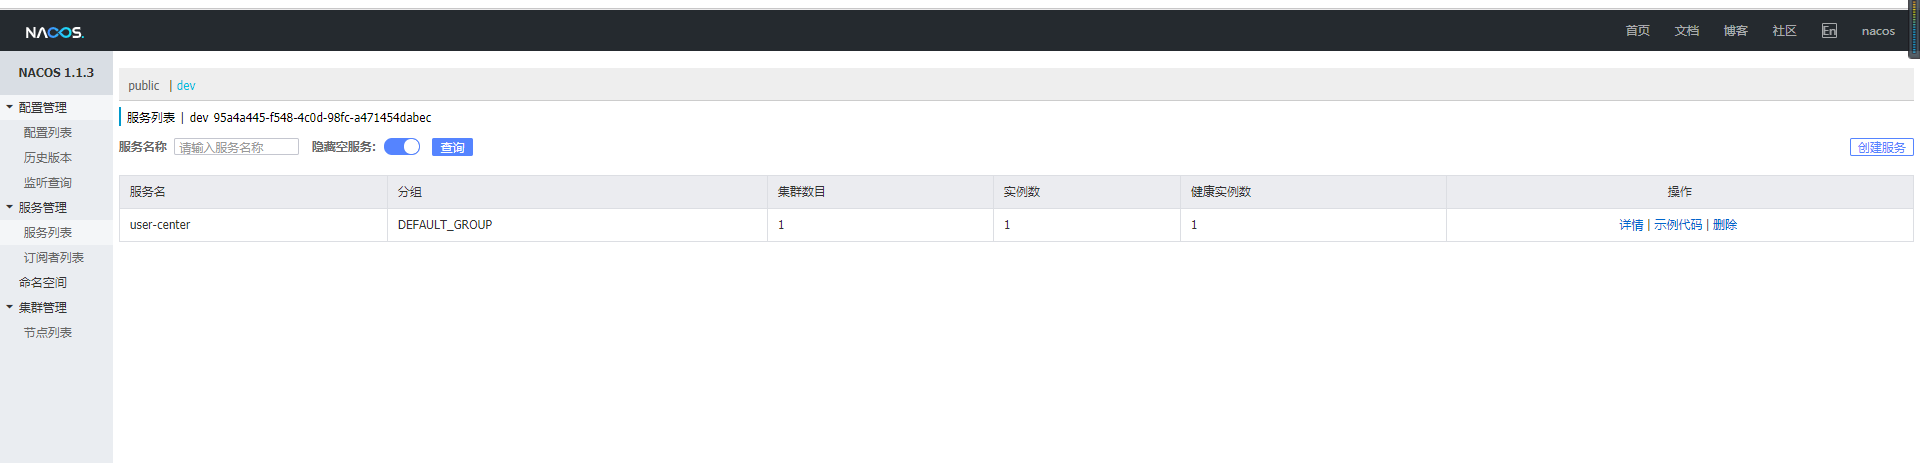
## user-center 內部原理請參考03.模塊詳解部分
- 前言
- 1.項目說明
- 2.項目更新日志
- 3.文檔更新日志
- 01.快速開始
- 01.maven構建項目
- 02.環境安裝
- 03.STS項目導入
- 03.IDEA項目導入
- 04.數據初始化
- 05.項目啟動
- 06.付費文檔說明
- 02.總體流程
- 1.oauth接口
- 2.架構設計圖
- 3.微服務介紹
- 4.功能介紹
- 5.梳理流程
- 03.模塊詳解
- 01.老版本1.0.1分支模塊講解
- 01.db-core模塊
- 02.api-commons模塊
- 03.log-core模塊
- 04.security-core模塊
- 05.swagger-core模塊
- 06.eureka-server模塊
- 07.auth-server模塊
- 08.auth-sso模塊解析
- 09.user-center模塊
- 10.api-gateway模塊
- 11.file-center模塊
- 12.log-center模塊
- 13.batch-center模塊
- 14.back-center模塊
- 02.spring-boot-starter-web那點事
- 03.自定義db-spring-boot-starter
- 04.自定義log-spring-boot-starter
- 05.自定義redis-spring-boot-starter
- 06.自定義common-spring-boot-starter
- 07.自定義swagger-spring-boot-starter
- 08.自定義uaa-server-spring-boot-starter
- 09.自定義uaa-client-spring-boot-starter
- 10.自定義ribbon-spring-boot-starter
- 11.springboot啟動原理
- 12.eureka-server模塊
- 13.auth-server模塊
- 14.user-center模塊
- 15.api-gateway模塊
- 16.file-center模塊
- 17.log-center模塊
- 18.back-center模塊
- 19.auth-sso模塊
- 20.admin-server模塊
- 21.zipkin-center模塊
- 22.job-center模塊
- 23.batch-center
- 04.全新網關
- 01.基于spring cloud gateway的new-api-gateway
- 02.spring cloud gateway整合Spring Security Oauth
- 03.基于spring cloud gateway的redis動態路由
- 04.spring cloud gateway聚合swagger文檔
- 05.技術詳解
- 01.互聯網系統設計原則
- 02.系統冪等性設計與實踐
- 03.Oauth最簡向導開發指南
- 04.oauth jdbc持久化策略
- 05.JWT token方式啟用
- 06.token有效期的處理
- 07.@PreAuthorize注解分析
- 08.獲取當前用戶信息
- 09.認證授權白名單配置
- 10.OCP權限設計
- 11.服務安全流程
- 12.認證授權詳解
- 13.驗證碼技術
- 14.短信驗證碼登錄
- 15.動態數據源配置
- 16.分頁插件使用
- 17.緩存擊穿
- 18.分布式主鍵生成策略
- 19.分布式定時任務
- 20.分布式鎖
- 21.網關多維度限流
- 22.跨域處理
- 23.容錯限流
- 24.應用訪問次數控制
- 25.統一業務異常處理
- 26.日志埋點
- 27.GPRC內部通信
- 28.服務間調用
- 29.ribbon負載均衡
- 30.微服務分布式跟蹤
- 31.異步與線程傳遞變量
- 32.死信隊列延時消息
- 33.單元測試用例
- 34.Greenwich.RELEASE升級
- 35.混沌工程質量保證
- 06.開發初探
- 1.開發技巧
- 2.crud例子
- 3.新建服務
- 4.區分前后臺用戶
- 07.分表分庫
- 08.分布式事務
- 1.Seata介紹
- 2.Seata部署
- 09.shell部署
- 01.eureka-server
- 02.user-center
- 03.auth-server
- 04.api-gateway
- 05.file-center
- 06.log-center
- 07.back-center
- 08.編寫shell腳本
- 09.集群shell部署
- 10.集群shell啟動
- 11.部署阿里云問題
- 10.網關安全
- 1.openresty https保障服務安全
- 2.openresty WAF應用防火墻
- 3.openresty 高可用
- 11.docker配置
- 01.docker安裝
- 02.Docker 開啟遠程API
- 03.采用docker方式打包到服務器
- 04.docker創建mysql
- 05.docker網絡原理
- 06.docker實戰
- 6.01.安裝docker
- 6.02.管理鏡像基本命令
- 6.03.容器管理
- 6.04容器數據持久化
- 6.05網絡模式
- 6.06.Dockerfile
- 6.07.harbor部署
- 6.08.使用自定義鏡像
- 12.統一監控中心
- 01.spring boot admin監控
- 02.Arthas診斷利器
- 03.nginx監控(filebeat+es+grafana)
- 04.Prometheus監控
- 05.redis監控(redis+prometheus+grafana)
- 06.mysql監控(mysqld_exporter+prometheus+grafana)
- 07.elasticsearch監控(elasticsearch-exporter+prometheus+grafana)
- 08.linux監控(node_exporter+prometheus+grafana)
- 09.micoservice監控
- 10.nacos監控
- 11.druid數據源監控
- 12.prometheus.yml
- 13.grafana告警
- 14.Alertmanager告警
- 15.監控微信告警
- 16.關于接口監控告警
- 17.prometheus-HA架構
- 18.總結
- 13.統一日志中心
- 01.統一日志中心建設意義
- 02.通過ELK收集mysql慢查詢日志
- 03.通過elk收集微服務模塊日志
- 04.通過elk收集nginx日志
- 05.統一日志中心性能優化
- 06.kibana安裝部署
- 07.日志清理方案
- 08.日志性能測試指標
- 09.總結
- 14.數據查詢平臺
- 01.數據查詢平臺架構
- 02.mysql配置bin-log
- 03.單節點canal-server
- 04.canal-ha部署
- 05.canal-kafka部署
- 06.實時增量數據同步mysql
- 07.canal監控
- 08.clickhouse運維常見腳本
- 15.APM監控
- 1.Elastic APM
- 2.Skywalking
- 01.docker部署es
- 02.部署skywalking-server
- 03.部署skywalking-agent
- 16.壓力測試
- 1.ocp.jmx
- 2.test.bat
- 3.壓測腳本
- 4.壓力報告
- 5.報告分析
- 6.壓測平臺
- 7.并發測試
- 8.wrk工具
- 9.nmon
- 10.jmh測試
- 17.SQL優化
- 1.oracle篇
- 01.基線測試
- 02.調優前奏
- 03.線上瓶頸定位
- 04.執行計劃解讀
- 05.高級SQL語句
- 06.SQL tuning
- 07.數據恢復
- 08.深入10053事件
- 09.深入10046事件
- 2.mysql篇
- 01.innodb存儲引擎
- 02.BTree索引
- 03.執行計劃
- 04.查詢優化案例分析
- 05.為什么會走錯索引
- 06.表連接優化問題
- 07.Connection連接參數
- 08.Centos7系統參數調優
- 09.mysql監控
- 10.高級SQL語句
- 11.常用維護腳本
- 12.percona-toolkit
- 18.redis高可用方案
- 1.免密登錄
- 2.安裝部署
- 3.配置文件
- 4.啟動腳本
- 19.消息中間件搭建
- 19-01.rabbitmq集群搭建
- 01.rabbitmq01
- 02.rabbitmq02
- 03.rabbitmq03
- 04.鏡像隊列
- 05.haproxy搭建
- 06.keepalived
- 19-02.rocketmq搭建
- 19-03.kafka集群
- 20.mysql高可用方案
- 1.環境
- 2.mysql部署
- 3.Xtrabackup部署
- 4.Galera部署
- 5.galera for mysql 集群
- 6.haproxy+keepalived部署
- 21.es集群部署
- 22.生產實施優化
- 1.linux優化
- 2.jvm優化
- 3.feign優化
- 4.zuul性能優化
- 23.線上問題診斷
- 01.CPU性能評估工具
- 02.內存性能評估工具
- 03.IO性能評估工具
- 04.網絡問題工具
- 05.綜合診斷評估工具
- 06.案例診斷01
- 07.案例診斷02
- 08.案例診斷03
- 09.案例診斷04
- 10.遠程debug
- 24.fiddler抓包實戰
- 01.fiddler介紹
- 02.web端抓包
- 03.app抓包
- 25.疑難解答交流
- 01.有了auth/token獲取token了為啥還要配置security的登錄配置
- 02.權限數據存放在redis嗎,代碼在哪里啊
- 03.其他微服務和認證中心的關系
- 04.改包問題
- 05.use RequestContextListener or RequestContextFilter to expose the current request
- 06./oauth/token對應代碼在哪里
- 07.驗證碼出不來
- 08./user/login
- 09.oauth無法自定義權限表達式
- 10.sleuth引發線程數過高問題
- 11.elk中使用7x版本問題
- 12.RedisCommandTimeoutException問題
- 13./oauth/token CPU過高
- 14.feign與權限標識符問題
- 15.動態路由RedisCommandInterruptedException: Command interrupted
- 26.學習資料
- 海量學習資料等你來拿
- 27.持續集成
- 01.git安裝
- 02.代碼倉庫gitlab
- 03.代碼倉庫gogs
- 04.jdk&&maven
- 05.nexus安裝
- 06.sonarqube
- 07.jenkins
- 28.Rancher部署
- 1.rancher-agent部署
- 2.rancher-server部署
- 3.ocp后端部署
- 4.演示前端部署
- 5.elk部署
- 6.docker私服搭建
- 7.rancher-server私服
- 8.rancher-agent docker私服
- 29.K8S部署OCP
- 01.準備OCP的構建環境和部署環境
- 02.部署順序
- 03.在K8S上部署eureka-server
- 04.在K8S上部署mysql
- 05.在K8S上部署redis
- 06.在K8S上部署auth-server
- 07.在K8S上部署user-center
- 08.在K8S上部署api-gateway
- 09.在K8S上部署back-center
- 30.Spring Cloud Alibaba
- 01.統一的依賴管理
- 02.nacos-server
- 03.生產可用的Nacos集群
- 04.nacos配置中心
- 05.common.yaml
- 06.user-center
- 07.auth-server
- 08.api-gateway
- 09.log-center
- 10.file-center
- 11.back-center
- 12.sentinel-dashboard
- 12.01.sentinel流控規則
- 12.02.sentinel熔斷降級規則
- 12.03.sentinel熱點規則
- 12.04.sentinel系統規則
- 12.05.sentinel規則持久化
- 12.06.sentinel總結
- 13.sentinel整合openfeign
- 14.sentinel整合網關
- 1.sentinel整合zuul
- 2.sentinel整合scg
- 15.Dubbo與Nacos共存
- 31.Java源碼剖析
- 01.基礎數據類型和String
- 02.Arrays工具類
- 03.ArrayList源碼分析
- 32.面試專題匯總
- 01.JVM專題匯總
- 02.多線程專題匯總
- 03.Spring專題匯總
- 04.springboot專題匯總
- 05.springcloud面試匯總
- 文檔問題跟蹤處理